Overview
Red Lion’s RAM® industrial cellular RTUs provide a secure all-in-one platform that offers unmatched reliability for the remote monitoring and control of field-deployed assets. With a built-in connectivity with embedded IO database, and event engine that can trigger I/O and alert via SMS text messages or email based on real-time operational data, Red Lion’s rugged cellular RTUs provide local control regardless of location.
**Rugged Industrial Design **: Developed with industrial environments in mind, RAM cellular RTUs are enclosed in hardened metal DIN-rail or panel mount enclosures to offer a wide -40° to 75°C operating temperature range, UL Class I, Division 2 listing and high tolerance to shock and vibration.
Industrial Internet of Things (IIoT) Cloud Connectivity: Red Lion’s RAM® industrial cellular RTUs feature cloud connectivity, which allows for reliable, secure and scalable communication to leading IIoT cloud platforms. RAMQTT, Red Lion’s native MQTT client, simplifies implementations with pre-configured profiles
**Built-In Event Engine **: With an intuitive web-based, menu-driven interface that requires no knowledge of programming languages, the RAM event engine can quickly be configured to trigger I/O or send SMS messages based on operational data. Whether a tank level is too high or a valve pressure level out of range, the RAM event engine will take action and send SMS text message notifications to keep you in the know.
Connectivity Options: RAM cellular RTUs natively supporting Modbus and DNP3 protocols include built-in digital and analog I/O. Available with a split-LAN (WAN/LAN) architecture, RAM RTUs feature up to 5 10/100Base-T(X) Ethernet ports and support serial-to-IP conversions through an on-board RS-232 serial port to securely monitor remote devices and reduce costly site visits. Red Lion also offers expansion devices for protocol conversion from over 300 industrial protocols, including PLC’s, drives, sensors, fieldbusses and other proprietary communication methods over different media. This enables IIoT applications for all your legacy equipment.
**Secure Networking **: Designed to deliver secure communications to remote locations, RAM cellular RTUs support robust security features such as VPN tunnels, port forwarding, stateful firewall, packet filtering, data encryption and an Access Control List (ACL).
Powerful Management: RAM cellular RTUs can be managed locally through direct device connection or remotely via SixView Manager® software. With a web-based console and customized dashboard, users can remotely access, configure and manage critical device information from a central location to increase productivity and reduce overall cost.
Configuration and Connecting to Cumulocity
The Cumulocity cloud was introduced as a cloud provider in firmware 4.27. Cumulocity allows for data points to be transmitted from the Red Lion RAM IODB (IO database) to one of their cloud servers. The Cumulocity cloud provides many ways to register a Red Lion Cellular router to their cloud. This guide will outline the steps for each method.
Please set up a Cumulocity user account before proceeding.
Cumulocity setup without Device Credentials
One method to connect devices to the Cumulocity cloud uses only the account username and password from Cumulocity. There are no configurations required on the Cumulocity platform before the setup of the RAMQTT Client.
Note that, using this method is inherently insecure and is not recommended.
Perform the following steps to setup the RAMQTT Client using this method:
Step 1. Navigate to: “Services” in the RAMQTT Client.
Step 2. Select “Yes” from the “Enable RAMQTT Client” drop down list.
Step 3. Select “Cumulocity” from the “IoT Cloud” drop down list.
Step 4. Enter the host address into the “Broker” field. The
format for the host address is: <tenant>.cumulocity.com.
This is created during Cumulocity cloud account setup.
Step 5. Enter the username into the “User Name” field. The format for the username is: “<tenant>/<account username>.”
Step 6. Enter the account password into “Password” field.
Step 7. Select “cumulocity.com.cert” from the “Device Root CA” drop down list.
Note: The 4.27 firmware has the cumulocity.com.cert Root Certificate Authority already installed on the device. The version of the Root CA is the latest version as of the 4.27 firmware release date (August 2017).*
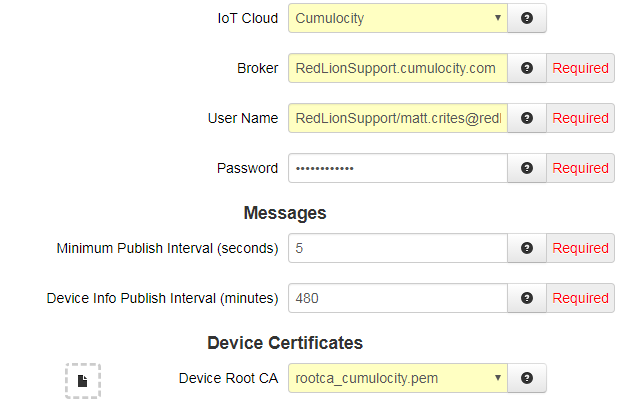
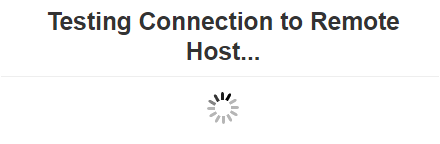
Step 8. Click on the “Test Server Availability” button at the bottom of the screen.

Step 9. If the information above was filled out correctly, then an Alert message should pop up saying “Device can successfully connect to remote host”. Click “OK”.
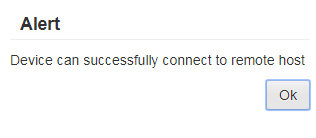
Note: If a device with the same Device ID is already created, the device will fail to connect. Ensure the device is not already registered on the Cumulocity cloud.
Step 10. Click the “Apply” button at the bottom of the screen.
This concludes the configuration process for the RAMQTT Client. A device entry will be created on the Cumulocity cloud. However, no Device-level credentials entry will have been created. The Device-level entry is created in the next part of the procedure.
Cumulocity cloud Setup with device credentials
The Cumulocity cloud provides two ways to register a Red Lion cellular router using device-level credentials: • Request generated credentials • Upload user defined credentials using CSV upload.
Setup using generated credentials
A device can request generated credentials by following the below steps in the Cumulocity cloud. Before this setup can be started, ensure that static credentials have been acquired from Cumulocity cloud support. These static credentials are required to generate the actual credentials the device will need to connect to Cumulocity. Contact the Cumulocity support team if you do not have the required static credentials.
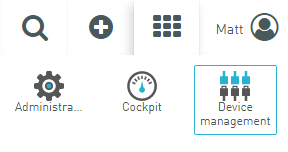
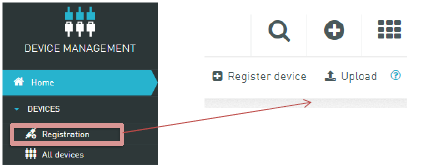
Step 1. Log into the “Cumulocity” platform and navigate to “Device Management”. “Device Management” can be found in the upper right corner of the web page. Click the 3x3 matrix icon and navigate to “Device Management”.
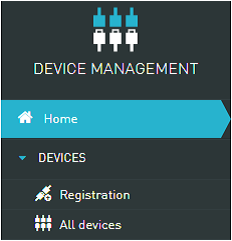
Step 2. “The Device Management” page will load. On the left side bar, click “Registration”.
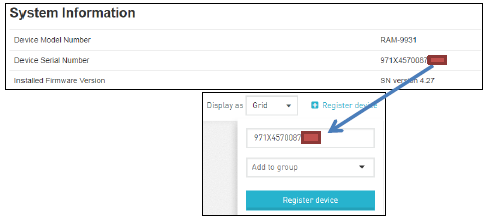
Step 3. In the upper right corner of page, click “Register device”. This will produce a dropdown menu asking for the “device ID”. Enter the serial number of the Red Lion Cellular router into this field then click “Register Device”.
Enter the serial number exactly as it is printed under “Status” and then “Summary” of the Red Lion Cellular router’s web UI.
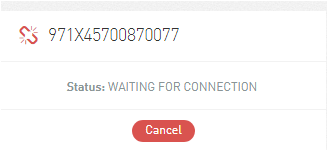
Step 4. An entry will be added to the “Registration” section of Cumulocity with the Serial Number of the Red Lion Cellular router with a status of “WAITING FOR CONNECTION”. The rest of the setup will be done on the Red Lion Cellular router.
Step 5. Log into the Red Lion Cellular router and navigate to “Services” and then “RAMQTT Client”.
Step 6. Select “Yes” from the “Enable RAMQTT Client” dropdown list.
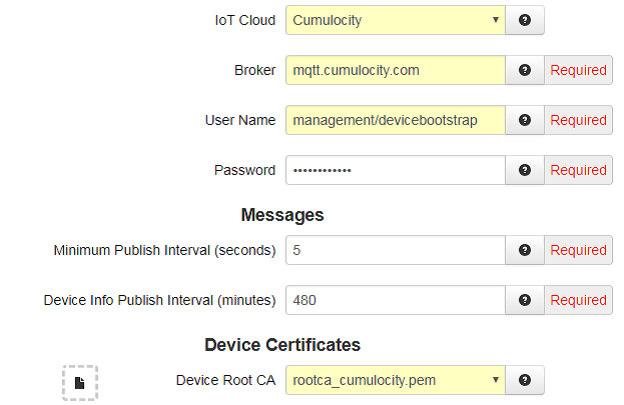
Step 7. Select “Cumulocity” from the IoT Cloud dropdown list.
Step 8. Enter “mqtt.cumulocity.com” in the “Broker” field.
Step 9. Enter “management/devicebootstrap” in the User Name field.
Step 10. Enter the password provided by Cumulocity support in the “Password” field.
Step 11. Select “cumulocity.com.cert” from the “Device Root CA” dropdown list.
Step 12. Click on the “Test Server Availability” button at the bottom of the screen.
Step 13. If the information above was filled out correctly, then an alert message should pop up saying “Device can successfully connect to remote host”. Click “Ok”.
Note: If a device with the same Device ID is already created, the device will fail to connect. Ensure the device is not already registered to the Cumulocity cloud.
Step 14. Click the “Apply” button at the bottom of the screen.
Step 15. The RAMQTT client will connect to the “mqtt.cumulocity.com” host and request credentials. Once the request reaches the host, the status of the entry in the registration page will change from “WAITING FOR CONNECTION” to “PENDING ACCEPTANCE”.
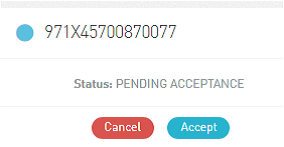
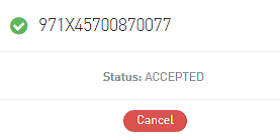
Step 16. Click “Accept”. The Red Lion Cellular router will change status to “Accepted”.
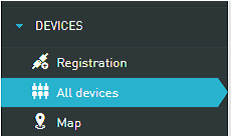
Step 17. Click on the “All devices” tab under “Devices” on the right side of page. If the registration was successful, an entry with the Serial Number of the device as the “NAME” and “SERIAL NUMBER” fields will be displayed.
It may take up to a few minutes for this entry to appear as the device is updating its own configuration with the newly obtained credentials and reconnecting to the actual host.

Setup User Defined Credentials using CSV Upload
The Cumulocity cloud requires a specific CSV format for each device entry needed. The first row of the CSV file needs to have the following column values:

Each row afterwards corresponds with one device. The “ID” of the device must be the Serial Number of the device being registered. The “CREDENTIALS” must be at least 8 characters long. The “TENANT” corresponds to the tenant of the account.

Step 1. Upload the created CSV file by clicking the “Registration” tab and then clicking “Upload”. Select the create CSV file.
Step 2. When complete, click on the “Device credentials” tab. If the registration was successful, there will be a series of entries corresponding to each entry in the CSV file uploaded in the previous step.
The rest of the setup is completed on the Red Lion Cellular router.
Step 3. Log into the Red Lion Cellular router and navigate to “Services” and then “RAMQTT Client”.
Step 4. Select “Yes” from the “Enable RAMQTT Client” drop down list.
Step 5. Select “Cumulocity” from the “IoT Cloud” dropdown list.
Step 6. Enter the host address into the “Broker” field. The
format for the host address is: <tenant>.cumulocity.com.
Step 7. Enter the username into the “User Name” field. The format for the username is: “<tenant>/device_<device’s serial number>” .
Step 8. Enter the password provided by Cumulocity support in the “Password” field.
Step 9. Select “cumulocity.com.cert” from the “Device Root CA” dropdown list.
Step 10. Click on the “Test Server Availability” button at the bottom of the screen.
Step 11. If the information above was filled out correctly, then an Alert message should pop up saying “Device can successfully connect to remote host”. Click “Ok”.
Please note that, if a device with the same Device ID is already created, the device will fail to connect. Ensure the device is not already registered to the Cumulocity cloud.*
Step 12. Click the “Apply” button at the bottom of the screen.
RAMQTT Client Data Point Mapping
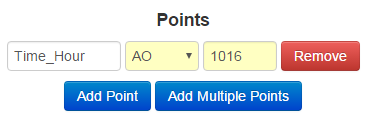
Once communication is successful, data points are added and published from the right side of screen. Data points can be entered by their tag name or by using the type and register location. Adding a data point, using a tag name will auto fill the rest of the fields. When the data point has been entered into its respective field, click “Add Point”.
Step 1. Click “Add Multiple Points” to enter multiple data points at one time. A tag selection window will appear, and displays all available tags.
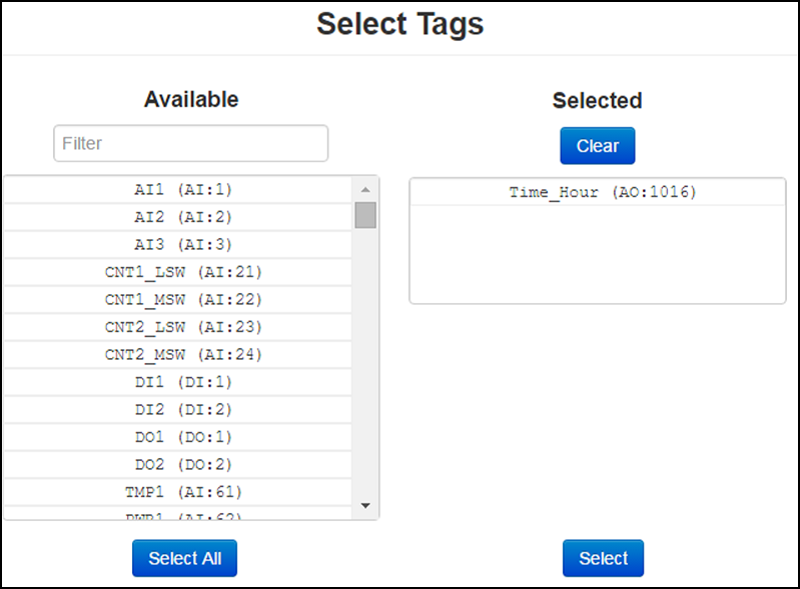
Step 2. All of the available data points are displayed on the left side and all of the currently selected data points are displayed on the right. Select the desired data point by scrolling through the list and clicking the tag, or simply filter for certain data points by entering text into the “Filter” text box.
Step 3. To remove any data points from the selected window, click on the data point and it will be removed.
Step 4. Once all the data points have been selected, click “Select”.
Step 5. To add all user created data tags, click “Add User Tags”. All user tags created under “Automation” -> “Tags” will be displayed under Points.
Step 6. Any on board data points can be added by clicking “Add On Board IO” button.
Step 7. Any tag that should not be published to the cloud can be removed by clicking “Remove” next to the tag.
Step 8. Once everything has been configured, click “Apply”.
Step 9. Data points will start being published to the Cumulocity platform immediately.