Overview
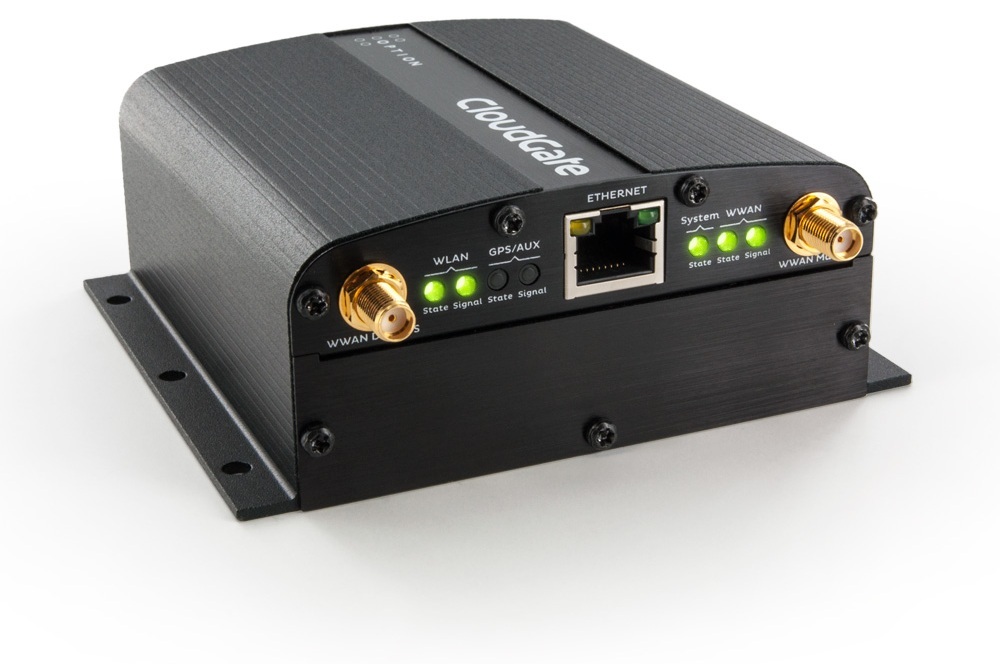
CloudGate is the M2M Gateway from Option. It provides competitively priced LAN to WWAN routing and GPS functionality in a single basic unit certified by all major US cellular operators (CDMA/EvDO and WCDMA/HSPA+). CloudGate is simple to configure locally or remotely from your PC, tablet or smartphone.
In the following, we describe how to configure the CloudGate device so that you are able to remotely manage the CloudGate device from Cumulocity and work with its connected sensors and controls. This allows you to:
- Install Firmware updates
- Perform device-specific operations
- Change the configuration
- Send measurements, events and alarms
Configuration
After setting up the CloudGate device, make sure to have the latest firmware installed. To install firmware on your CloudGate device, you can either register your CloudGate to the Option provisioning server or you can upload it manually. In both cases you have to create an account first.
To upgrade your CloudGate remotely
- Log into CloudGate Universe.
- Navigate to the Devices tab.
- Before activating a new device, you first need to create a new group. Click New group and provide the required information.
- Click Activate new device and provide the required information.
- Navigate to your device and click Change version in the Firmware section.
- Select the version you want to install on your CloudGate device and click Apply changes.
To upgrade your CloudGate manually
- Log into CloudGate Universe.
- Navigate to the Library tab.
- Click View firmware in the Firmware section.
- Search for the firmware matching your device type and click View details.
- Click the download icon next to the version you want to install.
- Access your CloudGate device via web browser.
- Log into the CloudGate web interface. The default username and password are both “admin”.
- Navigate to the Provisioning tab and in the left menu select Upload device provisioning file.
- Click Browse and navigate to the zip archive.
- Click Upload and wait for the file to be sent.
After the device has restarted, you can check the firmware version under Home > System Information in the web interface of the CloudGate device.
To connect your CloudGate device to Cumulocity, the LuvitRED plugin needs to be installed. The installation is similar to the firmware upgrade described above. The plugin can be found in the Application section instead of the Firmware section.
If you upgrade your CloudGate device remotely, it will automatically check for updates. This means that in case the version which is installed on your CloudGate device differs from the version specified in your CloudGate Universe account, the device will automatically download and install the version specified in your account. This is, for example, useful if you have to perform a factory reset on your device which would reset the firmware on the device.
LuvitRED
Overview
LuvitRED is a browser-based application which allows you to write applications without any programming language. With the help of an editor, you can easily create workflows by utilizing a set of nodes which perform certain tasks.
To view the LuvitRED editor, navigate to the Plugin tab in the CloudGate web interface and select LuvitRED. Click Advanced Editor.
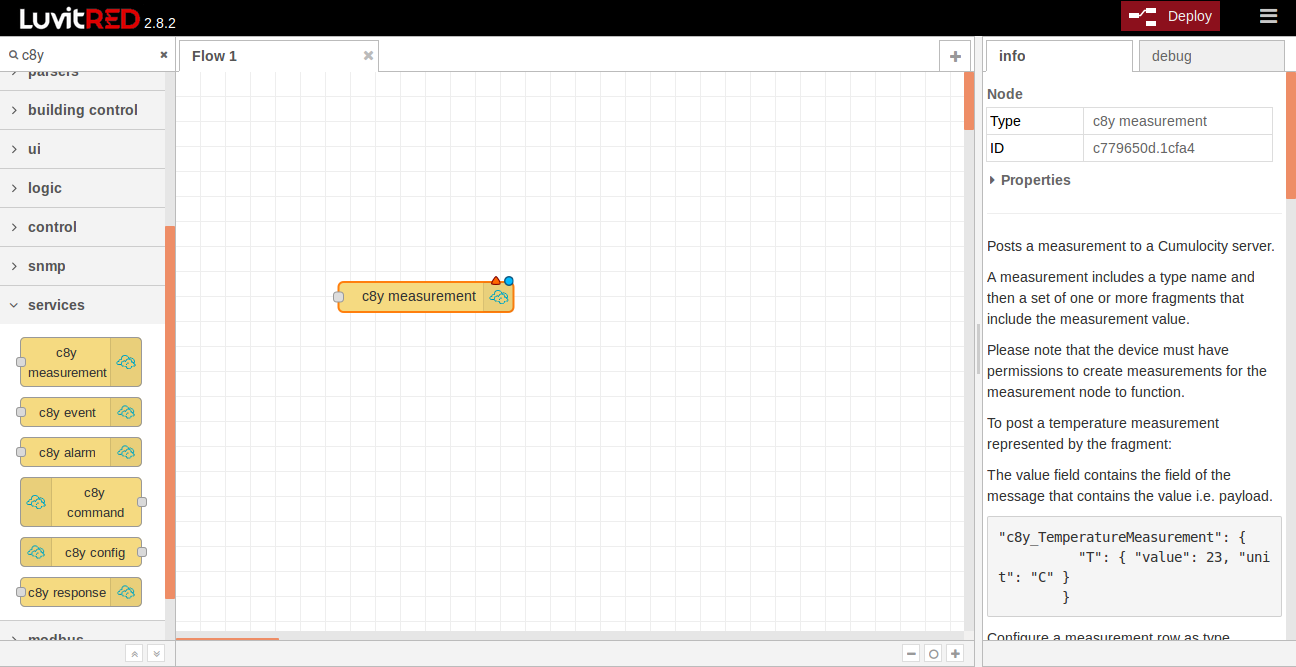
On the left, you will find a list of nodes which are ready to use. To check the function of a node, click it and find a description on the right. Drag a node into the middle area to add it to your current workflow.
Before creating a workflow, make sure that your device is connected to CloudGate, otherwise the workflow will not work.
You have to include at least one “c8y” node in your workflow in order to connect to Cumulocity. Type “c8y” into the search bar to view all the nodes which are related to Cumulocity. The “c8y” nodes perform the following tasks:
- c8y measurement: Sends a measurement to the Cumulocity server
- c8y alarm: Sends an alarm to the Cumulocity server
- c8y event: Sends an event to the Cumulocity server
- c8y command: Receives a command sent by the Cumulocity server
- c8y config: Receives a configuration update sent by the Cumulocity server
- c8y response: Sends a response to commands to the Cumulocity server
Info: Nodes in LuvitRED which require the user to write code (e.g. the “function” node) use Lua as a programming language.
Using LuvitRED with Cumulocity: An Example
Basic workflow
In general, a node can have an input and/or output, depending on its functionality.
Two nodes can be connected by linking the output of one node with the input of another node.
Double-click a node to configure it in the resulting dialog box. After configuring the nodes, the workflow is ready to be deployed. Click Deploy at the top right to start the workflow.
If changes in the configuration have not yet been deployed, this is indicated by a blue dot above the node. If at least one mandatory parameter in the configuration is not yet specified, this is indicated by a red triangle above the node.
In the following example, the “inject” and “debug” node will be used. Drag both nodes into the middle area and connect them by clicking on the output of the “inject” node, holding the mouse and releasing it above the input of the “debug” node.
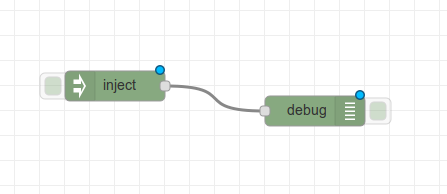
The “debug” node is used for displaying the input it gets on the console (the “debug” tab on the right side of the editor) while the “inject” node is used for sending a customizable value as output. In this case, the “debug” node will just display the value we will configure in the “inject” node. To configure the “inject” node, double-click it.
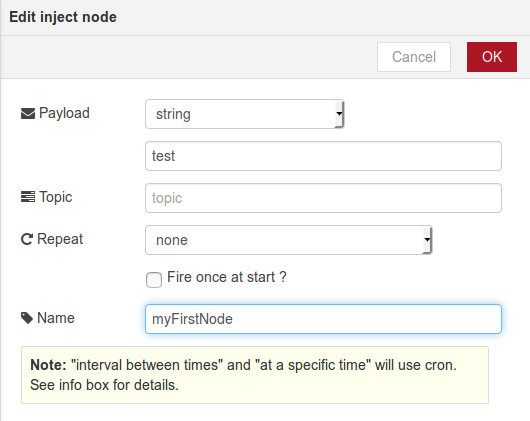
- Payload: Defines what will be sent as output.
- Select “string” as the type of the payload in the drop-down menu.
- Enter “test” as payload.
- Repeat: Specifies when the payload will be sent.
- Check “Fire once at start”.
- Name: Defines the name of the node which will be displayed in the user interface.
- Enter an arbitrary name.
After deploying the changes, you should be able to see the specified value in the “debug” tab.

Basic workflow with Cumulocity
In the following example, we will simulate a periodic temperature measurement and send it to Cumulocity. To do so, replace the “debug” node with a “c8y measurement” node.
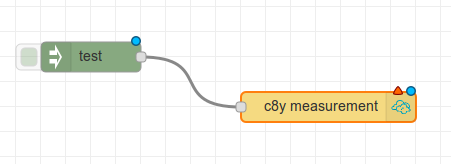
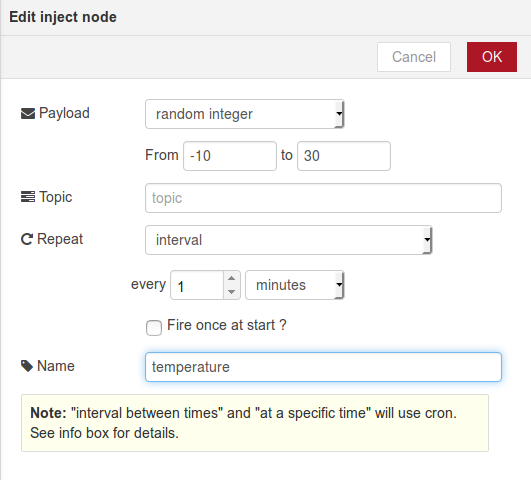
To send random numeric values perdiodically, change the configuration of the “inject” node. First, select “random integer” as payload type and choose a range of possible values. Second, select “interval” in the “repeat” field and specify an interval.
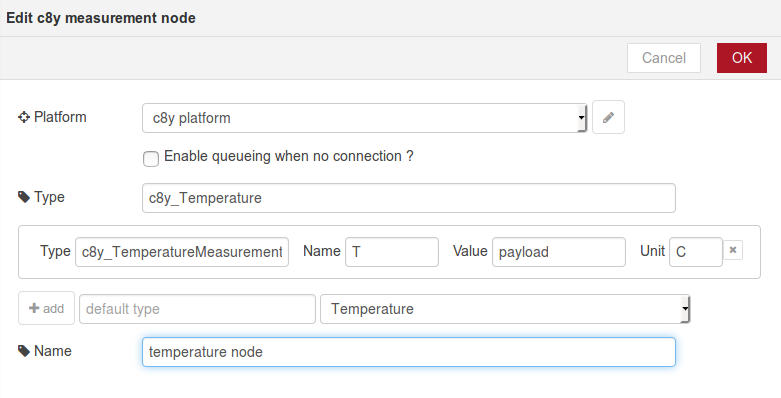
Next, the “c8y measurement” node needs to be configured.
-
Type: Type of the measurement.
- Enter “c8y_Temperature” as type.
- Select “Temperature” in the drop-down menu. A predefined fragment will be created depending on the selection.
- Click on the “add” button.
-
Platform: Defines the platform the node will use.
- Click on the “pencil” icon. Another dialog which represents the “c8y platform” node will appear.
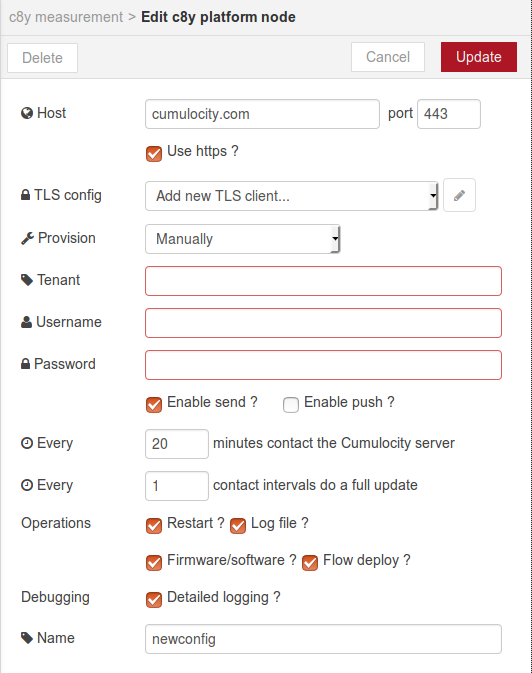
- Provision: Defines if the credentials will be set manually or autoprovisioned.
- Select “Manually” in the drop-down menu.
- Tenant: The tenant you want to register your device at.
- Enter the tenant name.
- Username: The username which will be used for authentication.
- Enter your username.
- Password: The password which will be used for authentication.
- Enter your password.
- Name: Defines the name of the node which will be displayed in the user interface.
- Enter an arbitrary name.
For more information on the “c8y measurement” and “platform” node, see below.
After configurating the “c8y measurement”, the workflow is ready to be deployed. You should be able to see the measurements sent by the device in the “Measurement” tab of your device in the “Device Management” application of Cumulocity. You can also see the amount of measurements which were sent in the status under the node.

LuvitRED Cumulocity Nodes
" c8y measurement " node
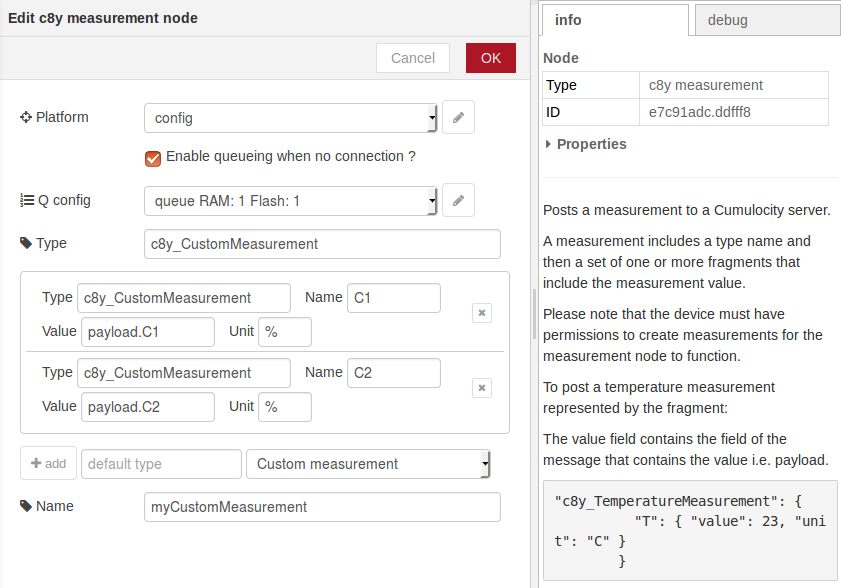
The following node allows you to send a measurement to the Cumulocity server. As input it expects the payload to be a numeric value or in case of a measurement with multiple series a field containing properties with a numeric value each.
To be able to run the node, the following parameters need to be defined:
- Platform: Select a platform for this node.
- Type: The type of the measurement.
- Measurement:
- Type: The type of the fragment.
- Name: The name of the series.
- Value: The numeric value of the measurement or series.
- Unit: The unit of the series.
The following parameters are optional:
- Enable queueing: Enables queueing messages when there is no connection.
- Q config: Select a queue configuration. Defines how many message can be stored in memory.
If you want to add multiple series to a measurement, you have to add a new measurement with the same type to the list.
For more information on measurements, refer to “Cumulocity’s domain model”.
For more information on the node, refer to the description which can be seen on the “Info” tab on the right side when selecting the node.
“c8y alarm” node
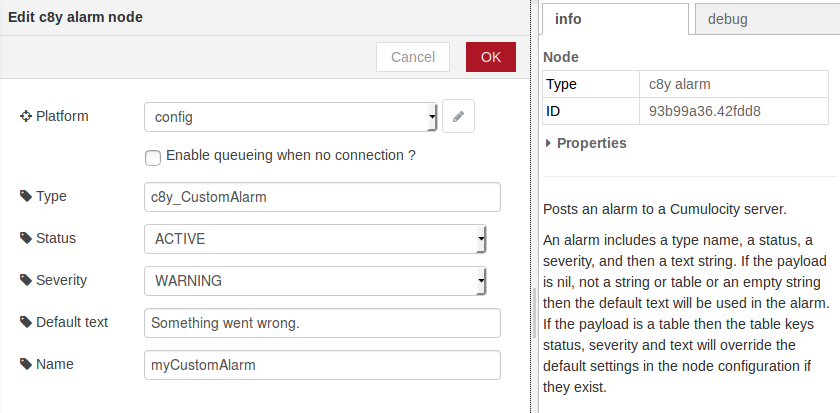
The following node allows you to send an alarm to the Cumulocity server. As input it expects the payload to be a string representing the textual description of the alarm.
To be able to run the node, the following parameters need to be defined:
- Platform: Select a platform for this node.
- Type: The type of the alarm.
- Status: The status of the alarm.
- Severity: The severity of the alarm.
The following parameters are optional:
- Enable queueing: Enables queueing messages when there is no connection.
- Q config: Select a queue configuration. Defines how many message can be stored in memory.
- Default text: The text which will be used if there is no payload.
For more information on alarms, refer to “Working with alarms”.
For more information on the node, refer to the description which can be seen on the “Info” tab on the right side when selecting the node.
“c8y event” node
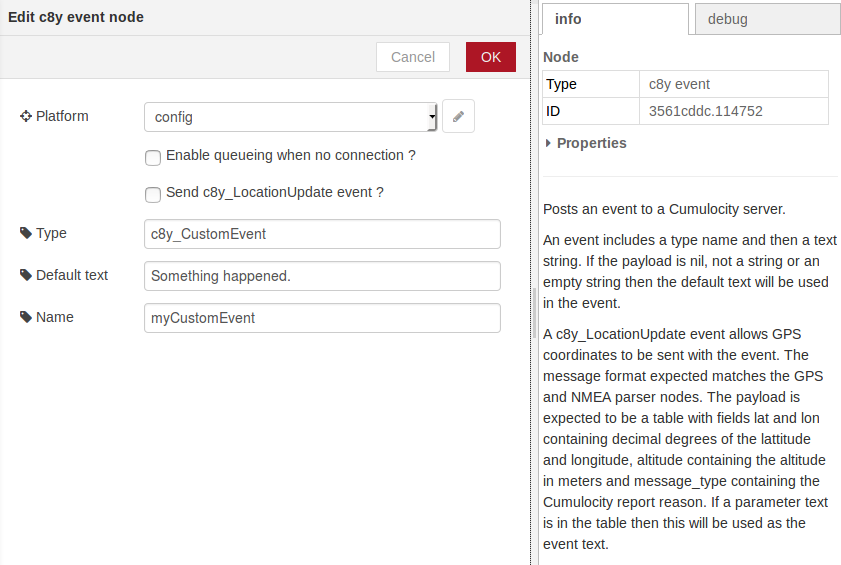
The following node allows you to send an event to the Cumulocity server. As input it expects the payload to be a string representing the textual description of the event.
To be able to run the node, the following parameters need to be defined:
- Platform: Select a platform for this node.
- Type: The type of the event.
The following parameters are optional:
- Enable queueing: Enables queueing messages when there is no connection.
- Q config: Select a queue configuration. Defines how many message can be stored in memory.
- Default text: The text which will be used if there is no payload.
For more information on events, refer to “Cumulocity’s domain model”.
For more information on the node, refer to the description which can be seen on the “Info” tab on the right side when selecting the node.
“c8y command” node
The following node allows you to receive a command sent by the Cumulocity server. As output it will initialize the payload with the command text. If the command fails, the payload will be empty or the message object will have a “failed” field.
To be able to run the node, the following parameters need to be defined:
- Platform: Select a platform for this node.
For more information on events, refer to “Shell”.
For more information on the node, refer to the description which can be seen on the “Info” tab on the right side when selecting the node.
“c8y config” node
The following node allows you to receive a command sent by the Cumulocity server. As output it will initialize the payload with the configuration text. If the command fails, the payload will contain a non string value or the message object will have a “failed” field.
To be able to run the node, the following parameters need to be defined:
- Platform: Select a platform for this node.
For more information on events, refer to “Configuration”.
For more information on the node, refer to the description which can be seen on the “Info” tab on the right side when selecting the node.
“c8y response” node
The following node allows you to send the result of a command to the Cumulocity server. As input the node expects a message routed from the “c8y command” or “c8y config” nodes.
For more information on the node, refer to the description which can be seen on the “Info” tab on the right side when selecting the node.
“c8y platform” node
This node is not visible in the list of nodes as it is used as a configuration which can be shared by multiple nodes. The configuration node defines the type of connection and the credentials which will be used to communicate with Cumulocity.
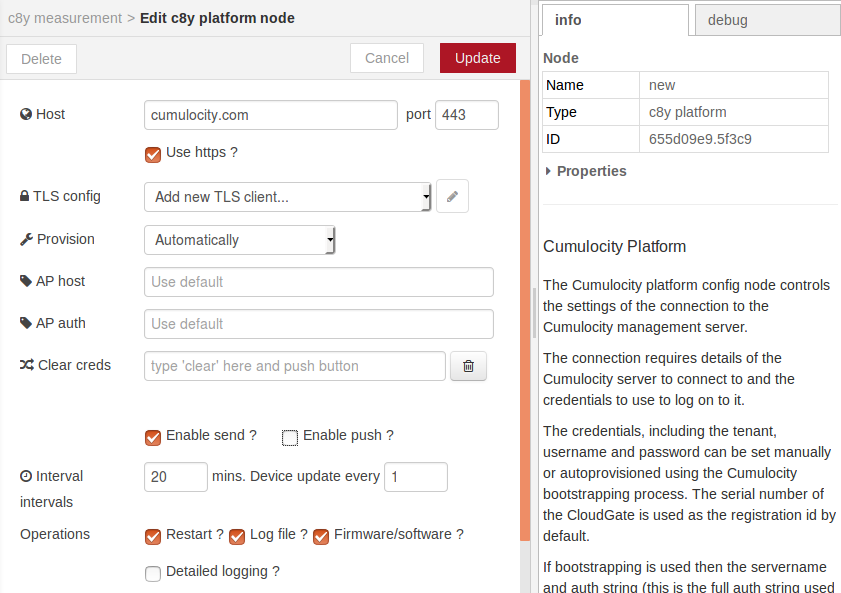
To be able to use the configuration, the type of provision has to be specified (“Manually” or “Automatically”).
In case of “Manually”, the user has to enter a tenant, username and password. After starting the workflow, the nodes which use this configuration should be able to connect to Cumulocity, provided that the credentials are correct.
In case of “Automatically”, the user can enter a servername and authentication string. If not, the node will use default values. Before or after starting the workflow, the user has to register the device with its serial number in the desired tenant. For more information on registering devices, refer to “Connecting devices manually”. After accepting the device in the tenant, the nodes which use this configuration should be able to connect to Cumulocity, provided that the credentials are correct.
LuvitRED example
The following example workflow is a bit more complex but shows a possible use case. Imagine that you have a device which measures the temperatures and publishes the measurements via MQTT. With the help of the “MQTT” node in LuvitRED, we are able to subscribe to the channel the measurements are published on.
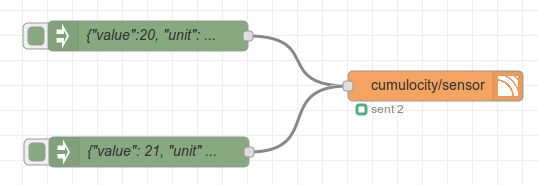
After the measurement was received, the “json” node converts the input to JSON format. Then the “switch” node decides to which node it will forward the input to depending on a user-defined condition. In this case, if the temperature is above a certain threshold, an alarm will be sent. Otherwise, a measurement will be sent to Cumulocity.
If you do not have a device which supports MQTT, you can use this workflow instead to simulate such a device.
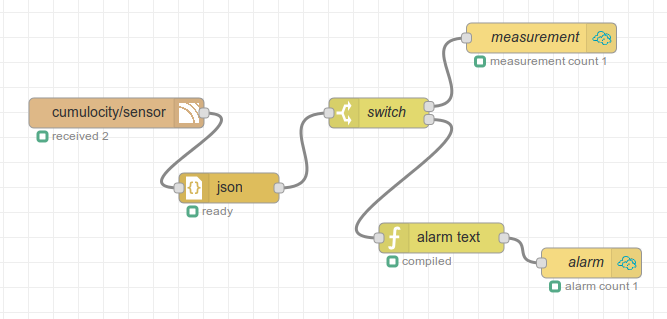
This workflow uses two “inject” nodes to simulate a measurement which triggers either the “c8y measurement” node or the “c8y alarm” node in the other workflow.
Import/Export LuvitRED flows
To facilitate the reuse of workflows LuvitRED offers the possibility to import/export workflows.
Export LuvitRED flows
To export your workflows, you can either use the LuvitRED or Cumulocity user interface.
If you want to use the LuvitRED user interface
- Click on the icon in the top right corner to open the menu.
- Go to the menu item “Export”.
- Select “File - All nodes”.
- Choose a name for your JSON file.
- Click on the “OK” button.
If you want to use the Cumulocity user interface, you have to make sure that one of your workflows contains a “c8y” node with a correctly configured “c8y platform” configuration node. Moreover, the “Flow deploy ?” checkbox needs to be checked in this “c8y platform” configuration node.
- Navigate to your CloudGate device in the “Device Management” application.
- Open the “Configuration” tab.
- Click on the “Get new snapshot from device” button.
- After the command successfully completed, you can find the JSON file in the “Configuration repository” menu.
Note that if there is no correctly configured “c8y platform” configuration node in your workflows, Cumulocity will not be able to communicate with the device and therefore will not be able to retrieve the JSON file.
Note that when a “c8y platform” configuration node contains credentials (usernames and passwords), these are not exported via the LuvitRED editor.
Import LuvitRED flows
To import your workflows, you can either use the LuvitRED or Cumulocity user interface.
If you want to use the LuvitRED user interface
- Click on the icon in the top right corner to open the menu.
- Go to the menu item “Import”.
- Select “From File”.
- Click on the “Choose a file” button.
- Navigate to the JSON file you want to import and select it.
- Click on the “OK” button.
If you want to use the Cumulocity user interface, you have to make sure that one of your current workflows contains a “c8y” node with a correctly configured “c8y platform” configuration node. Moreover, the “Flow deploy ?” checkbox needs to be checked in this “c8y platform” configuration node. When importing, your current workflows will be replaced with the workflows in the JSON file so make sure to save workflows that are not to be replaced, too.
- Navigate to your CloudGate device in the “Device Management” application.
- Open the “Configuration” tab.
- Go to the “Apply new snapshot” section and select the JSON file you want to import in the drop-down menu.
- Click on the “Put new snapshot to device” button.
- After the command successfully completed, refresh the LuvitRED tab in your browser. You should be able to see the imported workflows now.
Note that if there is no correctly configured “c8y platform” configuration node in one of your current workflows, Cumulocity will not be able to communicate with the device and therefore will not be able to push the JSON file onto the device.
The workflows should start automatically as soon as they are imported which means that it is not necessary to deploy them, provided that the “c8y platform” configuration node(s) in your imported workflows were configured correctly.