Viewing device details
For each device, detailed information is available. The kind of information actually provided for a device depends on the device type, device usage and the configuration of your user interface.
To view detailed information on the device, click a device in the device list.
The device details are divided into tabs. The number of tabs is dynamic and depends on the available information, that means, tabs are only displayed if the kind of information is available for the particular device. For a detailed description of the operations and fragments related to each device detail tab see the fragment library.
Initially the Info tab is shown, which offers general information on a device and is available for each device.
Each device at least shows the following tabs: Info, Alarms, Control, Events, Availability, Identity.
Below the name, a list of breadcrumbs is displayed. If the device is part of an asset hierarchy (such as a group), you can use the breadcrumbs to easily navigate up that hierarchy. Since devices can be part of multiple hierarchies, several rows of breadcrumbs may be shown.
Depending of the type and usage of a device, further actions are provided in an context menu when clicking More… at the right of the top menu bar.

Details on these additional menu items are provided where required.
Alarms
The Alarms tab provides information on the alarms of a device. See Working with alarms for detailed information on alarms.
Smart rules (NEW)
The Smart rules (NEW) tab allows to create and manage the Analytics Builder model instances directly from the context of a device or group.
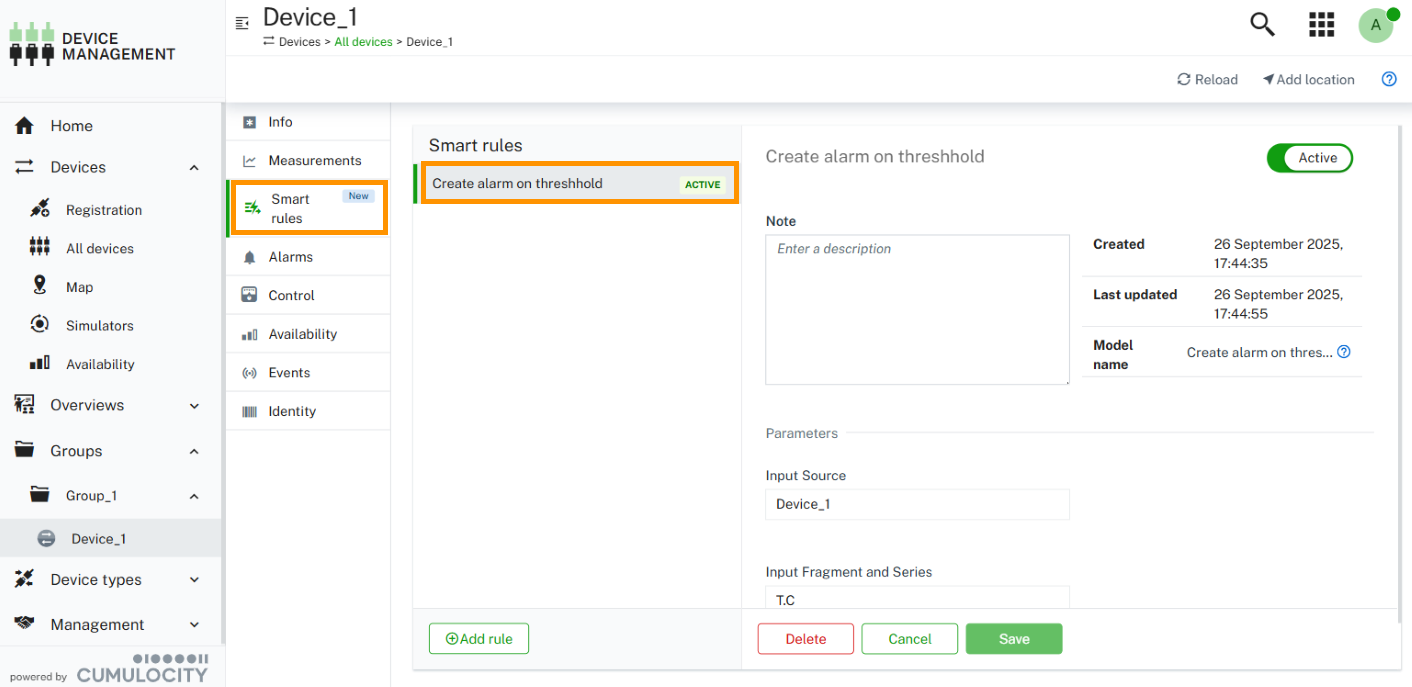
To create your first rule, refer to Create your first rule.
For more details about smart rules (NEW), refer to Smart rules plugin.
Availability
The Availability tab offers availability monitoring for machines, see Availability for more information.
Child devices
The Child devices tab shows a list of devices connected to the currently displayed device. For example, if you look at a gateway, the tab lists all machines connected to the gateway.
For details provided in the child device list, see Viewing all devices.
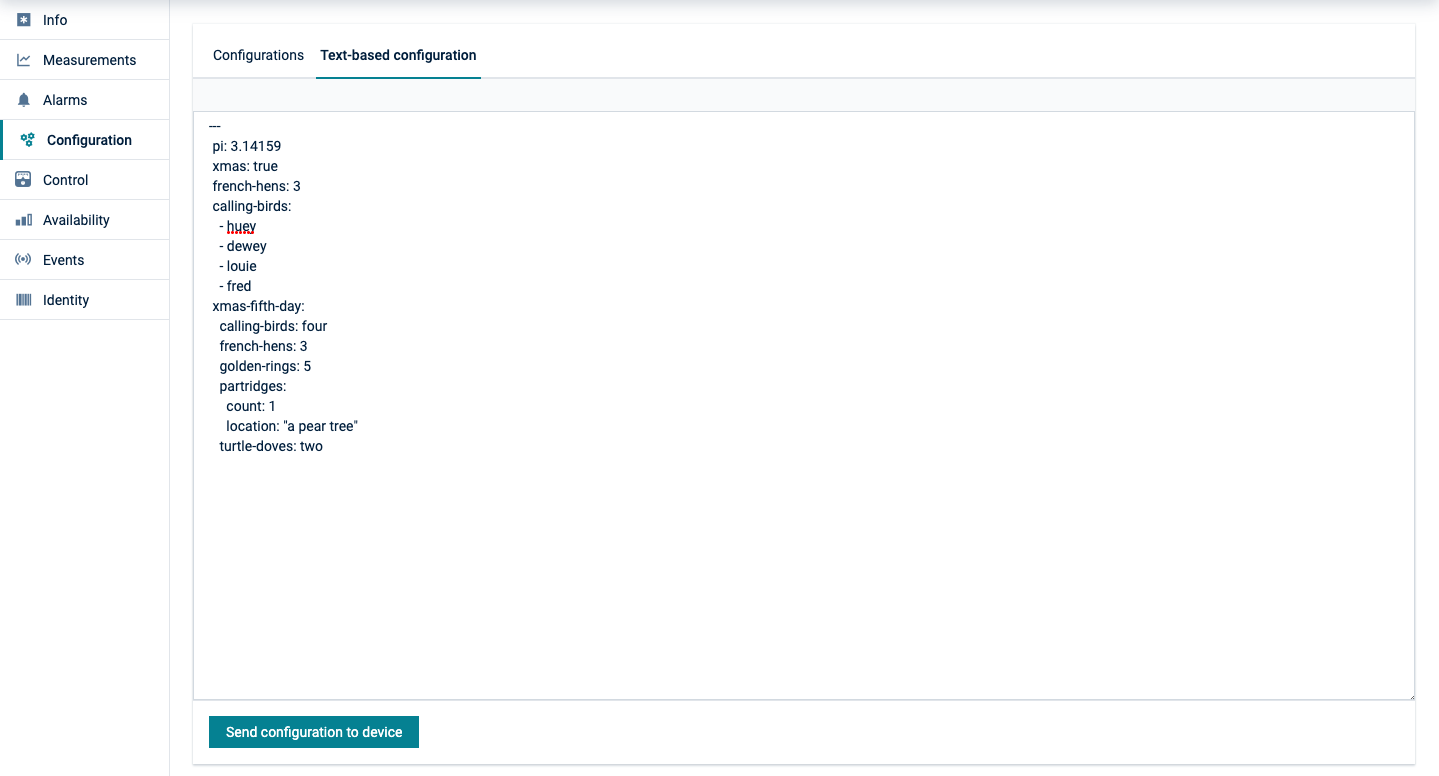
Configuration
The Configuration tab allows you to configure the parameters and initial settings of your device. Depending on the device, possible configurations are:
- Text-based configurations
- Binary-based configuration snapshots
For more details on managing binary-based configuration snapshots, see Managing configurations.
To request the current text-based configuration snapshot
- Navigate to the Configuration tab.
- Select one of the device-supported configurations in the list.
- Click Get snapshot from device.
To add or edit a text-based configuration snapshot
- In the Configuration tab, you can manually add or edit the device configuration in the text field.
- Click Send configuration to device to save your edits.
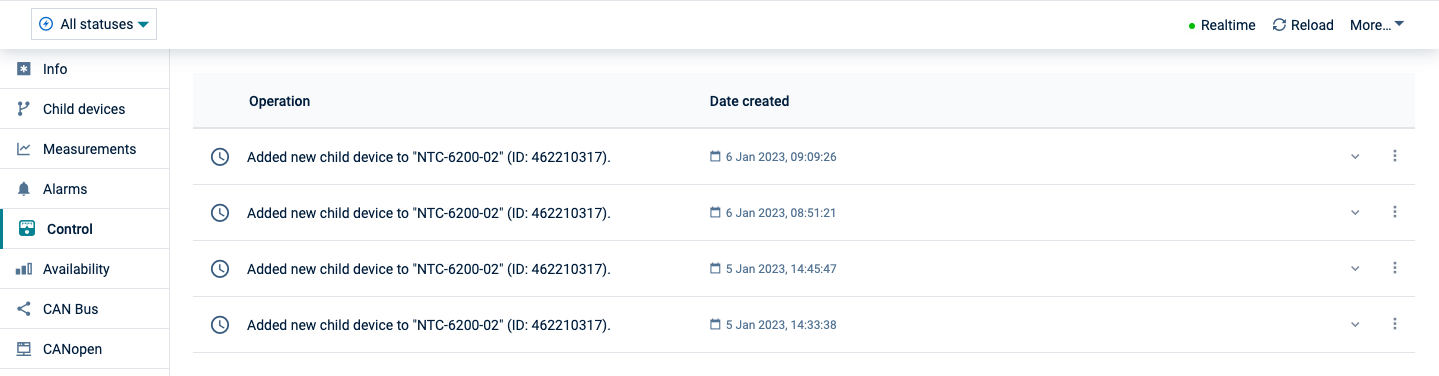
Control
The Control tab lists the operations being sent to a device. See Working with operations for detailed information on operations.
Device profile
See Applying device profiles to devices for more information on how to apply device profiles to a device.
Events
The Events tab displays events related to a device. This enables low-level troubleshooting of a device. See Troubleshooting devices for detailed information.
Firmware
See Managing firmware for more information on how to manage and update the firmware on a device.
Identity
Cumulocity can associate devices and assets with multiple external identities. For example, devices can often be identified by the IMEI of their modem, by a micro-controller serial number or by an asset tag. The Identity tab lists all the identities recorded for a particular device.
This is useful, for example, when you have non-functional hardware and must replace the hardware without losing the data that was recorded. Just connect the new hardware to your account and modify the identity entry of the old hardware, to contain the identity of the new hardware.
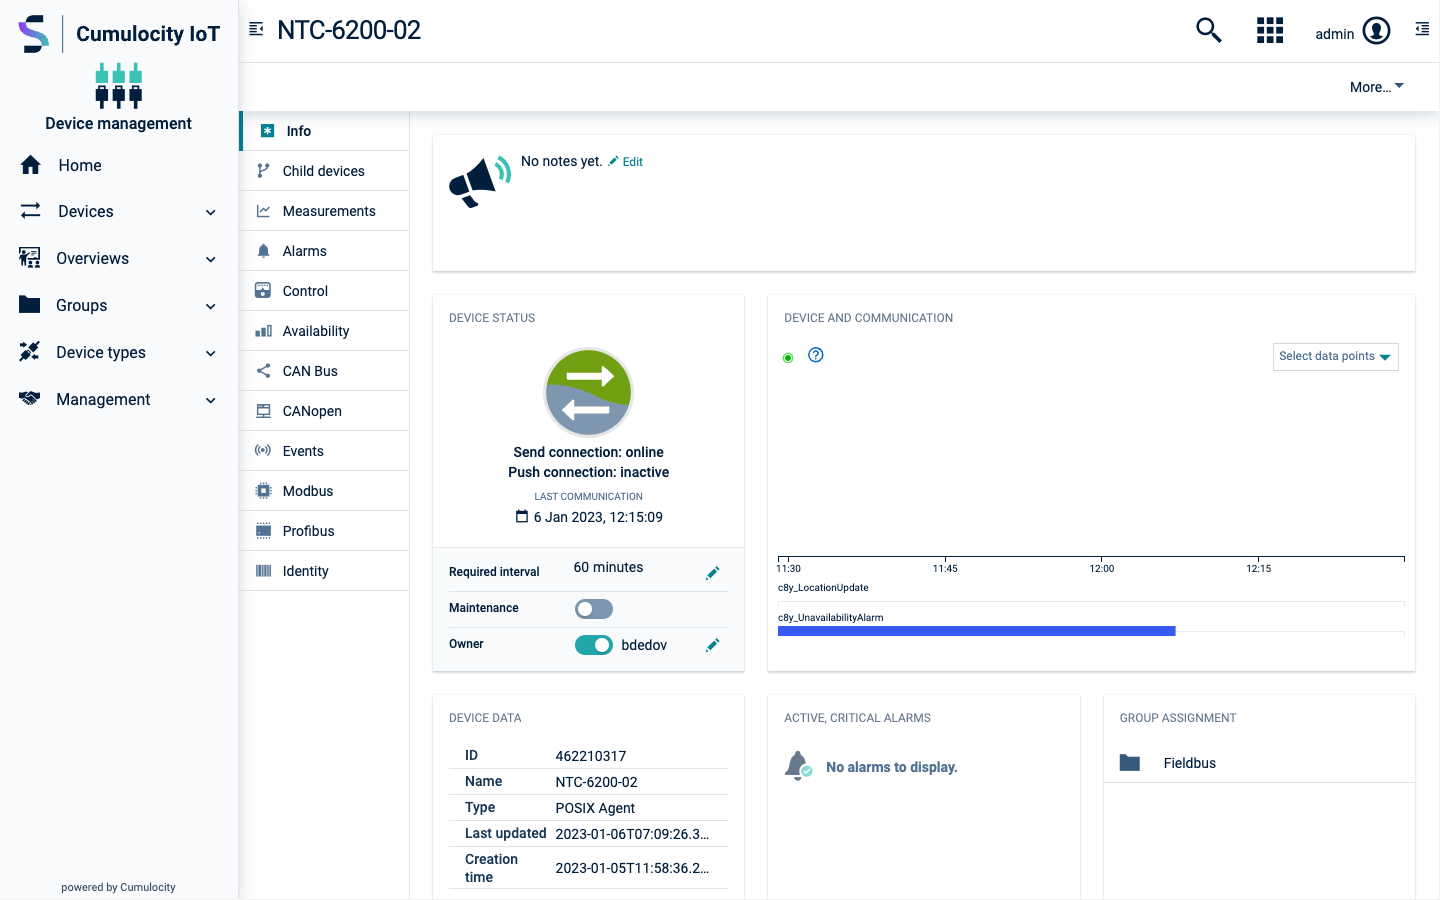
Info
The Info tab summarizes management-relevant device information in a dashboard.
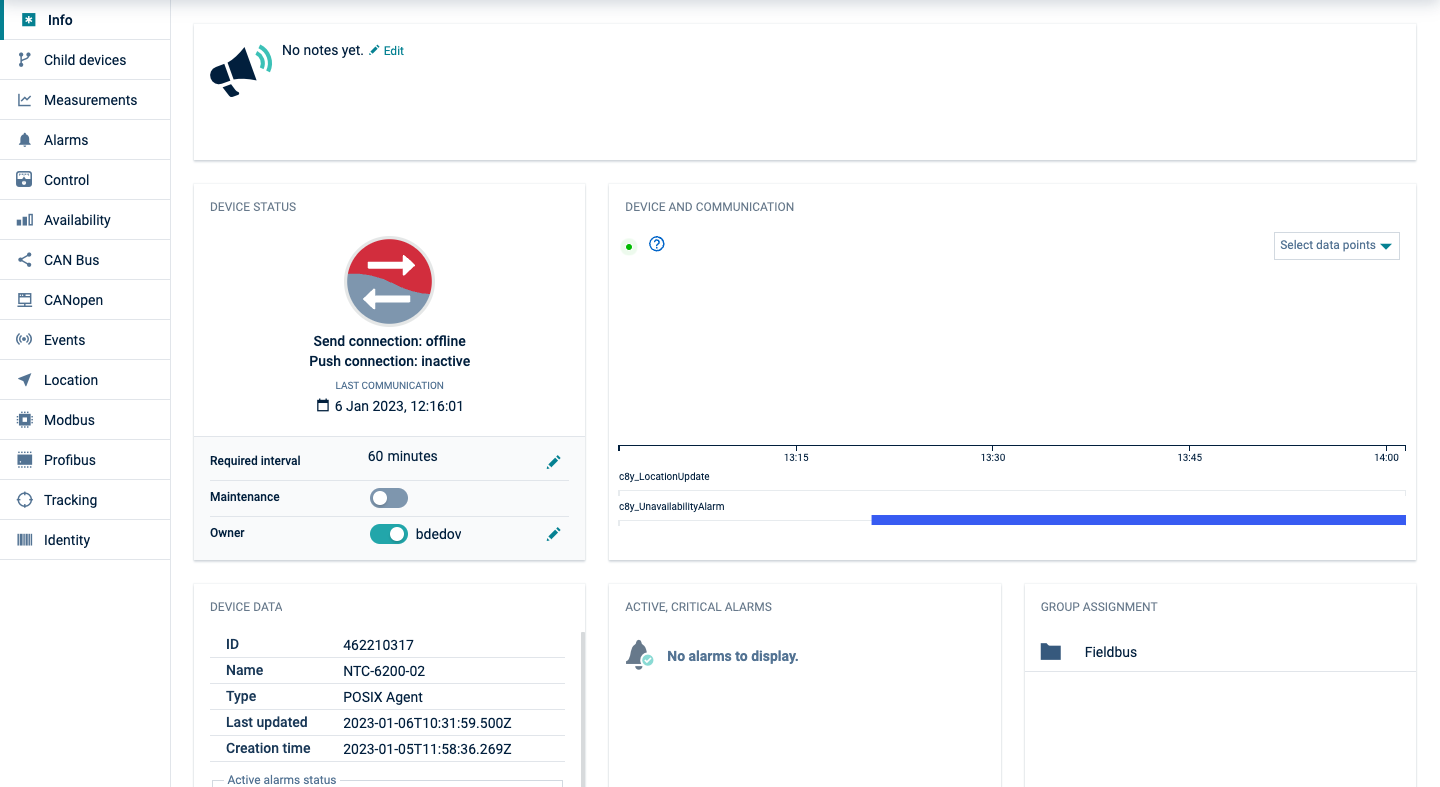
The information is provided on the following cards:
| Card | Description |
|---|---|
| Notes | Provides optional notes to inform about current activities. Notes usually may only be edited by an administrator. To add or edit a note, click Edit, enter your note or your modifications in the text box and save your edits by clicking the green checkmark at the right of the text box. |
| Device status | Displays connection-relevant information, as described in detail in Connection monitoring. |
| Device and communication | Shows a data graph displaying real-time data on particular measurements. Drag the x-axis to move the data point time measurement. To zoom in select a time period, double click to zoom out of the graph. For details on data graphs, refer to Working with data explorer. The following measurements may be shown here: Data points: c8y_Battery.level, c8y_SignalStrength.rssi, c8y_MemoryMeasurement.Used, c8y_CPUMeasurement.Workload, c8y_NetworkStatistics.Upload, c8y_SignalStrength.RCSP, c8y_SignalStrength.ber, c8y_SignalStrength.ECN0, c8y_NetworkStatistics.Download, c8y_MemoryMeasurement.Total Alarms: c8y_UnavailabilityAlarm Events: c8y_LocationUpdate |
| Device data | Displays general information on the device (ID, name, type, owner, last update). The fields Name and Type can be edited. Below the general device information, the card shows status information for active alarms, availability and connection (not editable). Moreover, various device-specific information like hardware and firmware is displayed here (editable). |
| Active, critical alarms | Shows the active critical alarms for the device. |
| Groups assignment | Displays the groups the device belongs to. Moreover you can add the device to groups here or unassign it from groups, see Grouping devices. |
| Location | Shows the location of a device on a map as reported by the device or as manually set, see Location. |
Location
The Location tab by default shows the location of a device on a map and as coordinates, as reported by the device. For devices that do not report a location you may manually set the location. Simply place the “pin” in the correct place of the displayed map.
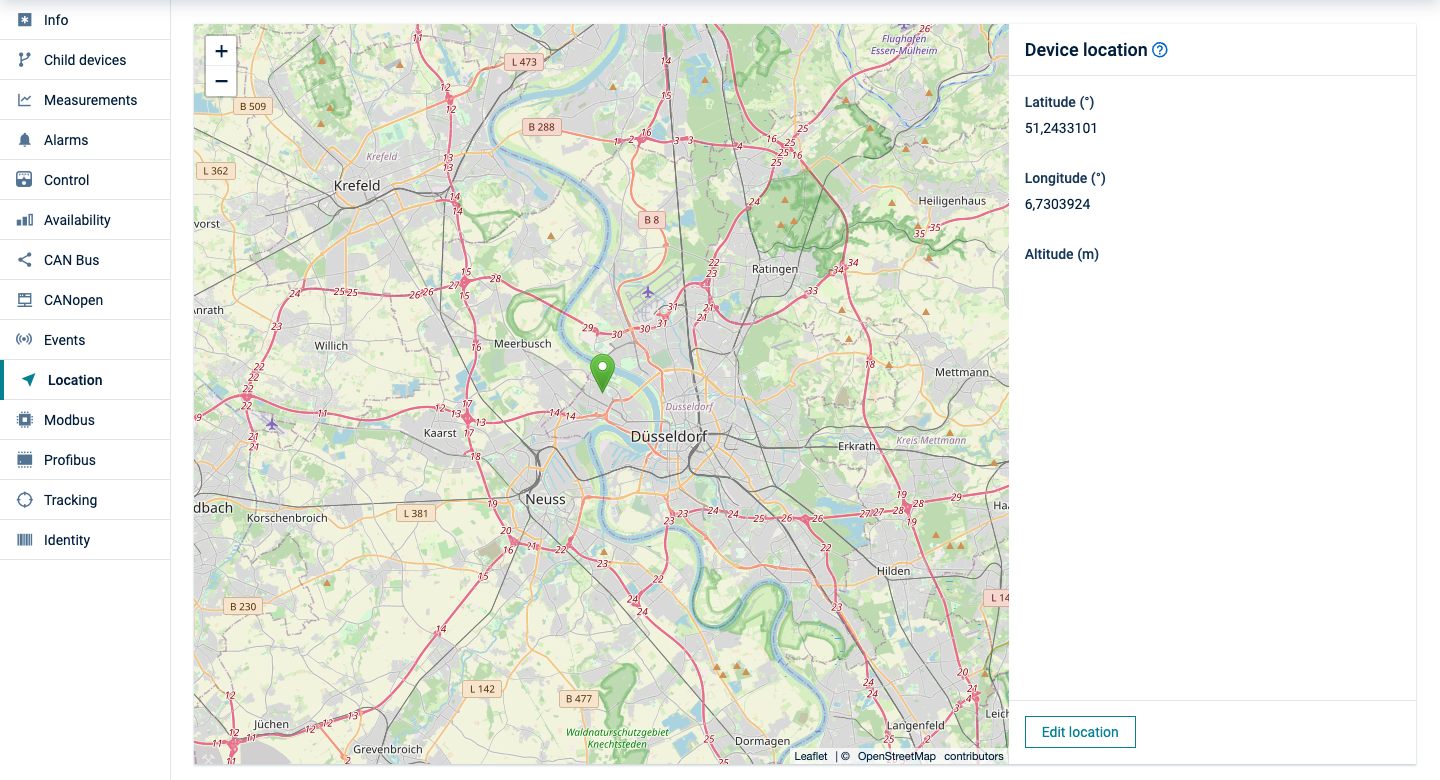
The Location tab also shows when a device contains c8y_Position property. When you send a new c8y_Position event, you can set the same c8y_Position fragment on the device and it will automatically mark its position on the map.
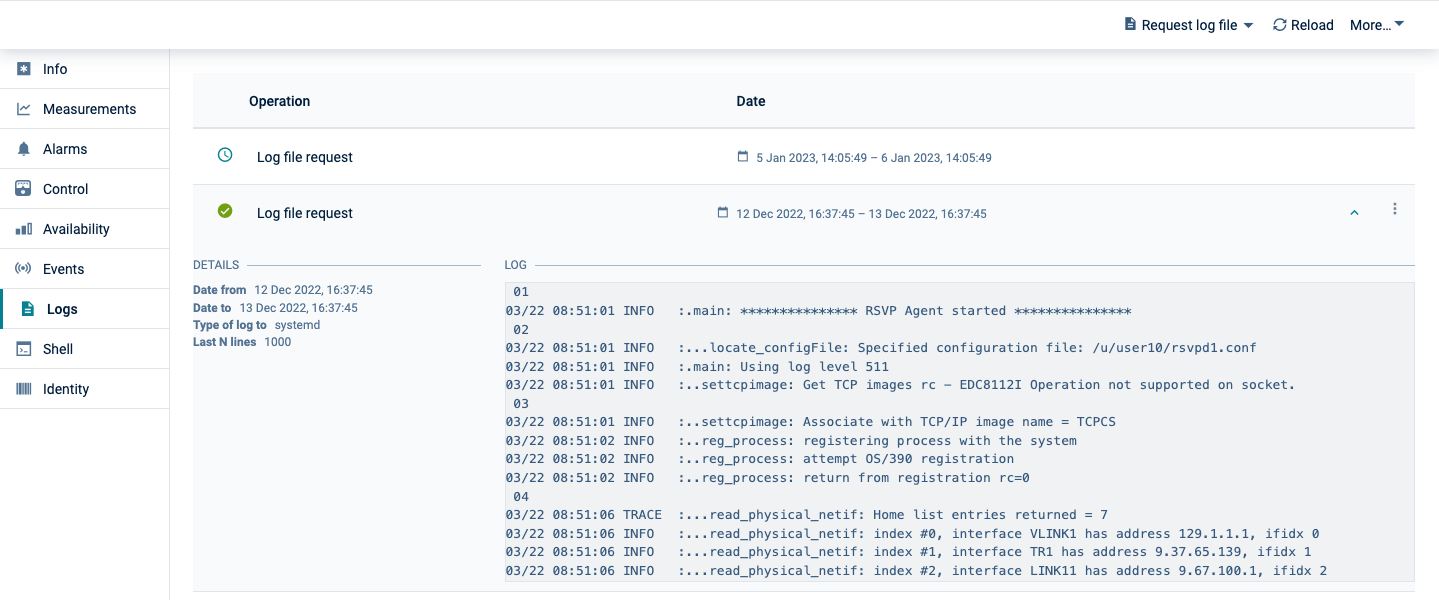
Logs
In the Logs tab you can manage log information from devices.
To request log information
- In the Logs tab, click Request log file at the right of the top menu bar.
- In the resulting dialog box, specify a date and time range for the log information.
- Select the type of log from the dropdown field. The supported logs listed are usually device-specific.
- Optionally, specify a text filter. For example, if you enter “Users”, only lines including the term “Users” will appear in the returned log information.
- Specify the maximum number of lines to be returned (counted from the end). The default value is 1000.
- Click Request log file.
The log information will be requested from the device.
Requesting a log from a device may take some time.
After the log has been transferred from the device to Cumulocity, it will be listed in the Logs tab. The row in the list shows the requested log time range.
Click on the entry in the list to show the entire log information.
To download a log
Hover over a row and click the download icon , to download the log excerpt to your file system.
To delete a log
Hover over a row and click the delete icon , to delete the log information.
Measurements
The Measurements tab provides a default visualization of numeric data provided by the device in the form of charts. Charts are grouped into types of measurements, which can contain multiple graphs or “series”.
The screenshot below, for example, shows a chart for temperature measurement with two different series.
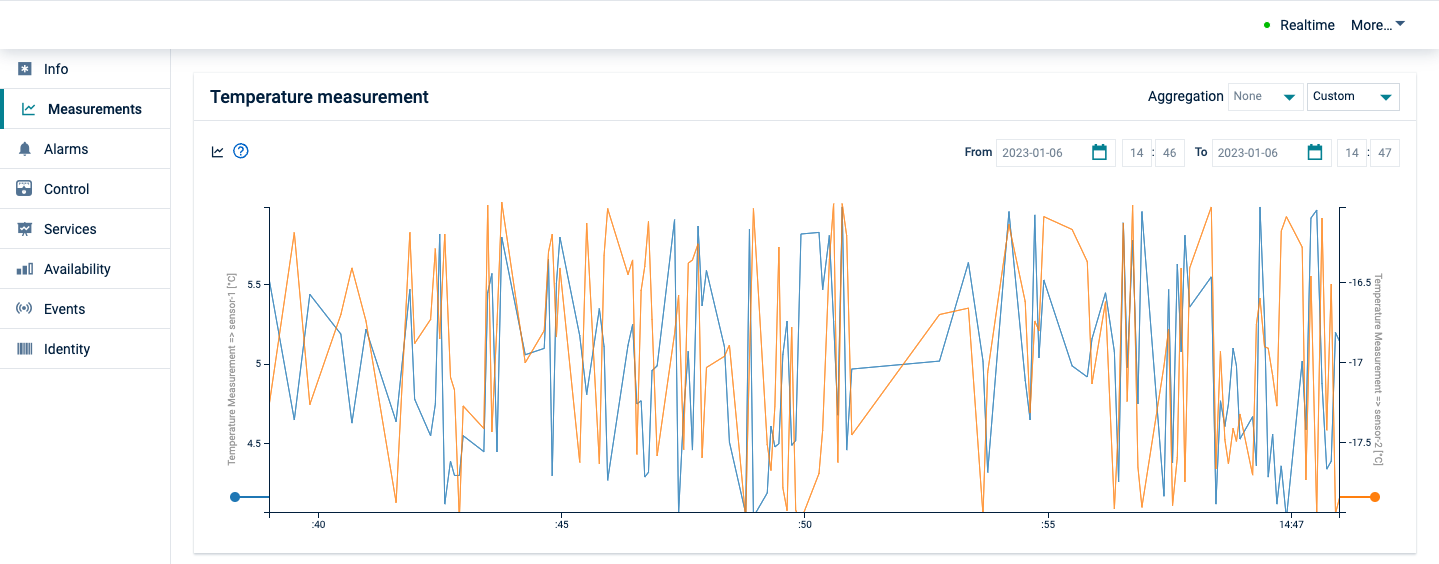
If a chart contains measurements with different series, one Y-axis is rendered per series. In the example above, temperature data is recorded from two sensors namely “sensors-1” and “sensor-2” having the same unit as °C. Here measurements from different sensors are categorized as separate “Series” data. The measurements from the respective sensors are stored using separate series names (same as the sensor names) and hence, two axes are rendered here. Only one Y-axis is rendered if the measurements belong to the same series.
To see detailed information about the measured values, hover over the chart. A tooltip will be displayed with detailed information on the measurement next to your cursor (the tooltip will “snap” to the closest measurement).
Time range and aggregation
By default, charts show the raw data of the last hour. To change the time range on the X-axis, open the “Last hour” dropdown menu at the top right and select a time range.
If you increase the time range, the value in the Aggregation field will automatically switch to “hourly” or “daily”. The chart now shows ranges instead of individual raw data points. For “hourly”, the chart will show a range of the minimum and maximum value measured in one hour. For “daily”, the chart will show the minimum and maximum value measured over one day. Likewise, the tooltips will now show ranges of values instead of individual values.
This enables you to get an efficient overview over larger time periods. A graph will only show 5.000 data points per graph maximum to avoid overloading your desktop browser. If you select a fine focus resulting in more than 5.000 data points, a warning message will be shown: “Truncated data. Change aggregation or select shorter date range.”
Clicking Realtime will enable real-time user interface updates of the graphs as new data flows into the system from the connected devices.
Measurement format
In order to see measurement graphs, the device must send measurements in a specified fragment format.
"fragment_name" : {
	"series_name" : {
		"value" : ...
		"unit" : ...
	}
}
Example:
"c8y_SpeedMeasurement": {
      "Speed": { "value": 1234, "unit": "km/h" }
}
"Fragment_name" and "series_name" can be replaced by different valid JSON property names, but no whitespaces and special characters like [ ],* are allowed. The structure must be exactly as above, two-level deep JSON object.
Network
In the Network tab, mobile network (WAN) and local area network (LAN) parameters can be viewed and configured.
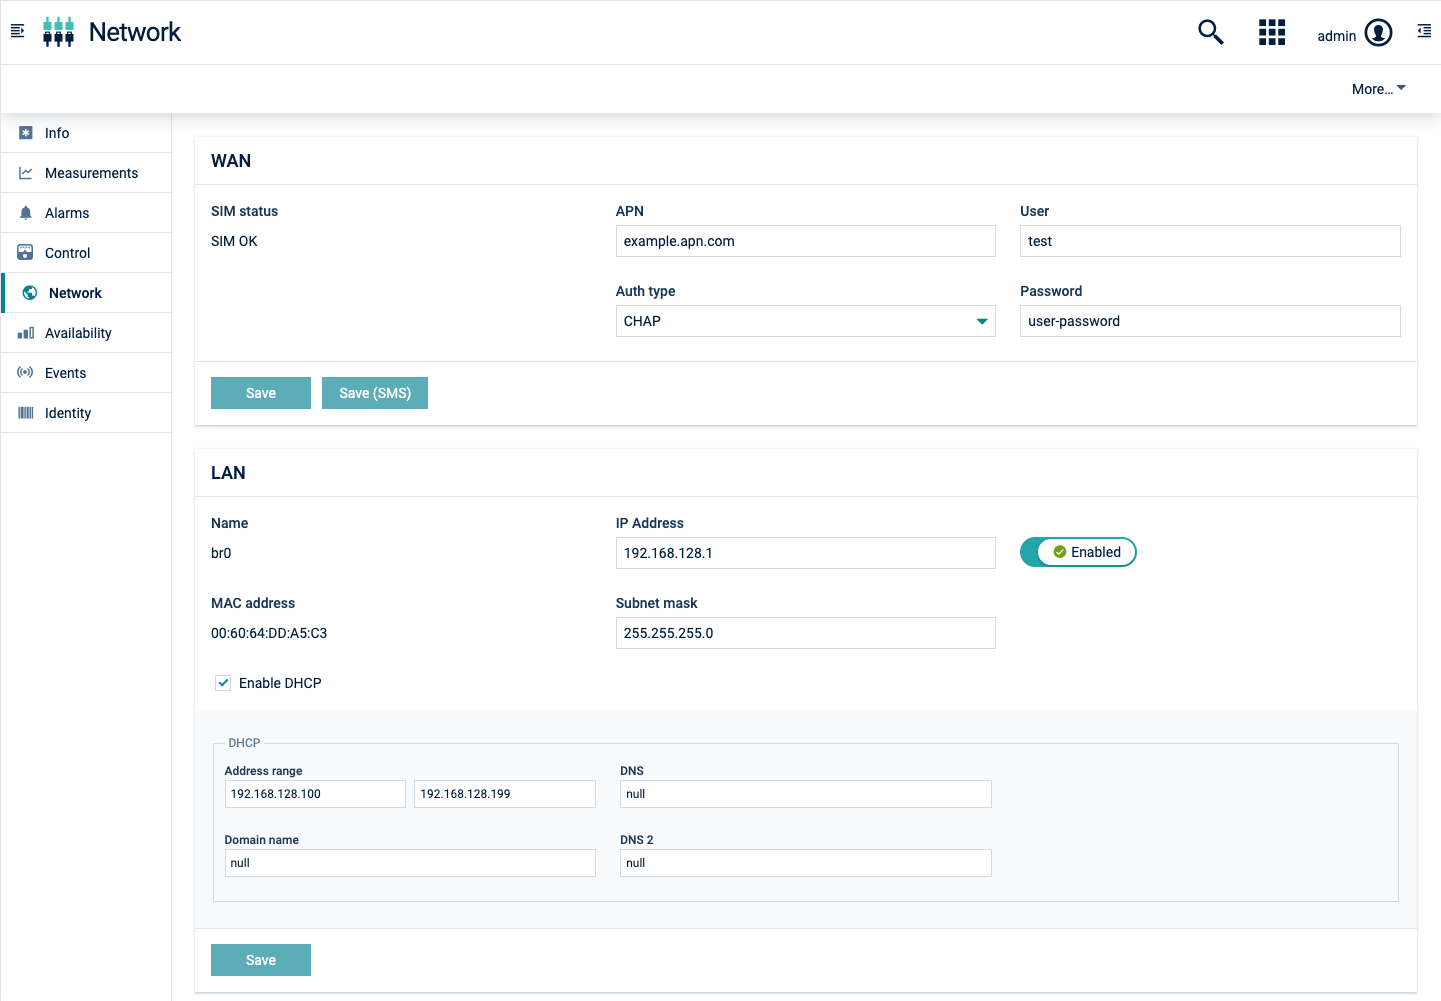
The WAN parameters in the user interface correspond to the first profile stored in the router. These parameter can be configured remotely or via SMS.
To configure WAN parameters
- Enter the Access Point Name (APN).
- Enter the username and the password of your account in the platform to which you wish to establish a connection.
- Select the authentication type.
- Click Save to save your settings.
To configure LAN parameters
To configure LAN parameters, simply enter IP address and Subnet mask.
To configure DHCP parameters
- Enter the address range in which the connection can be established.
- Enter the DNS.
- Enter the DNS 2.
- Enter the domain name.
- Click Save to save your settings.
Services
The Services tab provides a list of all services running on a device with their status, name, type and date of the last update. Every column allows services to be filtered and/or sorted by the respective value displayed.
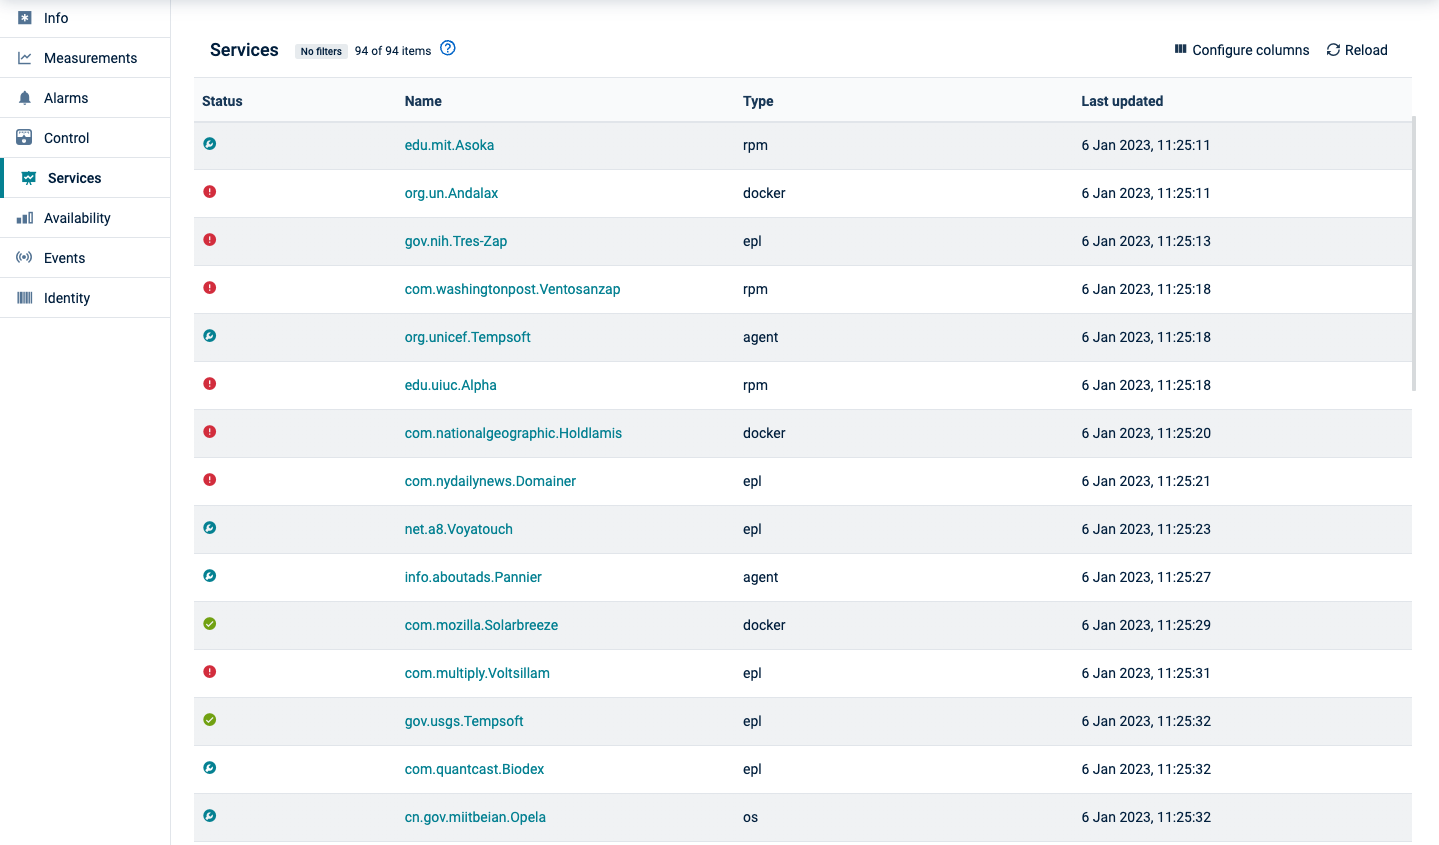
The platform defines three status options for services: Up, Down and Unknown. These predefined statuses have their own graphical representation and can be selected directly from the Status filter. Other status options are also allowed and can be freely defined, see Service module in the Web SDK documentation resources. They all share the same icon and must be entered manually in the Status filter. A tooltip on the status icon displays their actual value.
Shell
The device shell enables you to interactively work with remote devices. Many industrial devices support some form of command language, like AT commands for modems, CSV-style commands for many tracking devices or elaborate scripting mechanisms provided by many gateway makers. In the shell, you can send commands in the respective language of the device and interactively view the results of the commands.
The Shell tab presents a command prompt to enter commands.
In the command prompt you can enter arbitrary command text. To send the command text to the device, click Execute. This button only is activated once the command is written in the text area.
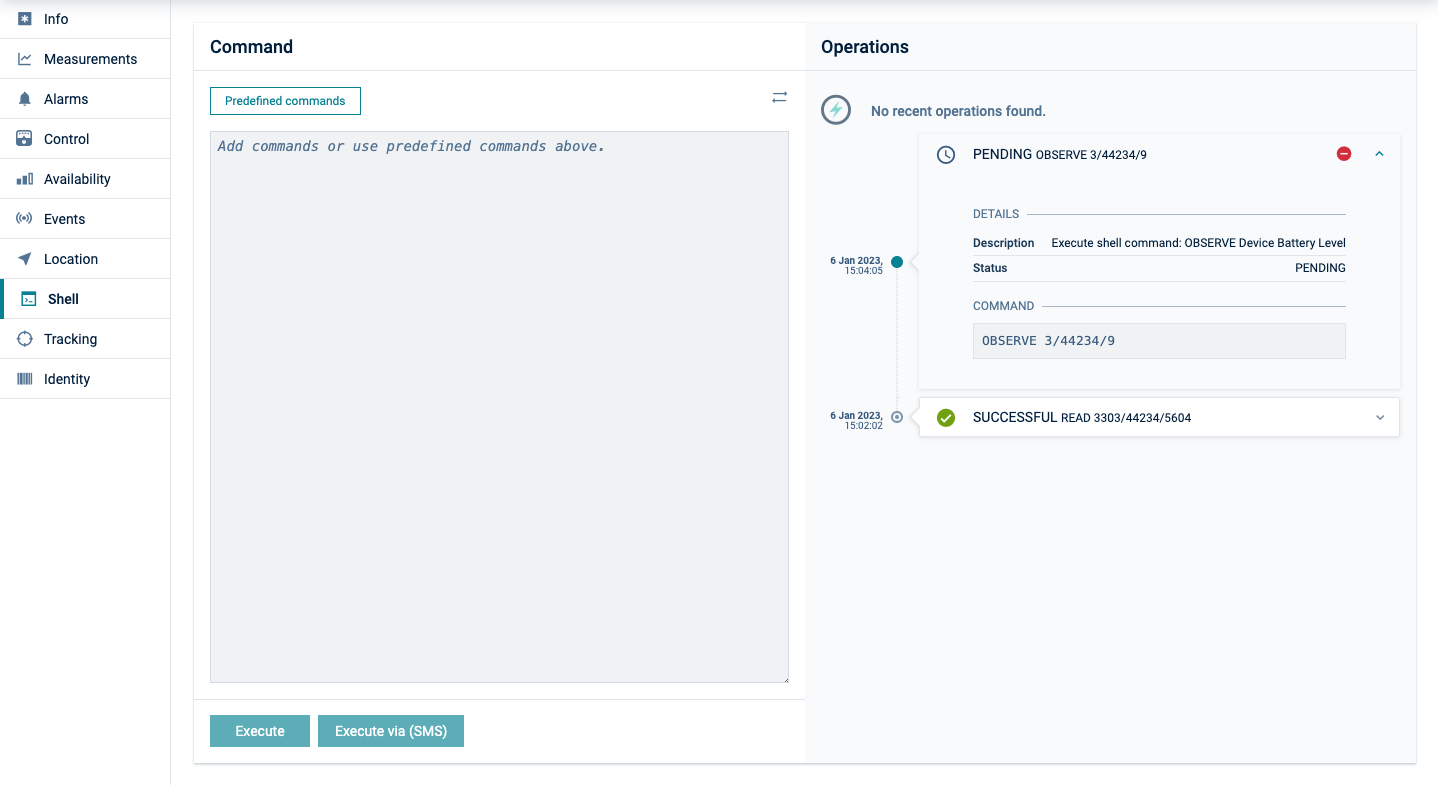
For your convenience, Cumulocity provides several frequently used commands for some devices. Click Predefined commands above the command prompt area to open a window containing a list of available pre-defined commands. Select the command of your choice and click Use, to copy the command to the command prompt. You may also add new commands here for re-use.
Software
See Managing software on a device for more information on how to manage and update the software installed on a device.
Tracking
Devices can record the history of their movements in Cumulocity. This movements may be viewed in the Tracking tab.
c8y_Position property.In the dropdown list at the top right you can select a time period (or specify one by selecting “Custom- from the list) and visualize the movements of the device during this period. Movements are shown as blue lines in the map.
![]()
Next to the map, the individual recordings with their time are listed (“location update events”). When you click a recording, a “pin” on the map will show the location at the time of the recording.
Depending on the type of device and the integration into Cumulocity, you can configure device-side geo-fencing and motion detection.