Asset hierarchy
Assets represent business objects in general like buildings, machines, production units or cars.
Assets are organized in hierarchies. For example, an energy monitoring application might have the following asset hierarchy:
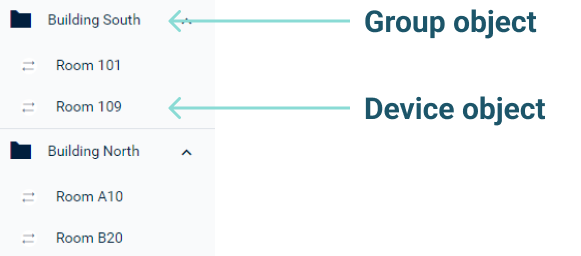
The asset hierarchy is composed of two types of objects:
-
Groups: Objects which group single devices or other groups. Groups can either be created in the Cockpit application or in the Device Management application.
-
Custom assets: Objects defined by an asset model and created in the Digital Twin Manager application.
-
Devices: Devices which are linked into the asset hierarchy. Before you can use devices in the Cockpit application, they must be connected to Cumulocity. This is done in the Device Management application. For details on connecting devices refer to Registering devices.
In this example, the group objects represent a building asset. The device objects represent the room asset. The group names and hierarchy can be defined individually by the user. The hierarchy can have multiple levels, like region level, city level, street level, building level, floor level and room level. Any device can be part of multiple and different hierarchies, like part of regional hierarchy and part of customer hierarchy.
To position a device in the asset hierarchy, you must “assign” the device to the respective group (see below).
Info
Single devices are not managed in the Cockpit application. They are managed in the Device Management application.
Asset hierarchy versus device hierarchy
Cumulocity supports two types of hierarchies: a device hierarchy and an asset hierarchy.
The device hierarchy tracks how devices are linked to Cumulocity from a communications point of view. The asset hierarchy structures the assets that are being remotely supervised and controlled through the IoT devices. For details, refer to Cumulocity’s domain model.
In the Cockpit application, you construct your asset hierarchy by creating group objects and by linking devices into the hierarchy. The asset hierarchy depends on the IoT devices used. There are many types of IoT devices, but these two types are very common:
-
Smart devices are self-contained devices that include sensors, actuators and a communication module. They are typically connected to a single asset. Smart devices are trackers, weather stations or general “smart” sensors with a built-in communication module.
-
Gateway devices establish the communication from other devices to Cumulocity but do not include sensors or actuators. Typical gateway devices include Zigbee, Modbus, M-Bus or KNX gateways.
The following section explains how to work with smart devices and gateway devices in the Cockpit application.
The first example shows how smart devices are linked into the asset hierarchy:
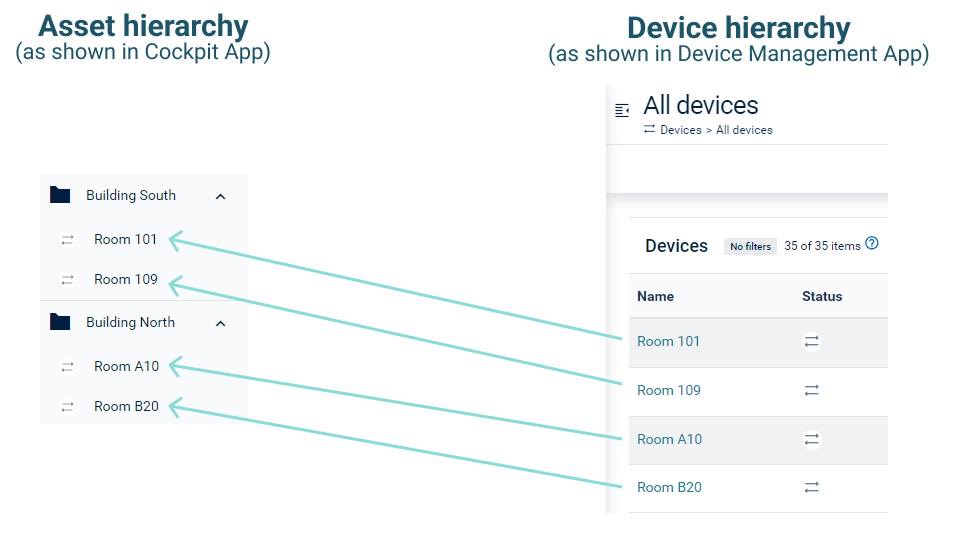
Smart devices are represented as top-level devices in the Device Management application. In the Cockpit application, you can organize smart devices into groups, as the arrows indicate in the above diagram.
The second example shows how gateway devices can be used in the Cockpit application.
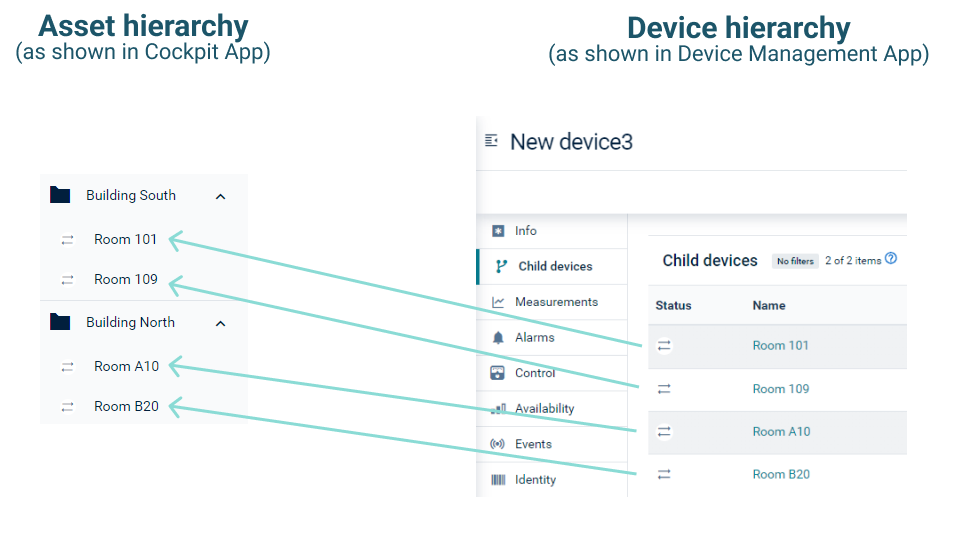
Gateway devices are as well represented as top level devices in the Device Management application. Their attached devices (like for example Modbus or KNX devices) are shown as child devices. These child devices can be organized in the asset hierarchy in the Cockpit application as shown above.
As you can see from the example, devices can have completely different hierarchies in the Device Management application and in the Cockpit application: While inside the Device Management application all child devices are below the gateway device, the same child devices are organized in two different buildings in the Cockpit.
Cockpit assets versus business assets
The mapping of objects in the Cockpit asset hierarchy is a virtual hierarchy.
If you manage trucks within the Cumulocity platform, then each truck is represented via its individual tracking device communicating with Cumulocity.
For building management, it is most common that a group of sensors inside a building represents the building as a group communicating with the Cumulocity platform.
If you need more properties and better visualization of business assets, we recommend you to use the Digital Twin Manager application. A custom asset created via the Digital Twin Manager application is also shown in the Cockpit application. It uses the chosen icon and additionally shows all properties in a list next to the subassets. These properties can be edited if the user has WRITE permission for the permission type “Inventory”.
Working with assets
To navigate assets
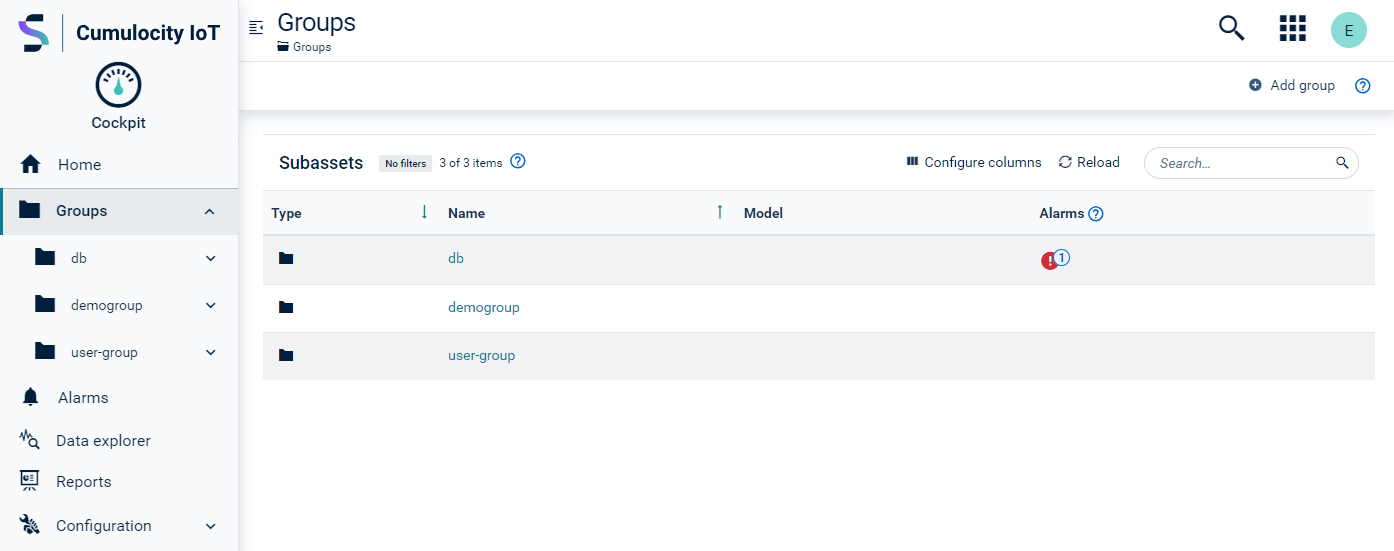
In the asset hierarchy, Cumulocity distinguishes between top-level groups and subassets. Subassets can either be other groups or devices.
In the navigator, top-level groups are shown in the Groups menu at top-level. Subassets are shown under its higher-level group.
Moreover, subassets are shown in the Subassets tab of the particular group which is initially displayed when you click on the group in the navigator.
Info
The count displayed on top of the table on the Subassets tab shows the total number of child assets assigned to the current group. Any type of managed object can be a child asset. For more details on the counting of objects refer to the operation Retrieve all child assets of a specific managed object in the Cumulocity OpenAPI Specification.
If you add a gateway device, the child devices are not shown. To show child devices, you must add them to the related asset. Details related to the child hierarchy are visible and editable in the Device Management application.
Use the navigator, to navigate through the asset hierarchy.
Asset details
Depending on the asset type (group or device), various tabs are available with detailed information.
Groups show the following tabs:
- Subassets - Shows group details and all subassets of a group, see also Viewing all devices.
- Smart rules - Shows smart rules specified for the group, see also Smart rules.
- Smart rules (NEW) - Shows smart rules (NEW) specified for the group, see also Smart rules plugin.
- Data explorer - Shows all data points of the children. For details refer to Changing visualization.
Requirements
ROLES & PERMISSIONS in groups context:
- To view all groups: READ permission for permission type “Inventory”
- To add new groups: CREATE permission for permission type “Inventory”
- To delete any group: ADMIN permission for permission type “Inventory”
- To rename a group or change group description: ADMIN permission for permission type “Inventory”
- To view specific groups: READ permissions for “Inventory” in the inventory roles
- To manage or delete specific groups: READ and CHANGE permissions for “Inventory” in the inventory roles
Note that global inventory permissions override inventory role permissions.
Devices show the following tabs:
- Smart rules - Shows smart rules specified for the device, see also Smart rules.
- Smart rules (NEW) - Shows smart rules (NEW) specified for the device, see also Smart rules (NEW) plugin.
- Alarms - Displays alarms for the device, see also Working with alarms.
- Data explorer - Shows all data points of the children. For details refer to Changing visualization.
- Location - Shows the current location of a device (only available with
c8y_Position).
Requirements
ROLES & PERMISSIONS in devices context:
- To view all devices within a group: READ permission for permission type “Inventory”
- To assign or unassign devices within a group: ADMIN permission for permission type “Inventory”
- To delete any device within a group: ADMIN permission for permission type “Inventory”
If dashboards have been created for a group or device, they will also be added as a tab. See Working with dashboards for details.
Moreover, additional tabs may be displayed here in case the application has been extended with a custom Web SDK extension. Refer to the Cumulocity Tech Community for a tutorial on adding custom tabs.
To add a group
- Click Add group at the right of the top menu bar.
- In the resulting dialog box, enter a unique group name and an optional description and click Next.
- In the list, select the devices you want to add. You may apply filters to reduce the number of displayed devices.
- Click Create to create the new group.
The new group will be added to the groups list.
Info
A group can be created with “0” devices in it.
To add a new group as a child of an existing asset, navigate to its Subassets tab and click Add Group in the top menu bar.
To edit a group
- In the navigator, click a group to open it.
- In the Subassets tab, you can edit the name and description of the group.
To delete a group
To delete a group either on top-level from the Groups page or from the Subassets tab of another group, hover over the respective entry you want to delete and click the delete icon at the right.
In the resulting dialog box, you can select to also delete all devices inside the selected asset and all its subassets.
To assign devices to a group
Before adding a device to the asset hierarchy, it must be connected to Cumulocity. Connecting devices to the platform is done in the Device Management application. For details on connecting devices refer to Device Management application.
To assign devices to a group, follow these steps:
- In the navigator, select a group from the Group menu and then open the Subassets page.
- Click Assign devices at the right of the top menu bar.
- In the list, select the devices you want to add. You may apply filters to reduce the number of displayed devices.
- Click Assign to assign the selected devices.
The devices will be assigned to the selected group and shown as subassets in the Subassets page.
To remove a device from a group
- Navigate to the Subassets tab of the group.
- Hover over the respective device you want to remove and click the delete icon at the right.
Removing a device does not delete the device, subdevices or any associated data. The device is only removed from its location in the asset hierarchy. It can be assigned to this group or other groups later.