Retention rules
Retention rules give you control on how long data is stored in your account. By default, all historical data is deleted after 60 days (configurable in the system settings by the platform administrator). You might however want to store measurements for 90 days for example, but delete alarms already after 10 days.
Requirements
ROLES & PERMISSIONS:
- To view retention rules: READ permission for the permission type “Retention rules”
- To manage retention rules (create, update, delete): ADMIN permission for the permission type “Retention rules”
The above permissions can be used to create roles for robust user management. Every new tenant have specified typical roles by default:
- Tenant Manager - Can manage tenant wide configurations like applications, tenant options and retention rules.
Info
Retention rules are usually run once per calendar day. When you edit a retention rule you don´t see an immediate effect in the Usage section on the Home screen of the Administration application.
To view retention rules
Click Retention rules in the Management menu to view a list of retention rules configured for your account.
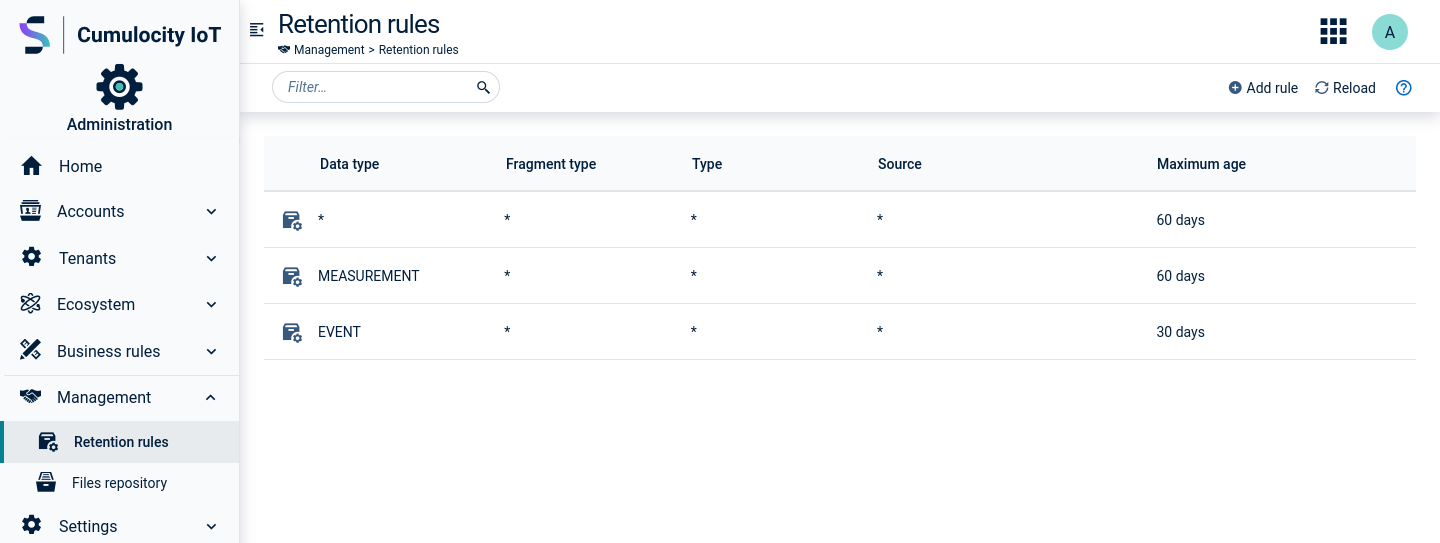
For each rule, the rule name, details on the data to be deleted (fragment type, type and source, see below) and the maximum age in days is provided.
The asterisk ("*") indicates that data with any value will be cleaned up.
Data types
The following data types are covered under retention rules:
- Alarms
- Audits
- Bulk operations
- Events
- Measurements
- Operations
Info
Retention rules do not apply to files stored in the files repository.
To add a retention rule
- Click Add rule in the top menu bar.
- In the resulting dialog box, select the type of data to be cleaned up (alarms, measurements, events, operations, audit logs or all).
- Optionally, enter a type or a fragment type to further restrict the data to be cleaned up. The type refers to the value of the object’s top-level
typefield and identifies the specific kind of object within the selected data type. The fragment type refers to the name of a JSON property contained in the object. An object has one type but can contain multiple fragments. - If you want to remove data only from a specific device, enter the device ID into the Source field.
- Enter the Maximum age in days (max. allowed value is 10 years in days).
- Click Save to save your settings.
The retention rule will be added to the list.
Info
Per default, an asterisk * is set in all fields except the Maximum age field, to include all values.
Alarms are only removed if they have a status of CLEARED.
To edit a retention rule
Simply click the row of the rule you want to edit.
For details on the fields, see To add a retention rule.
To delete a retention rule
Hover over the row with the rule you want to delete and click the remove icon that appears on the right.
Execution examples
All retention rules are executed sequentially and independent of each other.
If we have two retention rules, a more specific one with a greater maximum age that defines a subset of the documents that are defined by a more common rule with a lower maximum age, then effectively it will work as if we had a single, more common rule.
For example, given the two following rules:
| Data type | Fragment type | Type | Source | Maximum age |
|---|---|---|---|---|
| MEASUREMENT | * | c8y_Temperature | * | 30 days |
| MEASUREMENT | * | c8y_Temperature | 12345 | 60 days |
All measurements with the type c8y_Temperature which are older than 30 days will be removed, including those where the source equals 12345.
On the other hand, when we have the following retention rules defined:
| Data type | Fragment type | Type | Source | Maximum age |
|---|---|---|---|---|
| MEASUREMENT | * | c8y_Temperature | * | 30 days |
| MEASUREMENT | * | * | * | 60 days |
The retention process removes the measurements with the type c8y_Temperature which are older than 30 days, all other measurements will be removed when they are older than 60 days.
Info
The source parameter is the ID of the device. When it is defined, the retention process only removes the documents directly related to the device represented by the source, not its children or groups it belongs to.
File repository
The file repository provides an overview of the files stored in your account.
Requirements
ROLES & PERMISSIONS:
- To view files in the files repository: READ permission for the permission type “Inventory”. You can remove owned files with this permission but you cannot remove files of other users.
- To upload files to the files repository: CREATE permission for the permission type “Inventory”.
- To upload and manage files of all owners in the files repository: ADMIN permission for the permission type “Inventory”.
The above permissions can be used to create roles for robust user management. Every new tenant have specified typical roles by default:
- Global Manager - Can read and write all data from all devices
- Global Reader - Can read all data from all devices
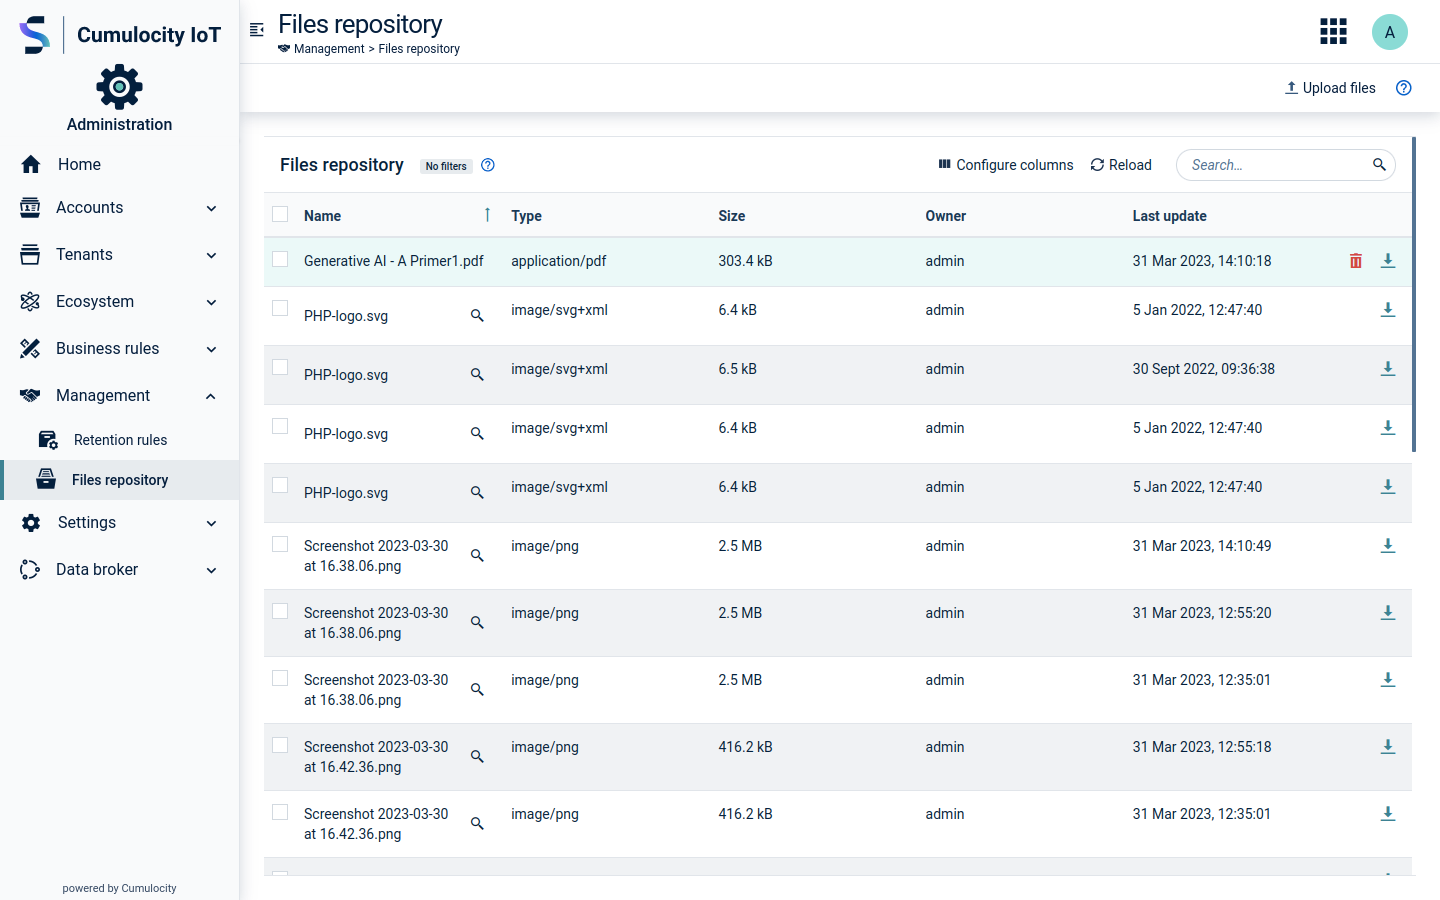
Click Files repository in the Management menu to see a list of files.
The files listed can come from various sources. They can be software images, configuration snapshots taken from devices, log files from devices or web applications uploaded from the All applications page.
For each file, the name of the file, its owner, its type (for example, image/bmp, text/csv), its size and its last update date are displayed. If file type is supported, you can click a magnifier icon next to the file name to preview it. You can download or delete a file by clicking action buttons which appear when hovering over the file row. Note that some files (for example, application archives) cannot be deleted from this page.
You can use filters or search input to look for particular files, see Search and filter functionality for details. By default, files are sorted by File name. To change the sorting, remove the default filter and define your own criteria for filtering the list.
To upload a file from your file system
Click Upload files in the top menu bar. In the resulting dialog box, select the files to be uploaded by browsing your file system or dropping the files. You can review the selected files in the displayed list and confirm the upload by clicking Upload.
To download a file from your account
Click the download icon at the right of the respective row.
To delete a file from your account
Hover your mouse over the row containing the file you want to delete, then click the delete icon at the right.
To delete multiple files
Select the checkbox next to each file you want to delete, or click the checkbox at the top of the table to select all displayed files. The table header shows the number of files selected and available actions. Click Delete and confirm the deletion.
Info
- If a file is an application archive, you cannot delete it from the files repository. Instead, you must delete this file from the applications details.
- If you delete files in bulk and your selection contains files not eligible for removal, the deletion will proceed while ignoring the files that cannot be deleted.
Latest measurement values
This section describes how to create a configuration for automated persistence of measurement values under the c8y_LatestMeasurements fragment.
How to enable it
Use the tenant options to create a category named measurement.series.latestvalue with a PUT request to a tenant options category.
Example:
PUT /tenant/options/measurement.series.latestvalue
{
  "c8y_Humidity.H":"", // to enable single series c8y_Humidity.H
  "c8y_Temperature.*":"" // to enable series under fragment c8y_Temperature
  // or "*":"" to enable all
}
where the key is a filter of measurement series that must be persistent and its value must always be an empty string (left for a future use case).
Important
Property names used for fragment and series must not contain whitespaces nor the special characters
$ & + , / : ; = ? @ " < > # % { } | \ ^ ~ [ ] `. This is necessary to ensure the new tenant option is processed correctly and saved successfully.How it works
If a measurement is created with a series that matches the configuration the device managed object is updated with the last series sent to the platform. Example:
If you send
POST /measurement/measurements
{
  "source":"5413"
  "time":"2024-02-01T10:00:00Z"
  "c8y_Temperature":{
     "T": {
        "value": 15,
        "unit":"C"
     }
  }
  "c8y_Speed":{
    "S": {
      "value": 15,
      "unit":"m/s"
    }
  }
}
then, considering the example configuration, only c8y_Temperature.T is stored as part of the device, while c8y_Speed.S is ignored.
This means, that the measurement is stored like before, only the state update is skipped.
To read the latest values on device level you must use the Inventory API and explicitly specify the withLatestValues parameter. For more information refer to the Cumulocity OpenAPI Specification.
To get a single device:
GET /inventory/managedObjects/5413?withLatestValues=true
{
   ...
   "c8y_LatestMeasurements":{
        "c8y_Temperature":{
           "T":{
             "value":15,
             "time":"2024-02-01T10:00:00Z",
             "unit":"C"
           }
        }
   }
}
To get a list of devices matching the expected criteria, for example, get all devices which have a reported temperature higher than 10 degrees:
GET /inventory/managedObjects?withLatestValues=true&query=$filter=c8y_LatestMeasurements.c8y_Temperature.T.value+gt+10
{
  managedObjects: [
    {
        ...
        "c8y_LatestMeasurements":{
            "c8y_Temperature":{
                "T":{
                    "value":15,
                    "time":"2024-02-01T10:00:00Z",
                    "unit":"C"
                }
            }
        }
    }
  ]
}
In scenarios where measurements are delayed in arriving (due to network latency or other factors), the system may incorrectly display them as the latest measurement, even though they are technically out of order.
To address this, the toggle strongConsistency is provided. When this value is set, the out-of-order measurements will not be shown as the latest data for the device, regardless of when they were actually received. Instead, only measurements that arrive in the correct order will be treated as the latest, ensuring that the most accurate, timely data is always presented.
The toggle can be set individually for each measurement fragment to allow fine-grained control over which measurement fragments are affected:
PUT /tenant/options/measurement.series.latestvalue
{
    "c8y_Humidity.H": "",
    "c8y_Temperature.*": "strongConsistency"
}
or it can be set globally, which will apply the setting to all measurement fragments from the device:
PUT /tenant/options/measurement.series.latestvalue
{
    "c8y_Humidity.H": "",
    "c8y_Temperature.*": "",
    "*": "strongConsistency"
}
It’s important to note that setting strongConsistency may slightly slow down the measurement injection process, as the system now needs to check the arrival time of each measurement to determine if it is delayed. This ensures that outdated or late data does not interfere with the integrity of the latest measurement display.
Previous measurements values
How to configure it
This functionality enables the storage and querying of measurement values that have the second most recent arrival time. Retrieving not only the most recent value but also the one before is often necessary — for example, to calculate trends or detect changes over time.
By default, this feature is enabled globally, but it can be configured at the tenant level via an API request.
To manage automated persistence of previous measurement values on tenant level use the tenant options to create a new category named measurement.series.previousvalue.enabled with a PUT request to a tenant options category.
Example:
POST /tenant/options/

 {
    "category": "configuration",
    "key": "measurement.series.previousvalue.enabled",
    "value": "true" //or "false" if the functionality needs to be disabled for a specific tenant
}
How it works
To retrieve previous values at the device level, you must use the Inventory API and explicitly include the withLatestValues parameter. For more information refer to the Cumulocity OpenAPI Specification.
The measurements returned belong to a series that matches the configuration of the latest values, allowing you to access both the most recent and previous measurements within the same series:
GET /inventory/managedObjects/5413?withLatestValues=true
{
   ...
   "c8y_LatestMeasurements":{
        "c8y_Temperature":{
           "T":{
             "value":15,
             "time":"2024-02-01T10:00:00Z",
             "unit":"C"
           }
        }
   },
    "c8y_PreviousMeasurements": {
        "c8y_Temperature": {
            "T": {
                "value": 30,
                "time": "2024-02-01T09:00:00Z",
                "unit": "C"
            }
        }
    }
}
Implications & precondition
This feature introduces an additional operation upon measurement creation. This results in performance degradation, depending on the number of series stored per measurement, reaching from 5% for single series in each measurement to more than 20% in case of 50 series per measurement. Such drawback applies if the text index is disabled. In other cases, the performance degradation can be much higher, up to more than 100%. Therefore disabling the text index is considered as a precondition.
Limitations
Security
The latest measurement values are part of the managed object and they follow the managed object inventory role permissions instead of respecting the inventory roles for measurements.
Data model
The latest measurements do not store the measurement type. This information can be obtained using the Measurements API.
Last value
The value stored in the device managed object is the last value sent to the platform.
If measurements are delivered to the platform in a different order than their creation time,
then the latest values may be affected — unless the strongConsistency toggle is enabled.