Using the data broker
The data broker lets you share data selectively with other tenants. You can share:
- Devices (and more generically, managed objects)
- Events
- Alarms
- Measurements
- Operations
Requirements
To be able to use this feature, your tenant must be subscribed to the application “feature-broker”.
Navigate to Data connectors in the Data broker menu if you would like to send data to another tenant. Navigate to Data subscriptions, if you would like to receive data from another tenant.
Important
Devices that are forwarded using the data broker are charged like normal devices in the destination tenant.
Limitations
Be aware of the following limitations of the data broker:
- Cloud Remote Access cannot be used on the destination tenant.
- The Management tenant cannot be used as data broker source tenant.
- Currently, the Fieldbus widget does not work on tenants that receive the fieldbus devices through data broker, as the corresponding data models are not synchronized.
- Event attachments are not forwarded to destination tenants.
- Data broker does not guarantee the same order of messages on destination tenants as it was on the source tenant.
- While we provide backwards compatibility, we cannot ensure that data broker can send data to Cumulocity tenants which run on earlier Cumulocity versions than the source.
Data connectors
A data connector describes the subset of the data that you would like to send to a destination tenant as well as the URL of that destination tenant.
To view data connectors
Click Data connectors in the navigator to see a list of all currently defined data connectors with their status.

For each data connector, the following information is provided:
- The data connector’s name
- Its destination tenant
- Description if provided, “None” displayed otherwise
- The status of the connector
- The number of filters set for the data connector
Use the toggle to enable and disable data forwarding to the destination tenant. If data is being forwarded, the toggle reads “Active”. If data is not being forwarded, the toggle reads “Suspended” or “Pending”. “Suspended” means that you have disabled forwarding. “Pending” means that the destination tenant has disabled forwarding.
Info
If the source tenant has been suspended all its data broker connectors will be suspended as well.
To add a data connector
-
Click Add data connector in the top menu bar.
-
In the Settings tab, provide the following information to create a new data connector:
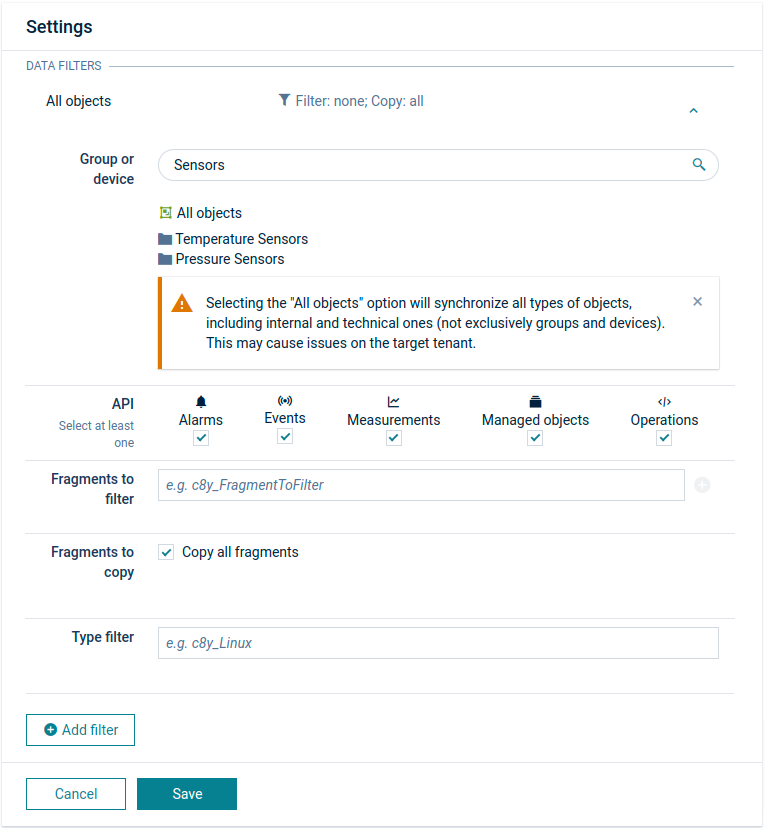
Field Description Title The name of the data connector. Target URL for data connector The URL of the tenant to which data will be forwarded. Once saved, you cannot edit this value anymore. Description A textual description of the configuration. Both the name and the description will be visible on the destination side after accepting the subscription. Data filters A set of filters that define what is copied to the destination. You must configure at least one filter. -
Click Add filter to configure a new filter.
-
Each data filter contains the following information:
Field Description Group or device The group or device that is forwarded. If you select a group here all subgroups and subdevices of this group will be forwarded. See the warning below on the usage of All objects. API The type of data being forwarded (alarms, events, measurements, managed objects) or being received (operations). Fragments to filter The fragments that must be present in the message payload for it to be forwarded. Fragments to copy The fragments that are copied to the destination. If nothing is specified here, only standard properties of managed objects, alarms, events and measurements are forwarded (see below). Select Copy all fragments to forward the entire object. Type filter Forwarded data must have this value in its "type" property. -
Click Save to save the configuration.
Important
The option All Objects is left in the UI to ensure backward compatibility with older versions. We intend to deprecate it and we strongly recommend to not use this option.
When selected, Cumulocity will synchronize all types of objects, system as well as user-defined, and might override, or create out of context, objects in the destination tenant. Such objects may contain references to other objects and also configuration information. It is the user’s responsibility to check and ensure consistency of such information in the transferred objects in the target environment.
This concerns items such as SmartREST templates, device protocols, smart rule configurations and dashboards.
For example, when you create a smart rule on the source tenant and you synchronize all objects, then the data broker creates a smart rule managed object on the destination tenant. The rule itself is not copied, because a synchronized smart rule would perform the same action on the same device for the same configuration. That would create duplicate emails for the same recipients when an alarm occurs.
If the Group or device field is filled in, the entire descendant structure of the inventory is forwarded to the destination as soon as the connector stays active. if the Group or device field is empty or set to “all” the descendant structure of the inventory is not forwarded; in this case the filter works in “lazy” mode, meaning it forwards the device or asset along with its first event/measurement/alarm.
If operation API is checked in filters, operations created in the target tenant will be forwarded to the source tenant. This applies only to operations that meet the following conditions:
- The operation’s device itself is a result of forwarding data.
- The operation matches other filter criteria.
Updates of the operation status coming from the source tenant will be forwarded to the destination tenant.
The heading of a data filter summarizes the configuration in one line. The standard properties that are copied by default are:
- For created alarms: type, text, time, severity, status
- For updated alarms: status, text, severity
- For created events: type, text, time
- For created measurements: type, text, time
- For created and updated devices: type, name, c8y_IsBinary, c8y_IsDeviceGroup, c8y_IsDevice, c8y_DeviceGroup, c8y_DeviceSubgroup, c8y_SmartRule, c8y_DynamicGroup, c8y_DeviceQueryString
- For updated operations: status
After saving the configuration, you will see a security code displayed below your configuration. The security code prevents unintended forwarding of data. You must communicate this security key separately to an administrative user of the destination tenant. You can click the copy icon next to the security code to copy the code to your clipboard.
To edit a data connector
Click the connector title, or click the menu icon at the right of a data connector entry and then click Edit.
In the Settings tab, edit the data connector configuration.
See To add a data connector for details on the settings.
To duplicate a data connector
Click the menu icon at the right of a data connector entry and then click Duplicate to create another data connector with the same configuration.
To delete a data connector
Click the menu icon at the right of a data connector entry and then click Delete to stop data forwarding and delete the data connector.
Info
A data connector can also be deleted from the Settings tab of a connector configuration.
To view alarms for a data connector
Open a data connector and switch to the Alarms tab to display current alarms for the data connector.
For details on data broker alarms, see Troubleshooting.
For details on alarms in general, see Working with alarms.
Data subscriptions
In the Data subscriptions page, you can manage existing data subscriptions or create new ones.
To view subscriptions
Click Data subscriptions to see a list of all currently defined data forwarded to your tenant.
For each subscription, the name, the target tenant and the status (enabled or disabled) is provided on a card.
Use the toggle to temporarily stop forwarding data into your tenant.
To set up data forwarding on the receiving end
- Click Add data subscription in the top menu bar to receive data.
- In the new card, enter the security code that you received from the sending end of the data.
- When the connection is established, click Accept to start forwarding data into your tenant. The subscription is active now.
- You can use the toggle in the card to temporarily stop forwarding data into your tenant.
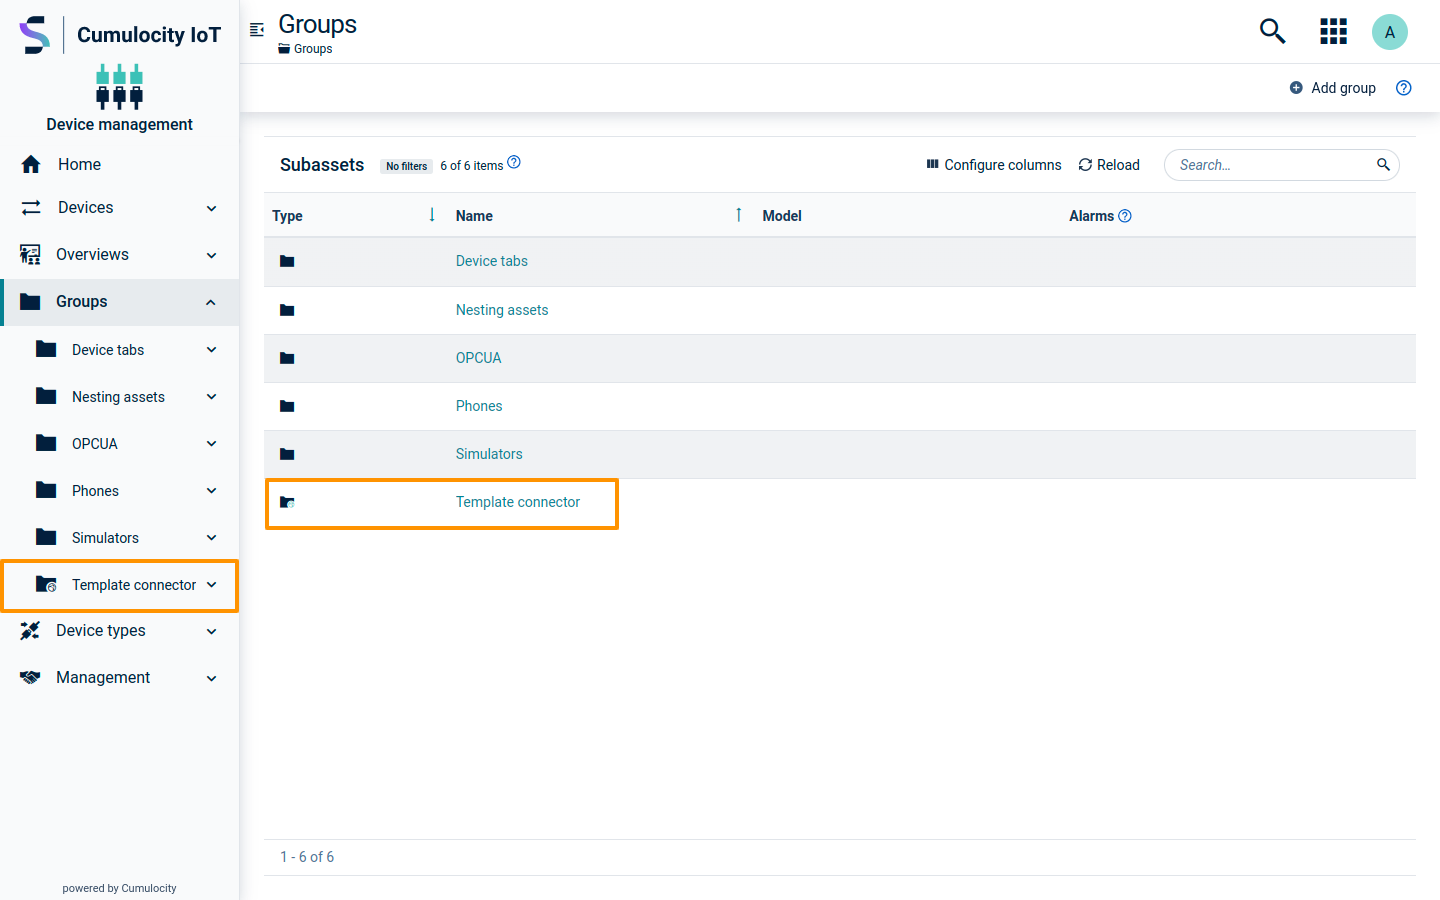
You can now navigate to the Device Management application or the Cockpit application. You will find a new “virtual group” with a specific icon showing the forwarded devices. The group will have the same name as your subscription. Devices are “lazily” created on the destination side whenever they send data for the first time after setting up an active subscription.
To delete a data connector
Click the menu icon and then click Delete to stop data forwarding and delete the data connector.
Troubleshooting
If the data broker is not able to connect to a destination tenant, a CRITICAL alarm is raised, showing the connector which is affected.
Queue overflow
On the source tenant, data broker queues data that cannot be forwarded immediately to the destination tenant. The amount of data that can be queued is limited. If Cumulocity cannot queue any further data, the oldest queued data is dropped. In this case, a MAJOR alarm is raised in the tenant, showing the connector which is affected.
Similarly, an alarm is raised when the input queue is overflown.
To reduce the number of alarms, alarms are not triggered more often than once per minute.