The MQTT implementation of Cumulocity provides the following benefits:
Multi-tenancy support: A single endpoint serves multiple tenants.
Device identity management: Devices authenticate using device-specific credentials.
Device registration: Non-personalized devices can be deployed by pairing them with Cumulocity tenants.
Device management: Rich, pre-defined device management payload formats to enable out-of-the-box management of millions of devices.
Standard IoT payload formats: Pre-defined payload formats to support IoT sensor readings, alarm management, remote control and device hierarchies.
Custom payload formats: Additional payload formats can be added.
Minimum traffic overhead.
Processing modes: Control whether data is persisted in Cumulocity database, transiently passed to real-time processing, processed using quiescent mode which ensures that real-time notifications are disabled or is processed using CEP mode that ensures data is transiently sent to real-time processing engine only with real-time notifications disabled.
This section does not describe the basics of MQTT communication. If you are unfamiliar with MQTT, we recommend you to consult one of the numerous introductions in the Internet. Some references can be found on the MQTT website.
Info
For all MQTT connections to the platform, the maximum accepted payload size is 16184 bytes (16KiB), which includes both message header and body. The header size varies, but its minimum is 2 bytes.
MQTT implementation
This section lists the implementation details for the MQTT protocol. The Cumulocity implementation supports MQTT Version 3.1.1.
Connecting via MQTT
Cumulocity supports MQTT both via TCP and WebSockets. As URL you can use the domain of the instance in the format mqtt.<instance_domain> (for example mqtt.cumulocity.com) or your tenant domain (for example mytenant.cumulocity.com/mqtt).
Available ports:
TCP
WebSockets
SSL
8883
443
no SSL
1883
80
Info
Port 80 is deactivated in cloud systems.
Port 8883 supports two types of SSL: two-way SSL using certificates for client authorization and one-way SSL using username and password for client authorization.
The two-way SSL support is enabled by default. To disable it please contact product support.
Info
To use WebSockets you must connect to the path /mqtt and follow the MQTT standard for WebSocket communication.
SmartREST payload
The Cumulocity MQTT implementation uses SmartREST as a payload.
SmartREST is a CSV-like message protocol that uses templates on the server side to create data in Cumulocity.
It incorporates the highly expressive strength of the REST API but replaces JSON with comma-separated values (CSV) to avoid the complexity of JSON parsing for embedded devices.
Additionally, the simple and compact syntax of CSV renders it highly efficient for IoT communication via mobile networks.
It can save up to 80% of mobile traffic compared to other HTTP APIs.
Info
For all MQTT connections to the platform, the maximum accepted payload size is 16184 bytes, which includes both message header and body. The header size varies, but its minimum is 2 bytes.
SmartREST basics
A SmartREST message is a single row in which each parameter is separated by comma. The first parameter is an ID that defines the message. You can send multiple messages in a single publish by using a line break between messages.
SmartREST escaping
The CSV (comma-separated values) format is used for communication with the SmartREST endpoint. The following rules must be followed to ensure a frictionless communication.
Every row must be terminated by the \n character sequence.
Values are always separated by a comma (,).
If a value contains double-quotes ("), commas (,), leading or trailing whitespaces, line-breaks (\n), carriage returns (\r) or tab stops, it must be surrounded by quotes ("). Contained double-quotes (") must be escaped by prepending a backslash (\).
The same escaping rules apply to messages that will be sent from the server to the client.
Publish example:
100,"This value, needs escaping",This value does not need escaping
\n does not create a new line in the output (for example console, UI); to achieve this, a new line character (ASCII 0A) must be used.
Device hierarchies
MQTT sessions are linked to a single device, but this device can have a freely configurable device hierarchy below it.
All children require a unique ID defined when creating the device. We recommend you to use a combination of the unique ID of the root device and a unique ID within the hierarchy.
To create data for a child instead of the root device, the unique ID of the child is added as another section in the topic (for example s/us/myChildDeviceIdentifier).
The client will automatically receive operations for every child in the hierarchy by subscribing to the respective topic. It is not required to subscribe for each child.
Every operation received will contain the template ID followed by the ID of the device/child for which the operation was created (followed by other operation parameters).
MQTT features
MQTT authentication
The communication with Cumulocity employing MQTT supports authentication in two ways:
Username and password. The MQTT username must include the tenant ID and username in the format <tenantID/username>.
Device certificates. The devices must contain the whole chain of certificates leading to the trusted root certificate. Also, they must contain the server certificate in their truststore.
Troubleshooting
A device sends correct username and password, but incorrect certificate at the same time
If the platform is configured to support two-way SSL, your devices have a configured keystore with invalid certificates, and you want to use basic authorization, we recommend you to turn off sending certificates during connection.
Certificates may be invalid because they expired or the root certificate is not uploaded to the platform.
Turn off certificate sending in the device’s software.
If that is not possible, to make the connection work, check the following:
The platform’s trust store cannot be empty. At least one trusted certificate must be uploaded to the platform.
The device’s MQTT client must be configured to not send certificates if it does not find its root certificate in the accepted issuers list returned by the server during handshake. In most cases this happens automatically. It is known that it’s not working with the MQTT client and Java 11. However, it works with Java 8.
In order to support this situation, the platform must be configured accordingly. In case you experience issues please contact product support.
If all of the cases above are met and the device connection is still rejected due to certificates validation, then probably some other tenant uploaded a certificate with the same ‘Common Name’ as one of those sent by your device. In this case the device will always try to authorize itself with certificates.
MQTT ClientId
The MQTT ClientId is a field to uniquely identify each connected client. The Cumulocity implementation also uses the ClientId to link the client directly to a device. Therefore, the following format should be used for the ClientId:
The uniqueness of the MQTT ClientId is determined only by the deviceIdentifier. Therefore, from the above examples only one client can be connected at the same time.
During an SSL connection with certificates, the deviceIdentifier must match the ‘Common Name’ of the used certificate (first certificate in the chain, which is provided by the device).
MQTT Quality of Service (QoS)
The Cumulocity implementation supports all 3 levels of MQTT QoS:
QoS 0: At most once
The client just sends the message once (fire and forget).
No reaction from the server.
QoS 1: At least once
The client repeats the message until it receives a server acknowledgement.
QoS 2: Exactly once
The client sends a message.
The server acknowledges (holds the message).
The client sends a release command.
The server processes the messages and acknowledges again.
For subscriptions to the operation or error topics, we will deliver all messages in the QoS which the client defined when subscribing to the topic.
MQTT clean session
Cumulocity requires clean session to be set to “1” (true). Currently we cannot guarantee that disabling clean session will work reliably, hence we recommend you to always enable clean session.
MQTT retained flag
In the current Cumulocity implementation, subscriptions to topics where devices publish data are not allowed. Publishing data with the retained flag on this topic is allowed but has no practical difference to sending it without the flag.
Messages published by Cumulocity like operations and errors do not contain the retained flag.
MQTT last will
In MQTT, the “last will” is a message that is specified at connection time and that is executed when the client loses the connection. For example, using 400,c8y_ConnectionEvent,"Device connection was lost." as last will message and s/us as last will topic, raises an event whenever the device loses the connection.
Info
The execution of the “last will” updates the device availability.
MQTT return codes
When there is an MQTT error, the platform responds with a CONNACK message with a non-zero return code.
This message is the first clue that there is a problem.
Such a return code can be treated similarly to REST API HTTP codes, such as 401.
They can be returned because of an unexpected error, lack of permissions, and so on.
CONNACK is not only a response to a CONNECT message, but also a way to signal errors that occurred in the platform.
Therefore, it is possible to receive this message a second time during a normal connection, and without a direct action.
It is also a way to signal a closing connection, as most MQTT clients treat CONNACK with a code other than 0 like the connection needs to be closed.
See the details below.
The table below shows the list of errors returned by Cumulocity:
Code
Canonical message
Troubleshooting
0
Connection accepted
No issue, connection is working.
1
Connection refused, unacceptable protocol version
Unsupported version of the MQTT protocol. Currently, Cumulocity only allows 3.1 and 3.1.1.
2
Connection refused, identifier rejected
ClientId is not accepted by the platform.
3
Connection refused, Server unavailable
General platform side error, used on internal errors and unknown authorization problems. Can be received on network issues. The error should be temporary and independent of device state, therefore the usual solution to this is to try again later.
4
Connection refused, bad username or password
Incorrect credentials (wrong username and/or password, but not on empty password). This error is never returned when authenticating with certificates.
5
Connection refused, not authorized
Mostly a device side related problem, used when the device doesn’t have permissions or is doing something forbidden. For example, if the client sends malformed messages or tries to execute an operation without authenticating first, such as publishing a message. Thrown on any issue with certificate authentication (for example, wrong common name, failed auto registration). Also thrown on general issues with receiving device data or some other authorization problem related to the device state on the platform. For example, device managed object problems, or the sudden removal of permissions. In this situation it may be required to take action on the platform to investigate and apply a fix. When clientId is too long the user can receive this error when using 3.1 version of MQTT. This can happen if clientId has 24 characters or more. Lastly, it can also be thrown on unexpected exceptions like performance issues, especially during connection. Therefore it is a good approach to repeat the connection a few times to overcome temporary performance issues.
To support developers during development, it is possible to subscribe to the topic s/e. On this topic the device can retrieve debug and error messages that occur during a publish from the device.
Info
This topic is purely designed to support the development of clients. It is not recommended to always subscribe to this channel as the messages are verbose and can significantly increase the data usage. Also, you should not use this topic to trigger actions of the device based on what you receive on the topic. It is not a response channel.
MQTT broker certificates
MQTT broker uses the certificates which are assigned to the main environment domain. MQTT broker always sends these certificates during TLS handshake to devices.
Moreover, Enterprise tenants are not able to customize MQTT broker certificates via the SSL Management feature.
Device certificates
Overview
Devices can authenticate against the Cumulocity platform using X.509 client certificates.
Devices can communicate using the MQTT interface of the platform, but MQTT over WebSocket is not supported. The Cumulocity platform expects devices to connect using SSL on port 8883.
Each tenant individually defines whom it trusts by uploading the base CA certificate.
Devices connecting to the platform with certificates do not need to provide the tenant ID, username and password. Authentication information will be obtained from the certificates.
General requirements for connecting devices with certificates
The CA certificate may also be a self-signed certificate.
Certificates must be uploaded as X.509 version 3 certificates.
Uploaded certificates must have set BasicConstraints:[CA:true].
The certificate’s common name should not contain : characters, see MQTT ClientId for more information.
Devices must trust the Cumulocity server certificate.
Certificates used by devices must contain the certificate chain that includes the uploaded CA certificate.
Certificates used by devices must be signed either by uploaded CA certificates or by intermediate certificates signed by uploaded CA certificates.
Registering devices using certificates
Cumulocity supports two ways to register devices which will be able to connect using certificates:
Auto registration
The user for the device will be created during the first MQTT call, if a device certificate is derived from a trusted certificate which was uploaded to the Cumulocity platform with a flag autoRegistrationEnabled with a value of true.
Auto-registration must be activated for the uploaded certificate.
If auto-registration is not activated it is required to use the bulk registration (see below).
To manage the auto registration field of uploaded certificates in the UI refer to Managing trusted certificates.
Bulk registration
The user for the device can also be created via the standard bulk registration in the Device management application.
The CSV file used in bulk registration should meet the requirements described in Create a bulk device credentials request in the Cumulocity OpenAPI Specification. Moreover, it is required that the CSV file has an additional column AUTH_TYPE with value CERTIFICATES, and that the column CREDENTIALS is either not present or has an empty value.
Single registration
Single registration is not supported for devices which are going to use certificates for authentication.
Info
During device registration, the device user is created, which is necessary for device communication with the platform.
JWT token retrieval
A device which is authenticated by certificates and connected to the Cumulocity platform can receive a token which can later be used to authenticate HTTP requests.
First the device subscribes to the topic s/dat.
Then the device publishes an empty message on the topic s/uat.
After a while a token will be published on the subscribed s/dat topic in the format:
71,<<Base64 encoded JWT token>>
A device token lifetime can be configured using tenant options with a category of oauth.internal and a key of device-token.lifespan.seconds.
The default value is 1 hour.
The minimum allowed value is 5 minutes.
Refer to the Tenant API in the Cumulocity OpenAPI Specification for more details.
A device can fetch a new device token before the old one expires, if it request a JWT token after half of the token’s lifetime has passed.
Caution
A device can only subscribe to a topic like s/dat once certificate based mutual authentication is successful. The MQTT broker will not make any information available on the device’s subscribed topics until the device publishes a message to s/uat or s/us.
Introduction to X.509 certificates
X.509 is a standard that defines public key certificates, which are commonly used in the SSL protocol to provide secure connection and data transfer.
Version 3 is up-to-date since 1995.
The general purpose of an X.509 certificate is to bind an identity to a pair of keys: the public key is publicly known as a part of the certificate while the private key is known only by the certificate owner.
Such pairs of keys should be created with an asymmetric-key algorithm, which is considered secure nowadays.
An example of such an algorithm is RSA with at least 2048 bits key size.
A size of 1024 bits or lower is no longer considered safe.
A private key can be used in two ways:
To prove that the message was sent by the certificate owner - The owner encrypts some message with his private key and sends it. Then the receiver can decrypt it with the sender’s public key. If the decrypted message matches his expectation, then he can be sure that it was sent by the certificate owner.
To read a message intended only for the certificate owner - If someone encrypts the message with receiver public key, then only the owner of the private key would be able to decrypt it. No third party who somehow intercepted the message will be able to read it.
Every certificate can be self-signed or can be signed by another certificate.
To tell if the certificate is self-signed you can look at the “Issuer Name” and “Subject Name” fields of the certificate.
If they are the same then it means that it is a self-signed certificate, otherwise the certificate claims to be signed by the issuer.
To verify if the issuer really signed the certificate, you must check the “Signature” field of the certificate.
After decryption with the issuer’s public key, the signature should match the data of the signed certificate.
Signing a certificate by another, means that if the issuer’s certificate is trusted then the signed certificate also can be trusted.
For example if a platform trusts the customer certificate and that customer has 20 devices with individual certificates, then he does not have to upload each one of them.
If these device certificates are signed by the customer certificate, then the platform should trust them too.
In this case, every device should send not only its own certificate, but the whole chain of certificates (so-called chain of trust) during the SSL handshake.
The chain of certificates starts with the one belonging to the device, through all used intermediate certificates until it reaches the CA certificate trusted by the platform.
Usually the chain of certificates does not have to contain the trusted CA certificate, so it can end with the certificate signed directly by the CA.
However, in the Cumulocity platform it is also required to provide the trusted CA certificate in the chain of certificates.
Providing the chain of certificates lets the platform verify the signatures of every certificate in the chain to make sure that the device certificate is signed directly or indirectly by the trusted certificate.
The chain of the certificates can differ in length, so if the platform trusts certificate A and certificate B is signed by A, and certificate C is signed by B, then certificate C will also be trusted.
However, there are a few things to keep in mind:
Every certificate which is used to sign another certificate must contain the extension “CA:TRUE”.
The lengths of the chain of certificates can be restricted by the certificate extension “pathlen”. This extension limits the amount of other CA certificates that can be placed in the chain between the device certificate and the one with that extension. For example the valid chain of the certificates with minimal values of path length would look like this: “A (CA:TRUE, pathlen: 2) -> B (CA:TRUE, pathlen: 1) -> C (CA:TRUE, pathlen: 0) -> D (device with CA:FALSE)”".
The structure of an X.509 certificate in version 3 looks like this:
Version - The version number of the x.509 certificate,
Serial Number - Unique serial number that is created for each certificate that is created by an issuer,
Issuer - The distinguished name of the issuer,
Not Before - Date since the certificate is valid,
Not After - Date since the certificate is expired,
Subject - Distinguished name of the certificate’s owner,
Public Key Algorithm - Algorithm used to generate the public key,
Subject Public Key - Public key value,
Certificate Signature Algorithm - Algorithm used to generate the certificate signature,
Certificate Signature - Certificate signature generated by encrypting certificate data with the issuer’s private key,
Extensions - optional; they are responsible for providing various pieces of information, for example if the certificate is CA, which means that it can be used to sign another certificate. Added in version 3 of X.509,
Issuer Unique Identifier - optional; can be present in the certificate to handle the possibility of reuse of issuer names,
Subject Unique Identifier - optional; can be present in the certificate to handle the possibility of reuse of subject names.
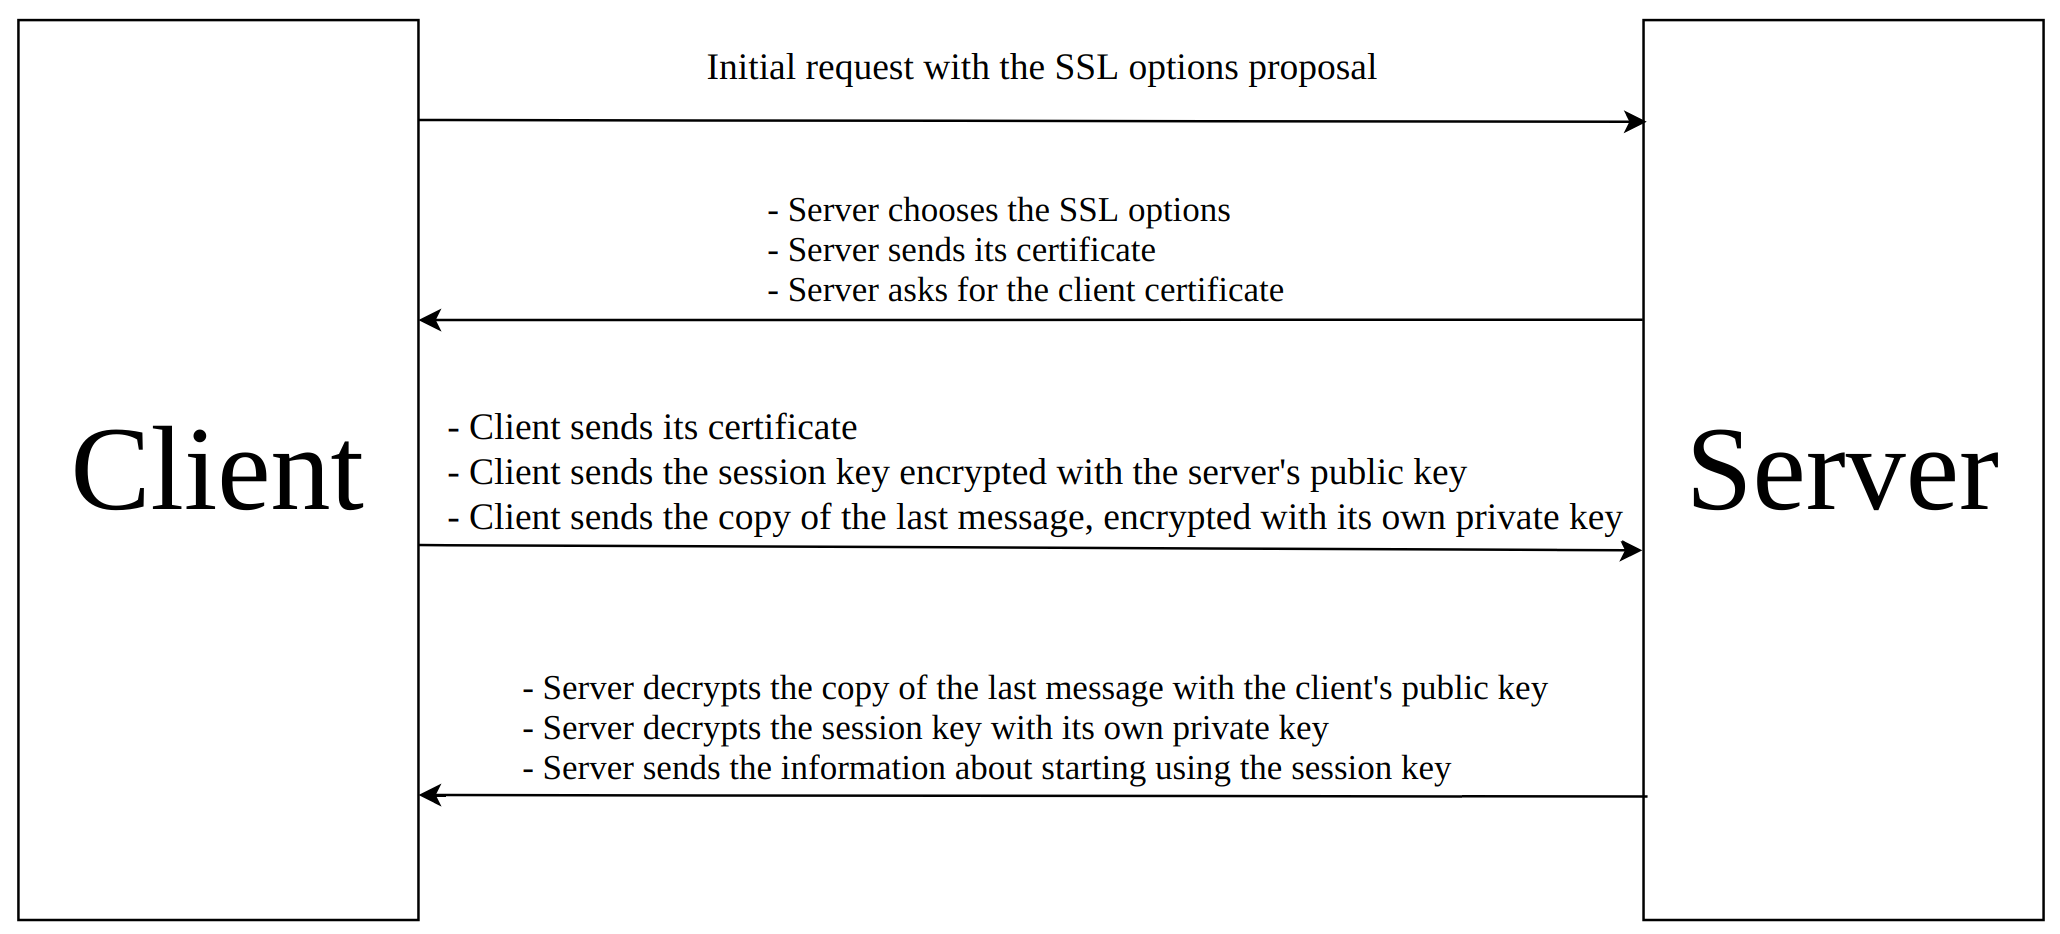
To show how the authentication with X.509 certificates works, there is an example of the simplified mutual SSL handshake:
A server knows that the client is the owner of the certificate it sent, after the server has decrypted the encrypted copy of the message using the client’s public key.
The client knows that the server is the owner of the certificate it sent, if the server uses the correct session key, because that means that the server decrypted it with its private key.
In basic authentication with username and password, the password must be sent over the network to authenticate the user.
When certificates are used, the private key is never sent, which makes the use of the certificates much more secure than the basic authentication with username and password.
There are 3 important terms related to X.509 certificates, which everyone should know who wants to start working with them:
Keystore is a file which a device uses to authenticate itself in the mutual SSL handshake. That means that keystore contains the chain of the certificates used by the device and the private key of the device.
Truststore is a file which contains all trusted certificates. A server or device would only establish a connection with something that is using a certificate from their truststore. When the chain of certificates is used, only one of the certificates in the chain must be trusted to establish the connection.
Certificate Authority (CA) in the simplest sense is an entity that signs certificates.
Both keystore and truststore can be stored in the same file, but for security reasons we recommended you to keep them separately.
The truststore contains public data and the keystore contains the private key, which only to the owner should know.
The most popular formats for these files are:
PKCS12 (Public Key Cryptography Standards, version 12), which can be generated using the OpenSSL toolkit.
JKS (Java KeyStore), which can be generated with the Java Keytool.
Generating and signing certificates
To generate certificates we use the OpenSSL toolkit. If you do not have it already installed, then you can download if from the website: https://www.openssl.org/source/
Creating a self-signed CA certificate
Create a directory for the root certificate and the signing configuration, for example:
mkdir /home/user/Desktop/caCertificate
Go to the created directory and create a configuration file for your CA certificate:
touch caConfig.cnf
Create a database file for keeping the history of certificates signed by the CA:
touch database.txt
Create a serial file with initial serial number, which will be used to identify signed certificates. After assigning this serial to the signed certificate, the value in this file will be automatically incremented:
echo 1000 > serial
Create subdirectories for signed certificates and the certificate revocation list:
mkdir deviceCertificates crl
Fill in the configuration file. This is the example configuration, which can be used for tests after changing the directory dir to your own. If you want to use it in the production environment then please consult it first with some security specialist:
[ ca ]
default_ca = CA_default
[ CA_default ]
# Directory and file locations.
dir               = /home/user/Desktop/caCertificate
certs             = $dir # directory where the CA certificate will be stored.
crl_dir           = $dir/crl # directory where the certificate revocation list will be stored.
new_certs_dir     = $dir/deviceCertificates # directory where certificates signed by CA certificate will be stored.
database          = $dir/database.txt # database file, where the history of the certificates signing operations will be stored.
serial            = $dir/serial # directory to the file, which stores next value that will be assigned to signed certificate.

# The CA key and CA certificate for signing other certificates.
private_key       = $dir/caKey.pem # CA private key which will be used for signing certificates.
certificate       = $dir/caCert.pem # CA certificate, which will be the issuer of signed certificate.

default_md        = sha256 # hash function
default_days      = 375 # default number of days for which the certificate will be valid since the date of its generation.
preserve          = no # if set to 'no' then it will determine the same order of the distinguished name in every signed certificate.
policy            = signing_policy # the name of the tag in this file that specifies the fields of the certificate. The fields must be filled in or even match the CA certificate values to be signed.

# For certificate revocation lists.
crl               = $crl_dir/caCrl.pem # CA certificate revocation list
crlnumber         = $crl_dir/crlnumber # serial, but for the certificate revocation list
crl_extensions    = crl_ext # the name of the tag in this file, which specifies certificates revocation list extensions, which will be added to the certificate revocation by default.
default_crl_days  = 30 # default number of days for which the certificate revocation list will be valid since the date of its generation. After that date it should be updated to see if there are new entries on the list.

[ req ]
default_bits        = 4096 # default key size in bits.
distinguished_name  = req_distinguished_name # the name of the tag in this file, which specifies certificates fields description during certificate creation and eventually set some default values.
string_mask         = utf8only # permitted string type mask.
default_md          = sha256 # hash function.
x509_extensions     = v3_ca # the name of the tag in this file, which specifies certificates extensions, which will be added to the created certificate by default.

# descriptions and default values of the created certificate fields.
[ req_distinguished_name ]
countryName                     = Country Name (2 letter code)
stateOrProvinceName             = State or Province Name
localityName                    = Locality Name
organizationName                = Organization Name
organizationalUnitName          = Organizational Unit Name
commonName                      = Common Name
emailAddress                    = Email Address

# A default value for each field can be set by adding an extra line with field name and postfix "_default". For example: "countryName_default = PL". If you add this line here, then leaving country name empty during certificate creation will result in the value "PL" being used. If the default value was specified there, but during certificate creation you do not want to use this value, then instead use "." as the value. It will leave the value empty and not use the default.

# default extensions for the CA certificate.
[ v3_ca ]
subjectKeyIdentifier = hash # subject key value will be calculated using hash funtion. It's the recommended setting by PKIX.
authorityKeyIdentifier = keyid:always,issuer # The subject key identifier will be copied from the parent certificate. It's the recommended setting by PKIX.
basicConstraints = critical, CA:true, pathlen:10 # "critical" specifies that the extension is important and must be read by the platform. CA says if it is the CA certificate so it can be used to sign different certificates. "pathlen" specifies the maximum path length between this certificate and the device certificate in the chain of certificates during authentication. Path length is set here only to show how it is done. If you do not want to specify max path length, you can keep only the "basicConstraints = critical, CA:true" part here.
keyUsage = digitalSignature, cRLSign, keyCertSign # specifies permitted key usages.

# Default extensions for the device certificate. This tag is not used directly anywhere in this file, but will be used from the command line to create signed certificate with "-extensions v3_signed" parameter.
[ v3_signed ]
subjectKeyIdentifier = hash
authorityKeyIdentifier = keyid,issuer
basicConstraints = critical, CA:false
keyUsage = nonRepudiation, digitalSignature, keyEncipherment

# default extensions for certificate revocation list
[ crl_ext ]
authorityKeyIdentifier=keyid:always

# Policy of certificates signing. It specifies which certificate fields must be filled in during certificate creation. There are three possible values here:
# "optional" - field value can be empty
# "supplied" - field value must be filled in
# "match" - signed certificate field value must match the CA certificate value to be created
[ signing_policy ]
countryName             = optional
stateOrProvinceName     = optional
organizationName        = optional
organizationalUnitName  = optional
commonName              = supplied # every certificate should have a unique common name, so this value should not be changed.
emailAddress            = optional
Create a private key with aes256 encryption and a length of at least 2048 bits. You will also be asked to set the password for the key during its creation:
openssl genrsa -aes256 -out caKey.pem 4096
Create a self-signed certificate using specifications from the configuration file. The “days” parameter says how long this certificate will be valid since the generation, so set it as you prefer:
You can print the created certificate with the command:
openssl x509 -noout -text -in caCert.pem
Creating an intermediate certificate
The intermediate certificate is signed by the CA certificate, but will also be used to sign device certificates.
This step is optional.
If you are fine with signing all the device certificates with one common CA certificate, then you can skip this step.
However, if you need some certificates between the CA certificate and the device certificate then it is the way to go.
Keep in mind that in the Cumulocity cloud the maximum length of the chain of certificates is currently restricted to 10.
This behaviour can be changed for dedicated installations by changing a platform wide configuration setting and increasing (or decreasing) the allowed maximum length of the chain of certificates to more (or less) than 10.
If you use a chain with a length greater than 2, we strongly recommend you to use the proof of possession feature to protect your service from DOS attacks.
To create the intermediate certificate:
Create a new directory for intermediate certificates inside the caCertificate path: mkdir intermediateCertificate
Go to this directory and create a configuration file for your intermediate certificate: touch intermediateConfig.cnf
Create a database file for keeping the history of certificates signed by the intermediate certificate: touch database.txt
Create a serial file with initial serial number, which will be used to identify signed certificates: echo 1000 > serial
Create subdirectories for the signed certificates and the certificate revocation list: mkdir deviceCertificates crl
Fill in the configuration file as in the CA configuration, but remember to change the general directory (“dir”) to your intermediateCertificate folder. Also don’t forget to change private_key, certificate and crl names from current with “ca” prefix to “intermediate” prefix (for example: caKey.pem -> intermediateKey.pem), because files with this prefix will be generated in the next steps.
Generate a private key for the intermediate certificate: openssl genrsa -aes256 -out intermediateKey.pem 4096
Go to the caCertificate directory and generate a signed intermediate certificate. You must use the CA configuration here, because the private key specified in the configuration file will be used to sign the certificate: openssl ca -config caConfig.cnf -extensions v3_ca -days 3650 -notext -md sha256 -in intermediateCertificate/intermediateCsr.pem -out intermediateCertificate/intermediateCert.pem
Verify if the generated certificate is correctly signed by CA: openssl verify -CAfile caCert.pem intermediateCertificate/intermediateCert.pem
Creating a device certificate signed by CA or intermediate
Go to the directory of your caCertificate or intermediateCertificate depending on which one is used to sign the device certificate.
Generate the private key for the new certificate: openssl genrsa -aes256 -out deviceCertificates/deviceKey.pem 4096
Generate the certificate signing request (change “caConfig.cnf” to “intermediateConfig.cnf” if you are in the intermediateCertificate directory): openssl req -config caConfig.cnf -new -sha256 -key deviceCertificates/deviceKey.pem -out deviceCertificates/deviceCsr.pem
Remember that the commonName of the device certificate, which you will be asked to provide in the console, must match the ClientId of the device during the connection.
Generate the certificate signed by the CA or intermediate (change “caConfig.cnf” to “intermediateConfig.cnf” if you are in the intermediateCertificate directory): openssl ca -config caConfig.cnf -extensions v3_signed -days 365 -notext -md sha256 -in deviceCertificates/deviceCsr.pem -out deviceCertificates/deviceCert.pem
Verify if the generated certificate is correctly signed by CA or intermediate (change “caCert.pem” to “intermediateCert.pem” if you are in the intermediateCertificate directory): openssl verify -partial_chain -CAfile caCert.pem deviceCertificates/deviceCert.pem
Creating the chain of certificates
Go into your caCertificate directory.
If you created the CA certificate, which was used to sign the intermediate certificate and then the intermediate certificate was used to sign the device certificate, then you create your chain with the command:
If you are using multiple intermediate certificates between the CA certificate and the device certificate, then remember that you must keep the correct order during the chain creation (Every certificate must be followed by the certificate, which it is signed by).
Creating keystore and truststore
Go into your deviceCertificates directory with the device’s private key and the generated chain of certificates. If you are using an intermediate certificate between the CA certificate and the device certificate then it will be the caCertificate/intermediateCertificate/deviceCertificates path, otherwise it will be caCertificate/deviceCertificates. Create keystore using the generated chain of certificates and the private key of the device: openssl pkcs12 -export -name devicekeyentry -inkey deviceKey.pem -in deviceCertChain.pem -out deviceKeystore.pkcs12
If you want to convert your keystore to JKS format then you would need the Java Keytool which is usually downloaded together with Java Development Kit: keytool -importkeystore -srckeystore deviceKeystore.pkcs12 -srcstoretype PKCS12 -destkeystore deviceKeystore.jks -deststoretype JKS
If you do not have the server certificate, get it by the command: openssl s_client -showcerts -connect <cumulocity url>:<mqtt mutual ssl port (currently 8883, but that can be changed in the future)> | openssl x509 -outform PEM > serverCertificate.pem
Now you can create a truststore, which will contain the server certificate. It must be created with Java Keytool (openssl does not support creating truststore, so if you don’t want to use Java keytool then you must keep every trusted certificate in a separate PEM file).
Remember that alias is the unique identifier for every keystore or truststore entry. It means that if you want to add a second trusted certificate to the same truststore then you must change the alias from servercertificate in the command below to some other name:
Optionally, instead of creating a new file for the truststore, you can add the trusted certificates to your created keystore and store everything in one file, which is not the recommended solution:
If your keystore is in the PKCS12 format: keytool -importcert -noprompt -keystore deviceKeystore.pkcs12 -alias servercertificate -file serverCertificate.pem
If your keystore is in the JKS format: keytool -import -file serverCertificate.pem -alias servercertificate -keystore deviceKeystore.jks
You can check the content of your keystore (or truststore) with the command: keytool -list -v -keystore deviceKeystore.jks
Upload your CA (or intermediate) certificate to the platform. This operation will add your uploaded certificate to the server’s truststore. It can be done in two ways, both of which have a role requirement of either ROLE_TENANT_ADMIN or ROLE_TENANT_MANAGEMENT_ADMIN:
Via UI:
In the Device management application, navigate to the Management menu in the navigator and select Trusted certificates.
In the resulting dialog, enter a custom name for the new certificate.
Drop your CA certificate (caCert.pem or intermediateCert.pem).
Select the Auto registration check box.
Set the toggle to Enabled.
Click Add certificate.
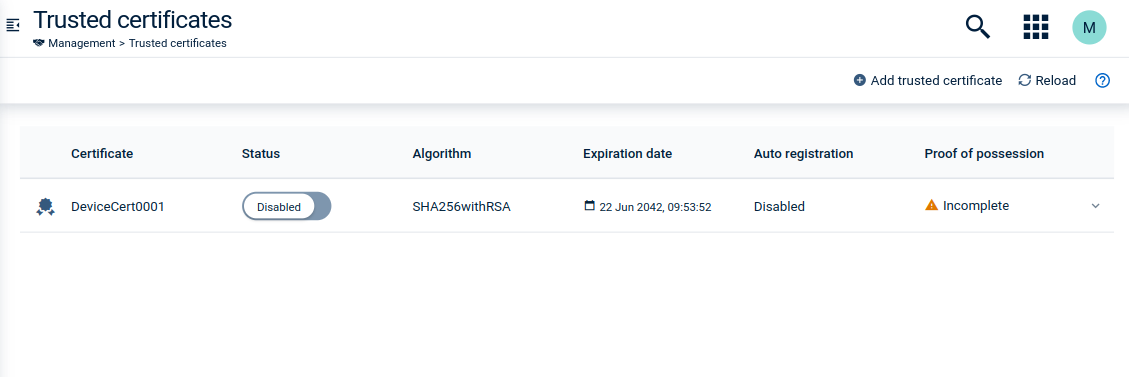
Then new certificate will be added to the trusted certificates list:
Via REST:
Display your CA (or intermediate) certificate, which you want to upload to the Cumulocity platform and copy its PEM value, which starts with “—–BEGIN CERTIFICATE—–” and ends with “—–END CERTIFICATE—–” (including the hyphens). Remove new line symbols (\n) if they were added automatically at the end of each line: openssl x509 -in caCert.pem -text
Cumulocity platform uses X.509 certificates to authenticate end devices.
The certificates work with a chain of trust: you can create trustworthy subcertificates with a trusted certificate.
Each certificate consists of a public and a private part.
Also see asymmetric encryption.
Cumulocity platform receives the public part of each certificate that is to be used for device authentication.
The assignment of the device to a tenant is also done by the certificate, since each certificate must be uniquely assigned.
Performing the proof of possession steps filters out all certificates without prior proof of possession, giving preference to tenant mappings of certificates with a validated proof of possession.
However, since the public part of a certificate (and the subcertificates) is not secret, anyone on the internet theoretically has access to it.
A potential attacker could upload the public part of a certificate to Cumulocity platform even if he does not have access to the private part of the certificate (thus not being the owner of the certificate).
In this case the Cumulocity platform cannot decide which uploader is the legitimate one, so the platform does not accept any reference to this certificate as valid, which would result in a DOS scenario.
To ensure verification of ownership by the uploader, a proof of possession is required by the platform.
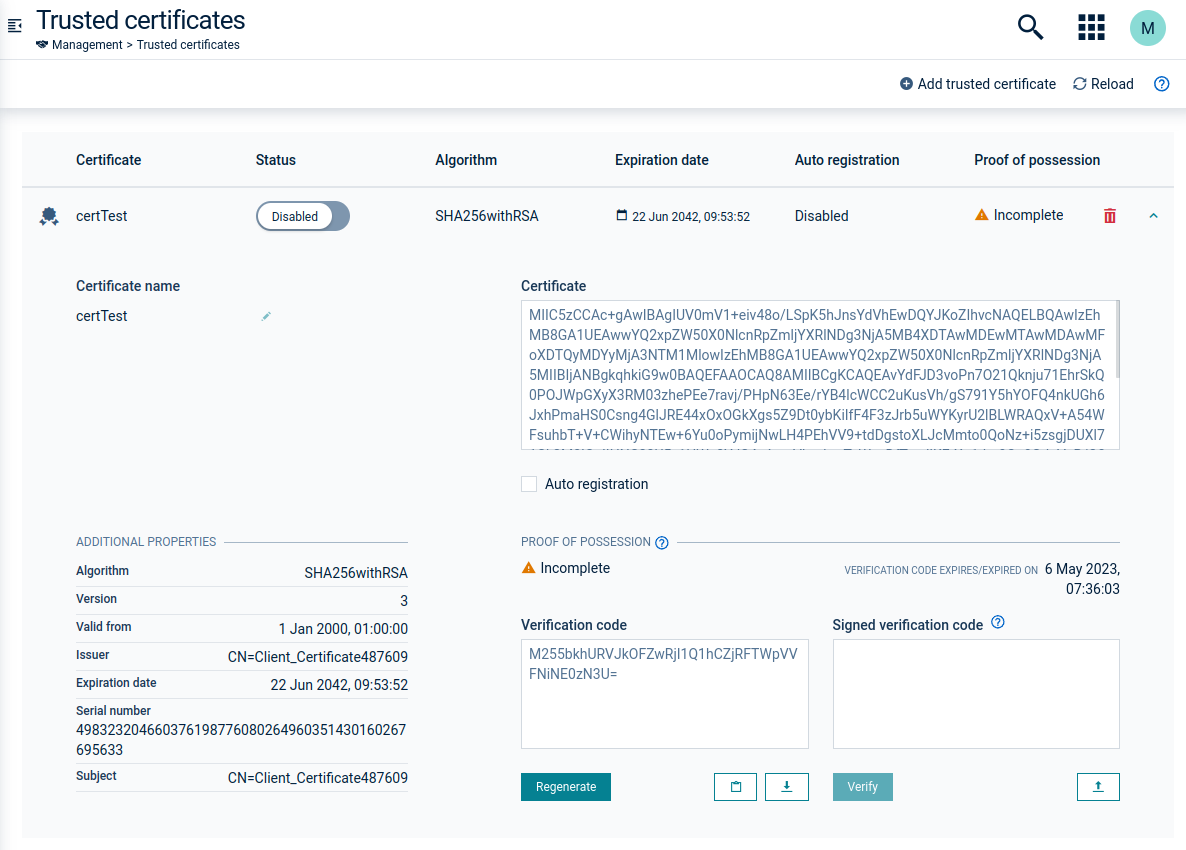
The steps for the proof of possession are as follows:
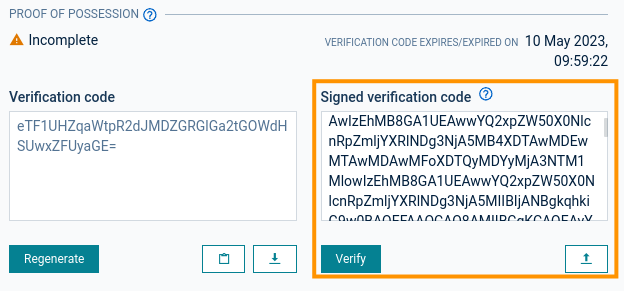
Navigate to Management > Trusted certificates in the Device management application and verify that the certificate has been uploaded properly.
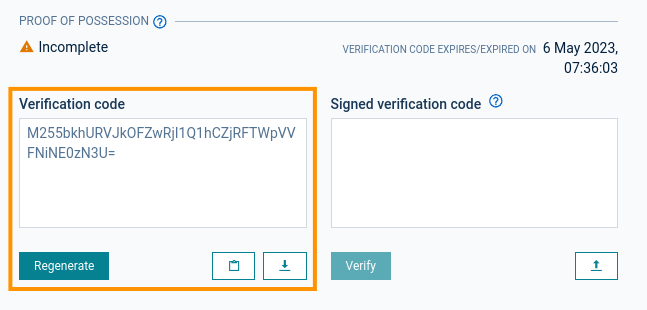
In the Proof of Possession section of the certificate details, download the verification code.
Encrypt the verification code using the private key of the certificate to produce the signed verification code.
Use the following OpenSSL command:
openssl dgst -sha256 -sign <private.key> <verification_code.txt> | openssl base64 -A
Upload the signed verification code to the platform.
The proof of possession is confirmed if the uploaded signed verification code matches the signed verification code expected by the platform. This is indicated by switching the state from “Incomplete” to “Complete” in the Proof of Possession section.
Info
If administrators cannot carry out this process on their own for organizational reasons, they can manually request the proof of possession for the corresponding certificate and the Cumulocity Support team can complete the proof of possession through a back end API upon reasonable verification.
MQTT example client
The code of the Cumulocity MQTT example client implemented in Java, which connects to the platform using x.509 certificates, is available here: https://github.com/Cumulocity-IoT//cumulocity-examples/tree/develop/mqtt-client.
This example client uses the implementation of Eclipse Paho, which is described in detail on their website: https://www.eclipse.org/paho/index.php?page=documentation.php.
Here is an example that shows how to add the needed dependency in Maven to use Eclipse Paho client:
Then the instance of the MQTT client can be created with a single line:
MqttClient mqttClient = new MqttClient(BROKER_URL, "d:" + CLIENT_ID, new MemoryPersistence());
The BROKER_URL should contain protocol, url and port, which the client will connect to, like this: ssl://<cumulocity url>:8883.
The CLIENT_ID value must match the value of the common name of the device certificate that will be used.
The “d:” prefix is used in Cumulocity for device connections and it should not be removed or changed.
Now the only thing that must be configured to establish the SSL connection is to fill paths in the code fragment:
KEYSTORE_NAME is the path to your keystore, which contains the private key and the chain of certificates, which the device will use to authenticate itself.
KEYSTORE_PASSWORD is the password created for keystore to use its private key.
KEYSTORE_FORMAT should be “JKS” or “PKCS12” depending on the file format. The path is provided by KEYSTORE_NAME.
TRUSTSTORE_NAME is the path to your truststore, which contains the certificate of the server.
TRUSTSTORE_PASSWORD is the password to access the truststore.
TRUSTSTORE_FORMAT should be “JKS” or “PKCS12” depending on the file format. The path is provided by TRUSTSTORE.
After filling in this data, the example client will use the provided data to connect to the specified platform using certificates.
The example also shows how to create the callback for the connection.
First thing is to create the class which implements the interface MqttCallbackExtended.
Then such a class can be created and an instance of it can be provided to the MQTT client: mqttClient.setCallback(this);.
In general, the MQTT Eclipse Paho Client uses the Java Secure Socket Extension, which is part of the Java Development Kit, to provide secure connections via SSL.
JSSE provides the Java implementation of the SSL and TLS protocol, which can be configured by developers using its classes.
The documentation of the Java Secure Socket Extension shows how the SSL connection is established and provides some examples of customizing the implementation.
The full document is available on the official Oracle website.
Integration life cycle
Overview
The basic life cycle for integrating devices into Cumulocity is discussed in Interfacing devices.
In this section, we will show how this life cycle can be managed using the MQTT implementation.
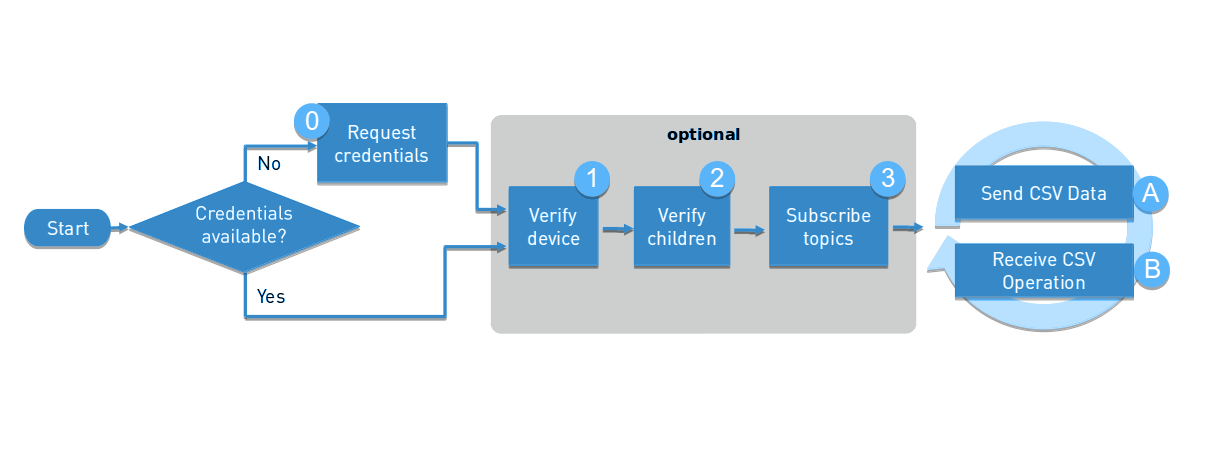
The life cycle consists of two phases, a startup phase and a cycle phase.
The startup phase can be as short as just checking the credentials:
Step 0: Request device credentials, if they have not been requested yet.
Access via bootstrap user credentials. See Device credentials for more information on how to obtain and use bootstrap credentials.
Startup phase
Step 0: Request device credentials
In Cumulocity, every MQTT connection must be authenticated. You can use the device credentials topics in the MQTT implementation to generate new credentials for a device.
Once the device retrieved the credentials, it needs to store them locally for further connections.
To establish a connection you must configure the following parameters:
Host: <your_cumulocity_url>
User: <tenantID>/<username> (user alias is not supported)
Password: <your_cumulocity_password>
For more information, refer to the Hello MQTT section.
The process works as follows:
Cumulocity assumes that each device has some form of unique ID. For instance, a good device identifier can be the MAC address of the network adapter, the IMEI of a mobile device or a hardware serial number.
When you take a new device into use, you enter this unique ID into Device registration in the Device management application in Cumulocity, and start the device.
The device will use this ID as part of the MQTT ClientId and static user credentials that can be enquired from product support.
The device subscribes to the topic s/dcr.
The device starts publishing continuous empty messages on the topic s/ucr to notify the server that it is ready to retrieve credentials.
Next, you must accept the connection from the device in the Device Registration page.
When the device sends the next empty message it should receive credentials in the format 70,<tenantID>,<username>,<password>.
After receiving the credentials, the device can close the MQTT connection and create a new one with the received credentials.
Step 1: Verify device
As MQTT supports an automatic device creation if the client sends data and there is no device present, this step is only required if you want to create the device manually.
The device creation can be achieved by employing the static template 100. This template can be blindly used on every boot of the device as it will only create the device if it is not already present.
The device will be linked automatically to the ID the client uses with its MQTT ClientId.
100,Device Name,Device Type
Info
The topic used for Cumulocity’s pre-provided static templates is s/us.
Step 2: Verify children
Like the root device, also its children are covered by the automatic device creation.
To handle this step manually you can send the static template 101 for creating a child device. The template will only create the child if it does not already exist.
101,Unique Child ID,Child Name,Child Type
Step 3: Subscribe topics
If the device supports operations, it should subscribe to all required topics (static templates and SmartREST 2.0).
Cycle phase
Step A: Send CSV data
While the device holds an active MQTT connection, it can publish either on the topics for static templates or on the topics for a SmartREST template to send data to the server.
Based on the MQTT ClientId, the physical device is directly connected to the device object in Cumulocity. Therefore, the data you send is automatically connected to the device.
To send data to a child device, publish the data to the topics described in Device hierarchies.
Step B: Receive CSV operations
By subscribing to a topic the device automatically tells Cumulocity that it wants to receive operations. Any operation created will be automatically parsed using either the static templates or the templates the device defines.