Permissions define what a user is allowed to do in Cumulocity IoT applications. To manage permissions more easily, they are grouped into global and inventory roles. Every user can be associated with a number of roles, adding up permissions of the user.
Requirements
ROLES & PERMISSIONS:
To view global roles, inventory roles, applications: READ permission for the “User management” permission type.
To manage global roles (assign to users, unassign from users), to manage inventory roles, to manage application access: ADMIN permission for the “User management” permission type.
To assign owned roles to users (“feature-user-hierarchy” application subscription required): CREATE permission for the “User management” permission type.
To create new roles with available (owned) permissions: CREATE and ADMIN permission.
The above permissions can be used to create roles for robust user management. Every new tenant have specified typical roles by default:
Global User Manager - Can access and modify the full user hierarchy
Shared User Manager - Can create new own sub-users and manage them (“feature-user-hierarchy” application subscription required)
Roles and Inventory Roles in the Cumulocity IoT OpenAPI Specification for managing permissions via REST.
Global roles
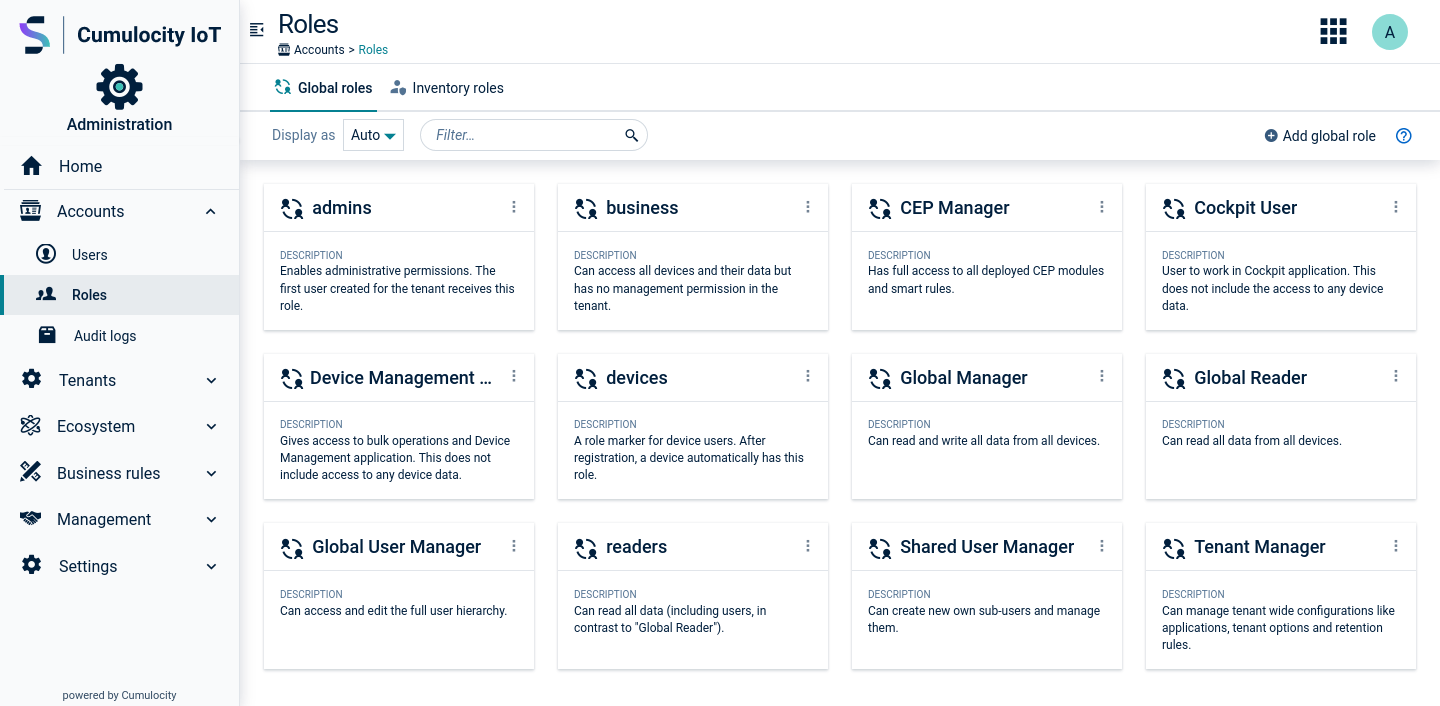
Click Roles in the Accounts menu to display a list of configured roles.
In the Global roles tab you can find the roles which grant permissions on a system level. There are several global roles pre-defined, but you can define your own according to your needs.
Info
The pre-defined roles are configured as samples for a particular purpose. You may use them as a starting point and further adapt them to your individual needs.
On creating a new user, make sure that the global roles you assign to the user contain all necessary permissions relevant for this particular user in either of those roles assigned. Permissions from different roles are merged together when assigned to the same user. If, for example, a user only has the role “Cockpit User” (see below), the user is only able to access the Cockpit application and nothing more. But if you also assign inventory permission via some of the available roles, the user will get access to the whole inventory, such as devices, groups, and configurations.
The roles “admins” and “devices” have a special status:
Role
Description
admins
Administrative permissions are enabled. The initial administrator, the first user created in a tenant, has this role.
devices
Typical permission setup for devices. After registration, a device automatically has this role. Edit this role if your devices require less or more permissions, or assign other roles to your devices.
Furthermore, the following pre-configured roles are initially provided.
Role
Description
CEP Manager
Can access all smart rules and event processing rules.
Cockpit User
Can access the Cockpit application. In addition, you should add a role providing access to devices.
Devicemanagement User
Can access the Device management application. The user will be able to use the simulator and to run bulk operations. In addition, you should add a role providing access to devices.
Global Manager
Can read and write all data from all devices.
Global Reader
Can read all data from all devices.
Global User Manager
Can manage all users.
Shared User Manager
Can manage sub-users. The subscription plan must include user hierarchies to be able to manage sub-users.
Tenant Manager
Can manage tenant-wide settings, such as own applications, data brokerage, data retention, options and tenant statistics.
You may also see the following legacy roles:
Role
Description
business
Can access all devices and their data but has no management permission in the tenant.
readers
Can read all data (including users, in contrast to “Global Readers”).
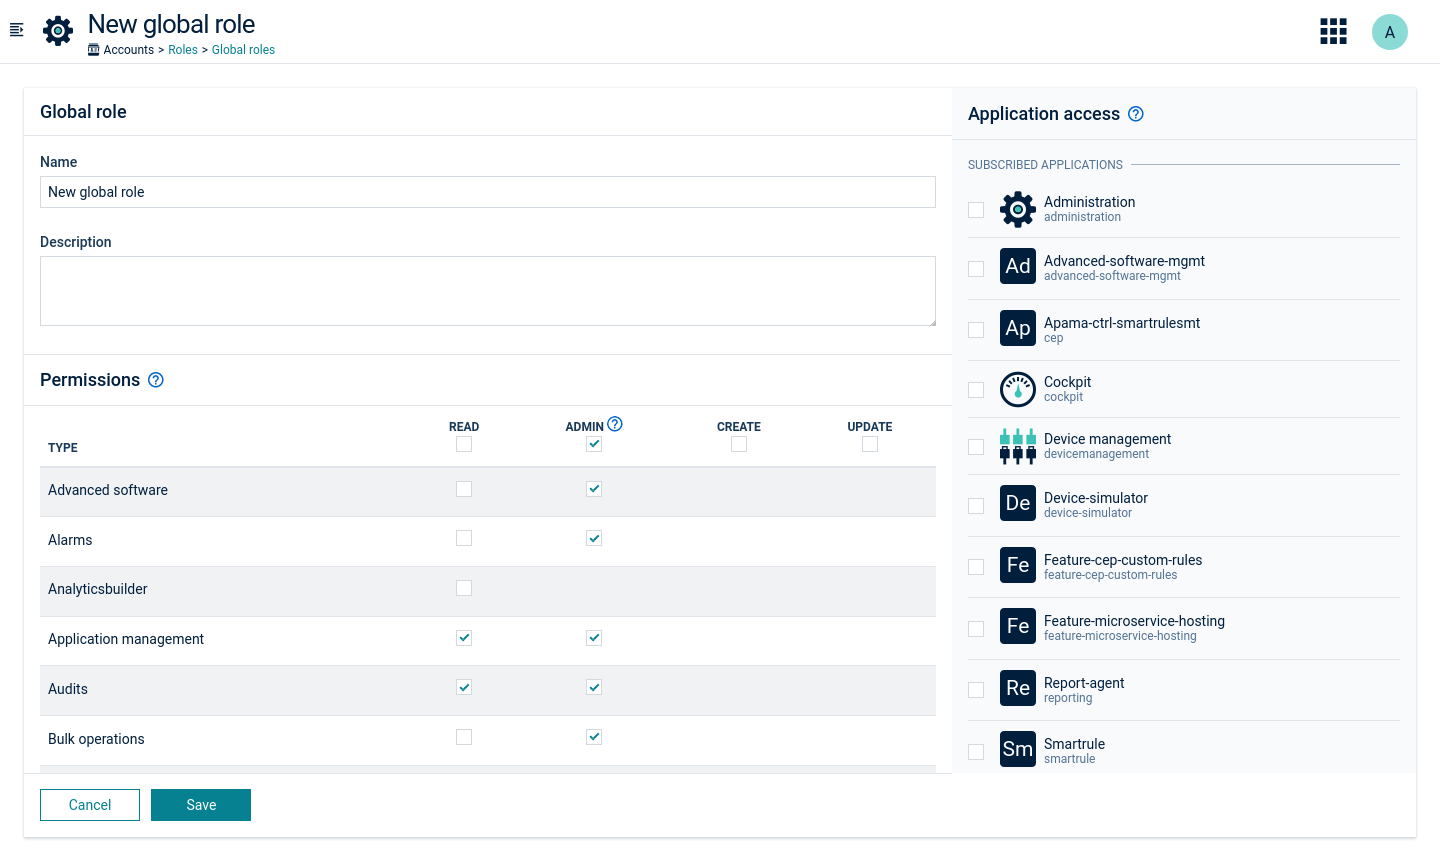
To add a global role
Click Add global role in the Global roles tab. In the New global role page you will see a list of permission types at the left and a list of applications to be accessed at the right. The following screenshot shows the settings for the “admins” role.
Permission levels
For each type, you can select the following permission levels:
READ - read the specified data.
CREATE - create new data like users and inventory data and edit users within your hierarchy.
UPDATE - change and delete the specified data (not including READ).
ADMIN - create, update or delete the specified data.
Info
CREATE permissions are related to the concept of ownership in Cumulocity IoT. If you have created an object, you are the owner of it and can manage it without requiring any further permissions. For example, if you have CREATE permission for “Inventory”, you can create devices and groups, and fully manage these devices and groups. You cannot manage any devices or groups that you did not create yourself, unless you also have the UPDATE permission or an additional inventory role (see below). This concept helps to assign minimal permissions to devices. It also enables you to limit user management permissions to sub-users, if you subscribed to user hierarchies.
Select the checkbox at the top of a column to set the respective level to all permission types.
Permission categories
The following permission categories are available by default:
Category
Description
Alarms
View or edit alarms.
Application management
View or edit the applications available in this account.
Audits
View or create audit logs.
Bulk operations
View or create bulk operations.
CEP management
View or edit CEP rules.
Data broker
Send data to other tenants or receive data from other tenants.
Device control
View or edit commands for devices resp. send commands to devices. Also used for device registration.
Events
View or create events.
Global smart rules
Configure global smart rules.
Identity
View or edit identifiers for devices.
Inventory
View or edit inventory data.
Measurements
View or create measurements.
Option management
View or edit account options such as password policies.
Retention rules
View or edit retention rules.
Schedule reports
Manage the schedule of report exporting.
Simulator
Configure simulated devices.
Sms
Configure SMS.
Tenant management
View, create, edit or delete subtenants.
Tenant statistics
View the usage data for this account, as shown on the Home screen of the Administration application.
User management
View or edit users, global roles and permissions.
Own user management
View or edit your own user. Note that this permission may only be applicable to technical users.
There may be additional permissions visible depending on the features in your subscription plan. These are documented along with the respective feature.
Important
When new features with new permissions are added to Cumulocity IoT, these are not automatically added to existing roles. If you notice that you cannot use a new feature that was recently announced, check your permissions.
To assign global roles
You can assign global roles to users either directly in the user list, or by opening the details page for a particular user and adding them there.
Important
By default it is not possible to change roles of SSO users (created automatically during SSO login) as those would be overridden by dynamic access mapping. However this behaviour can be changed. For more information refer to Custom template configuration.
To assign global roles from the user list
Click the Global roles column of a particular user to open a list of global roles.
Select or clear the respective checkboxes.
Click Apply to save your settings.
To assign global roles from the user page
Click on the row of the respective user in the user list.
In the user page, select or clear the checkboxes for the relevant global roles at the right.
Click Save to save your settings.
Inventory roles
Inventory roles contain permissions that you can assign to groups of devices. For example, an inventory role can contain the permission to restart a device. You can assign this inventory role to a group of devices “region north” and to a user “smith”. The result is that the user “smith” can restart all devices that are in the group “region north” or any of its subgroups.
To view inventory roles
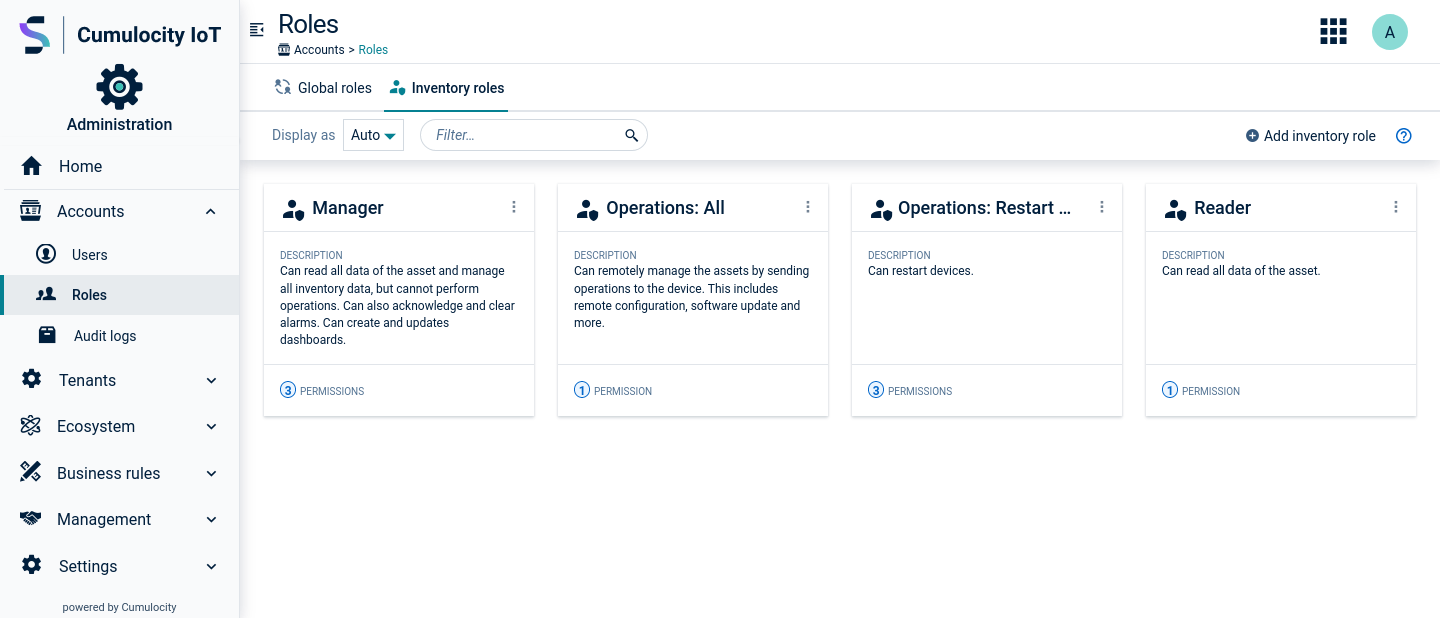
To view the currently configured inventory roles, click Roles in the Accounts menu and switch to the Inventory roles tab.
In the Inventory roles tab you can manage user permissions for particular groups and/or its children. There are several default inventory roles defined, but you can define your own according to your needs.
The following default inventory roles are initially available in new tenants:
Role
Description
Manager
Can read all data of the asset and manage all inventory data but cannot perform operations. In addition, can manage inventory data (including dashboards) and alarms.
Operations: All
Can remotely manage the assets by sending operations to a device (for example software updates, remote configurations).
Operations: Restart Device
Can restart devices.
Reader
Can read all data of the asset.
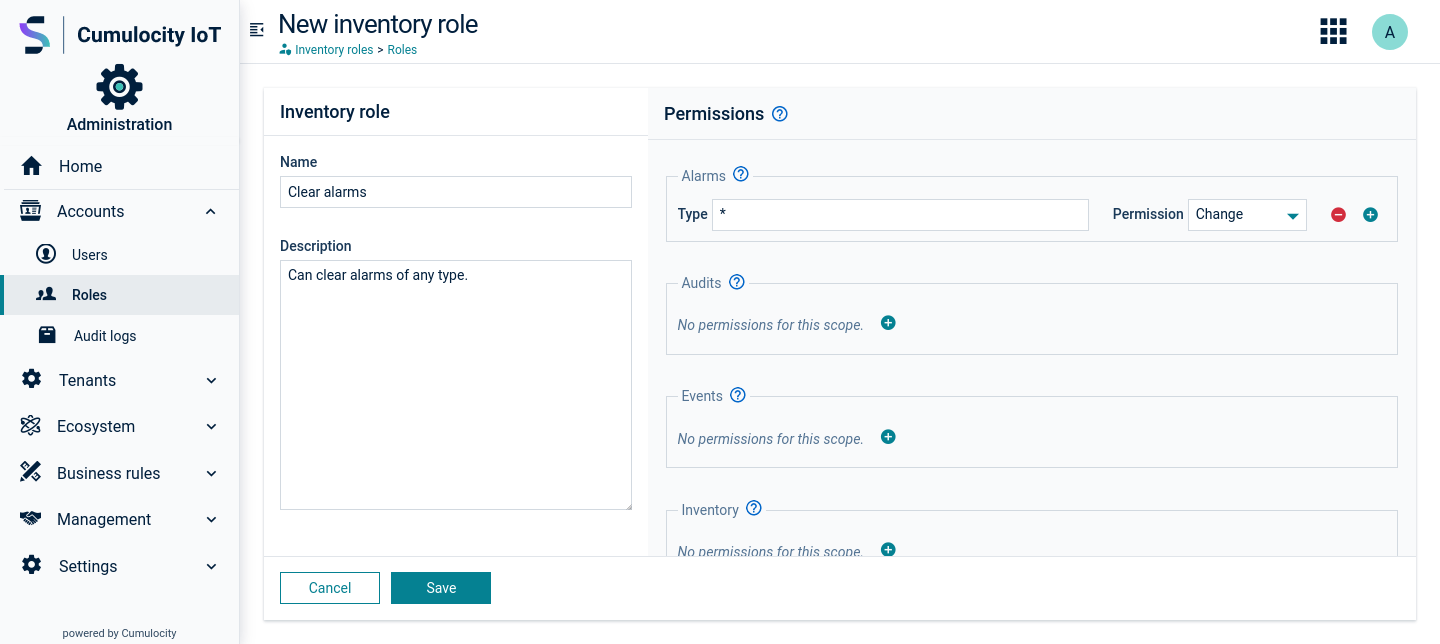
To add an inventory role
Click Add inventory role in the Inventory roles tab.
In the “New inventory role” page, provide a name and a description, and assign the permissions for the new inventory role.
Permissions are grouped into the following categories:
Category
Description
Alarms
Permissions related to working with alarms from devices.
Audits
Permissions related to audit logs.
Events
Permissions related to working with events from devices.
Inventory
Permissions for viewing and editing devices.
Measurements
Permissions related to measurements.
Device control
Permissions to remote control devices.
Full access
Complete access to the associated devices, mainly to simplify configuration.
Add a permission to the role by clicking the plus icon next to the desired category.
In the Type field, specify a fragment to further restrict the types of data that this permission applies to. Access will only be granted to objects that contain
exactly the specified fragment types. If the selected object contains more fragment types than those defined in the inventory roles configuration, in order to display it, they also must be added to the inventory role configuration.
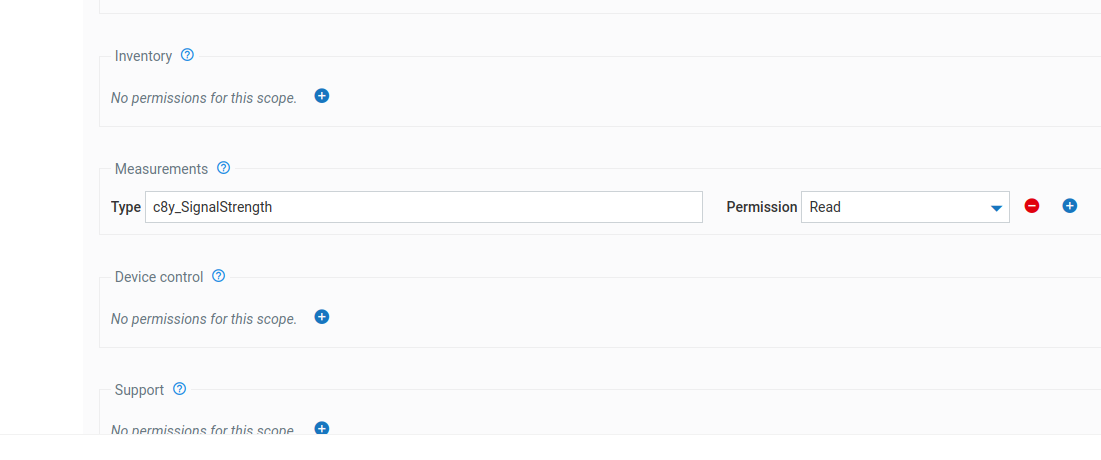
For example, assume that your device sends measurements related to device management, such as “c8y_SignalStrength” but the measurement itself also has “c8y_Temperature” which you are not interested in.
For the selected device, there are also measurements containing only the “c8y_Temperature” fragment.
You want a user to only see the device management measurements which have a fragment “c8y_SignalStrength”.
In the default configuration for inventory roles we must provide access to all fragments that the measurement has, that is, “c8y_SignalStrength” and “c8y_Temperature”.
Note that if a measurement also contains other fragment types, they must also be added in the inventory role configuration, and they are also returned in the response.
Otherwise such measurements are not returned because they contain fields to which the user has not been granted access.
After setting the tenant option value to true, in order to have access to a single measurement fragment like “c8y_SignalStrength”, you do not have to grant access to all fragments types that the measurement has.
For example, assume that your device sends measurements such as those in the previous example, including “c8y_SignalStrength” and “c8y_Temperature” and other measurements with “c8y_Temperature” only.
You want a user to only see the device management measurements which have a fragment “c8y_SignalStrength”.
After changing the tenant option, we can specify only the types of fragments that interest us.
Note that only measurements that have a defined set of types are returned, and additional types not listed in the inventory role configuration are removed from the returned measurements.
This allows the user to see measurements that contain only the defined types, without the additional need to configure other types of fragments that the measurement has.
By default, the Type field contains an asterisk “*” selecting all types.
Info
For further information on possible types, check your device documentation or the fragment library. The type being used here is the so-called “fragment type”, not the “type” property. You must enter all fragment types send in a measurement to make the measurement visible; similar for other types of data.
In the Permission field, select a permission level from the dropdown list:
READ - to view objects
CHANGE - to modify objects (does not include READ permission)
ALL - to read AND modify objects
Important
When you add a permission, you may see a small exclamation mark. The exclamation mark indicates that the permission that you have just added is not effective, because another, “higher” permission set for the user already includes the respective permission. Check if you have set, for example, “Full access” or if there is another permission in the same section with “*” as type and ALL as permission.
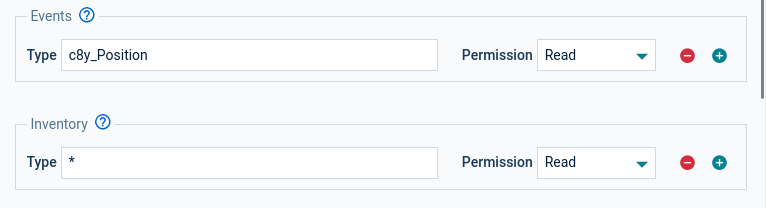
As another example, assume that you are using tracking devices. You want to allow your user to see all devices, but not to change anything. In addition, the user should be able to follow tracks of devices on a map. Tracks are recorded using an event with fragment type “c8y_Position”, see fragment library. To do so, assign READ permission on inventory as well as on events with type “c8y_Position” as shown in the image below.
To assign inventory roles to users
Inventory roles are assigned to a user and a group of devices.
To assign inventory roles, click Users in the Accounts menu, select a user in the user list and switch to its Inventory roles tab.
In the Inventory roles tab you will see a tree of device groups. To assign an inventory role, open the dropdown at the right of the group row. Select the relevant roles and click Apply. For a detailed description of a role click the info icon next to it.
Important
If a user already has a global role containing inventory permissions, the user will be
able to see or change all devices regardless of what inventory roles you set here.
Inventory roles are inherited from groups to all their direct and indirect subgroups, and to the devices in these groups. If you select, for example, a role with read permissions on alarms for a group of devices, the user will be able to see alarms of all devices in this group and all its subgroups.
If a user has inventory access to a group of devices, the user will also have that access to all dashboards for that group of devices in the Cockpit application.
You can also copy inventory roles from another user. To copy roles, click Copy inventory roles from another user. In the upcoming window, select a user from the list and click Copy. At the top you can select if you want to merge the roles with the existing user roles (the default) or if you want to replace the existing user roles. Copying roles makes it easier to manage the permissions of many users as you can create a reference user and then copy the permissions from there.
Granting application access
The Application Access tab shows a list of all available applications in your tenant in alphabetical order.
To assign applications to the user, simply select the respective applications and click Save.
If a user has global permission to read all applications, an information box will be shown.
Troubleshooting permissions
If you try to perform actions without sufficient permissions, an error message will occur.
To help troubleshooting permissions, click the User button (showing the current user name) at the right of the top bar. From the context menu, select Access denied requests. In the resulting window details on the denied accesses are provided. An administrator user or the product support can help in fixing the permissions.
Improving the performance
The Cumulocity IoT platform provides optimized UI performance for users with inventory roles access. In particular, requests for tenants with large inventory hierarchies are faster.
The performance of the following UI pages is improved:
In the device details view, the tabs Info, Measurements, Alarms, Events and Control.
Pages with aggregated alarm views from multiple devices, if the number of alarms in the system is low, for example, Cockpit > Home dashboard, Cockpit > Alarms and Device management > Home.
Pages with aggregated events from multiple devices, if the number of events is low, for example, Device management > Events.
Pages with aggregated operations from multiple devices, if the number of operations is low, for example, Device management > Decie control > Single operations.
As an administrator, you can disable the performance feature by doing the following:
On platform level via the configuration file (only available for platform administrators, see the Cumulocity IoT - Operations guide for details).
On tenant level via a tenant option. The tenant option has 2 possible values: LEGACY/OPTIMIZED, where OPTIMIZED is the global default.