Widget plugin
In this document you will get an overview on how to develop a plugin that adds a new widget to dashboards.
Before you start working on the widget plugins, we recommend you to take a look at the introduction which deals with the basic concepts of applications and plugins as well as the “Hello world!” style demo plugin.
You can find this and all the other plugins described in the documentation inside the repository cumulocity-ui-plugin-examples.
Iconmap plugin
With the following plugin a new widget will be available for dashboards which displays devices as icons on a map. The new widget looks like this:
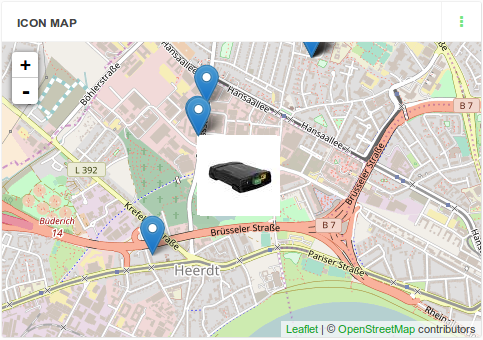
In order to achieve this goal you need to do the following steps:
- Create a plugin.
- Declare the plugin on the imports list of the application manifest.
- Add an item to the widget menu list.
- Get the images for the devices.
- Create a view for the widget.
We assume that you have already created an application that you can add the new plugin to. If not, you can use the application provided in the repository mentioned above. You can also find the example described here in the folder “plugins/iconmap”.
Create a plugin
Inside your application folder, run the command:
$ c8y create:plugin iconmap
Then edit the plugin manifest in /plugins/iconmap to add the following information:
{
  "name": "Icon Map",
  "description": "Shows devices on a map using an icon for the device type.",
}
Then create a file “iconmap.module.js” at the plugin’s root folder to have the following content:
(function () {
  'use strict';

  angular.module('myapp.iconmap', []);
}());
Update the application manifest to add this new plugin to the import list.
{
  (...)
  "imports": [
    (...)
    "myapplication/iconmap"
  ]
}
Add an item to the widget menu list
Next, we have to create a configuration file which adds a menu item to the widget menu list. For that purpose, we can use the service “c8yComponentsProvider” provided by the Cumulocity IoT JavaScript API. Inject the service into your config and call the following function:
(function () {
  'use strict';

  angular
    .module('myapp.iconmap')
    .config(configure);

  configure.$inject = [
    'c8yComponentsProvider',
    'gettext'
  ];

  function configure(
    c8yComponentsProvider,
    gettext
  ) {
    c8yComponentsProvider.add({ // adds a menu item to the widget menu list with ...
      name: 'iconmap', // ... the identifier *"iconmap"* which has to be unique among the widgets in the application
      nameDisplay: gettext('Icon Map'), // ... the displayed name *"Icon Map"*
      description: gettext('Displays a map with icons for devices instead of markers'), // ... a description
      templateUrl: ':::PLUGIN_PATH:::/views/iconmap.main.html', // ... displaying *"iconmap.main.html"* when added to the dashboard
      options: { noDeviceTarget: true }
    });
  }
}());
Get the images for the devices
To start with, we need to define an array “markers” which contains markers for every device to be displayed on the map. In this example, we will assign an image to a device based on its hardware model. To get the images, we need to get all binary objects in the inventory with the help of the “c8yBinary” service. Then we have to filter the binary objects for images which represent a certain hardware model. Afterwards, the devices will be placed on the map according to their “c8y_Position” fragment either with an image, if there is an image for the hardware model, or with the usual marker, if there is none.
(function () {
  'use strict';

  angular
    .module('myapp.iconmap')
    .controller('iconmapController', iconmapController);

  iconmapController.$inject = [
    '$scope',
    '$q',
    'c8yInventory',
    'c8yBinary'
  ];

  function iconmapController(
    $scope,
    $q,
    c8yInventory,
    c8yBinary
  ) {
    $scope.markers = [];

    var getDevicesAndBinaries = {
      devices: getDevicesWithLocation(),
      binaries: c8yBinary.list({})
    };
    $q.all(getDevicesAndBinaries).then(placeTypes);

    function getDevicesWithLocation() {
      var filters = {fragmentType: 'c8y_Position' };
      return c8yInventory.list(filters);
    }

    function placeTypes(devicesAndBinaries) {
      var devicesOfType = createTypeMap(devicesAndBinaries.devices);
      var iconOfType = createIconMap(devicesAndBinaries.binaries);
      angular.forEach(devicesOfType, _.curry(placeType)(iconOfType));
    }

    function placeType(iconOfType, devices, type) {
      var icon = iconOfType[type];
      if (icon) {
        var placeDevices = _.curry(place)(devices);
        c8yBinary.downloadAsDataUri(icon).then(placeDevices);
      } else {
        place(devices);
      }
    }

    function createTypeMap(devices) {
      var typeMap = {};
      angular.forEach(devices, _.curry(addDeviceToTypeMap)(typeMap));
      return typeMap;
    }

    function addDeviceToTypeMap(typeMap, device) {
      var hw = 'default';
      if (device.c8y_Hardware && device.c8y_Hardware.model) {
        hw = device.c8y_Hardware.model;
      }

      if (!typeMap[hw]) {
        typeMap[hw] = [];
      }

      typeMap[hw].push(device);
    }

    function createIconMap(binaries) {
      var iconMap = {};
      angular.forEach(binaries, _.curry(addIconToIconMap)(iconMap));
      return iconMap;
    }

    function addIconToIconMap(iconMap, icon) {
      if (c8yBinary.isImage(icon)) {
        var name = icon.name;
        name = name.substring(0, name.lastIndexOf('.'));
        iconMap[name] = icon;
      }
    }

    function place(devices, uri) {
      angular.forEach(devices, _.curry(placeDevice)(_, uri));
    }

    function placeDevice(device, uri) {
      var pos = device.c8y_Position;
      var marker = {
        lat: pos.lat,
        lng: pos.lng,
        message: '<a href="#/device/' + device.id + '">' + device.name + '</a>'
      };

      if (uri) {
        marker.icon = { iconUrl: uri };
      }

      $scope.markers.push(marker);
    }
  }
}());
Now that we have added the module, config and controller to our plugin, we have to specify “myapp.iconmap” as our module and add each javascript file to our plugin manifest:
{
	"name": "Icon Map",
	"description": "Shows devices on a map using an icon for the device type.",
  "ngModules": [
    "myapp.iconmap"
  ],
  "js": [
    "iconmap.module.js",
    "iconmap.config.js",
    "iconmap.controller.js"
  ]
}
Create a view for the widget
In our config, we already specified the .html file which contains our view for the widget. In this example, our widget should show a simple map. To add a map to the view, create a folder “views” inside your plugin folder, create a file “iconmap.main.html” and add the following content:
<div ng-controller="iconmapController">
    <leaflet markers="markers" ></leaflet>
</div>
The “leaflet” tag adds an interactive map to our widget. To display the devices on the map, we just need to assign the array we defined in the controller to the “markers” attribute of the “leaflet” tag.
Test your plugin
After creating and deploying the plugin to your tenant, you should be able to create a widget “Icon Map”. Note that in order to see an image for your device, you have to upload an image with the device type as file name to the file repository of your tenant.
Weather Plugin
With the following plugin a new widget will be available for dashboards which shows the current weather at the location of a device. The new widget looks like this:
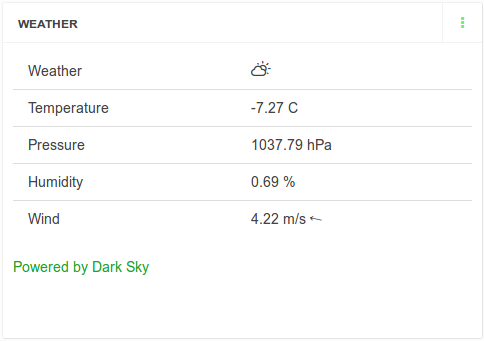
In order to achieve this goal you need to do the following steps:
- Create a plugin for using the Dark Sky API.
- Create a plugin for entering the API key.
- Add an item to the navigator menu.
- Create a view where the user can save the API key.
- Create a plugin for the widget.
- Declare the plugins on the imports list of the application manifest.
- Add an item to the widget menu list.
- Get the weather for the device.
- Create a view for the widget.
We assume that you already have created an application that you can add the new plugin to. If not, you can use the application provided in the repository mentioned above. You can also find the example described here in the folders “plugins/weather”, “plugins/weatherAdmin” and “plugins/weatherService”.
Create a plugin for using the Dark Sky API
In this case, we recommend you to download the “weatherService” plugin from the repository and to save it in your application. This plugin provides the possibility to save and load the API key as well as retrieving weather information.
Do not forget to include the plugin in your application manifest:
{
  (...)
  "imports": [
    (...)
    "myapplication/weatherService"
  ]
}
Create a plugin for entering the API key
Inside your application folder, run the command:
$ c8y create:plugin weatherAdmin
Then edit the plugin manifest in /plugins/weatherAdmin to add the following information:
{
  "name": "Weather settings",
  "description": "Configure the API key for weather forecasts",
  "icon": "cloud",
  "category": "Administrator",
  "imports": [
    "myapplication/weatherService"
  ]
}
We will import the “weatherService” plugin, since it provides us the possibility to load the API key or save the API key the user enters.
Update the application manifest to add this new plugin to the import list.
{
  (...)
	"imports": [
    (...)
    "myapplication/weatherAdmin"
  ]
}
Add an item to the navigator menu
Next, we have to create a configuration file, which adds an item to the navigator menu. For that purpose, we can use the service “c8yNavigatorProvider” and “c8yViewsProvider” provided by the Cumulocity IoT JavaScript API. Inject the service into your config and call the following function:
(function () {
  'use strict';

  angular
  .module('myapp.weatherAdmin', [ 'myapp.weatherService' ])
  .config(configure);

  configure.$inject = [
    'c8yNavigatorProvider',
    'c8yViewsProvider',
    'gettext'
  ];

  function configure(c8yNavigatorProvider, c8yViewsProvider, gettext) {
    c8yNavigatorProvider.addNavigation({ // adds a menu item to the navigator with ...
      parent: gettext('Settings'), // ... the category *"Settings"*
      name: gettext('Weather'), // ... the name *"Weather"*
      path: 'weather', // ... */weather* as path
      icon: 'cloud' // ... the cloud icon (icons are provided by the great Font Awesome library and you can use any of their [icon names](http://fontawesome.io/icons/) without the *fa-* prefix here
    });

    c8yViewsProvider.when('/weather', { // when the path "/weather" is accessed ...
      templateUrl: ':::PLUGIN_PATH:::/views/weatherAdmin.html' //  ... display our html file "weatherAdmin.html" inside the "views" folder of our plugin (the plugin's folder is represented using the magic string ```:::PLUGIN_PATH:::```, which is replaced by the actual path during the build process)
    });
  }
}());
In our controller, we just need to implement a function for loading the API key and for saving the API key the user entered. For loading the API key, we use the “load” method provided by the “weatherService” plugin.
(function () {
  'use strict';

  angular
    .module('myapp.weatherAdmin')
    .controller('weatherAdminController', weatherAdminController);

  weatherAdminController.$inject = [
    '$scope',
    'c8yTitle',
    'weatherService',
    'gettext'
  ];

  function weatherAdminController($scope, c8yTitle, weatherService, gettext) {
    $scope.updateKey = updateKey;
    weatherService.load().then(function setOpt(key) {
      $scope.key = key;
    });

    c8yTitle.changeTitle({
      title: gettext('Weather provider settings')
    });

    function updateKey() {
      weatherService.save($scope.key);
    }
  }
}());
Now that we have added the config and controller to our plugin, we have to specify “myapp.weatherAdmin” as our module and add each javascript file to our plugin manifest:
{
  "name": "Weather settings",
  "description": "Configure the API key for weather forecasts",
  "icon": "cloud",
  "category": "Administrator",
  "imports": [
    "myapplication/weatherService"
  ],
  "ngModules": [
    "myapp.weatherAdmin"
  ],
  "js": [
    "weatheradmin.config.js",
    "weatheradmin.controller.js"
  ]
}
Create a view where the user can save the API key
In our config, we already specified the .html file which contains our view for the navigation item. In this example, our view should show a simple text and input field as well as a button for saving. To add this view to the plugin, create a folder “views” inside your plugin folder, create a file “weatherAdmin.main.html” and add the following content:
<div ng-controller="weatherAdminController">
  <div class="col-lg-6 panel panel-clean">
    <p translate>Weather functionality is based on the <a href="https://darksky.net" target="_blank">Dark Sky</a> service. Usage of Dark Sky requires an API key that can be obtained by registering at <a href="https://darksky.net/dev/" target="_blank">https://darksky.net/dev/</a>. Paste the API key below.</p>
    <form class="form-horizontal" name="weatherAdminForm" novalidate>
      <div class="form-group">
        <label for="key" class="control-label" translate>API Key</label>
        <div ng-class="{'has-error': invalid('license')}">
          <input type="text" class="form-control" required name="key" id="key" ng-model="key" c8y-autocomplete="off">
        </div>
      </div>
      <div class="form-group ">
        <button type="submit" class="btn btn-primary" ng-click="updateKey()"
                ng-disabled="weatherAdminForm.$invalid||weatherAdminForm.$pristine" translate>
          Save
        </button>
      </div>
    </form>
  </div>
</div>
Create a plugin for the widget
Inside your application folder, run the command:
$ c8y create:plugin weather
Then edit the plugin manifest in /plugins/weather to add the following information:
{
  "name": "Weather",
  "description": "Shows the current weather at the location of a device.",
  "category": "Widgets",
  "icon": "cloud",
  "imports": [
    "myapplication/weatherService"
  ]
}
We will import the “weatherService” plugin, since it provides us the possibility to get weather information for a certain location.
Update the application manifest to add this new plugin to the import list.
{
  "imports": [
    (...)
    "myapplication/weather"
  ]
}
To be able to use the Weather plugin two things need to be added to the application manifest.
Firstly, we need to enable users to use dashboards in our application so that they can create the Weather widget instances. This is possible by importing two core plugins:
{
  "imports": [
    (...)
    "core/dashboard2",
    "core/dashboardUI"
  ]
}
Secondly, we need to allow our application to send requests to Dark Sky API. In order to achieve that, let’s add a new property to the application manifest called contentSecurityPolicy with the following value:
{
  (...)
  "contentSecurityPolicy": "connect-src 'self' *.darksky.net"
  (...)
}
Add an item to the widget menu list
Next, we have to create a configuration file, which adds a menu item to the widget menu list. For that purpose, we can use the service “c8yComponentsProvider” provided by the Cumulocity IoT JavaScript API. Inject the service into your config and call the following function:
(function () {
  'use strict';

  angular
    .module('myapp.weather', [ 'myapp.weatherService' ])
    .config(configure);

  configure.$inject = [
    'c8yComponentsProvider',
    'gettext'
  ];

  function configure(c8yComponentsProvider, gettext) {
    c8yComponentsProvider.add({ // adds a menu item to the widget menu list with ...
      name: 'weather', // ... the identifier *"weather"* which has to be unique among the widgets in the application
      nameDisplay: gettext('Weather'), // ... the displayed name *"weather"*
      description: gettext('Shows the current weather at the location of a device'), // ... a description
      templateUrl: ':::PLUGIN_PATH:::/views/weather.main.html' // ... displaying *"weather.main.html"* when added to the dashboard
    });
  }
}());
Get the weather for the device
In our controller, we get the weather information based on the position of the device which is selected in the widget dialog. If the device changes, the widget will be updated as well.
(function () {
  'use strict';

  angular
  .module('myapp.weather')
  .controller('weatherController', weatherController);

  weatherController.$inject = [
    '$scope',
    '$q',
    'weatherService',
    'gettext',
    'c8yInventory'
  ];

  function weatherController($scope, $q, weatherService, gettext, c8yInventory) {
    $scope.$watch('child.config.device', function reInit(newVal, oldVal) {
      if (newVal && !angular.equals(newVal, oldVal)) {
        init();
      }
    }, true);
    init();

    function init() {
      getDevice().then(tryGetWeather).then(showWeather, printError);
    }

    function getDevice() {
      var deviceId = $scope.child.config.device.id;
      $scope.status = gettext('Retrieving device ...');
      return c8yInventory.detail(deviceId);
    }

    function tryGetWeather(res) {
      $scope.device = res.data;

      if (locationAvailable($scope.device)) {
        $scope.status = gettext('Retrieving weather ...');
        return getWeather($scope.device.c8y_Position);
      }

      $scope.status = gettext('Device has not reported a location, cannot retrieve weather.');
      return $q.reject();
    }

    function locationAvailable(device) {
      return device && device.c8y_Position && device.c8y_Position.lat && device.c8y_Position.lng;
    }

    function getWeather(coordinate) {
      return weatherService.weather.getCurrent(coordinate.lat, coordinate.lng);
    }

    function showWeather(weather) {
      $scope.weather = weather;
      $scope.windDirection = {
        'display': 'inline-block',
        '-ms-transform': rotate(weather),
        '-webkit-transform': rotate(weather),
        'transform': rotate(weather)
      };
      $scope.status = 'ready';
    }

    function printError() {
      $scope.status = gettext('Error retrieving weather information.');
    }

    function rotate(weather) {
      var direction = (weather.currently.windBearing + 180) % 360;
      return 'rotate(' + direction + 'deg)';
    }
  }
}());
Now that we have added the config and controller to our plugin, we have to specify “myapp.weather” as our module and add each javascript file to our plugin manifest:
{
  "name": "Weather",
  "description": "Shows the current weather at the location of a device.",
  "category": "Widgets",
  "icon": "cloud",
  "imports": [
    "myapplication/weatherService"
  ],
  "ngModules": [
    "myapplication.weather"
  ],
  "js": [
    "weather.config.js",
    "weather.controller.js"
  ]
}
Create a view for the widget
In our config, we already specified the .html file which contains our view for the widget. In this example, our widget should show a simple table with information about the temperature, pressure, humidity and wind at the position of the device. To add the table to the view, create a folder “views” inside your plugin folder, create a file “weather.main.html” and add the following content:
<div ng-controller="weatherController" style="padding: 10px">
  <div ng-show="status != 'ready'" class="alert alert-info">{{ status }}</div>
  <div ng-show="status == 'ready'">
    <table class="table">
      <tbody>
        <tr>
          <td>{{ 'Weather' | translate }}</td>
          <td>
            <dark-sky-icon icon="{{ weather.currently.icon }}" uib-tooltip="{{weather.currently.summary | translate }}" tooltip-append-to-body="true"></dark-sky-icon>
          </td>
        </tr>
        <tr>
          <td>{{ 'Temperature' | translate }}</td>
          <td>{{weather.currently.temperature}} C</td>
        </tr>
        <tr>
          <td>{{ 'Pressure' | translate }}</td>
          <td>{{weather.currently.pressure}} hPa</td>
        </tr>
        <tr>
          <td>{{ 'Humidity' | translate }}</td>
          <td>{{weather.currently.humidity * 100}} %</td>
        </tr>
        <tr>
          <td>{{ 'Wind' | translate }}</td>
          <td>{{weather.currently.windSpeed}} {{ 'm/s' | translate }}
            <span class="direction" ng-style="windDirection" uib-tooltip="{{weather.currently.windBearing}} {{ 'deg' | translate }}">↑</span>
          </td>
        </tr>
      </tbody>
    </table>
    <a href="https://darksky.net/poweredby/" target="_blank">Powered by Dark Sky</a>
  </div>
</div>
Test your plugin
After creating and deploying the plugin to your tenant, you should be able to create a widget “Weather”. Note that you have to enter the API key first to see the weather information.