Tab plugin
In this document you will get an overview on how to develop a plugin that adds a new tab to devices.
Overview
Before you start working on the tab plugins, we recommend you to take a look at the introduction which deals with the basic concepts of applications and plugins as well as an “Hello world!” style demo plugin.
You can find this and all the other plugins described in the documentation inside the repository cumulocity-ui-plugin-examples.
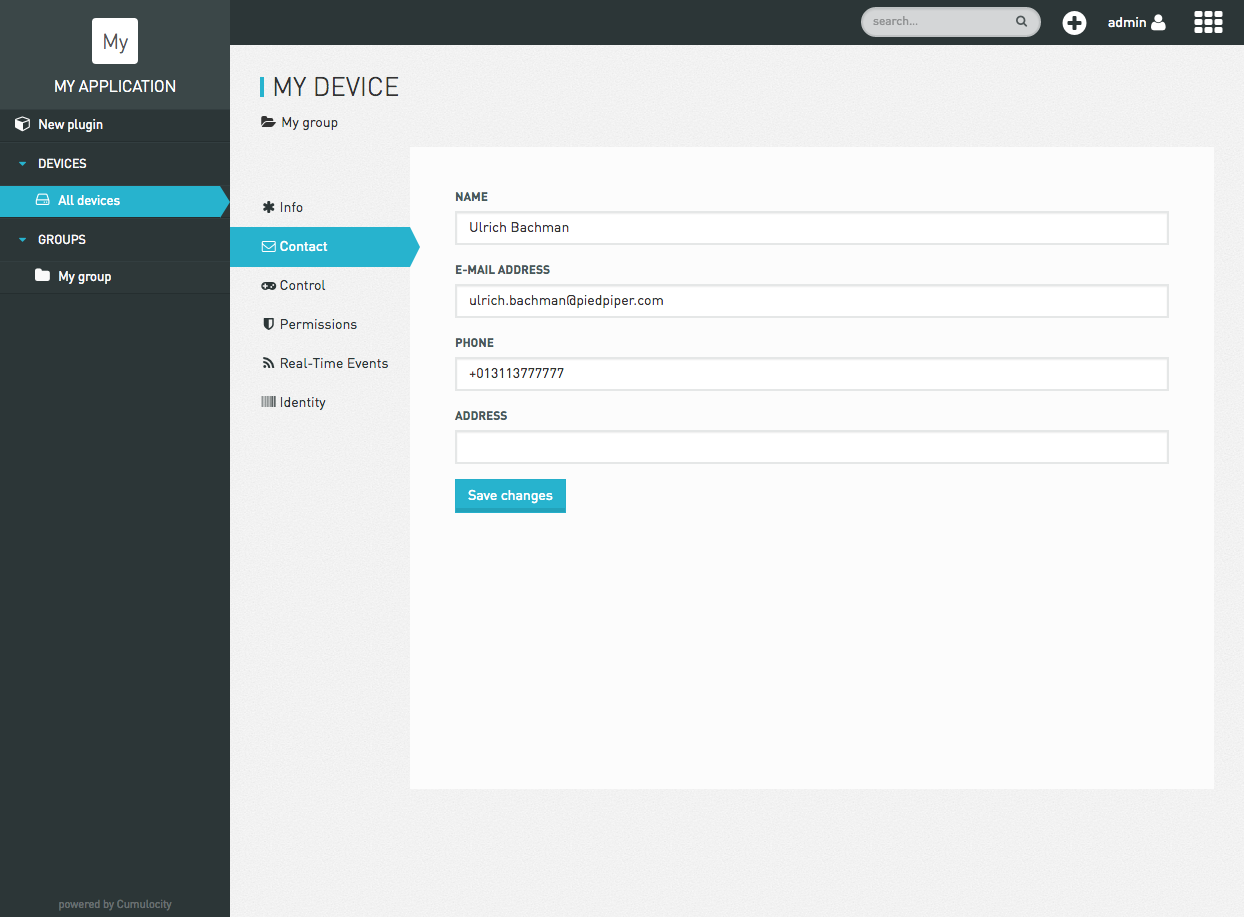
Device Contact plugin
This section shows how to create a plugin that adds a new tab “Contact” to devices in your application. Clicking on “Contact” presents the user with a simple form for entering contact details. When the user saves the form, the contact details are stored as part of the device object in the inventory. The new tab looks like this:
In order to achieve this goal you need to do the following steps:
- Create a plugin.
- Declare the plugin on the imports list of the application manifest.
- Add a tab to devices.
- Display data in the tab.
- Persist the data to Cumulocity IoT backend.
We assume that you already have created an application that you can add the new plugin to. If not, you can use the application provided in the repository mentioned above. You can also find the example described here in the folder “plugins/deviceContact”.
Adding dependencies
For this exercise, let us consider you want to extend the application “Device Management”. In practice, this means adding the set of plugins used in Device Management and adding your own to the list of imports in your application manifest. You can print the list of used plugins by any available application in your development environment by executing the command c8y util:showimports <appContextPath>.
In this case:
$ c8y util:showimports devicemanagement
Add the printed list of plugins to the imports definition of your application manifest.
Note that you have to exclude the c8yBranding plugin if you have already defined your own branding plugin.
However, if you prefer a more minimalistic approach you can also read the “cumulocity.json” file in cumulocity-ui-plugin-examples and only import the essential plugins for the Device Contact plugin to work.
TIP Run
c8y util:showimports cockpitorc8y util:showimports administrationto see other plugins available to you. The manifests for the built-in applications are stored in _apps.json inside “node_modules/cumulocity-ui-build”.
Create a plugin
Inside your application folder, run the command:
$ c8y create:plugin deviceContact
Then edit the plugin manifest in “plugins/deviceControl” to add the following information:
{
	"name": "Device Details - Contact",
	"description": "Plugin adds a Contact tab to Device Details view"
}
Then create a file “deviceContact.module.js” at the plugin’s root folder to have the following content:
(function () {
	'use strict';

	angular.module('myapp.deviceContact', []);
}());
Update the application manifest to add this new plugin to the import list.
{
	...
	"imports": [
		...
		"myapplication/deviceContact"
	]
}
Add a tab to devices
Now, we create an empty “Contact” tab in the device details view, which we will fill with contents in the following step. Inside the plugin folder, create a file “deviceContact.config.js” with the content below. Just like in the “Hello world!” example, we will use the “c8yViewsProvider” service provided by the Cumulocity IoT JavaScript API to add a new view to our application.
(function() {
  'use strict';

  angular
    .module('myapp.deviceContact')
    .config(configure);

  configure.$inject = [
    'c8yViewsProvider'
  ];

  function configure(
		c8yViewsProvider
	) {
    c8yViewsProvider.when('/device/:deviceId', { // when the path "/device/:deviceId" is accessed ...
      name: 'Contact', // ... show a tab with the name *"Contact"*
      icon: 'envelope-o', // ... use the envelope-o icon (icons are provided by the great Font Awesome library and you can use any of their [icon names](http://fontawesome.io/icons/) without the *fa-* prefix here
      priority: 1000, // ... set the priority to 1000, which means that all tabs with a priority lower than 1000 appear before this tab and all with a priority higher than 1000 appear after this tab
      templateUrl: ':::PLUGIN_PATH:::/views/deviceContact.html', //  ... display our html file "deviceContact.html" inside the "views" folder of our plugin (the plugin's folder is represented using the magic string ```:::PLUGIN_PATH:::```, which is replaced by the actual path during the build process)
      controller: 'deviceContactCtrl' // ... use "deviceContactCtrl" as controller
    });
  }

}());
Note that when multiple views are attached to the route ("/device/:deviceId" in this case), tabs are created automatically for each of them. Since the device details view uses /device/:deviceId for device details already, “Contact” is rendered as a tab.
Next, we have to define our view and controller. For the controller, create a new file “deviceContact.controller.js” inside the plugin folder and add the following content:
(function () {
	'use strict';

	angular
    .module('myapp.deviceContact')
    .controller('deviceContactCtrl', DeviceContactController);

	function DeviceContactController() {

	}
}());
Inside the plugin folder, create a new folder “views” and add the file “deviceContact.html” with the following content:
	<div class="panel panel-clean">
		<div class="panel-body">
			Contact
		</div>
	</div>
Now that we have added the module, config and controller to our plugin, we have to specify “myapp.deviceContact” as our module and add each javascript file to our plugin manifest:
{
  "name": "Device Details - Contact",
  "description": "Plugin adds a Contact tab to Device Details view",
  "category": "Examples",
  "ngModules": [
    "myapp.deviceContact"
  ],
  "js": [
    "deviceContact.module.js",
    "deviceContact.config.js",
    "deviceContact.controller.js"
  ]
}
At this point, you can test your application by deploying it. When selecting a device, a new tab “Contact” should be displayed.
Display data in the “Contact” tab
Previously, we only set up a dummy view for the “Contact” tab. In this step, we will display the actual contact information stored with a device in the view. We will define that the contact data is stored in a fragment “c8y_Contact” of a device in the inventory like this:
	{
		"c8y_Contact": {
			"name": "John Smith",
			"email": "john.smith@example.com",
			"phone": "123-456-789",
			"address": "Sample Street 11 A"
		}
	}
Add a load function to “deviceContact.controller.js” and the necessary injection dependencies as shown below. The function gets the details of the currently displayed device ($routeParams.deviceId) and adds the device’s id and “c8y_Contact” fragment to the local scope.
(function() {
  'use strict';

  angular
    .module('myapp.deviceContact')
    .controller('deviceContactCtrl', DeviceContactController);

  DeviceContactController.$inject = [
    '$scope',
    '$routeParams',
    'c8yDevices'
  ];

  function DeviceContactController($scope, $routeParams, c8yDevices) {

    function load() {
      c8yDevices.detail($routeParams.deviceId).then(function (res) {
        var device = res.data;
        $scope.device.id = device.id;
        $scope.device.c8y_Contact = device.c8y_Contact;
      });
    }

    $scope.device = {};

    load();
  }

}());
Edit the device contact view in deviceContact.html with the content below.
	<div class="panel panel-clean">
		<div class="panel-body">
			<form name="contactForm">
				<div class="form-group">
					<label for="contact_name">Name</label>
					<input id="contact_name" type="text" class="form-control" ng-model="device.c8y_Contact.name">
				</div>
				<div class="form-group">
					<label for="contact_email">E-mail address</label>
					<input id="contact_email" type="text" class="form-control" ng-model="device.c8y_Contact.email">
				</div>
				<div class="form-group">
					<label for="contact_phone">Phone</label>
					<input id="contact_phone" type="text" class="form-control" ng-model="device.c8y_Contact.phone">
				</div>
				<div class="form-group">
					<label for="contact_address">Address</label>
					<input id="contact_address" type="text" class="form-control" ng-model="device.c8y_Contact.address">
				</div>
			</form>
		</div>
	</div>
Allow the user to save the data
After completing the following steps, you will be able to save the data entered in the new contact form.
Update the controller in “deviceContact.controller.js” to also save data by adding another injection dependency and the content below just after the closing brace of the load function. “c8yDevices.save” is a library function that stores a device using the Cumulocity IoT REST API. “c8yAlert.success” is a library function that displays a green confirmation box at the top of the user interface.
(function() {
  'use strict';

  angular
    .module('myapp.deviceContact')
    .controller('deviceContactCtrl', DeviceContactController);

  DeviceContactController.$inject = [
    '$scope',
    '$routeParams',
    'c8yDevices',
    'c8yAlert'
  ];

  function DeviceContactController($scope, $routeParams, c8yDevices, c8yAlert) {

    function load() {
      c8yDevices.detail($routeParams.deviceId).then(function (res) {
        var device = res.data;
        $scope.device.id = device.id;
        $scope.device.c8y_Contact = device.c8y_Contact;
      });
    }

    function save(device) {
      c8yDevices.save(device).then(onSave);
    }

    function onSave() {
      c8yAlert.success('Contact information successfully saved!');
    }

    $scope.save = save;
    $scope.device = {};

    load();
  }

}());
Add a “Save changes” button to the device contact view. Paste the div below just before the closing form tag in deviceContact.html. The button will trigger the save function that we just defined.
	<div>
		<a href="" class="btn btn-primary" ng-click="save(device)" ng-disabled="contactForm.$invalid">Save changes</a>
	</div>
Now your plugin is done! Deploy your plugin, open your application in the web browser and click on a device to see the new “Contact” tab.