Hello world
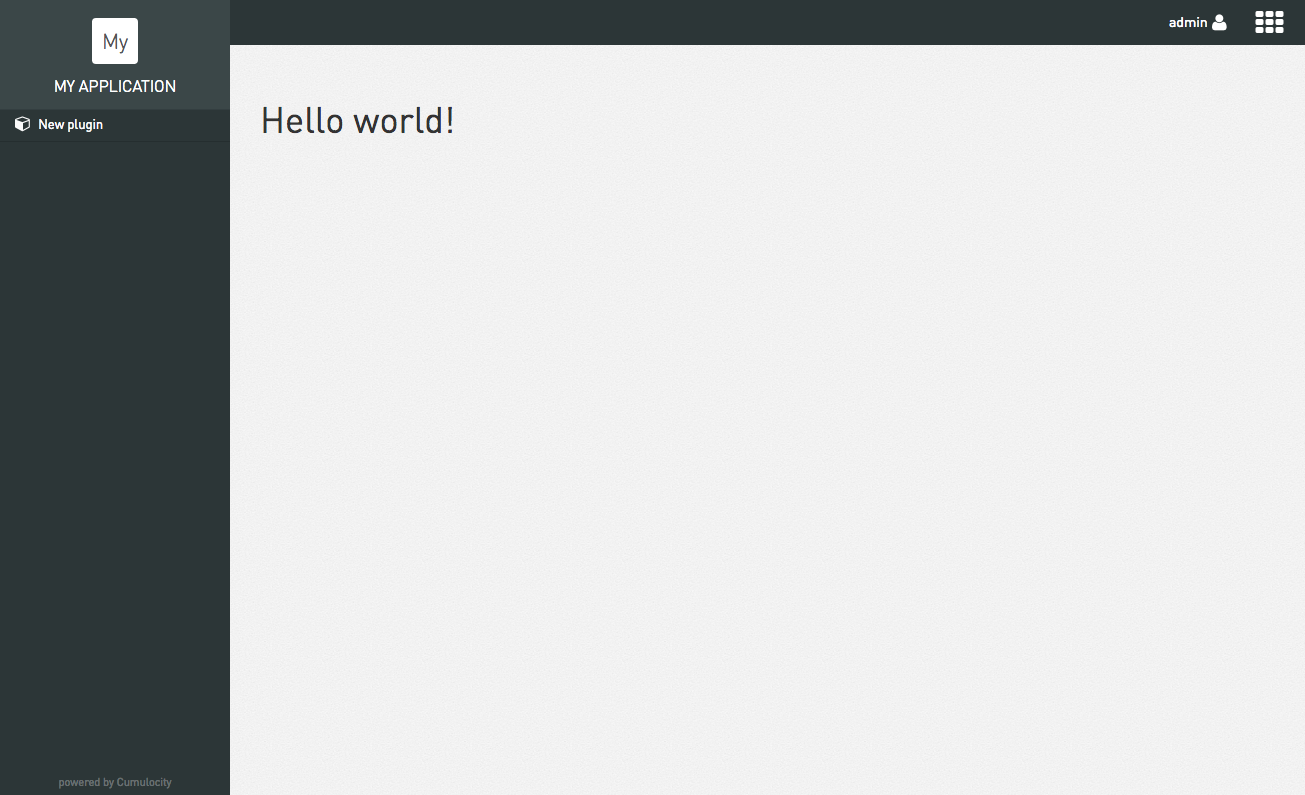
The purpose of this plugin is to add a new application to the app switcher menu. This application will consist of a single menu item which will display a simple “Hello world!” page when selected by the user. At the end, the application should look as follows:
In order to achieve this goal we need to do the following steps:
- Set up an application project.
- Configure the application manifest.
- Create the application in your tenant.
- Configure the plugin manifest.
- Implement the plugin’s initialization function to add a menu item and associate it with a view template.
- Implement the controller to provide data for the view template (a simple text in this case).
- Add the view template to display the data.
- Test the application.
- Finally, build and publish the application and the plugin.
Set up an application project
First, we need to create the application project by
- Creating a new folder with an arbitrary name.
- Creating a “cumulocity.json” file inside this folder, representing our application manifest.
- Running the command “npm init” to create a new “package.json” file.
- Running the command “c8y install latest” to get the latest core plugins.
After these steps you should have the following folder structure:
<<root folder>>
├── node_modules
|		└── ...
├── cumulocity.json
└── package.json
Configure the application manifest
Second, we have to fill out the application manifest (the “cumulocity.json” file inside our root folder) with information about our Cumulocity IoT application, such as its name, key, URL and dependencies. For this example, we have to specify the following properties:
	{
		"availability": "PRIVATE",
	  "contextPath": "myapplication",
	  "key": "myapplication-appkey",
	  "name": "myapplication",
	  "resourcesUrl": "/",
	  "type": "HOSTED",
		"imports": [
			"core/c8yBranding"
		]
	}
With the project structure so far, we can already test our application. By adding the “c8yBranding” plugin from the Cumulocity IoT UI package to our imports, our application will not be completely empty when we try to access it. As the name already indicates, the plugin adds the Cumulocity IoT’s branding to our application. Before we can test an application locally, we have to create it on our tenant first.
For more details on other properties of the manifest, see Concepts > Manifests.
Create the application in your tenant
After successfully logging in into a Cumulocity IoT UI application, the application key is fetched automatically. Thus, to develop an application we need to make sure that the application is created in our tenant. To create the application in our tenant we simply deploy it using c8y deploy:app <appContextPath>.
$ c8y deploy:app myapplication
? Tenant piedpiper
? User admin
? Password ***********
? Base URL https://piedpier.cumulocity.com
GET application/applicationsByOwner/piedpier?pageSize=10000 200
POST application/applications/31337/binaries/ 201
PUT /application/applications/31337 200
You will be asked for the name and base URL of your tenant, as well as your username and password. To prevent filling out these prompts over and over again, you can define the following environment variables on your computer: C8Y_TENANT, C8Y_USER, C8Y_PASS and C8Y_BASE_URL.
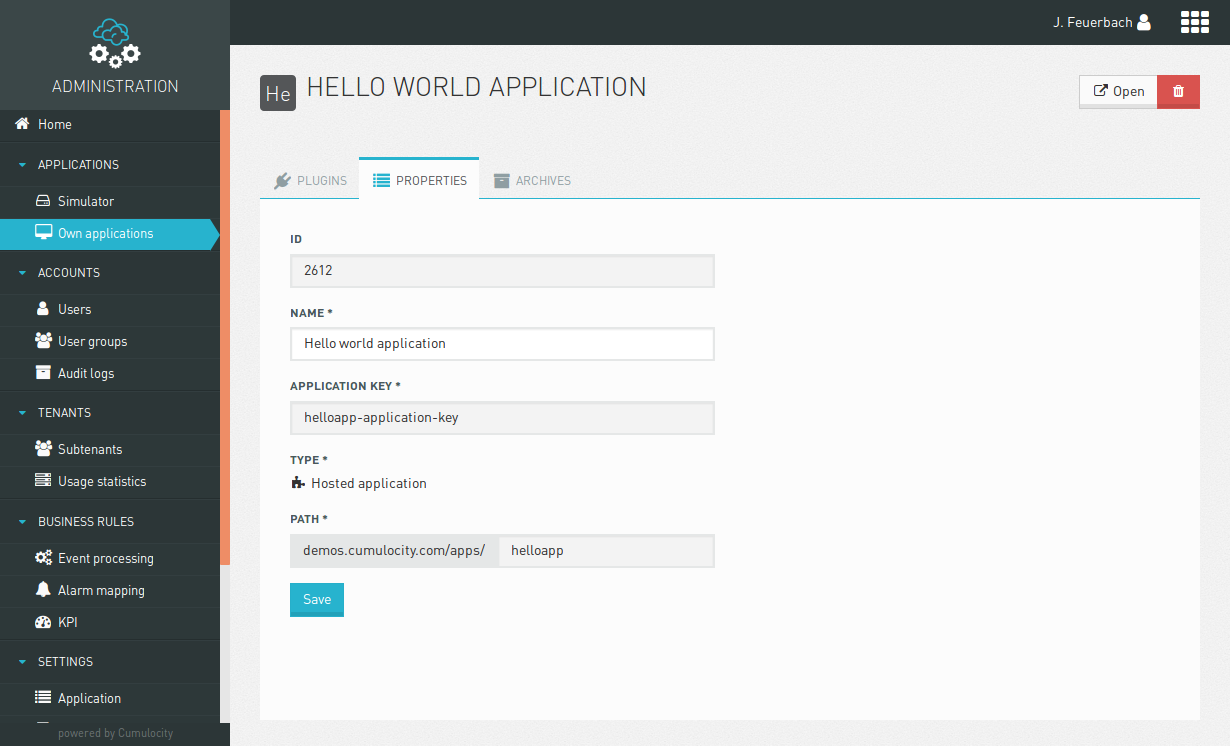
After deploying your application, it appears in the “Own applications” menu of the “Administration” application.
Test your application
To run your application locally, just run c8y server.
Additionally, you can pass options:
-u https://tenant.cumulocity.comwith the instance as parameter where you want your api calls to be proxied to,-t examplesor-t targets/examples/jsonto use specific target file, e.g. if you want to test your plugins inside one of the standard applications and you have defined your target file as in the example:
{
  "name": "Examples",
  "comment": "Release with additional example plugins",
  "replaceImports": {
    "core/c8yBranding": "myapplication/myBranding"
  },
  "applications": [
    {
      "contextPath": "administration",
      "addImports": [
        "myapplication/weatherAdmin"
      ]
    },
    {
      "contextPath": "devicemanagement",
      "addImports": [
        "myapplication/deviceEventsRealTime",
        "myapplication/deviceContact"
      ]
    },
    {
      "contextPath": "cockpit",
      "addImports": [
        "myapplication/weather",
        "myapplication/iconmap"
      ]
    }
  ]
}
Example console output:
$ c8y server -u https://tenant.cumulocity.com -t targets/examples.json
Cumulocity UI development server running in port 9000.
Proxying api requests to https://tenant.cumulocity.com
140 modules loaded.
5 application manifest loaded.
http://localhost:9000/apps/myapplication/ cumulocity.json
http://localhost:9000/apps/fieldbus4/  Packaged App
http://localhost:9000/apps/administration/  Packaged App
http://localhost:9000/apps/cockpit/  Packaged App
http://localhost:9000/apps/devicemanagement/  Packaged App
Now, you can test your application by opening your browser at the URL “http://localhost:9000/apps/myapplication/”. If you access your application now, you should be able to see the following:

What is missing now is a plugin which adds a menu item to the navigator.
Configure the plugin manifest
Each plugin comes in a separate subfolder inside the plugins folder of your application. So to add a plugin to our application, we have to
- Create a “plugins” folder in our project
- Create a folder named “myplugin” inside the “plugins” folder.
- Create a “cumulocity.json” file inside the “myplugin” folder, representing our application manifest.
- Create a “views” folder inside the “myplugin” folder.
- Create a “hello.html” file inside the “views” folder, representing the view of our plugin.
After these steps you should have the following folder structure:
<<root folder>>
├── node_modules
├── plugins
|		└── myplugin
|				├──views
|				|	 └── hello.html
|				└── cumulocity.json
├── cumulocity.js
└── package.json
The plugin manifest provides information about our plugin, such as the name, a short description, files to be loaded, and angular modules to be added to the main app. For our example, add the following lines to the “cumulocity.json” file:
{
	"name": "Hello world plugin testing",
	"description": "Simple hello world plugin."
}
For more details on other properties of the manifest, see Concepts > Manifests.
Now that we have added a plugin to our application, we also have to add it to the imports of our application manifest. The name of the import consists of two parts separated by a slash. The first part has to be the context path of the application the plugin is located in and the second part has to be the name of the plugin folder. In our case, our plugin is located in our application with the context path “myapplication” as specified in the application manifest and our plugin folder is named “myplugin” which results in:
	{
		"availability": "PRIVATE",
		"contextPath": "myapplication",
		"key": "myapplication-appkey",
		"name": "myapplication",
		"resourcesUrl": "/",
		"type": "HOSTED",
		"imports": [
			"core/c8yBranding",
			"myapplication/myplugin"
		]
	}
After we added the plugin folder to our application, we can start implementing the functionality.
Implement the plugin’s initialization function
Even though the scope of this example is very small, we recommend you to use a modular approach. For this reason, create a file “hello.module.js” for the module, a file “hello.config.js” for the config and a file “hello.controller.js” for the controller inside the “myplugin” folder.
Inside the “hello.module.js” file, we initialize the module for our plugin:
(function () {
  'use strict';

  angular.module('myapp.hello', []);
}());
In our “hello.config.js” file, we have to configure our plugin so that it adds a menu item to the navigator and redirects to our view when clicking on this menu item. For that purpose, we can use the services “c8yNavigatorProvider” and “c8yViewsProvider” provided by the Cumulocity JavaScript API. Simply inject the services into your config and call the following functions:
(function () {
  'use strict';

  angular
    .module('myapp.hello')
    .config(configure);

  configure.$inject = [
    'c8yNavigatorProvider',
    'c8yViewsProvider'
  ];

  function configure(
    c8yNavigatorProvider,
    c8yViewsProvider
  ) {
    c8yNavigatorProvider.addNavigation({ // adds a menu item to the navigator with ...
      name: 'hello', // ... the name *"hello"*
      icon: 'cube', // ... the cube icon (icons are provided by the great Font Awesome library and you can use any of their [icon names](http://fontawesome.io/icons/) without the *fa-* prefix here
      priority: 100000, // ... a priority of 100000, which means that all menu items with a priority lower than 100000 appear before this menu item and all with a priority higher than 100000 appear after this menu item
      path: 'hello' // ... */hello* as path
    });

    c8yViewsProvider.when('/hello', { // when the path "/hello" is accessed ...
      templateUrl: ':::PLUGIN_PATH:::/views/hello.html', //  ... display our html file "hello.html" inside the "views" folder of our plugin (the plugin's folder is represented using the magic string ```:::PLUGIN_PATH:::```, which is replaced by the actual path during the build process)
      controller: 'HelloController', // ... use "HelloController" as controller
      controllerAs: 'vm'
    });
  }
}());
Implement the controller
Second, we have to implement the controller for our view. For this example, the controller just defines a variable “text” which contains the simple static text “hello, world”:
(function () {
  'use strict';

  angular
    .module('myapp.hello')
    .controller('HelloController', HelloController);

  function HelloController() {
    var vm = this;

    vm.text = 'hello, world';
  }
}());
Now that we have added the module, config and controller to our plugin, we have to specify “myapp.hello” as our module and add each javascript file to our plugin manifest:
{
	"name": "Hello world plugin testing",
	"description": "Simple hello world plugin.",
	"ngModules": [
    "myapp.hello"
	],
	"js": [
    "hello.module.js",
    "hello.config.js",
    "hello.controller.js"
	]
}
View template
After we defined the variable “text”, we can access it in our view template. To render the text, add the following to your hello.html file:
<div>{{vm.text}}</div>
Test your application
To test your application, use the command c8y server with the complete URL of your tenant as parameter.
Build and deploy your application and plugins
If you run c8y --help you will list all available commands.
You can choose to build applications or plugins which results in a zip file that you can add by hand in any Cumulocity “Administration” application or you can deploy the app directly to your tenant.
build:app
Builds the application to the specified folder (./build by default). Inside the outputFolder you will find a directory named [appContextPath] and a zip file [appContextPath].zip. This zip file can then be uploaded in the “Administration” application. If you omit appContextPath the contextPath will be read from the “cumulocity.json” file at the path where the command was executed.
$ c8y build:app [appContextPath] [outputFolder]
build:plugin
Builds the plugin to the specified folder (./build by default). Inside the outputFolder you will find a directory named [pluginName] and a zip file [pluginName].zip. This zip file can be uploaded in the “Administration” interface and added to any application.
$ c8y build:plugin <pluginName> [outputFolder]
deploy:app
Builds all the plugins, assembles the application and uploads it to the defined tenant. If the app doesn’t yet exist on the remote instance it will be automatically created.
$ c8y deploy:app <appContextPath>
The build process for plugins includes the following steps:
- Annotate angular functions with $inject. (Using ng-annotate).
- Replace the
:::PLUGIN_PATH:::by the proper strings. - Transform every html file to be included via $templateCache.
- Concatenate and minify all the defined js files in the manifest (using UglifyJS 2).
- Compile all the less files.
- Concatenate and minify all the CSS and result of the less files.
- Copy all the files defined in ‘copy’ in the manifest.
- Copy all the localization files that may be available inside locales folder inside the plugin.
- Copy the plugin manifest.
- Create a zip file with the above contents.
The build process for an app includes the following steps:
- Copy a built version of each plugin defined in the imports list.
- Assemble all the localization files available in each plugin and assemble them in a single .json and .po file for each available language.
- Generate an index.html.
- Copy the application manifest.
- Create a zip file with the above contents.
Deploy your plugin to the core applications
You can also add or replace plugins in the core applications by specifying a target .json file. This file is not restricted in its name or path.
{
	"name": "Examples",
	"comment": "Release with additional example plugins",
	"applications": [
		{
			"contextPath": "administration",
            "addImports": [ "myapplication/myplugin" ]
		}
	]
}
The example above shows how to add your self-developed plugin to one of the core applications, in this case the “Administration” application. When specifying a plugin, ensure to include the contextPath of the application the plugin is in. In this case, the plugin “myplugin” is located in the plugins folder of the application with the contextPath “myapplication”.
If you are not deploying to a management tenant, you need to include the following fragment to your target .json file:
	"allApplications": {
		"availability": "PRIVATE"
	}
To deploy a target file, you have to execute c8y deploy:target [targetFile]. Assuming that we have the following folder structure:
<<root folder>>
├── targets
|		└── target.json
├── plugins
|		└── ...
├── cumulocity.js
└── package.json
We would have to execute the following command:
c8y deploy:target targets/target.json