REST is a very simple and secure protocol based on HTTP(S) and TCP. It is today the de-facto Internet standard supported by all networked programming environments ranging from very simple devices up to large-scale IT. One of the many books introducing REST is RESTful Web Services.
This section explains how to use Cumulocity’s REST interfaces to integrate devices with Cumulocity. For general information on using REST interfaces and for information on developing applications on top of Cumulocity using REST refer to Microservice SDK.
The description is closely linked to the Cumulocity OpenAPI Specification, which describes each interface in detail, as well as the fragment library:
Fragment library specifies managed objects (devices) as well as for predefined sensor and control capabilities of devices.
If you develop using Java ME/SE, JavaScript or C/C++, check the relevant chapters in this guide for even more convenient access to Cumulocity’s functionality. Also, if you use any of the supported development boards, see the corresponding description in the Devices guide for more information.
Integration lifecycle
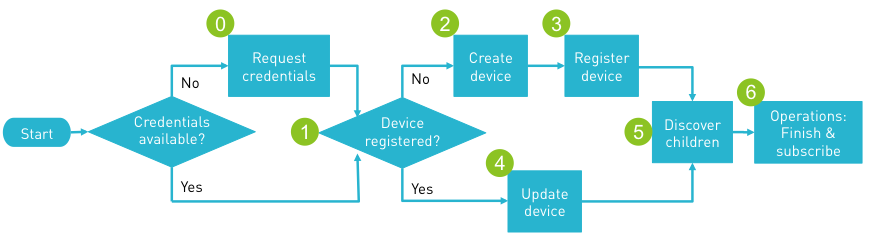
The basic lifecycle for integrating devices into Cumulocity is discussed in Interfacing devices. In this section, we will show how this lifecycle is implemented on REST level. The lifecycle consists of two phases, a startup phase and a cycle phase.
The startup phase connects the device to Cumulocity and updates the device data in the inventory. It also performs cleanup tasks required for operations. It consists of the following steps:
Step 0: Request device credentials, if not already requested.
Step 1: Check if the device is already registered.
Step 2: If not, create the device in the inventory and
Step 3: Register the device (create the identity).
Step 4: If yes, update the device in the inventory.
Step 5: Discover child devices and create or update them in the inventory.
Step 6: Complete operations that required a restart and subscribe to new operations.
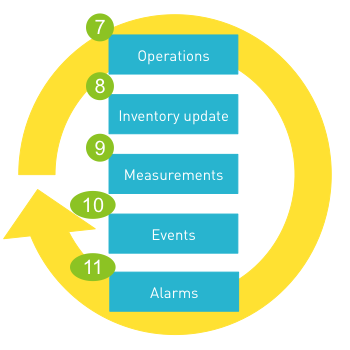
The cycle phase follows. It continuously updates the inventory, writes measurements, alarms and events and executes operations as necessary. It can be considered to be the “main loop” of the device which is executed until the device shuts down. The loop consists of the following steps:
Reference models for the data can be found in the fragment library.
Startup Phase
Step 0: Request device credentials
Every request to Cumulocity must be authenticated, including requests from devices. If you want to assign individual credentials to devices, you can use the device credentials API to generate new credentials automatically. To do so, request device credentials at first startup through the API and store them locally on the device for further requests.
The process works as follows:
Cumulocity assumes each device to have some form of unique ID. A good device identifier may be the MAC address of the network adapter, the IMEI of a mobile device or a hardware serial number.
When you take a new device into use, you enter this unique ID into the device registration dialog in the tenant UI and start the device.
Once started, the device will connect to Cumulocity and send its unique ID repeatedly. For this purpose, Cumulocity provides static bootstrap credentials that can be obtained by contacting product support.
You can accept the connection from the device in the device registration dialog in the tenant UI, in which case Cumulocity then sends generated credentials to the device.
The device will store and use these credentials for all further requests.
From a device perspective, this request for credentials is a single REST request:
The device issues this request repeatedly. While the user has not yet registered and accepted the device in the tenant UI, the request returns “404 Not Found.” After the device has been accepted in the tenant UI, the following response is returned:
HTTP/1.1 200 OK
Content-Type: application/vnd.com.nsn.cumulocity.devicecredentials+json;charset=UTF-8;ver=0.9
Content-Length: ...
{
  "id" : "0000000017b769d5",
  "self" : "<<URL of new request>>",
  "tenantId" : "test",
  "username" : "device_0000000017b769d5",
  "password" : "3rasfst4swfa"
}
The device can now connect to Cumulocity using the tenant ID, username and password. User alias is not supported for devices.
With the introduction of the concept of Enterprise tenants, it is no longer safe to assume the tenant name is the same as the tenant ID. The credentials request returns the tenant ID only. This cannot be used as the subdomain, combined with the domain name to provide a tenant URL that can be accessed with username only (and password). Access to the correct tenant can only be ensured by using the tenant ID and the username in authentication, for example, <tenant ID>/<username> with the password returned by the credentials request. In this case, the subdomain is irrelevant.
For example, a credentials request for a device added to xyz.cumulocity.com could return a user ID, password and a tenant ID of “t123456789”. The tenant ID “t123456789” cannot be used as a subdomain (that is, t123456789.cumulocity.com) for requests with the user ID and password - it will return “http 403”. The tenant ID must be used with the user ID in the form “t123456789/”, along with the password. The actual subdomain is then irrelevant. t123456789.cumulocity.com or management.cumulocity.com or even anything.cumulocity.com can be used.
Cumulocity uses the tenant ID specified with the user ID for full authentication and routing of the request to the correct tenant.
If the valid tenant URL is known (for example xyz.cumulocity.com as seen in the example above), then the username does not have to be prefixed by <tenant ID>/ for authentication.
Step 1: Check if the device is already registered
The unique ID of the device is also used for registering the device in the inventory. The registration is carried out using the Identity API. In the Identity API, each managed object can be associated with multiple identifiers distinguished by type. Types are, for example, “c8y_Serial” for a hardware serial, “c8y_MAC” for a MAC address and “c8y_IMEI” for an IMEI.
To check if a device is already registered, use a GET request on the identity API using the device identifier and its type. The following example shows a check for a Raspberry Pi with hardware serial “0000000017b769d5”.
Note that while MAC addresses are guaranteed to be globally unique, serial numbers for hardware may overlap across different hardwares. Hence, in the above example, we prefixed the serial number with a “raspi-” when registering the device (see Step 3).
In this case, the device is already registered and a status code of 200 is returned. In the response, a URL to the device in the inventory is returned in “managedObject.self”. This URL can be used to work with the device later on.
If a device is not yet registered, a 404 status code and an error message is returned:
GET /identity/externalIds/c8y_Serial/raspi-0000000017b769d6 HTTP/1.1

HTTP/1.1 404 Not Found
Content-Type: application/vnd.com.nsn.cumulocity.error+json;charset=UTF-8;ver=0.9
...
{
    "error": "identity/Not Found",
    "info": "https://www.cumulocity.com/guides/reference/#error_reporting",
    "message": "External id not found; external id = ID [type=c8y_Serial, value=raspi-0000000017b769d6]"
}
Step 2: Create the device in the inventory
If Step 1 above indicated that no managed object representing the device exists, create the managed object in Cumulocity. The managed object describes the device, both its instance and metadata. Instance data includes hardware and software information, serial numbers, and device configuration data. Metadata describes the capabilities of the devices, including the supported operations.
To create a managed object, issue a POST request on the managed objects collection in the Inventory API. The following example creates a Raspberry Pi using the Linux agent:
The example above contains a number of metadata items for the device:
“c8y_IsDevice” marks devices that can be managed using Cumulocity’s Device Management application.
“com_cumulocity_model_Agent” marks devices running a Cumulocity agent. Such devices will receive all operations targeted to themselves and their children for routing.
“c8y_SupportedOperations” states that this device can be restarted and configured. In addition, it can carry out software and firmware updates.
If the device could be successfully created, a status code of 201 is returned. If the original request contains an “Accept” header as in the example, the complete created object is returned including the ID and URL to reference the object in future requests. The returned object also include references to collections of child devices and child assets that can be used to add children to the device (see below).
Step 3: Register the device
After the new device has been created, it can now be associated with its built-in identifier as described in Step 1. This ensures that the device can find itself in Cumulocity after the next power-up.
Continuing the above example, we would associate the newly created device “2480300” with its hardware serial number:
If Step 1 above returned that the device was previously registered already, we must make sure that the inventory representation of the device is up to date with respect to the current state of the actual device. For this purpose, a PUT request is sent to the URL of the device in the inventory. Note, that only fragments that can actually change must be transmitted. (See Cumulocity’s domain model for more information on fragments.)
For example, the hardware information of a device will usually not change, but the software installation may change. So it may make sense to bring the software information in the inventory up to the latest state after a reboot of the device:
PUT /inventory/managedObjects/2480300 HTTP/1.1
Content-Type: application/vnd.com.nsn.cumulocity.managedobject+json
...
{
    "c8y_Software": {
        "pi-driver": "pi-driver-3.4.6.jar",
        "pi4j-gpio-extension": "pi4j-gpio-extension-0.0.5.jar"
    }
}

HTTP/1.1 200 OK
Important
Do not update the name of a device from an agent! An agent creates a default name for a device so that it can be identified in the inventory, but users should be able to edit this name or update it with information from their asset management.
Step 5: Discover child devices and create or update them in the inventory
Depending on the complexity of the sensor network, devices may have child devices associated with them. A good example is home automation: You often have a home automation gateway that installs a multitude of different sensors and controls installed in various rooms of the household. The basic registration of child devices is similar to the registration of the main device up to the fact, that child devices usually do not run an agent instance (hence the “com_cumulocity_model_Agent” fragment is left out). To link a device with a child, send a POST request to the child devices URL that was returned when creating the object (see above).
For example, assume a child device with the URL “https://…/inventory/managedObjects/2543801” has already been created. To link this device with its parent, issue:
POST /inventory/managedObjects/2480300/childDevices HTTP/1.1
Content-Type: application/vnd.com.nsn.cumulocity.managedobjectreference+json
{
    "managedObject" : {
        "id" : "2543801"
    }
}

HTTP/1.1 201 Created
Finally, devices and references can be deleted by issuing a DELETE request to their URLs. For example, the reference from the parent device to the child device that we just created can be removed by issuing:
DELETE /inventory/managedObjects/2480300/childDevices/2543801 HTTP/1.1

HTTP/1.1 204 No Content
This does not delete the device itself in the inventory, only the reference. To delete the device, issue:
DELETE /inventory/managedObjects/2543801 HTTP/1.1

HTTP/1.1 204 No Content
This request will also delete all data associated with the device including its registration information, measurements, alarms, events and operations. Usually, it is not recommended to delete devices automatically. For example, if a device has just temporarily lost its connection, you usually do not want to lose all historical information associated with the device.
Step 6: Complete operations and subscribe
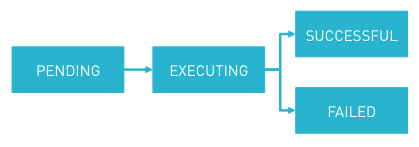
Each operation in Cumulocity is cycled through an execution flow. When an operation is created through a Cumulocity application, its status is PENDING, that means, it has been queued for executing but it hasn’t executed yet. When an agent picks up the operation and starts executing it, it marks the operations as EXECUTING in Cumulocity. The agent will then carry out the operation on the device or its children (for example it will restart the device, or set a relay). Then it will possibly update the inventory reflecting the new state of the device or its children (for example it updates the current state of the relay in the inventory). Then the agent will mark the operation in Cumulocity as either SUCCESSFUL or FAILED, potentially indicating the error.
The benefit of this execution flow is that it supports devices that are offline and temporarily out of coverage. It also allows devices to support operations that require a restart – such as a firmware upgrade. After the restart, the device needs to know what it previously did and hence must query all EXECUTING operations and see if they were successful. Also, it needs to listen what new operations may be queued for it.
To clean up operations that are still in EXECUTING status, query operations by agent ID and status. In our example, the request would be:
The restart seems to have executed well – we are back after all. So let’s set the operation to SUCCESSFUL.
PUT /devicecontrol/operations/2593101 HTTP/1.1
Content-Type: application/vnd.com.nsn.cumulocity.operation+json
{
    "status": "SUCCESSFUL"
}

HTTP/1.1 200 OK
Then, listen to new operations created in Cumulocity. The mechanism for listening to real-time operations in Cumulocity is described in the Device control notification API in the Cumulocity OpenAPI Specification and is based on the standard Bayeux protocol. First, a handshake is required. The handshake tells Cumulocity what protocols the agent supports for notifications and allocates a client ID to the agent.
Afterwards, the device respectively the agent must subscribe to notifications for operations. This is done using a POST request with the ID of the device as subscription channel. In our example, the Raspberry Pi runs an agent and has ID 2480300:
This request will hang until an operation is issued (that is, the HTTP server will not answer immediately) but will wait until an operation is available for the device (long polling).
Note that there might have been operations that were pending before we subscribed to new incoming operations. We must query these still. This is done after the subscription to not miss any operations between query and subscription. The technical handling is just like previously described for EXECUTING operations, but using PENDING instead:
GET /devicecontrol/operations?agentId=2480300&status=PENDING HTTP/1.1
Cycle Phase
Step 7: Execute operations
Assume now that an operation is queued for the agent. This will make the long polling request that we issued above return with the operation. Here is an example of a response with a single configuration operation:
When the agent picks up the operation, it sets it to EXECUTING status in Cumulocity using a PUT request (see above example for FAILED). It carries out the operation on the device and runs possible updates of the Cumulocity inventory. Finally, it sets the operation to SUCCESSFUL or FAILED depending on the outcome. Then, it will reconnect again to “/notification/operations” as described above and wait for the next operation.
The device should reconnect within ten seconds to the server to not lose queued operations. This is the time that Cumulocity buffers real-time data. The interval can be specified upon handshake.
Step 8: Update inventory
The inventory entry of a device usually represents its current state, which may be subject of continuous change. As an example, consider a device with a GPS chip. That device will keep its current location up-to-date in the inventory. At the same time, it will report location updates as well as events to maintain a trace of its locations. Technically, such updates are reported with the same requests as shown in Step 4.
Step 9: Send measurements
To create new measurements in Cumulocity, issue a POST request with the measurement. The example below shows how to create a signal strength measurement.
Note that all data types in Cumulocity can include arbitrary extensions in the form of additional fragments. In this case, the event includes a position, but also self-defined fragments can be added.
Step 11: Send alarms
Alarms represent events that most likely require human intervention to be solved. For example, if the battery in a device runs out of energy, someone must visit the device to replace the battery. Creating an alarm is technically very similar to creating an event.
However, you most likely should not create an alarm for a device, if there is a similar alarm already active in the system. Creating many alarms may flood the user interface and may require users to manually clear all the alarms. This is an example for finding the active alarms of our Raspberry Pi from above:
GET /alarm/alarms?source=2480300&status=ACTIVE HTTP/1.1
In contrast to events, alarms can be updated. If an issue is resolved (for example the battery has been replaced, power has been restored), the corresponding alarm should be automatically cleared to save manual work. This can be done through a PUT request to the URL of the alarm. In the above example for creating an alarm, we used an “Accept” header to get the URL of the new alarm in the response. We can use this URL to clear the alarm:
PUT /alarm/alarms/214600 HTTP/1.1
Content-Type: application/vnd.com.nsn.cumulocity.alarm+json
...
{
    "status": "CLEARED"
}

HTTP/1.1 200 OK
If you are uncertain on whether to send an event or raise an alarm, you can simply just raise an event and let the user decide with a Real-time rule if they want to convert the event into an alarm.
Replacing a physical device
You can replace a physical device that is already connected to the Cumulocity platform while keeping its external ID and the data the device has collected.
Do the following:
Open the old device in Cumulocity’s Device Management application and change its owner to the one you looked up, and also add the external IDs you removed from the new device.
Remove the new device object that was created earlier but keep the device user.
Turn on the new physical device.
The new physical device sends its data to the existing managed object.
Caution
The above steps only work if the device is using standard device bootstrapping.
Otherwise contact the device integrator or manufacturer.
Info
If the device has child devices, their owners must also be updated.
Device authentication
Devices can authenticate to the Cumulocity platform using:
Device user credentials, that is, using the device username and password,
Certificate Authentication, that is, using X509 certificates over a defined REST endpoint protocol to procure the JWT session token on port 8443.
Mutual TLS (mTLS) is a security protocol that uses X.509 certificates for both client and server authentication in a communication session.
The mTLS protocol is commonly used to secure connections in web services, APIs, and other networked applications. When generating tokens using mTLS, the process involves the authentication of both the client and the server using X.509 certificates.
Retrieving device access tokens from the platform with certificates does not require the tenant ID, username and password. Authentication information will be obtained from the certificates.
The device access token can be retrieved by sending only the device leaf certificate if an immediate issuer of the device certificate is uploaded to the trusted certificates list. If the uploaded trusted certificate is not an immediate issuer of the device certificate but belongs to the device’s chain of trust, then the device must send the entire certificate chain in the X-Ssl-Cert-Chain to be authenticated successfully and retrieve the device access token.
You can define which organization you trust by uploading the CA certificate (root/intermediate) to Cumulocity. For details, see Trusted certificates. Alternatively, you can use the Certificate Authority feature. In this case, the root CA certificate is created by Cumulocity, along with a device certificate that is signed by this CA. For details, see Certificate Authority.
JWT session token retrieval
The devices can authenticate using X.509 certificates against Cumulocity by using the below endpoint only. In response, a JWT session token is issued by Cumulocity after successful authentication which can later be used to make subsequent requests.
The device access token API can be called by executing the following curl statement:
Replace <device certificate chain> with your valid certificate chain when registering with Cumulocity. The header X-Ssl-Cert-Chain is not mandatory if you have an immediate issuer of the device certificate in Cumulocity.
A device token is used to access Cumulocity via REST calls. There is no need to send the certificate in subsequent requests once a device token is acquired.
A device token lifetime can be configured using tenant options with a category of oauth.internal and a key of device-token.lifespan.seconds.
The default value is 1 hour.
The minimum allowed value is 5 minutes.
Refer to the Tenant API in the Cumulocity OpenAPI Specification for more details.
It is recommended that the devices invalidate the session by explicitly calling the logout API before closing the HTTP connection. This will avoid any misuse of JWT session tokens generated.
Here is the logout API. Refer to the Users API in the Cumulocity OpenAPI Specification for more details.
Only devices that are registered to use certificate authentication can retrieve a JWT session token using this endpoint. Once the device successfully authenticates using certificates (that is, by using its private key and the certificate chain), the device retrieves the JWT session token. This mTLS over HTTP endpoint can be leveraged only over this endpoint on port 8443.
REST client examples
Hello REST
This section gives a very basic example how to create a device representation in Cumulocity and subsequently how to send related measurement data.
All steps are performed by calling REST interfaces. Those REST calls are demonstrated by CURL statements that can be executed on command line.
When creating a device, Cumulocity generates an ID, which is needed in further calls in order to reference the device. You can find this ID as the “id” attribute-value pair in the response.
Send measurement data
After the device is created, we can send measurement data.
In our case, we will send a temperature measurement in the unit of Celsius which was collected on a certain time:
If you like to, you can repeat sending measurements. Before sending the request again, you should update the timestamp (value of attribute ’time’) in order to create a time series.
Now you are done. Enter the Device Management application in the Cumulocity UI, select your device on the “All devices” page and switch to the “Measurements” tab. Here you can see your measurement data.
If you do not see data, you might need to change the filter setting to, for example, “last week” to include the timestamp you used in your submitted measurement.
Going further
The sequence of REST calls demonstrated here is just a shortened procedure of those described in Device integration.
The first step (creating a new device) is part of the ‘startup phase’, whereas step two (sending measurements) references to the ‘cycle phase’.
Refer to the section on Device integration to get the necessary information required for implementing real-world agents.
Hello X509 REST
In this section, we will learn how to generate a JWT token using mTLS protocol with Cumulocity.
For authentication with Cumulocity we use X.509 certificates. To learn more about X.509 certificates, refer to Device certificates. The Device access token API is only accessible on port 8443.
Prerequisites
In order to follow this tutorial, check the following prerequisites:
Verify that you have Maven 3 and at least Java 8 installed.
Create a root self-signed certificate (execute the script 00createRootSelfSignedCertificate.sh) and upload it to your tenant. You can do it via the Device Management application in the UI or via REST.
Create and sign the certificate (execute the script 01createSignedCertificate.sh).
Move the certificates to keystore (execute the script 02moveCertificatesToKeystore.sh).
Download the public server key from the respective environment and import it into JKS using this command:
The following configuration is required before calling the device access token API using:
KEYSTORE_NAME - The path to your keystore which contains the private key and the chain of certificates, which the device uses to authenticate itself.
KEYSTORE_PASSWORD - The password created for keystore to use its private key.
KEYSTORE_FORMAT - Either “JKS” or “PKCS12” depending on the file format. The path is provided by KEYSTORE_NAME.
TRUSTSTORE_NAME - The path to your truststore which contains the certificate of the server.
TRUSTSTORE_PASSWORD - The password to access the truststore.
TRUSTSTORE_FORMAT - Either “JKS” or “PKCS12” depending on the file format. The path is provided by TRUSTSTORE.
PLATFORM_URL - The URL of the platform.
PLATFORM_MTLS_PORT - Port 8443 is available for device access token API
DEVICE_ACCESS_TOKEN_PATH API - The endpoint responsible for the mTLS protocol.
LOCAL_DEVICE_CHAIN - The whole chain in PEM format. This header is not mandatory, if you have uploaded the immediate issuer of the device certificate as trusted certificate in Cumulocity.
Changing the configuration
To change the configuration in the REST Java client, copy the file chain-with-private-key-iot-device-0001.jks into the resource folder and set the configuration. Note that the script employed (Step 4.) uses the password changeit. If you changed the value in the script, also do it for KEYSTORE_PASSWORD and TRUSTSTORE_PASSWORD in the following example.
        private static final String KEYSTORE_NAME = "chain-with-private-key-iot-device-0001.jks";
        private static final String KEYSTORE_PASSWORD = "changeit";
        private static final String KEYSTORE_FORMAT = "jks";
        private static final String TRUSTSTORE_NAME = "truststore.jks";
        private static final String TRUSTSTORE_PASSWORD = "changeit";
        private static final String TRUSTSTORE_FORMAT = "jks";
        private static final String LOCAL_DEVICE_CHAIN = "-----BEGIN CERTIFICATE----- MIIcQhNJJ0F/lfjm -----END CERTIFICATE-----";
        private static final String PLATFORM_URL = "<URL of the platform>";
        private static final String PLATFORM_MTLS_PORT = "8443";
The device can now generate a JWT token. Note that before the first connect no other actions are required, for example, creating a user. The user is created during the auto registration process.
Info
You do not need to set a password, user or tenant for the REST java client using certificates. Cumulocity will recognize the tenant and the user by the provided certificate.
After filling in this data, the example client uses the provided data to retrieve the device access token to the specified platform using certificates.
In general, the mTLS protocol client uses the Java Secure Socket Extension, which is part of the Java Development Kit, to provide secure connections via SSL.
JSSE provides the Java implementation of the SSL and TLS protocol which can be configured by developers using its classes.
The documentation of the Java Secure Socket Extension shows how the SSL connection is established and provides some examples of customizing the implementation.
The full document is available on the official Oracle website.
Cumulocity mTLS protocol supports secured SSL connections.
What does the code in main do?
Configure the mTLS connection.
Connect with Cumulocity via a mTLS protocol.
Generate a JWT token after successful authentication using X.509 certificates.
Using this JWT token the further rest operation can be done without any certificates.
Building and running the application
Use the following commands to build the application:
      $ cd x509-rest-client
      $ mvn clean install
      ...
      [INFO]
      [INFO] --- maven-jar-plugin:2.4:jar (default-jar) @ x509-rest-client ---
      [INFO] Building jar: /home/schm/Pulpit/device-jwt-rest-client/target/x509-rest-client-1.0-SNAPSHOT.jar
      [INFO]
      [INFO] --- maven-install-plugin:2.4:install (default-install) @ x509-rest-client ---
      [INFO] Installing /home/schm/Pulpit/x509-rest-client/target/x509-rest-client-1.0-SNAPSHOT.jar to /home/schm/.m2/repository/c8y/example/x509/x509-rest-client/1.0-SNAPSHOT/x509-rest-client-1.0-SNAPSHOT.jar
      [INFO] Installing /home/schm/Pulpit/x509-rest-client/pom.xml to /home/schm/.m2/repository/c8y/example/x509/x509-rest-client/1.0-SNAPSHOT/x509-rest-client-1.0-SNAPSHOT.pom
      [INFO] ------------------------------------------------------------------------
      [INFO] BUILD SUCCESS
      [INFO] ------------------------------------------------------------------------
      [INFO] Total time: 2.642 s
      [INFO] Finished at: 2017-03-14T09:16:25+01:00
      [INFO] Final Memory: 14M/301M
      [INFO] ------------------------------------------------------------------------