Managing subtenants
Using the Enterprise tenant of Cumulocity, you can make use of the tenants functionality which allows you to create and manage subtenants.
APPLICATION ACCESS:
The user must have access to the Administration application of an Enterprise tenant.
ROLES & PERMISSIONS:
The user must have at least one permission for the permission type “Tenant management”:
- To view all tenants: READ permission.
- To create tenants: CREATE permission.
- To edit tenants (including subscriptions) and to suspend or activate tenants: UPDATE permission.
- To create tenants and perform activity permitted by UPDATE permission: ADMIN permission.
To view subtenants
Click Subtenants in the Tenants menu to view all subtenants available in your account.
The Tenants page provides the following information on each subtenant:
- The name of the subtenant, for example, company name of your customer.
- The ID and domain.
- Optionally, a contact name.
- The date when the tenant was created.
- The status of the tenant, either active (indicated by a green checkmark icon ) or suspended (indicated by a red cross icon ).
To create a subtenant
-
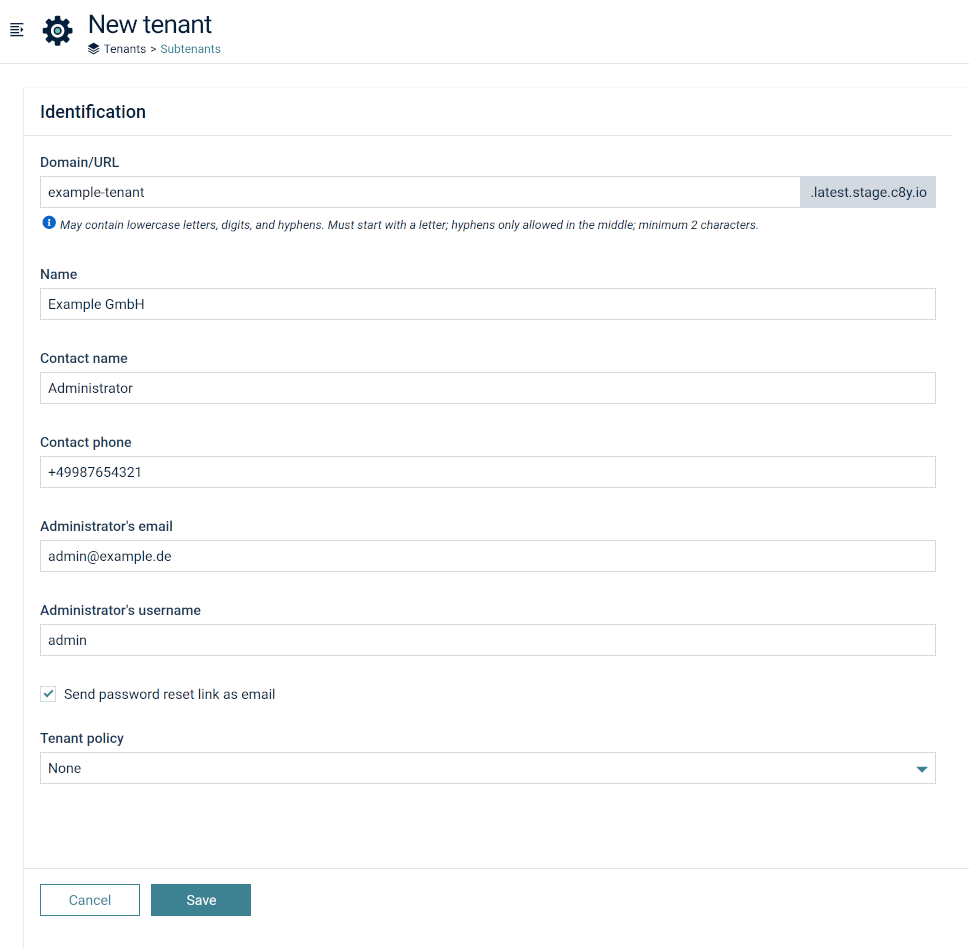
Click Create tenant at the right of the top menu bar.
-
Provide the following properties:
Field Description Required Domain/ URL Enter a subdomain of your choice, for example "acme". The tenant's URL will be "acme.cumulocity.com" on cumulocity.com. You can only use one subdomain level. For example, you can only use "acme.cumulocity.com" on cumulocity.com. You cannot use "mycustomer.acme.cumulocity.com". This is not permitted by the TLS standard.
The tenant domain may contain lowercase letters, digits or hyphens (-). It must start with a letter; hyphens are only allowed in the middle; minimum is 2 characters.Yes Name The name of the tenant, for example, the company's name. Yes Administrator's email A valid email address to enable users to reset their password. Yes Administrator's username Username for the administrator of this tenant. Yes Contact name Name of the contact. No Contact phone Phone number of the contact. Yes Send password reset link as email Selected by default. If you deselect this option, you must provide a password and confirm the password (see To change your password for more information on password strength). No Tenant policy You may select a tenant policy to be applied to the tenant from the dropdown list. No -
Click Save to apply your settings.
When the subtenant is created, it gets an auto-generated ID, which cannot be changed. Also, it is automatically provisioned with a first, administrative user (“Administrator’s username”). This administrator can create other users and set their permissions. The first user cannot be deleted to prevent you from locking yourself out.
From the Management tenant, you can enable other tenants to create subtenants. Contact your Operations team on how to configure this setting according to your needs.
To view or edit subtenant properties
Click on the desired subtenant or click the edit icon at the right of the subtenant entry.
In the Properties tab, all fields are editable except of ID, Domain/ URL and Administrator’s username. For details on the fields, refer to To create a subtenant.
To change the tenant password, click Change password, enter the new password in the upcoming fields and click Save.
Support user access information
At the right of the Properties tab, you can find information on the support user requests/access for the subtenants.
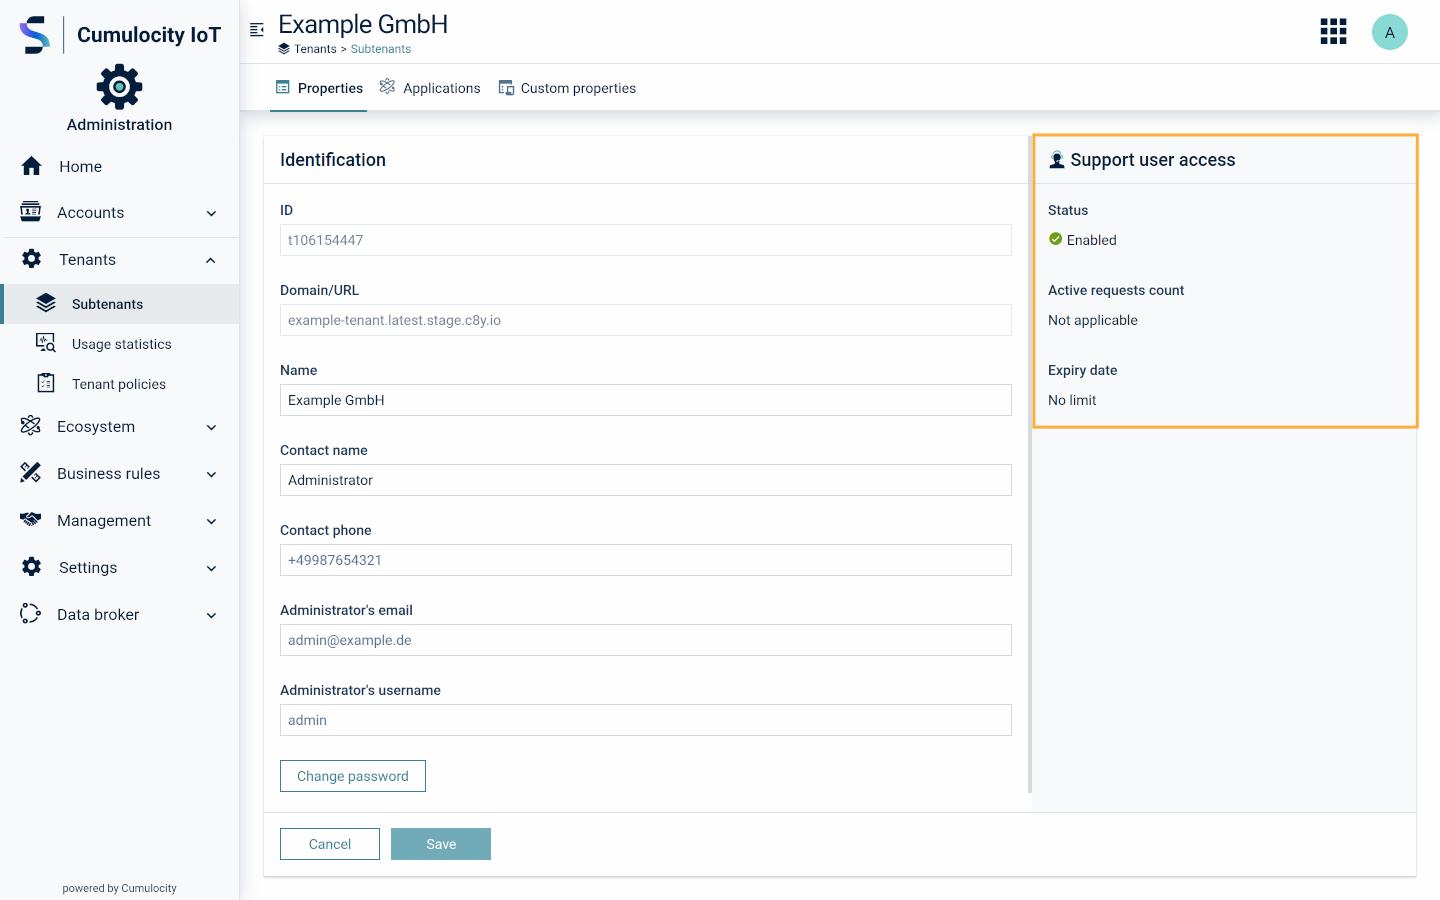
The following information is displayed here:
| Field | Description |
|---|---|
| Status | May be either "Enabled" or "Disabled". "Enabled" indicates that: - Support user access has been activated globally in the Management tenant. - One or more subtenant users have activated support user access. "Disabled" indicates that: - Support user access has been deactivated globally in the Management tenant. - No subtenant user has currently any active support user access (that means, each support user request has either expired or has actively been deactivated). |
| Active requests count | The number of requests currently active in the subtenant. Only displayed if support user access is not enabled globally in the Management tenant. Shown as a number in a small red dot. |
| Expiry date | Specifies the date on which support user access for the tenant will expire. If no date has been specified, the expiry date is set to "No limit". |
To suspend a subtenant
Suspending a tenant blocks any access to this tenant, regardless whether the access is from devices, users or other applications. In addition all its microservices are undeployed, and if the tenant is reactivated all its microservices are re-deployed.
The tenant’s data remains in the database and can be made available later by clicking Activate.
Refer to Lifecycle for details on the billing perspective of suspended tenants.
-
Click the menu icon at the right of the respective subtenant entry and then click Suspend.

-
In the resulting dialog box confirm the suspension by clicking Suspend and then entering your password.
- As part of suspending the tenant, an email is sent to the email address that was configured for the tenant administrator.
- If you are a service provider, you can suppress this email.
To delete a subtenant
Deleting a subtenant cannot be reverted. For security reasons, it is therefore only available in the Management tenant. You cannot delete tenants from any tenant but the Management tenant. Contact your Operations team for further support.
Administrators in Enterprise tenants are only allowed to suspend active subtenants, but not to delete them.
Click the menu icon at the right of the respective subtenant entry and then click Delete to finally delete a tenant and remove all the data of the tenant.
Subscribing applications
Overview
Cumulocity features an application marketplace that allows tenants to access and manage various applications.
Management tenants and Enterprise tenants can control application access for their subtenants. In the Applications tab of a tenant, they can:
- View and manage existing application subscriptions
- Subscribe applications to tenants
- Monitor the microservice status
For general information on applications as part of the Cumulocity ecosystem, refer to Managing the ecosystem.
To view subscribed applications
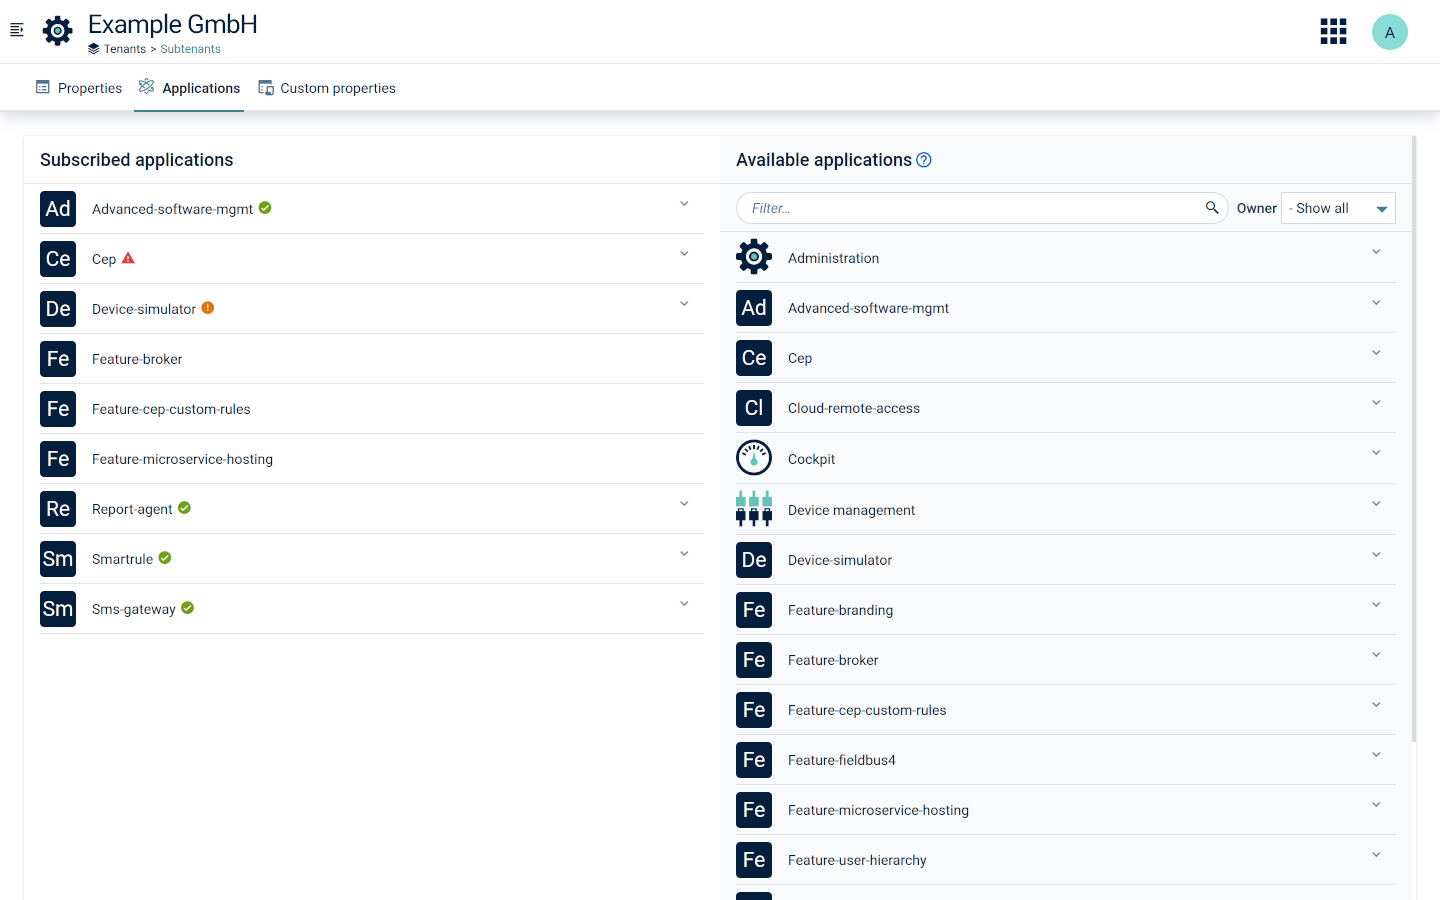
In the Applications tab of a tenant you can view all subscribed applications, subscribe applications to tenants, or remove the applications from the tenant. By default, the standard Cumulocity applications are subscribed to the tenant.
A tenant can have multiple available applications as displayed under Available applications but to use an application’s functionality a subscription to the application must be established for the tenant. The list of subscribed applications is shown under Subscribed applications.
applications fragment.To view the application details
Expanding an application entry in the Available applications list shows the following details:
- Availability - One of MARKET, SHARED or PRIVATE
- Type - One of HOSTED, MICROSERVICE or EXTERNAL
- Owner - Tenant that owns the application
To subscribe an application
Hover over the application under Available applications at the right and click Subscribe on the desired application.
To unsubscribe an application
Hover over the application under Subscribed applications at the left and click Unsubscribe.
To monitor the microservice status
For all applications hosted as microservices by Cumulocity the status of the application is indicated next to its name by symbols. It may be in one of the following states:
- Microservice is up and running.
- Microservice is unhealthy.
- Microservice is down.
You can view details on the status by expanding the respective entry.

The following information is provided:
- Active - the number of active microservice instances.
- Unhealthy - the number of inactive microservice instances.
- Desired - the number of desired microservice instances.
- Name - microservice instance name.
- Restarts - the number of microservice instance restarts.
Further details are provided on the Status tab of the respective microservice, see Monitoring microservices.
Custom properties
The Custom properties tab allows you to view and edit values of custom properties, either predefined ones (like “External reference”) or those defined in the properties library. Such properties are also displayed as columns in the Usage statistics page.
To limit subtenant request rate
Platform administrators can limit the request rate of each subtenant via the following custom properties:
- Limit HTTP queue - limit of HTTP request queue for tenant
- Limit HTTP requests - limit of HTTP requests for tenant per second
- Limit stream queue - limit of MQTT request queue for tenant
- Limit stream requests - limit of MQTT requests for tenant per second
The request throttling mechanism is only enabled when both HTTP properties (limit HTTP queue and limit HTTP requests) are configured. If one of the values is omitted, it does not work.
It is also possible to customize the buffer size for the CEP queue and the data broker queue for a particular tenant. This can be done from the Management tenant. Contact your Operations team on how to configure this setting according to your needs.
To limit subtenant device number
Platform administrators can limit the count of concurrently registered root devices or simply all devices (including child devices) via the custom property “Limit number of devices”.
They can view the peak number of concurrently registered devices, root devices and the peak value of used storage in the Usage statistics page.
Product experience tracking
Using the checkbox Enable Gainsight product experience tracking a parent tenant can enable/disable the product experience tracking through the Gainsight PX product experience software for the given child tenant.
At the tenant level, the product experience tracking by Gainsight can be disabled by turning off the cookie banner on the Branding page. For more information, see Branding.
When tracking is activated for a tenant, users are automatically tracked. However, the nature of this tracking depends on user consent. By accepting tracking, users permit the use of Personally Identifiable Information (PII) for tracking purposes. If users decline, their data is anonymized, ensuring privacy, yet tracking continues to capture usage data without personal identifiers. For more details, see Accessing and logging into the platform.
Tenant policies
A tenant policy is a set of tenant options and retention rules. Tenant options and retention rules may be specified during tenant creation.
Creating a tenant policy with a specific set of options and rules saves time when creating multiple tenants with the same settings.
To view tenant policies
Click Tenant policies in the Tenants menu to view all available tenant policies.
For each tenant policy, the name, an optional description and the number of options and retention rules is provided, either in a list or a grid.
To create a tenant policy
- Click Add policy in the top menu bar.
- In the resulting dialog box, enter a name and an optional description.
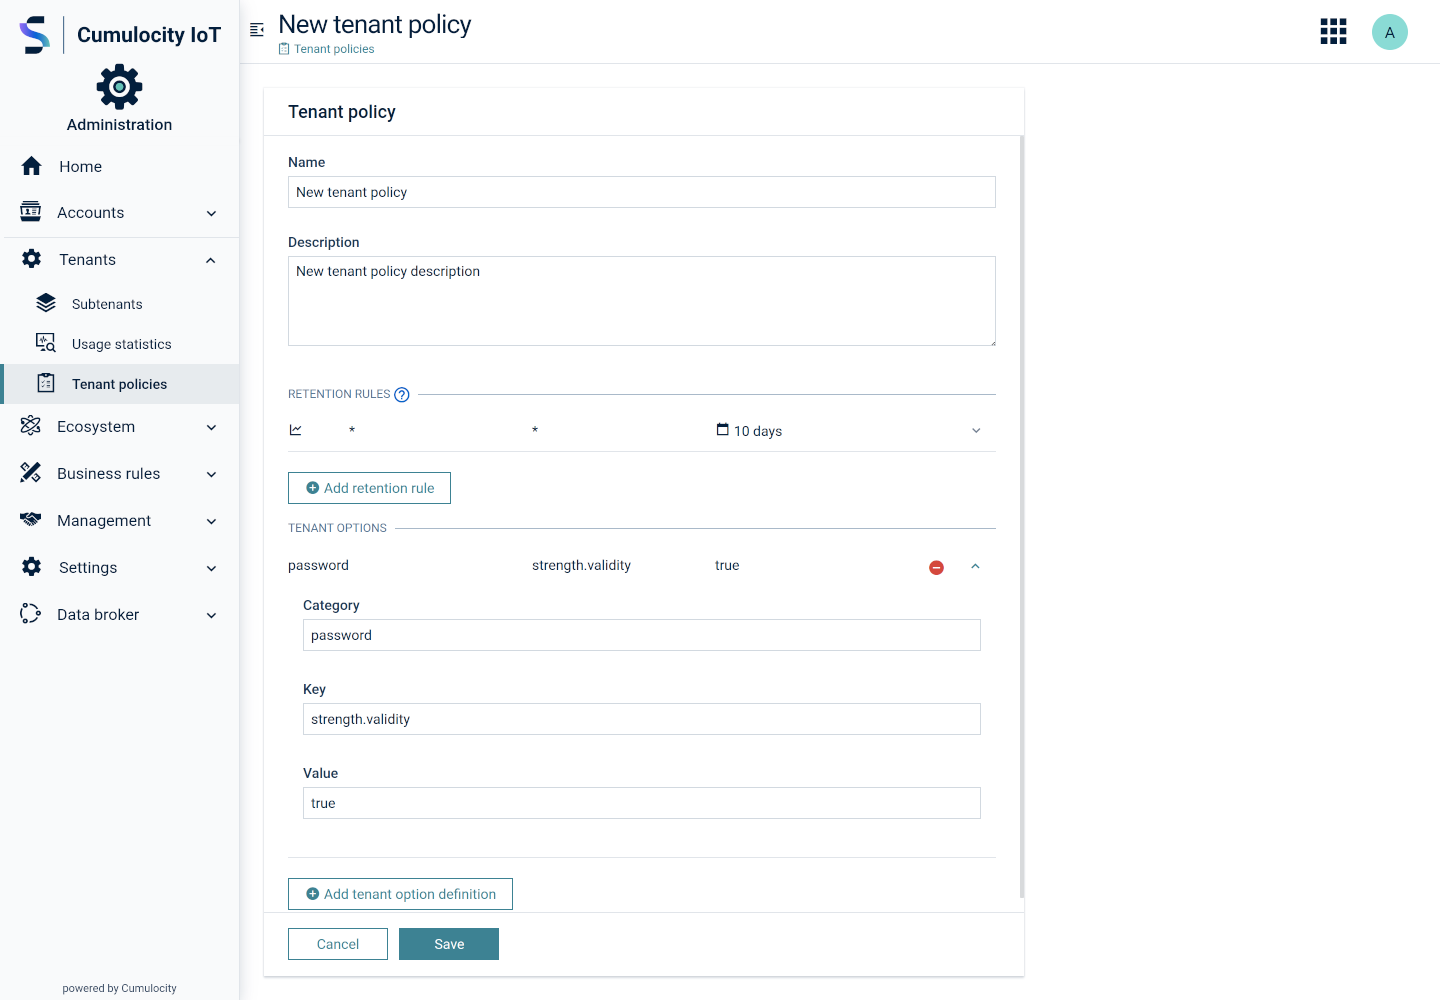
- Add at least one retention rule. For details on creating retention rules, see Retention rules.
- Optionally, add a tenant option.
- Click Save.
The tenant policy will be added to the tenant policies list.
To edit a tenant policy
Click the respective policy entry or click the menu icon at the right of the policy entry and then click Edit.
In the resulting dialog box, make your edits and click Save to save your settings.
To delete a retention rule or a tenant option from a policy, hover over it and click the remove icon .
To duplicate a tenant policy
Click the menu icon in the policy entry you want to duplicate and then click Duplicate.
To delete a tenant policy
Click the menu icon in the policy entry you want to delete and then click Delete.
Default subscriptions
In the Cumulocity platform, you can configure which applications and microservices are subscribed to a tenant on tenant creation. When you create a new tenant, the specified applications and microservices automatically get subscribed to it.
In addition, you can specify which applications and microservices are subscribed to a tenant when the system is upgraded. This list might differ from the default subscriptions on tenant creation. For example, certain default applications might have been unsubscribed from a tenant after creation and you may not want these applications to be subscribed to it again or you may want to subscribe different ones to it.
To view default subscriptions
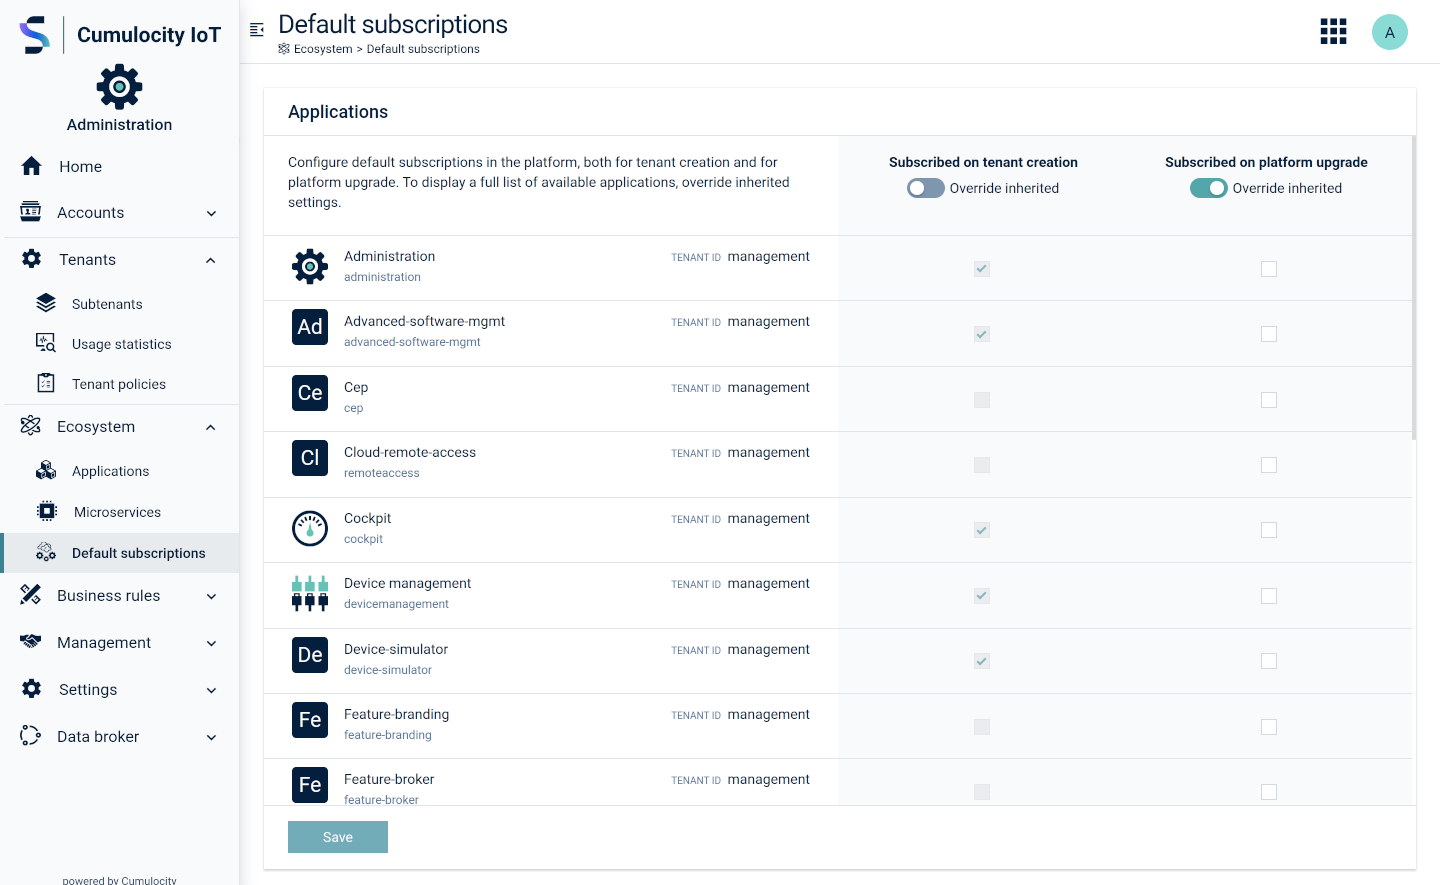
In the Default subscriptions page, you can configure two separate lists of applications. These will be subscribed by default to:
- Every new tenant on its creation.
- Every existing tenant on platform upgrade.
On the left, the list of subscribable applications (both web applications and microservices) is displayed, which consists of:
- All own applications.
- All subscribed applications which have different names than the own applications.
On the right, you see the Subscribed on tenant creation and the Subscribed on platform upgrade columns.
Initially, the lists show the default subscriptions inherited from the tenant hierarchy.
To configure default subscriptions
You can override both lists by switching the corresponding toggle. This will reveal all available applications (initially, unselected ones are hidden) but the selection will remain the same.
Next, adjust the lists to your needs by selecting additional applications to be subscribed by default or deselect applications you do not want to be subscribed.
You may also deselect all of them if you don’t want any subscriptions to be executed on tenant creation and/or platform upgrade.

If you want to return to the settings inherited from the tenant hierarchy, just switch the corresponding toggle again.
Save the settings by clicking Save at the bottom of the page.
To override default subscriptions
The default subscriptions can be overridden for subtenants by setting up a tenant policy with the following options:
- To define default web applications subscribed to new tenants on creation:
- category: configuration
- key: default.tenant.applications
- value: comma-separated list of application names, for example, administration,devicemanagement,cockpit,feature-microservice-hosting,feature-cep-custom-rules
- To define default microservices subscribed to new tenants on creation:
- category: configuration
- key: default.tenant.microservices
- value: comma-separated list of microservice names, for example, device-simulator,report-agent,sms-gateway
- To use a different list of web applications to be subscribed to existing tenants on platform upgrade:
- category: configuration
- key: on-update.tenant.applications.enabled
- value: true/false (when false or not set, the same list from default.tenant.applications will be used)
- To define default web applications subscribed to existing tenants on platform upgrade:
- category: configuration
- key: on-update.tenant.applications
- value: comma-separated list of application names, for example, administration,devicemanagement,cockpit,feature-microservice-hosting,feature-cep-custom-rules
- To use a different list of microservices to be subscribed to existing tenants on platform upgrade:
- category: configuration
- key: on-update.tenant.microservices.enabled
- value: true/false (when false or not set, the same list from default.tenant.microservices will be used)
- To define default microservices subscribed to existing tenants on platform upgrade:
- category: configuration
- key: on-update.tenant.microservices
- value: comma-separated list of microservice names, for example, device-simulator,report-agent,sms-gateway
