Overview
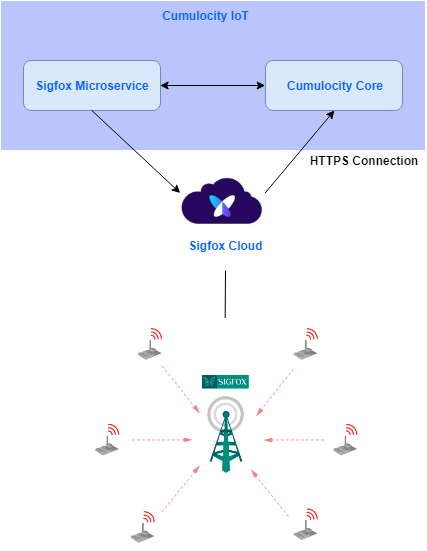
Cumulocity IoT can interface with Sigfox devices through the Sigfox Cloud. You can:
- Provision Sigfox devices easily using Cumulocity IoT Device management application.
- Decode upstream payload packets using a web-based user interface.
- Debug and post-process raw device data through Cumulocity IoT events.
- Send downstream data to the device using Cumulocity IoT operations.
- Make use of existing Cumulocity IoT features with Sigfox devices, for example: connectivity monitoring, device management, data visualization with dashboards, real-time analytics and more.
The following illustration grants you a quick overview of the Cumulocity IoT Sigfox integration:
The following sections describe how to:
- Manage the connectivity settings in Cumulocity IoT.
- Create device protocols with Cumulocity IoT’s device database.
- Register devices and visualize the Sigfox payload using Cumulocity IoT.
- Update devices registered with the general device registration.
- Send operations to devices.
Moreover, check out
- Uplink message processing for information on measurements and events created while processing the uplink message.
- Troubleshooting in case of any issues.
Info
To be able to use the Sigfox agent, your tenant needs to be subscribed to the application sigfox-agent. In case of any issues, please contact product support.
Managing the connectivity settings
Before you register a device, you must configure the Sigfox Cloud credentials in the Connectivity page in the Administration application. You must set up these Sigfox Cloud credentials in Sigfox.
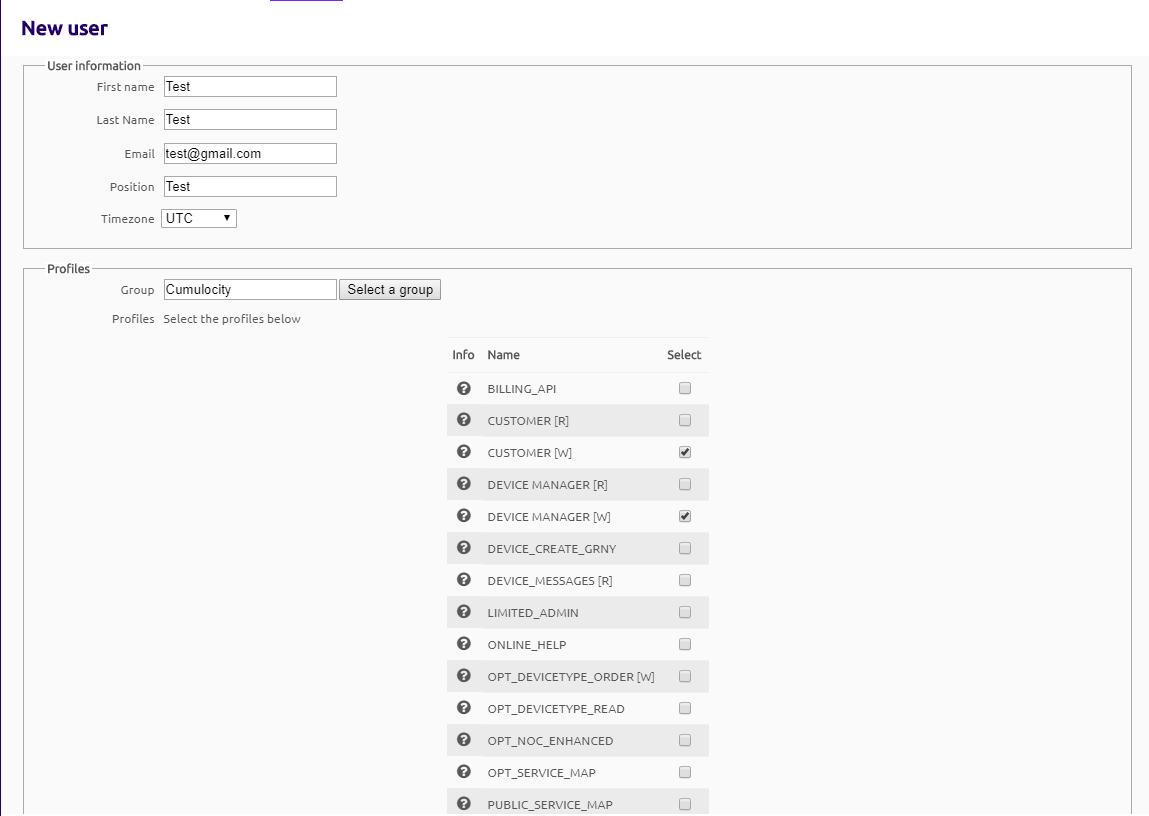
Before you create API access to Cumulocity IoT, you must have an “Associated user” which is added to the Cumulocity IoT group in Sigfox Cloud and has the following profiles:
- Customer [R]
- Device Manager [W]
Important
Without the profiles described below, the required Sigfox API access can not be set up.
Step 1
If you already have an associated user make sure it has the profiles mentioned below and proceed to step 2.
The group name is not constrained. “Cumulocity” is used as a sample group name throughout the remaining steps.
First, enter into your Sigfox Cloud account and create a new user. Add the user to the group and select the “Customer [R]” and “Device Manager [W]” profiles.
Step 2
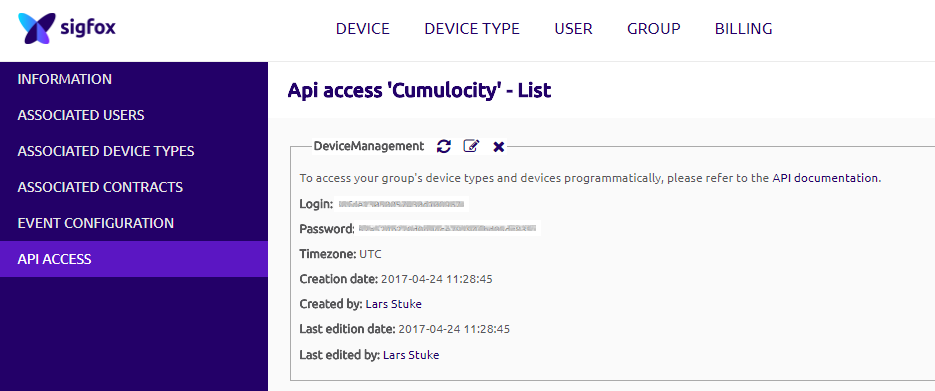
After creating an “Associated user” with the proper group and profiles navigate to the Groups page. In the API access tab, create a new entry and add the following profiles:
- Customer [R]
- Device Manager [W]
Step 3
After the API access entry has been created, you can connect your Sigfox Cloud account to Cumulocity IoT via the Connectivity page in the Administration application. Navigate to the Connectivity page and switch to the Sigfox provider settings tab.
The Connectivity tab facilitates creating, updating, and deleting multiple Sigfox connections.
The following information must be provided in order to create a connection:
- Name: Name of the Sigfox connection being created.
- Description: Description of the Sigfox connection being created.
- Login: The login token is located in the API access entry in the Sigfox Cloud.
- Password: The password token is located in the API access entry in the Sigfox Cloud next to Password.
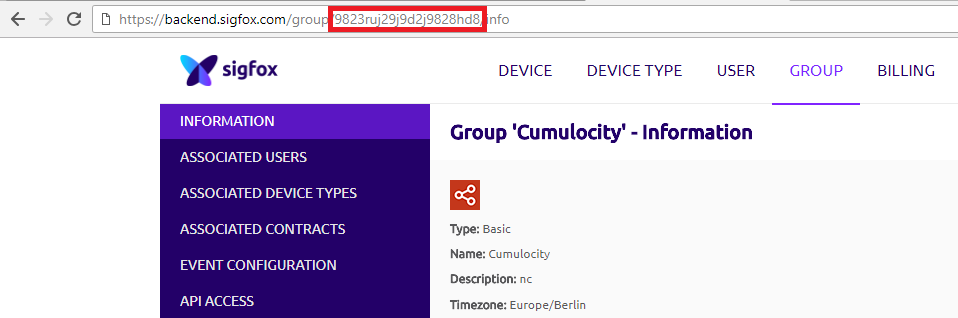
- Parent Group ID: This ID is written in your URL when you are logged into your Sigfox account and you have selected the “Cumulocity” group. For example, https://backend.sigfox.com/group/9823ruj29j9d2j9828hd8/info.
- Base URL: URL that points to the Sigfox Cloud account.
Info
The group name in the screenshot below is only an example. It does not necessarily have to be “Cumulocity”.
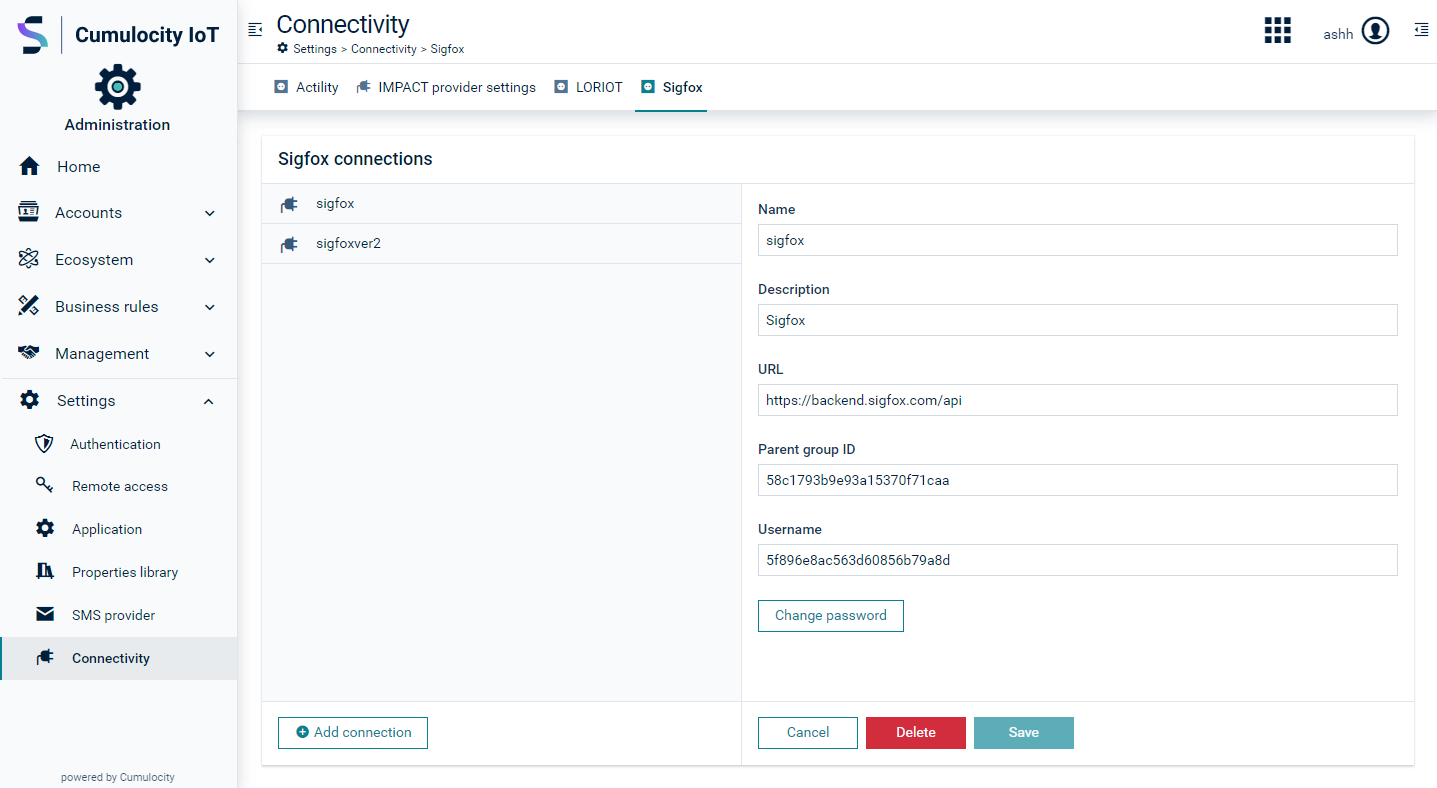
Click Save. If you have entered the correct information, the message “Credentials successfully saved” will be displayed.
To add another connection, click Add Connection and follow the steps above.
To update a connection
Select the connection to be updated, make your edits, and save the connection.
If there are devices associated with the connection, an error message will appear, stating “Can not update the LNS Connection with <name of LNS Connection> as it’s associated with <number of devices>. Click the link to download the file with the details of the associated devices: /service/<agent-context-path>/lns-connection/<lns-connection-name>/device”.
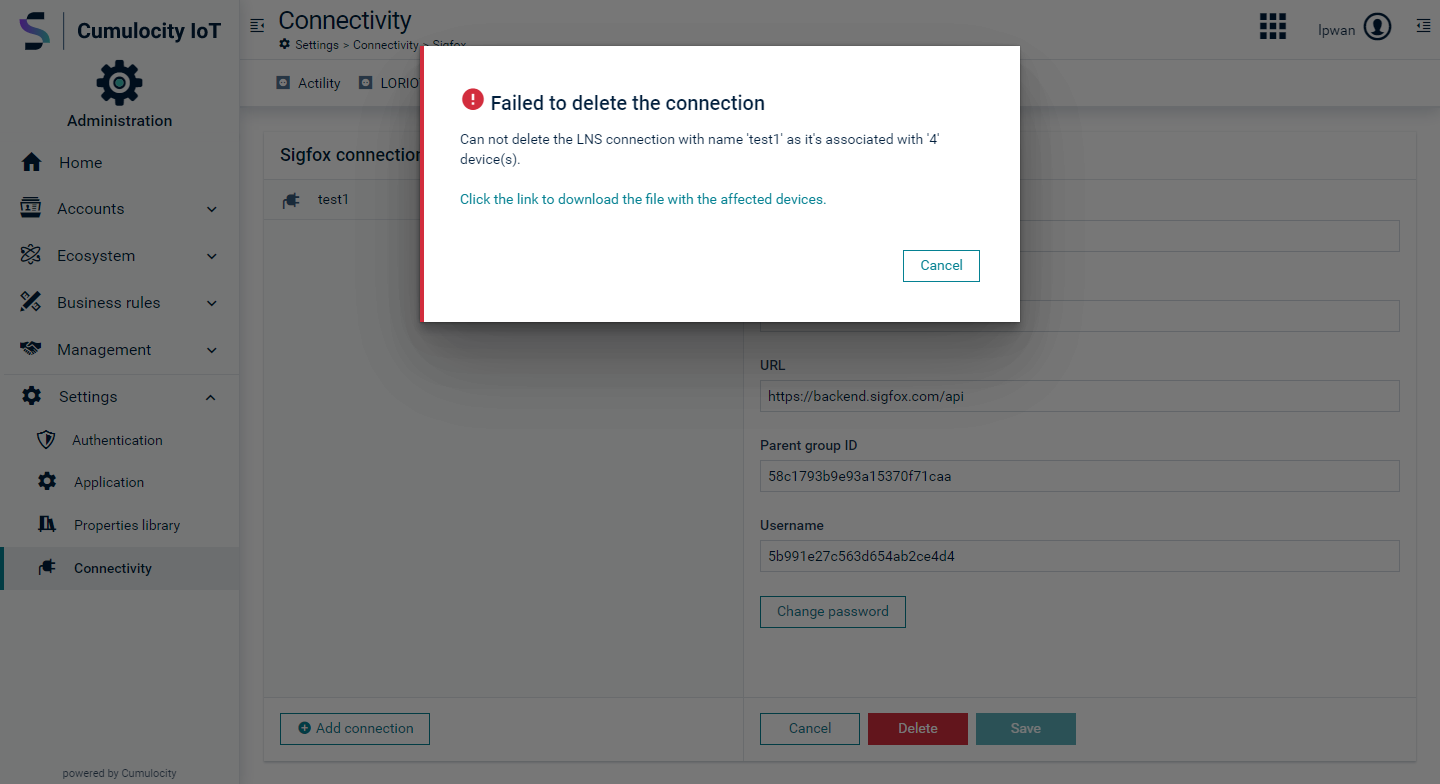
To delete a connection
Select the connection to be deleted and click Delete.
If there are devices associated with the connection, an error message will appear, stating “Can not delete the LNS Connection with <name of LNS Connection> as it’s associated with <number of devices>. Click the link to download the file with the details of the associated devices: /service/<agent-context-path>/lns-connection/<lns-connection-name>/device”.
Authentication to the Sigfox platform failed.
Authentication to the Sigfox platform failed. Check if the Parent group ID and/or the credentials are correct.
To resolve this, provide a correct baseUrl or parent group ID or username or password and try again.
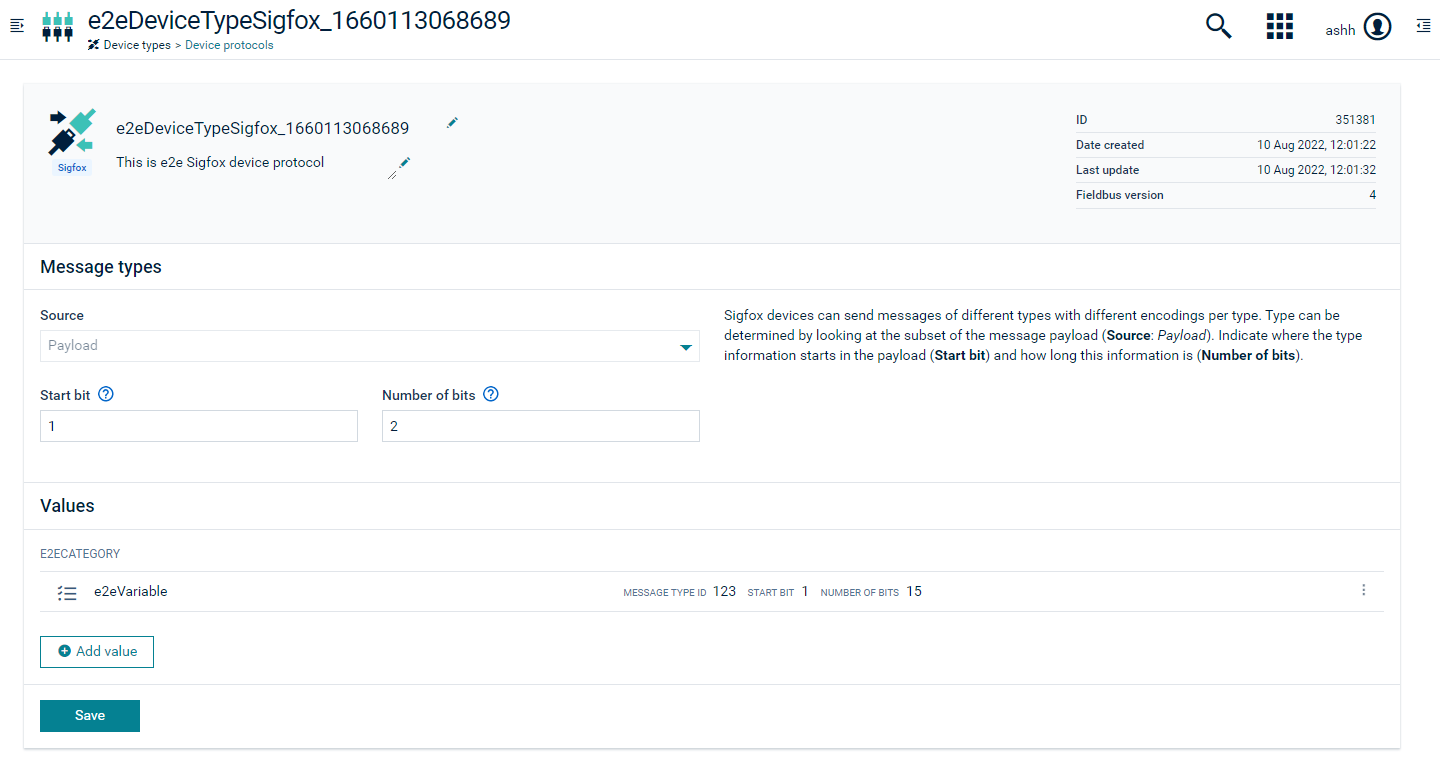
Creating device protocols
To process data from Sigfox devices, Cumulocity IoT needs to understand the payload format of the devices. Mapping payload data to Cumulocity IoT data can be done by creating a Sigfox device protocol.
During the device registration, you can associate this device protocol. The received uplink callbacks for this device with a hexadecimal payload will then be mapped to the ones you have configured in your device protocol.
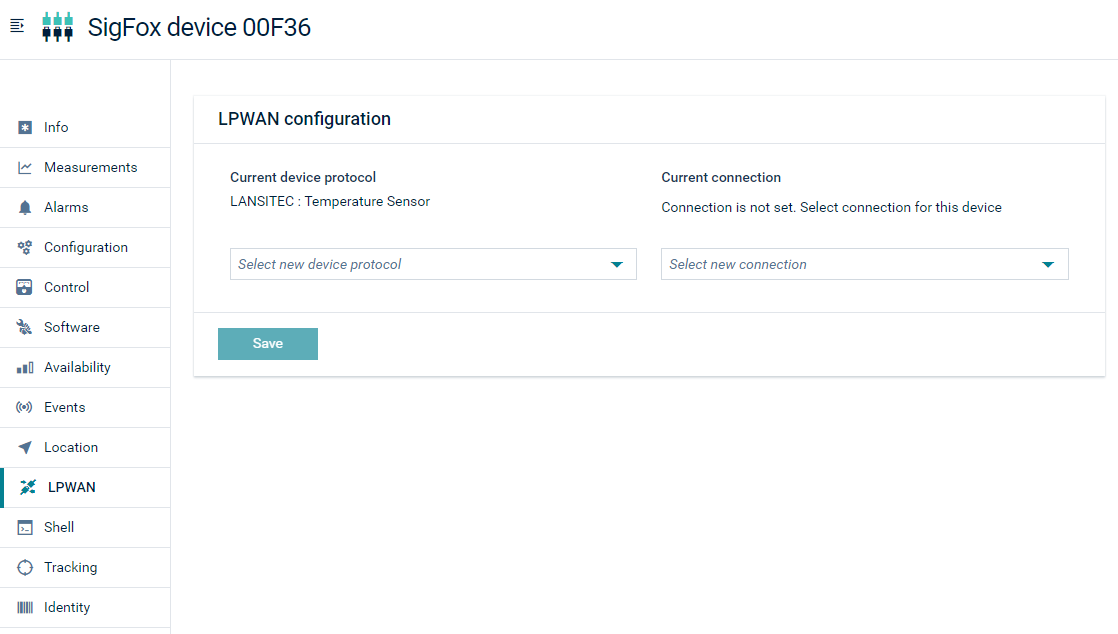
The device protocol assigned during Sigfox device registration can be changed from the LPWAN tab in the device details page.
Info
Device protocol mapping only supports decoding for fixed byte positions based on the message type.
The length for the device payload parts, which is set in the Number of bits field, can be maximum 32 bits (4 bytes).
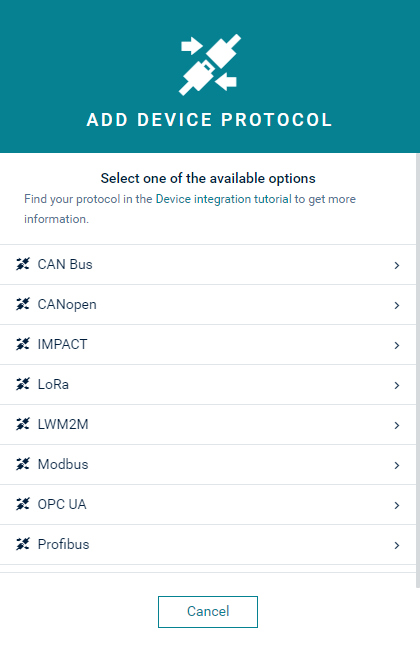
To create device protocols, select Device protocols in the Device types menu in the navigator of the Device management application. You can either import an existing device protocol or create a new one.
Importing a device protocol
In the Device protocols page, click Import.
Select the desired predefined device type or upload it from a file. When ready, click Import again.
Creating a new device protocol
In the Device protocols page, click New device protocol and select Sigfox from the options list.
Provide a name for the device protocol an and optional description, and click Create.
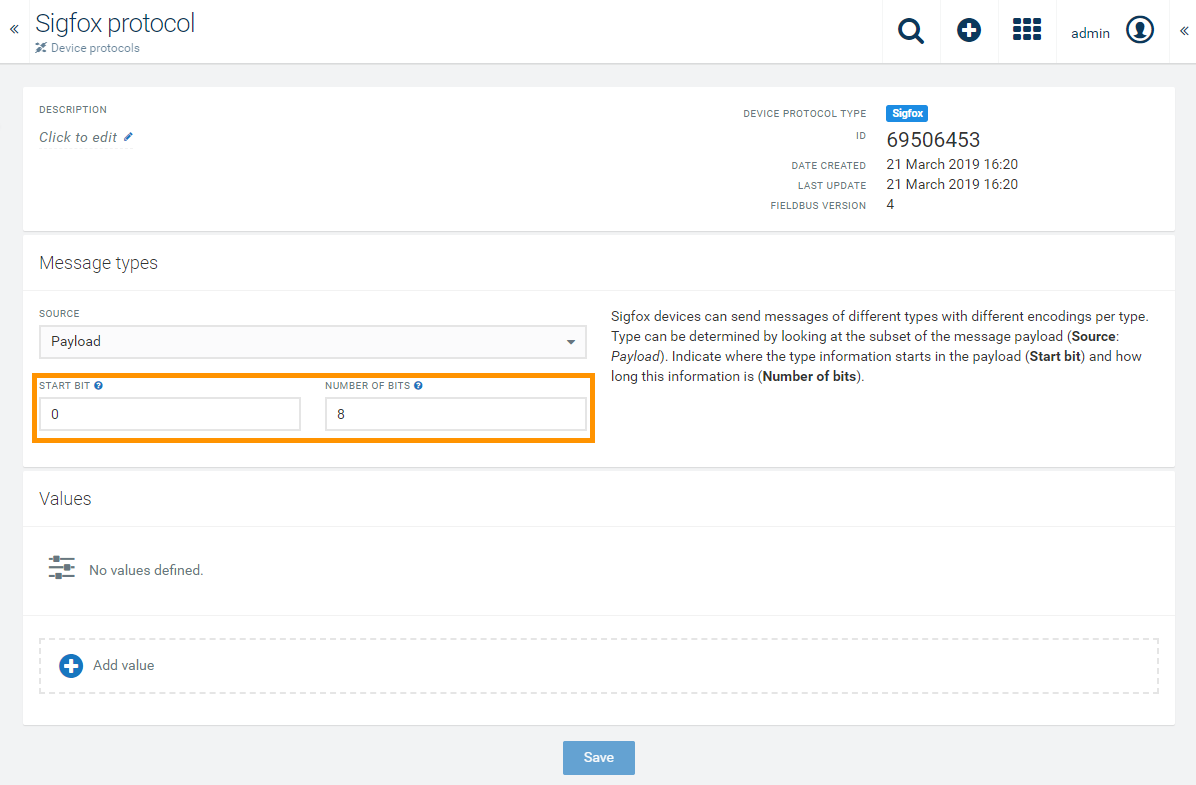
Under Message types, specify the message types. Sigfox devices can send messages of different types with different encodings per type. Depending on the device, the type can be determined by looking either at the FPort parameter of a message (Source: FPort) or at the subset of the message payload itself (Source: Payload).
In the Source field, select the way the message type is encoded:
- Payload: if the message type can be determined by looking at the subset of the message payload itself
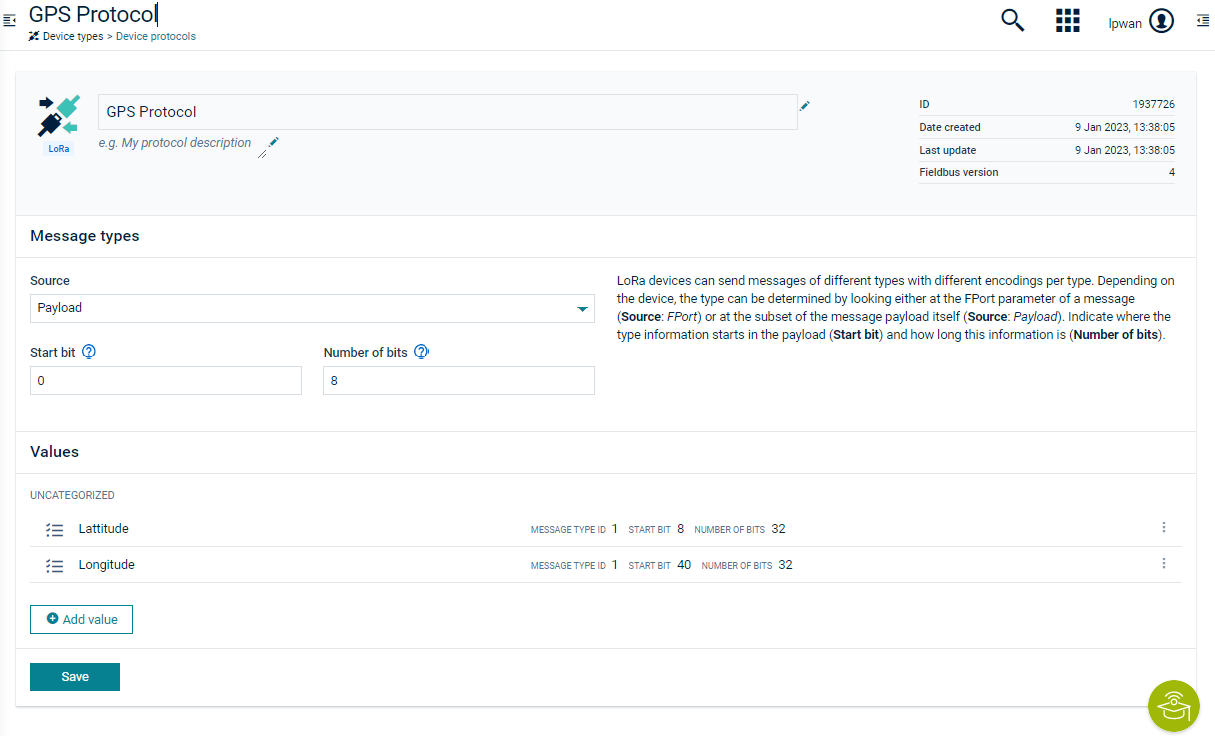
In the following sample payload structure, the first byte indicates the message type source (as highlighted).
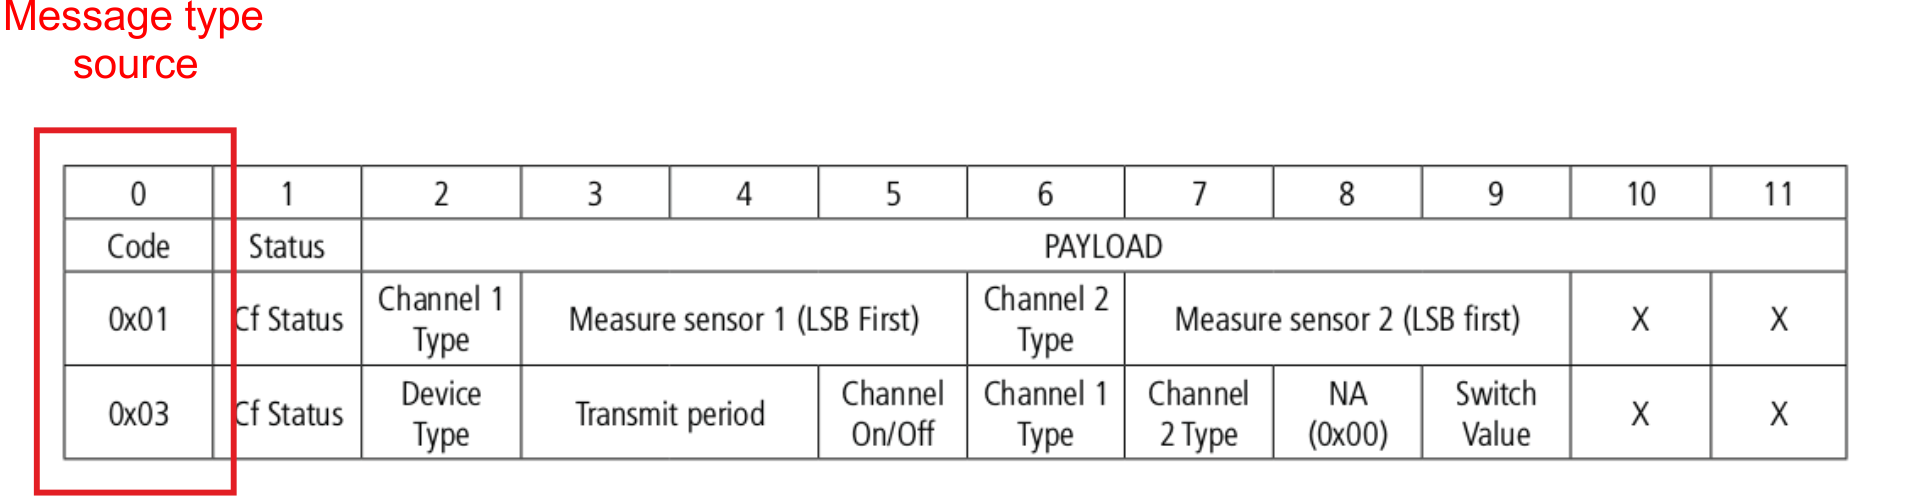
In the user interface, you can enter this type of message type source information as follows: In the Start bit field, indicate where the message type information starts in the payload. In the Number of bits field, indicate how long this information is. For example, start bit = “0” and number of bits = “8”.
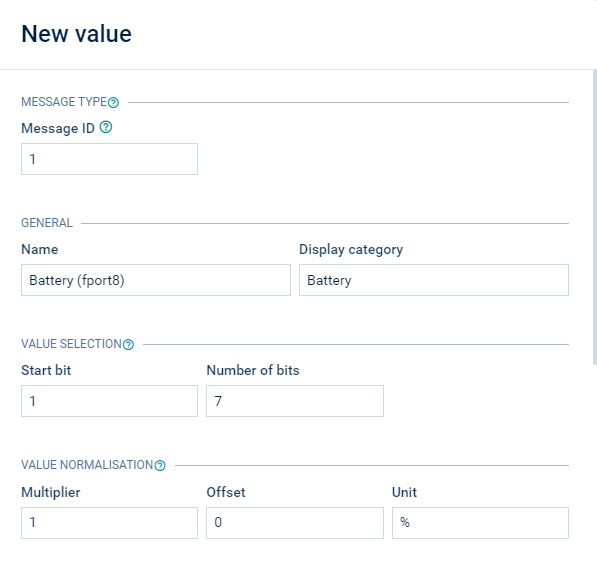
Configuring values
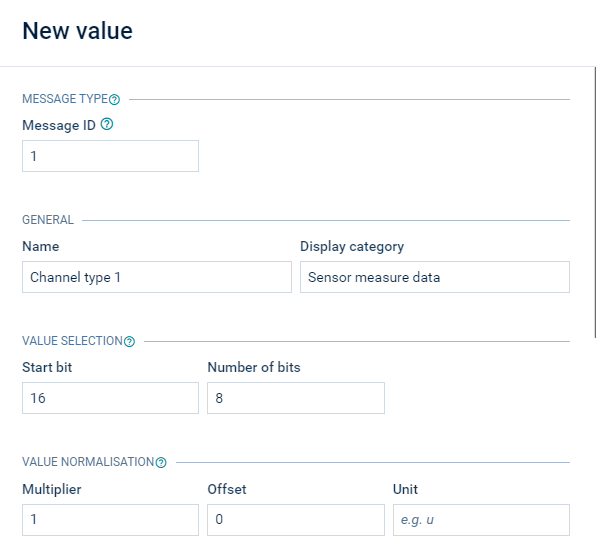
In the Values section, click Add value to create the value configuration.
In the following window, configure the relevant values as shown in this example.
New value window part 1
New value window part 2
The value configuration maps the value in the payload of a message type to the Cumulocity IoT data.
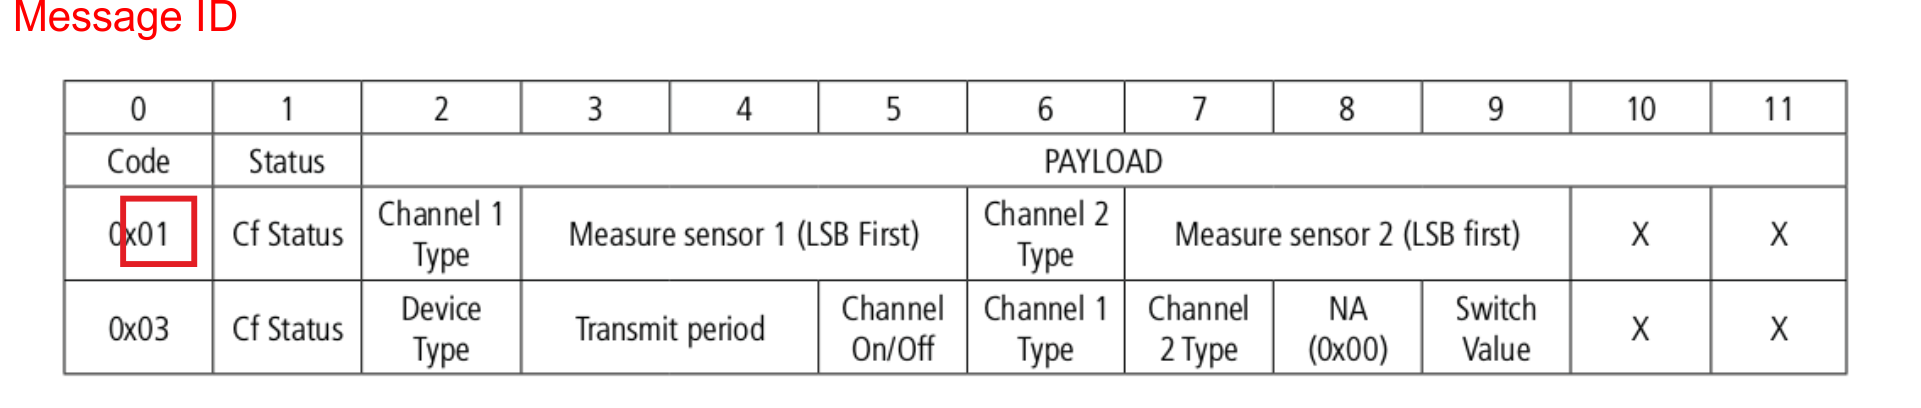
Under Message type, configure the Message ID according to your device message specification. The message ID is the numeric value identifying the message type. It will be matched with the message ID found in the source specified on the device protocol main page (that is, Payload or FPort). The message ID needs to be entered in decimal numbers (not hex).
In this sample payload structure the message ID is “1”.
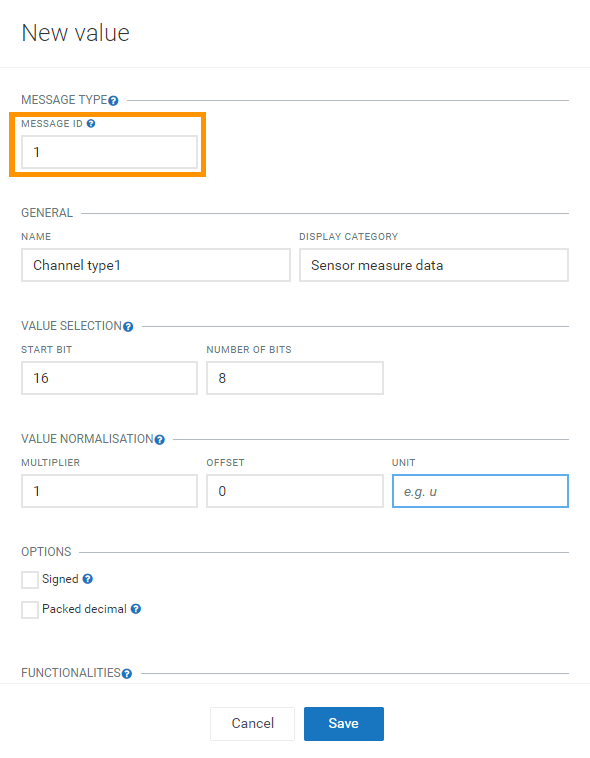
Under General, specify a name for the value and the category under which it will be displayed in the values list.
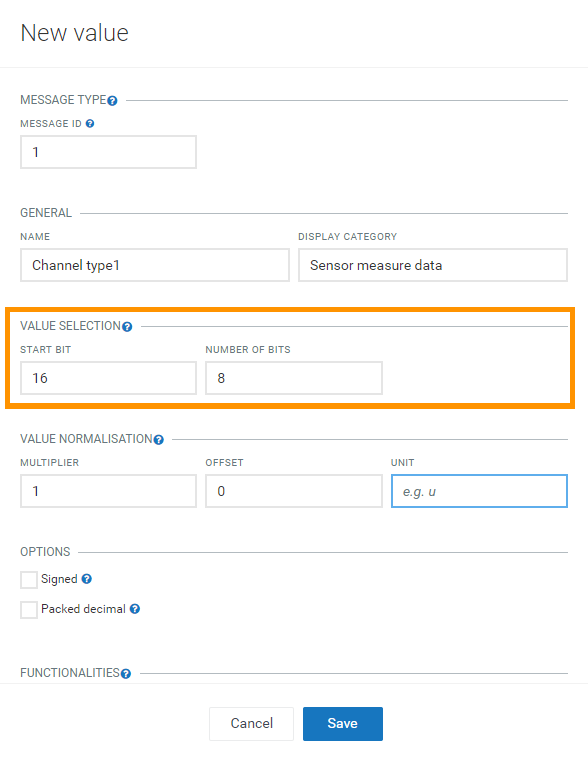
Under Value selection, specify from where the value should be extracted. In the Start bit field, indicate where the value information starts and in the Number of bits field, indicate the length of the information. The maximum value for the number of bits is 32 bits (4 bytes).
In this example, the “Channel 1 Type” information starts in byte 2 (that means, start bit = “16”) and is 1 byte long (that means, number of bits = “8”).
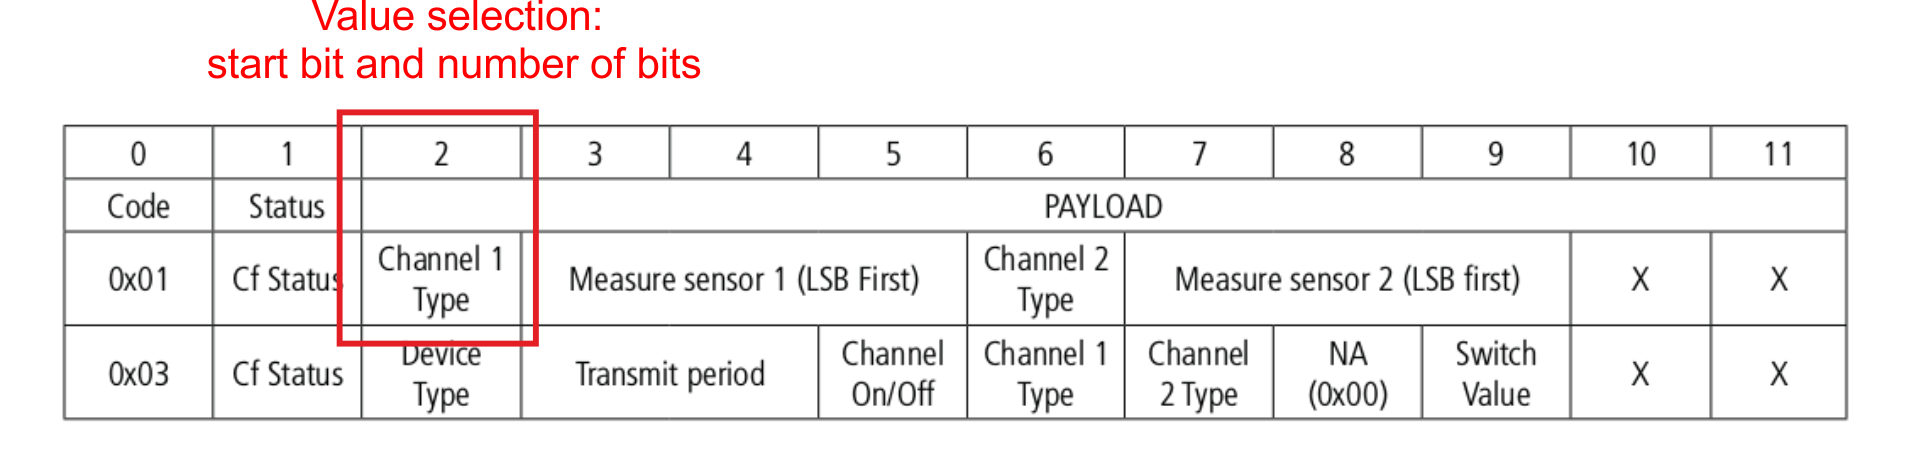
The hexadecimal value is converted to a decimal number and afterwards a “value normalization” is applied.
Under Value normalization, specify how the raw value should be transformed before being stored in the platform and enter the appropriate values for:
- Multiplier: This value is multiplied with the value extracted from the Value selection. It can be decimal, negative or positive. By default it is set to 1.
- Offset: This value defines the offset that is added or subtracted. It can be decimal, negative or positive. By default it is set to 0.
- Unit (optional): A unit can be defined which is saved together with the value (for example temperature unit “C” for degree Celsius).
For detailed information on how to decode the payload, refer to the documentation of the device.
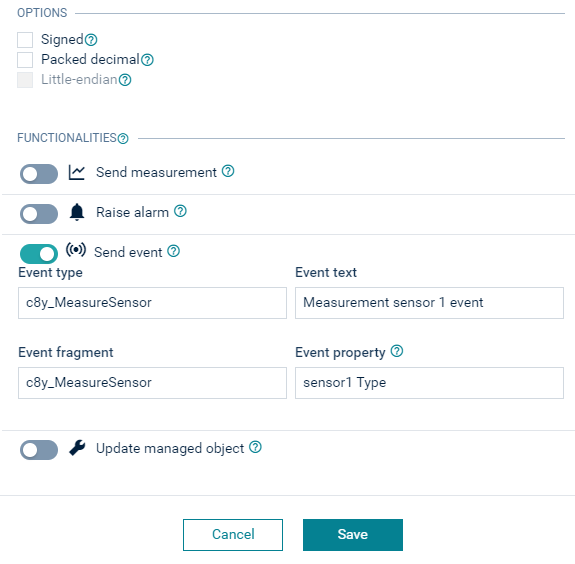
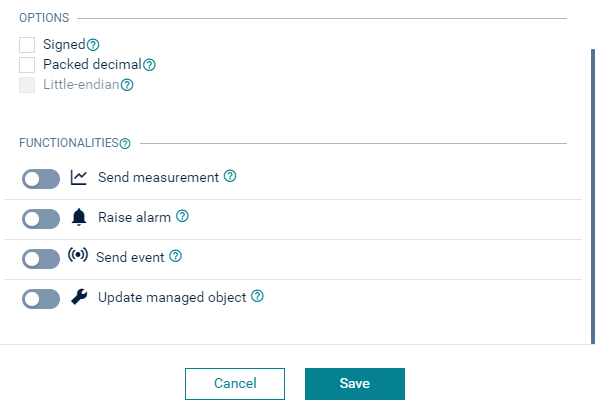
Under Options, select on of the following options, if required:
- Signed - if the value is a signed number.
- Packed decimal - if the value is BCD encoded.
Under Functionalities, specify how this device protocol should behave:
- Send measurement: creates a measurement with the decoded value.
- Raise alarm: creates an alarm if the value is not equal to zero.
- Send event: creates an event with the decoded value.
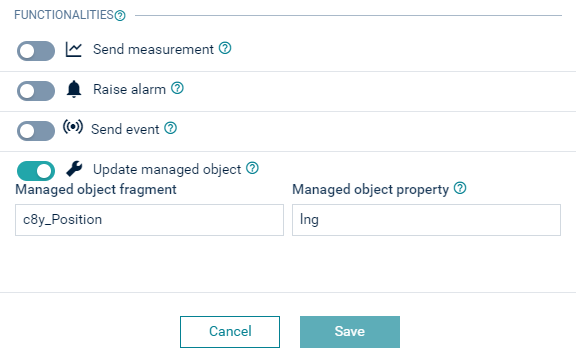
- Update managed object: updates a fragment in a managed object with the decoded value.
You can also have a nested structure with several values within a measurement, event or managed object fragment. In case of a measurement, all the properties of the same type will be merged to create a nested structure. In case of an event or a managed object all the properties with the same fragment are merged to create a nested structure. (Also refer to the example of a nested structure for a “Position” device protocol below.)
Click OK to add the values to your device protocol.
Click Save to create the device protocol.
Example with single property
The following images show an example for a message which sends a measurement when the battery level value changes.
New value window part 1
New value window part 2
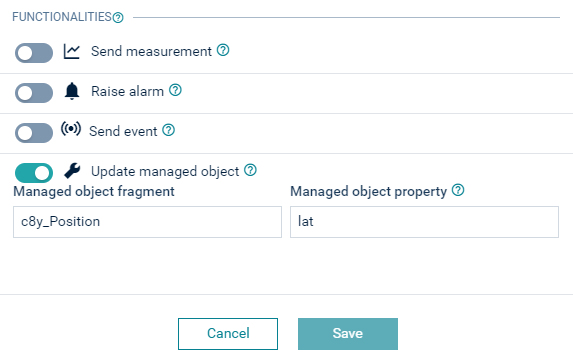
The following images show an example of a nested structure for a device protocol, reporting the current position of a GPS device. The device protocol is named “Position” and contains values for longitude and latitude.
The message ID should be the same for all the values. Enter the rest of the parameters according to the instructions above. Enter “c8y_Position” in the Managed object fragment field and create a new value for each: longitude and latitude.
New value window, Longitude
New value window, Latitude
This will be the result:
Using Custom decoding/encoding
The Sigfox agent also supports the decoding/encoding functionality by plugging in Custom microservice. Refer LPWAN custom codec for further details.
Registering Sigfox devices
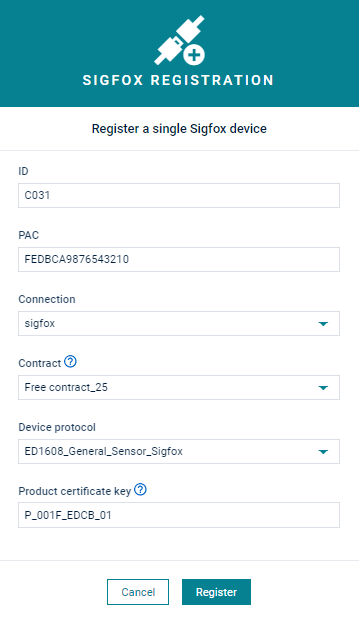
To register a Sigfox device in Cumulocity IoT navigate to Devices > Registration in the Device management application, click Register device at the top right and select Single device registration > Sigfox from the dropdown.

Info
If Sigfox is not one of the available options, your tenant is not subscribed to the relevant applications, see information at the top.
Info
- The device type created in the Sigfox Cloud platform has the following naming convention
c8y_{tenantId}_{device-protocol-name}_{contractId}, for example:c8y_myTenant_mySigfoxDeviceProtocol_aabbcc5b78c901d64eecf4faaa - If the constructed name exceeds 100 characters it will be truncated until it is less than 100 characters.
In the next window, fill in the required information:
- ID: Unique device ID. The value must be a hexadecimal number.
- PAC: Porting authorization code for your device. The value must be a hexadecimal number.
- Connection: Lists all configured Sigfox connections in the tenant. The following contract option is populated based on the selected Sigfox connection.
- Contract: Select your desired contract (all contracts are listed including active and expired).
- Device protocol: Select your desired device protocol from the drop-down list.
- Product certificate key: This key can be located in https://partners.sigfox.com/. Navigate to your device and copy the certificate key. If the checkbox is not selected and no product certificate key is specified, the device will be considered a prototype.
Info
The term “Device type” is used both by Sigfox and Cumulocity IoT, but with different meaning. In Sigfox, a device type specifies how to route data from devices. In Cumulocity IoT, a device type describes the data that is sent by devices of a particular type.
Click Register to submit the device registration request and create the device.
You can verify that the device is really connected by checking that events are actually coming in. You can do so by clicking on a device and opening its Events tab. All events related to this device are listed here.
For more information on viewing and managing your connected devices, also refer to Device management.
In order to migrate the device from one LNS connection to another, the device needs to be re-registered. Navigate to the LPWAN tab of the Device. Click on the Provider connection dropdown. A prompt will appear stating that in order to migrate the device from one LNS connection to another, you need to re-register the device. Click on the Re-Register button.
The user is directed to the device registration page where he can perform the re-registration following the steps above and selecting the desired LNS connection.
Updating devices registered with the general device registration
If devices have previously been registered via the general device registration the following URLs must be manually changed in the Sigfox Cloud:
https://sigfox-agent.cumulocity.com/sigfoxDataCallbacktohttps://<tenantId>.cumulocity.com/service/sigfox-agent/sigfoxDataCallback.https://sigfox-agent.cumulocity.com/sigfoxServiceAcknowledgeCallbacktohttps://<tenantId>.cumulocity.com/service/sigfox-agent/sigfoxServiceAcknowledgeCallback.https://sigfox-agent.cumulocity.com/sigfoxServiceStatusCallbacktohttps://<tenantId>.cumulocity.com/service/sigfox-agent/sigfoxServiceStatusCallback.https://sigfox-agent.cumulocity.com/sigfoxErrorCallbacktohttps://<tenantId>.cumulocity.com/service/sigfox-agent/sigfoxErrorCallback.
Info
General device registration for Sigfox devices is no longer supported.
Sending operations
If the device supports sending hexadecimal commands, you can send commands from the Shell. In the Device management application, navigate to the device you want to send an operation to in the All devices page. Switch to the Shell tab.
Info
Operations do not go to a status of EXECUTING immediately. They go to EXECUTING when the device is expecting the downlink message. Afterwards, the pending operation which is created first goes to a status of EXECUTING.
Uplink message processing
On the receipt of an uplink message, the Cumulocity IoT platform creates the following measurements and events, and updates the corresponding device managed object.
- Unprocessed data - An event of type
com_sigfox_UnprocessedDataEventis created with the unprocessed data. - Position - The
c8y_Positionfragment of the device managed object is updated to capture the latitude, longitude, altitude and accuracy information of the device. - Signal strength - A measurement is created with RSSI and SNR values of the device signal strength.
Troubleshooting
Sigfox callbacks in backend.sigfox.com are not created correctly
Device registration
No active contracts with free slots available.
Active contracts with free slots are filtered based on the activation end time and tokens in use. Contracts in which the activation end time is higher than the current time or the activation end time is unlimited, and contracts in which the max tokens are higher than the tokens in use or the max tokens are unlimited will be considered.
In order to resolve this error, please contact support.sigfox.com to create a contract for your Sigfox account.
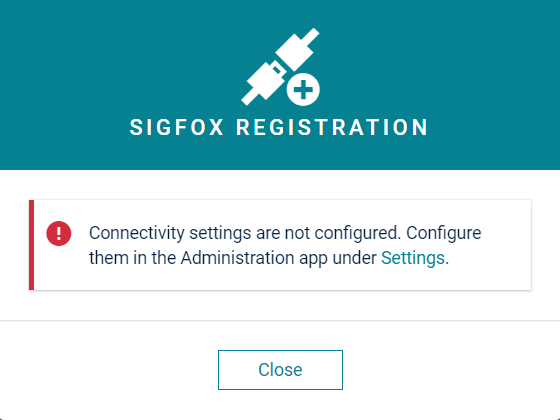
No Sigfox provider settings are found.
This warning message shows up when there are no connections set up for the sigfox connectivity.
To resolve this, refer to Configure Sigfox credentials.
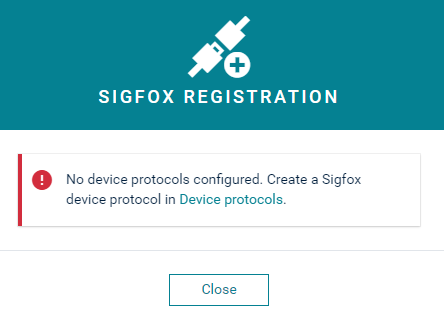
No Sigfox device type configured.
This warning message shows up when no Sigfox device protocol exists to be used for device registration.
To resolve this, configure at least one device protocol in the Device database.
Connectivity
Sigfox callbacks in backend.sigfox.com are not created correctly
The information for the callback setup is retrieved by a microservice.
To verify whether your setup is correct, execute the following REST API request:
```http
GET {{url}}/tenant/currentTenant
```
Info
The request above is simply an example API request that could be used. For more info on REST API requests, refer to the Tenants in the Cumulocity IoT OpenAPI Specification.
This warning message shows up when there are no connections set up for the Sigfox account. To resolve this click Settings to navigate to the Administration application where the connections are configured.
No device protocols configured
This warning message shows up when no Sigfox device protocol exists to be used for device registration. To resolve this, click Device protocols to navigate to the Device protocols page where the protocols are configured.
Issues with alarm provisioning
Issues with alarm provisioning
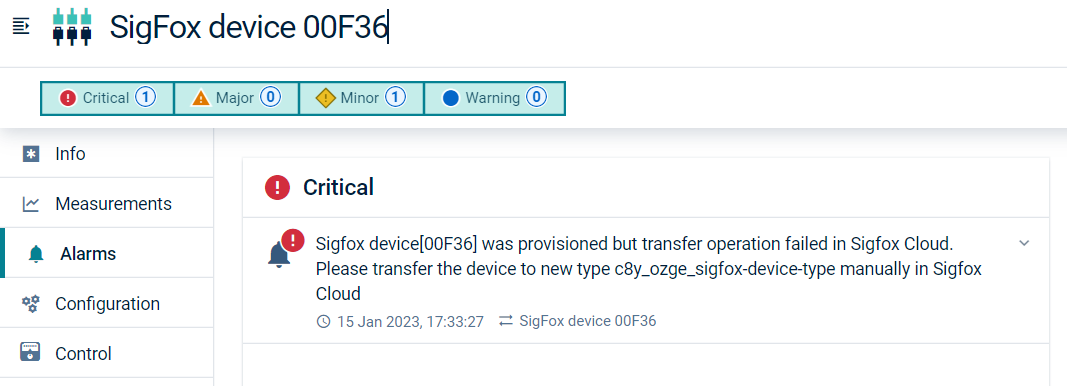
If the “transfer operation failed” alarm is triggered, the device is already provisioned in the Sigfox platform and changing the device type in the Sigfox platform failed. In order to fix this issue, you must manually change the device type in the Sigfox platform to the intended one.
Provisioned status is set to false

In case of this alarm, you can see that the Provisioned status is set to “false” which means that no data is coming from the Sigfox platform. In the alarm message there is more information regarding the error. In this case the PAC code given during registration was invalid.
Info
If the provisioning process has been completed, but has failed, information is returned as an alarm with the reason of the failure provided.
The Provisioned status is set to true when the device provisioning process is completed and success information is received from the Sigfox platform. Additionally, it is set to true when uplink messages are retrieved from the device.
Info
The status is updated asynchronously which means that sometimes you might have to wait a bit until it is set to true.
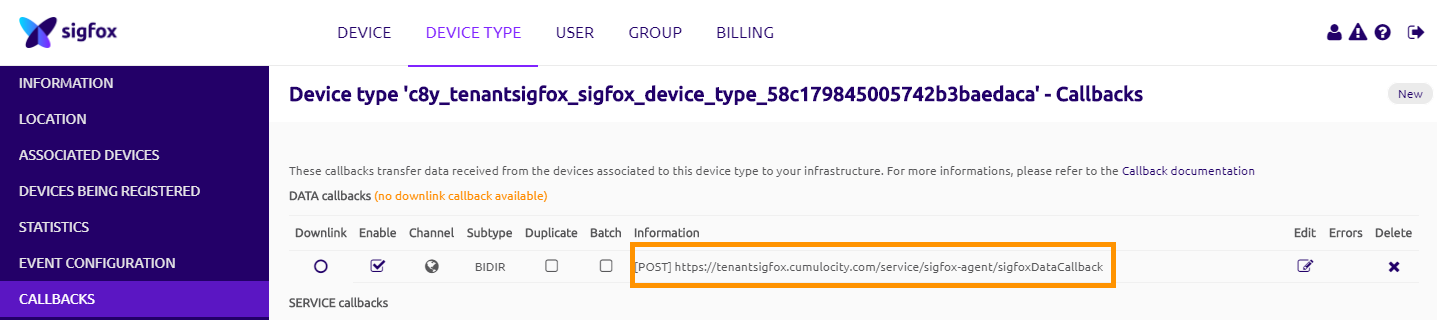
Callback creation failed
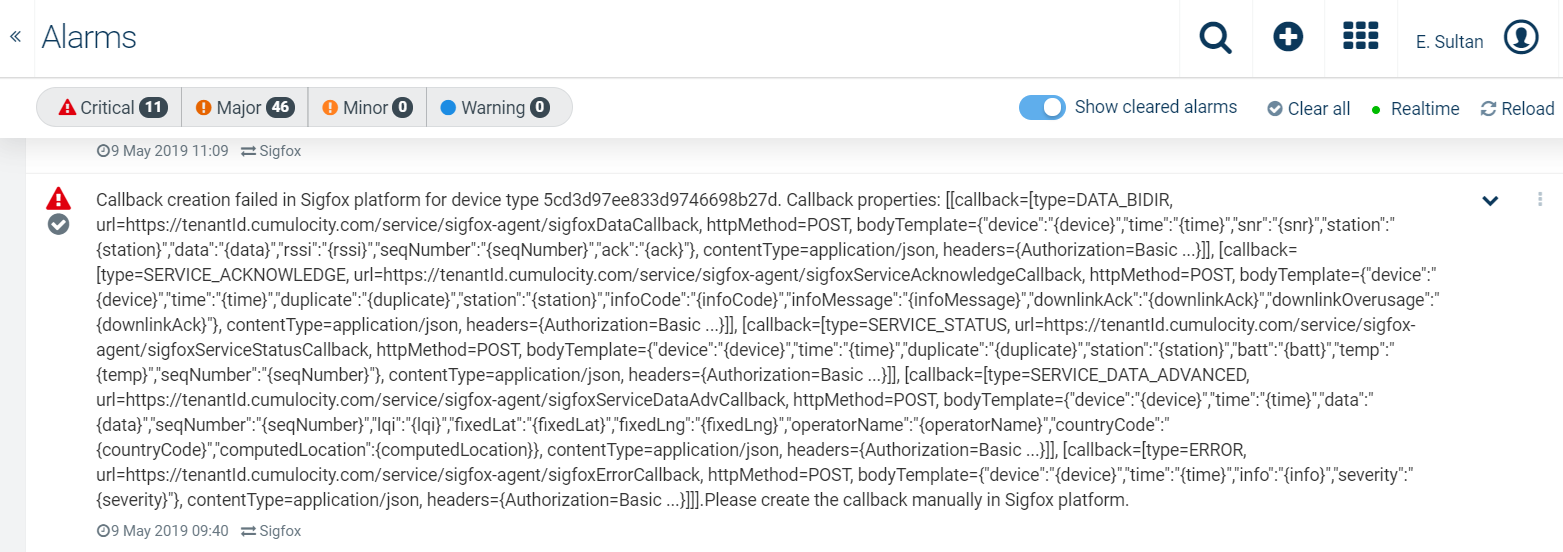
This alarm is created when one or more callback creation requests have failed in the Sigfox platform. You can view the alarm either in the Alarms page or in the Home page.
In order to fix this issue, navigate to the Sigfox platform web interface and check the device type with the id mentioned in the alarm.
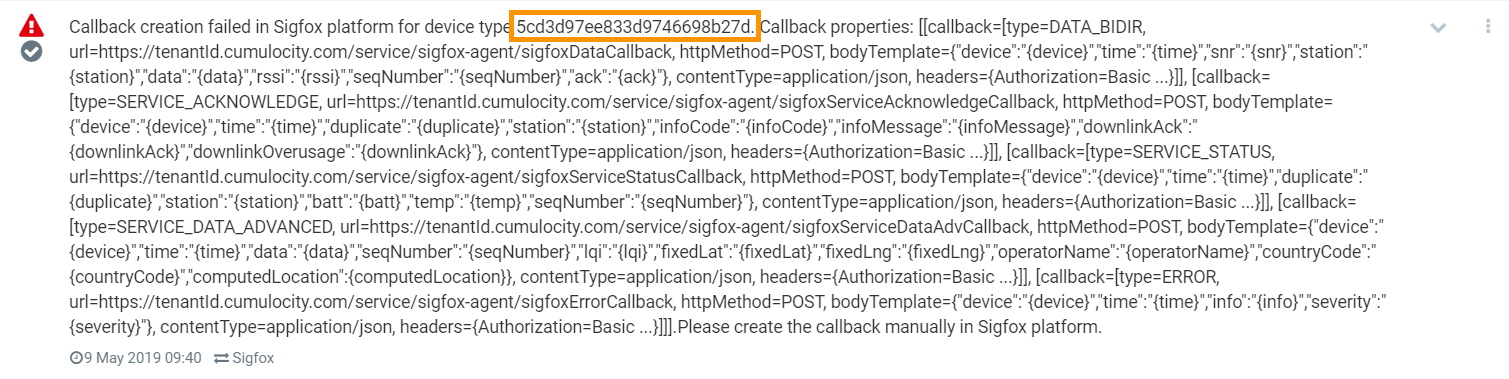
In this case navigate to the following address: https://backend.sigfox.com/devicetype/5cd3d97ee833d9746698b27d/callbacks
If the mentioned callbacks cannot be located in the Sigfox platform, you must create them manually. All of the required information needed for the creation of the callbacks is already given in the alarm description. In the case of the above alarm, the following callback is listed first:
- [[callback=[type=DATA_BIDIR, url=«tenant_url»/service/sigfox-agent/sigfoxDataCallback, httpMethod=POST, bodyTemplate={“device”:"{device}",“time”:"{time}",“snr”:"{snr}",“station”:"{station}",“data”:"{data}",“rssi”:"{rssi}",“seqNumber”:"{seqNumber}",“ack”:"{ack}"}, contentType=application/json, headers={Authorization=Basic …}]]
In order to manually create the callback, the following properties must be filled:
- type
- url
- httpMethod
- bodyTemplate
- contentType
- headers
Info
The Authorization header displayed in the alarm does not show the user credentials.
Non-mentioned properties from the alarm are:
- sendSni
- sendDuplicate
These properties will be set to false.