Overview
Assets
In the DTM application assets are the digital representation of physical assets. An asset in the DTM application can contain subassets and devices. You also have the opportunity to define properties or parameters of an asset through asset properties.
To work with assets in the DTM application, navigate to the Assets page using the navigator menu on the left. When you first start using the DTM application, no assets are displayed in the Assets page by default.
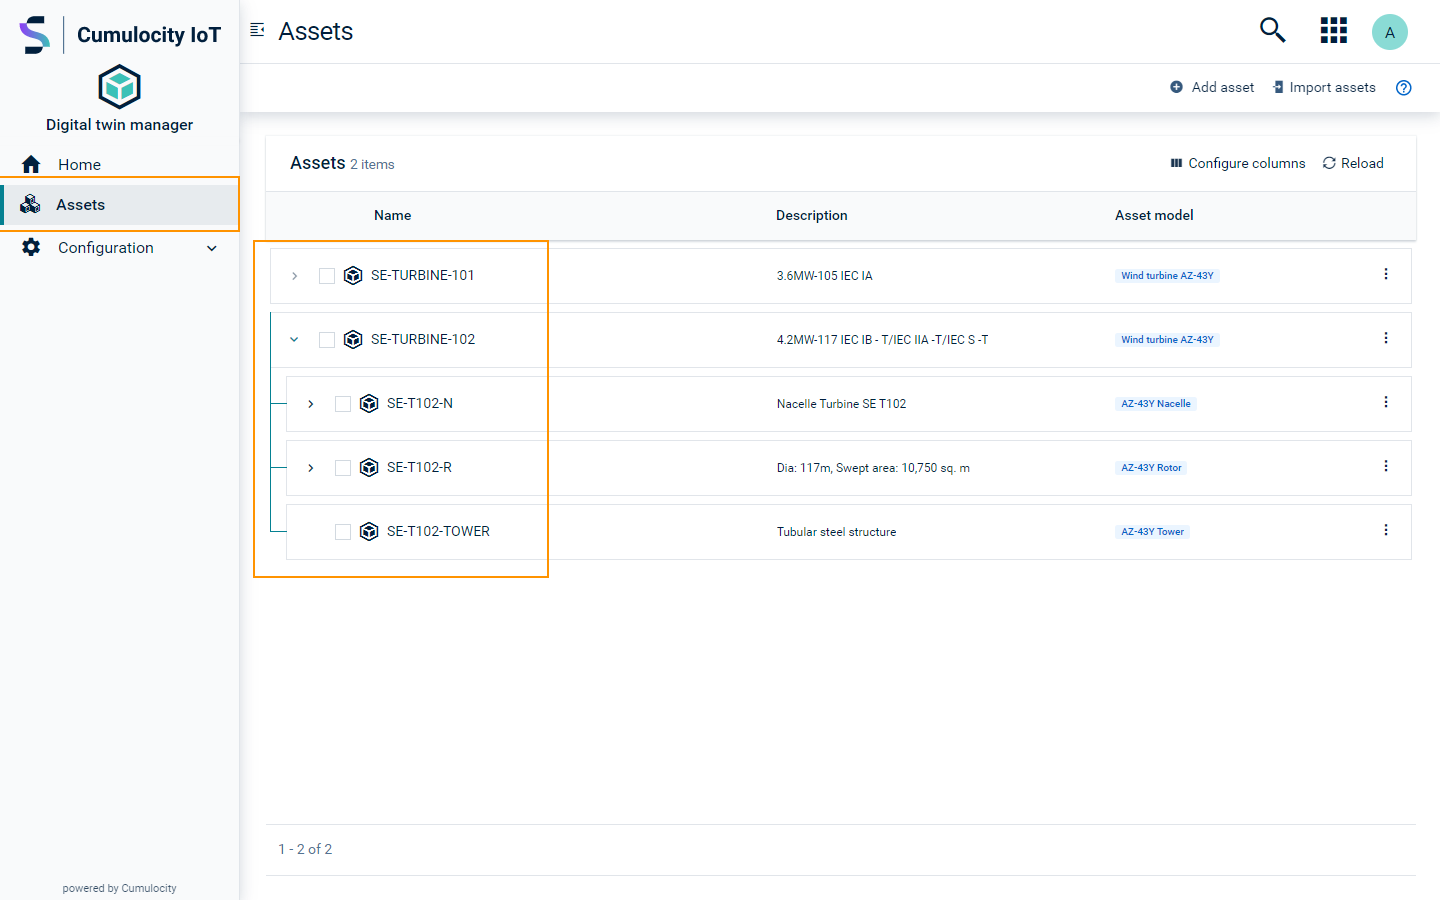
If you already created assets, you find them listed in a hierarchical view on this page.
Requirements
ROLES & PERMISSIONS
- To view all assets: READ permission for permission type “Inventory”
- To add/update/delete assets: CREATE/ADMIN permission for permission type “Inventory”
- To view specific assets: READ permissions for “Inventory” in the inventory roles
- To manage or delete specific assets: READ and CHANGE permissions for “Inventory” in the inventory roles
Note that global inventory permissions override inventory role permissions. By default, the user has full access to assets created by them regardless of the permissions granted to them. See Administration > Managing permissions in the User guide.
Asset hierarchy
An asset hierarchy is a structure that organizes multiple assets and devices into a hierarchy, allowing for the visualization and management of complex systems.
The asset hierarchy is displayed in the Assets page. An asset hierarchy consists of a root asset and all its subsequent subassets. Click Add asset to create the entire hierarchy of an asset in the New asset page. For details, see To create an asset.
Example:
If you create the root asset “Wind turbine” with the subasset “Rotor”, which has a subasset “Blade” then the hierarchy would be as follows:
Wind turbine > Rotor > Blade
Initially, all the asset hierarchies are collapsed and it lists only the root assets. The list also shows certain asset details, for example, asset model and description. Click the expand icon to the left of each asset to view the next level of subassets. Note that the devices assigned to an asset is not shown in the asset hierarchy.
Click the asset name to view the asset details and the devices assigned to it.
To edit or delete an asset from the Assets page, click the menu icon at the right of the row and click either Edit or Delete. To delete multiple assets at once, select one or more assets and click Delete in the top banner.
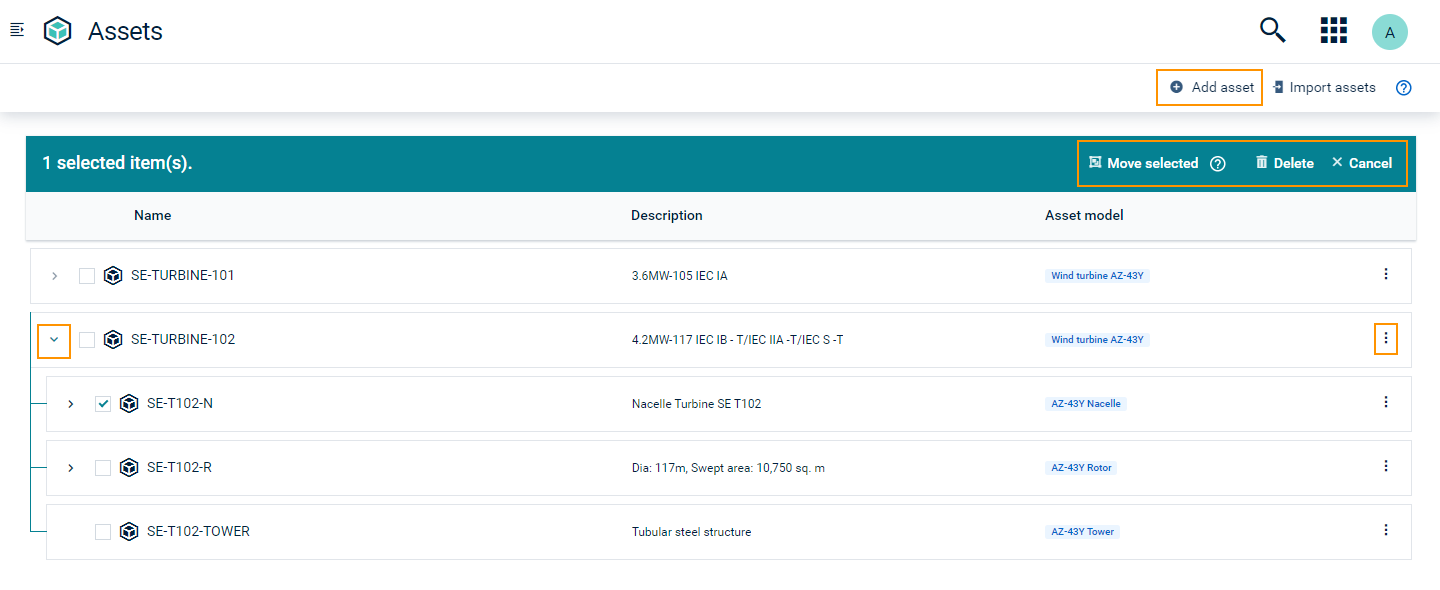
Select one or more assets of same type to relocate from its current hierarchy to another. For more information on how to move assets between hierarchies, see To move assets.
Creating assets via the UI
You have two options for creating assets in the DTM application. The following section describes how to create an asset via the UI. Alternatively, see Creating assets via bulk import on how to import assets in bulk into the DTM application.
To create an asset
To add an asset via the UI:
-
Click Add asset in the top right corner of the Assets page.
-
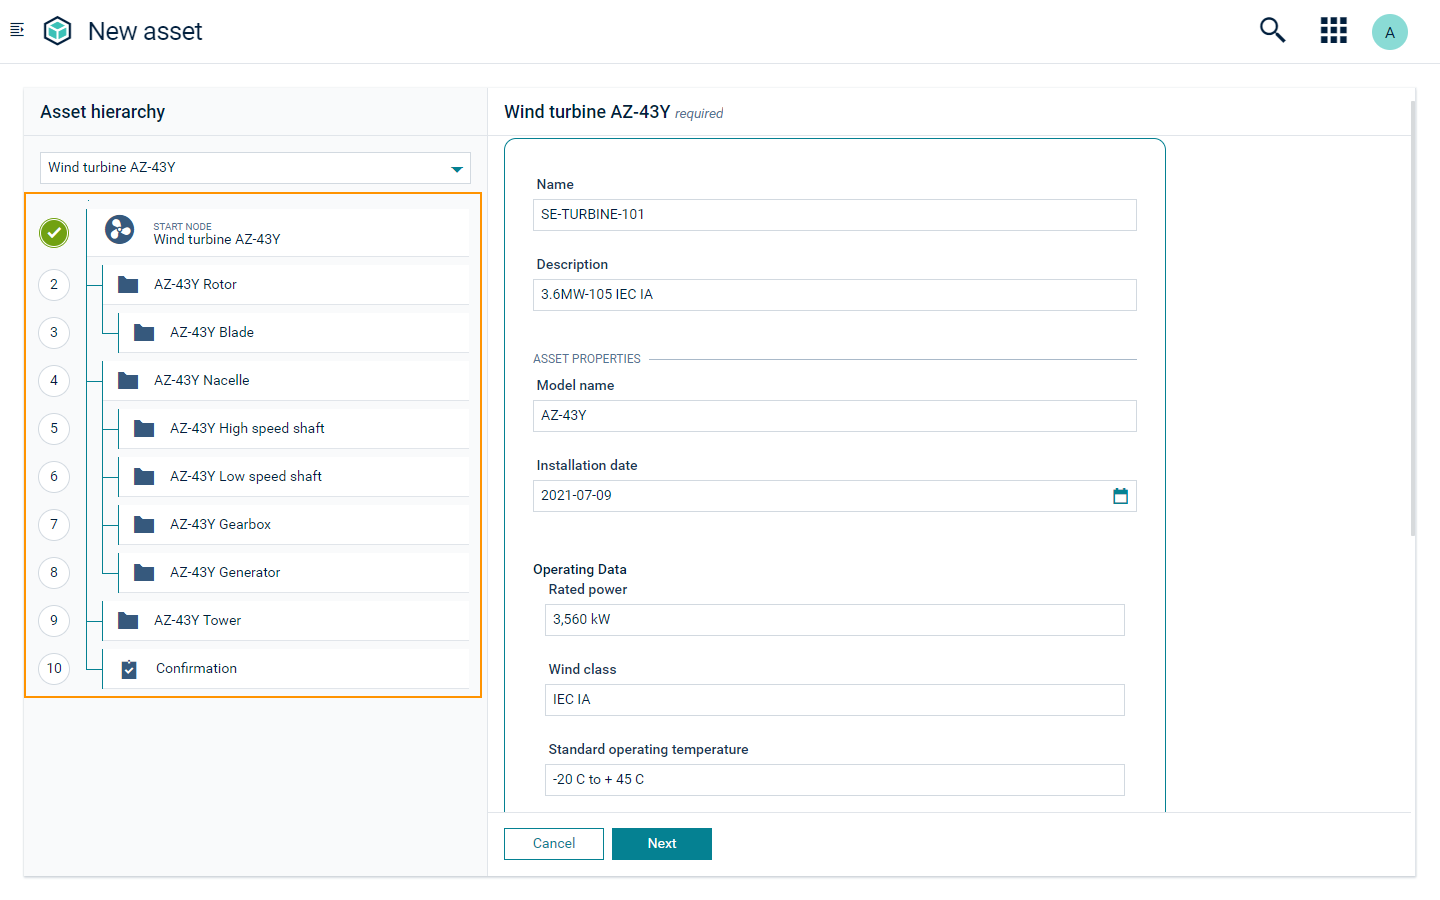
In the New asset page, select the desired asset model from the Choose asset model dropdown menu on the top left.
InfoThe asset models here are root asset models. They are labeled “START NODE” in the hierarchy. Root asset models are asset models which are at the top of hierarchy and don’t have any parent asset model above them. -
The asset hierarchy is shown in the left section and the respective dialog window is shown on the right. Fill out the fields labeled “required”.
-
Optionally, add a description or assign devices to your root asset.
-
To add more than one root asset, click Add.
-
Under Asset properties, fill in the required information. Here you find all asset properties assigned to the asset model that you create.
InfoThe asset properties are defined when creating the asset model. When creating an asset you must provide the values for all asset properties. -
Click Next to reach the next hierarchy level of your asset hierarchy and fill out the fields as necessary for your asset. Repeat for all asset hierarchy levels.
-
The Confirmation step displays an overview of your asset and asset hierarchy levels. Click Create to create your asset. The asset is now listed in the Assets page.
As you define each hierarchy level of your new asset, you see a green check mark on each asset hierarchy level in the section on the left.
Info
If there are validation errors on the page, they are indicated by red highlights.
Correct the required information to continue.
If you are leaving the page abruptly, a confirmation dialogue box is shown.
Example:
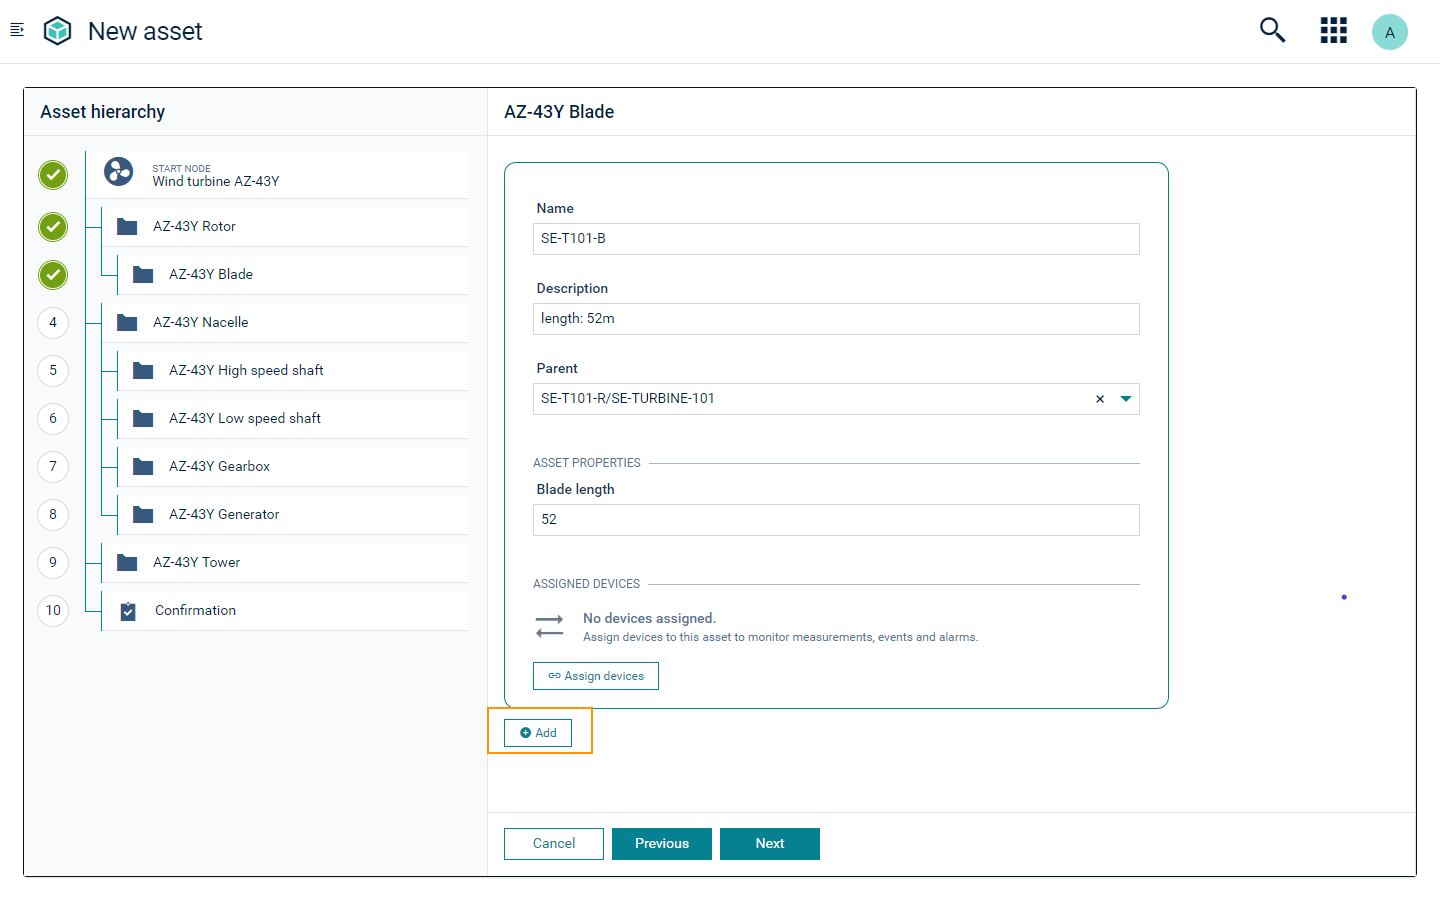
If you are creating an asset hierarchy for the asset model “Wind turbine AZ-43Y”, select the root asset model “Wind turbine AZ-43Y” in the Choose asset model dropdown menu. Starting with the root asset level, you see the dialog window “Wind turbine AZ-43Y” on the right. Enter the name of the wind turbine in the field Name, for example, “SE-TURBINE-101”. In the field Description you can enter a brief description of this asset, for example, “Wind turbine with rated power of 3.6MW”. However, this field is optional and can be left empty. To add more assets to this level, click Add new at the bottom. Repeat until all desired assets on this level have been filled out.
Click Next to see the next asset level, for example, “Rotor”. Fill out all required fields. You have the option to add more assets on this level. Click Next to continue until all assets are created.
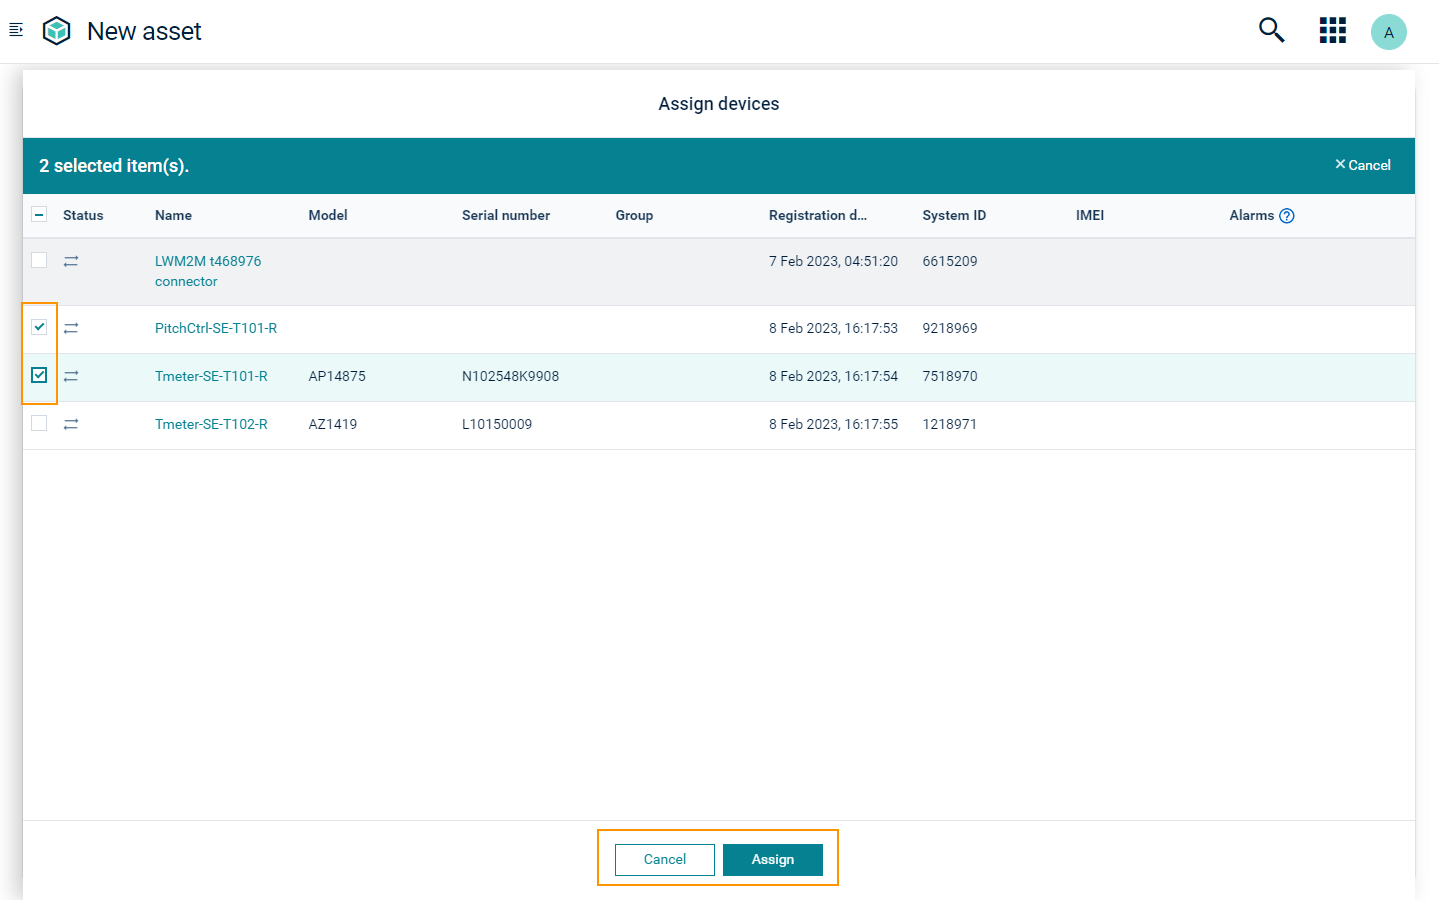
To assign devices to an asset
When you create a new asset you have the option of assigning one or more devices to this asset.
- Click Assign devices in the New asset page.
- The resulting dialog window lists all devices registered for the tenant. Select one or multiple devices and click Assign.
- The dialog closes and you can continue creating the asset.
To add a new device, add it through the Device management application. Refer to Device management > Connecting devices > Device registration in the User guide.
Info
Only select devices which are part of the current asset.
If a device belongs to a subasset, then select it when you create the subasset.
To filter and select devices
You can view, search or filter devices easily with the following options:
-
Columns in the grid specify the device details for each device. Click Configure columns at the top right to show or hide columns.
-
Click Reload to reload the page and display the latest list of devices present in the Cumulocity IoT tenant.
-
Click Sort on the applicable columns to view the device data in either ascending or descending order.
-
To filter devices based on text, use the Filter option in the applicable columns. If you apply a filter, you see a notification at the top.
-
To clear the filters, click Clear all filters.
InfoThe sort icon and the filter icons appear on hover over each column.
To add multiple instances of an asset
At each hierarchy level, you can create multiple assets from a single asset model.
Example:
For a wind turbine rotor with three blades, you first create the asset hierarchy level for “Rotor”. Then use the asset model “Blade” to add the blades.
-
Click Add at the bottom to add more blade assets.
-
To delete an added asset template, click the delete icon at the top right.
InfoThe delete icon appears on hover. -
Modify the assets by navigating the asset pages using the Previous and Next buttons. You can track your progress via the green check marks in the asset hierarchy on the left.
-
When done, the Confirmation page shows the asset hierarchy. Click Create to create the asset hierarchy.
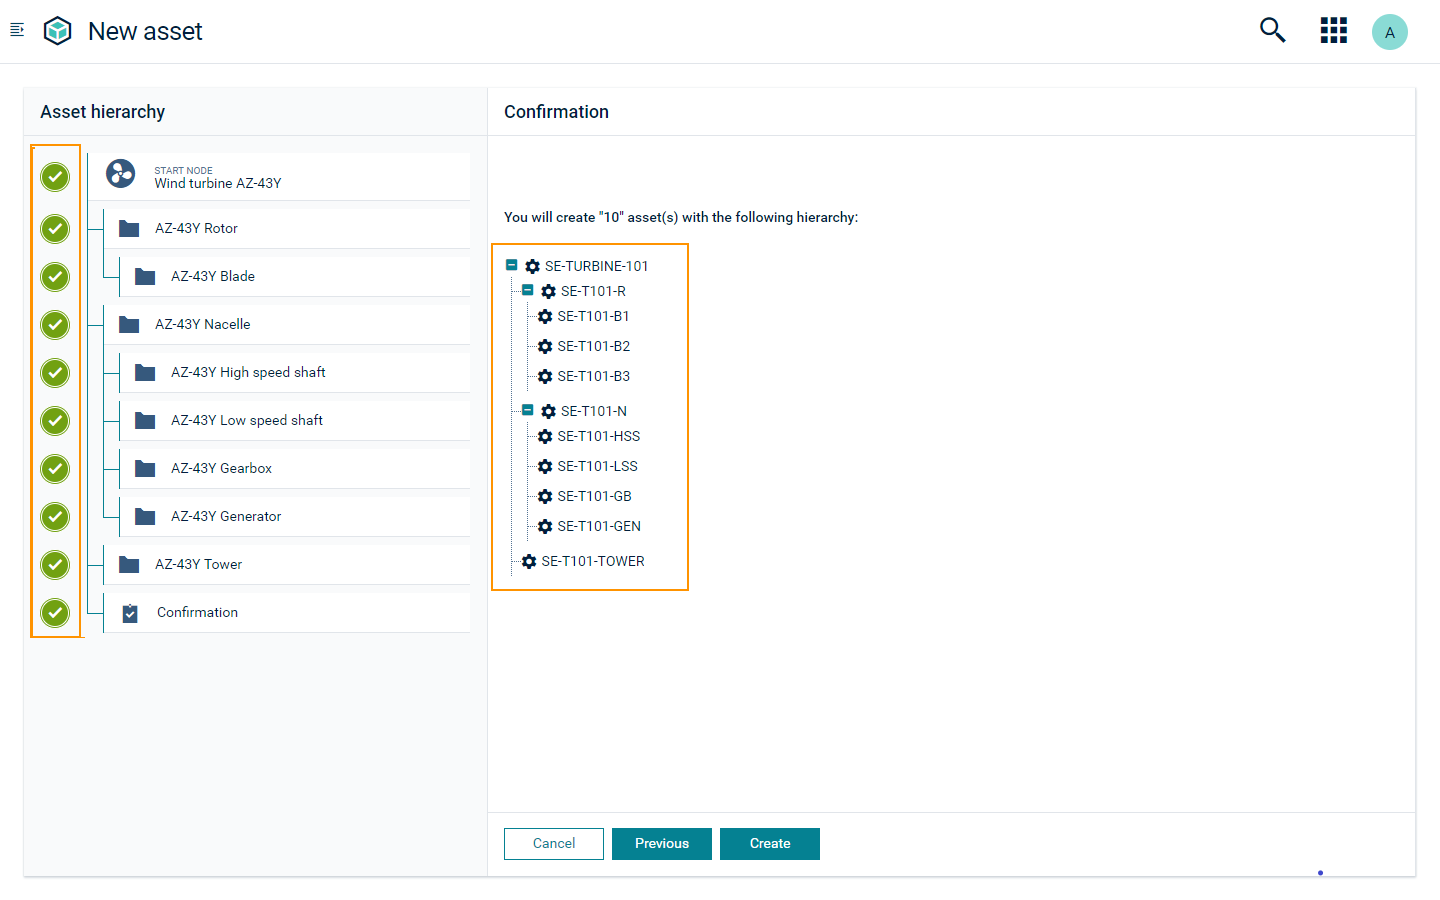
On successful asset hierarchy creation, you see a pop-up notification in the top right corner. You can view the newly created asset hierarchy in the Assets page. Also see viewing assets.
To view asset details
Select an asset in the Assets page to view the asset details in Subassets tab. It shows all the subassets, child devices and asset properties.
In the top right corner of the Subassets tab, you can assign devices.
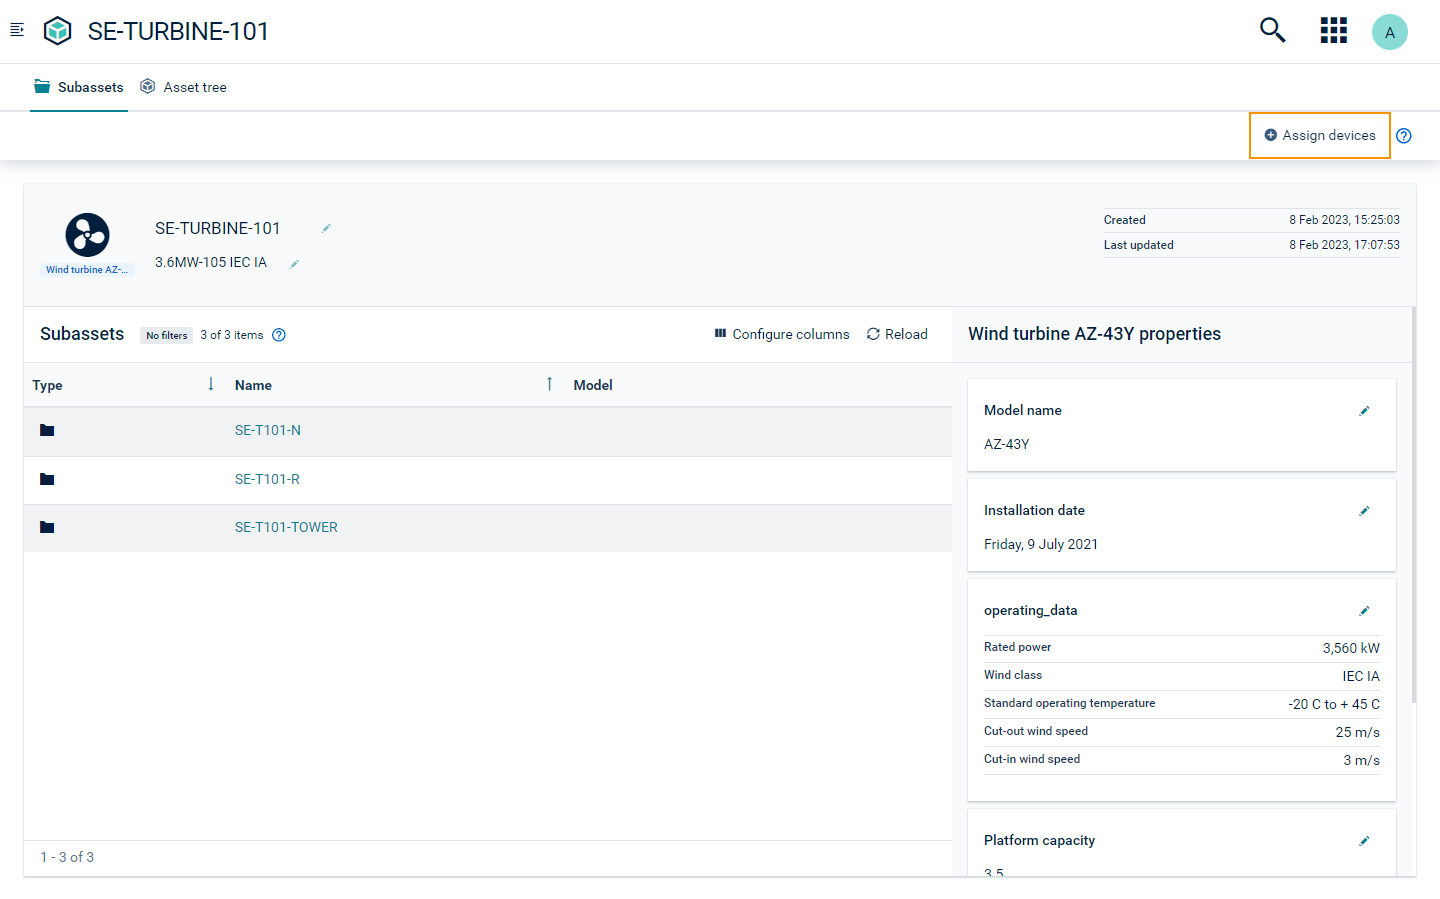
You can view the hierarchy of the asset in the Asset tree tab. Initially the asset hierarchy is collapsed. Click the expand icon to view the next level of subassets.
Click Add asset to add more subassets or click Import assets to add assets in bulk.

To add subassets
To add subassets to an asset open the Asset tree tab.
-
Click Add asset to load the Asset hierarchy for the selected asset.
-
The root asset is displayed with the label “parent node”. The asset hierarchy displayed below, is a subset of the root asset hierarchy.

Example:
If “Wind turbine” is a root level asset, then “Rotor” is a subasset of “Wind turbine” and “Blade” is a subasset of “Rotor”. If you navigate to the Asset tree page of “Wind turbine” and click Add asset, the asset hierarchy loads for “Rotor” and “Blade”.
If you navigate to the existing “Rotor” asset and want to add a subasset, you can only add subassets for “Blade”.
For details how to add assets in the asset hierarchy, see To add assets.
Info
If you are at the end of the hierarchy, you see no further option to create subassets.
Creating assets via bulk import
To import the entire asset hierarchy with all assets at once, use the bulk import feature. For each asset model, a CSV template is provided. Fill in the required details in this template and upload the file to create the assets in bulk for the selected asset model.
To use the bulk import feature
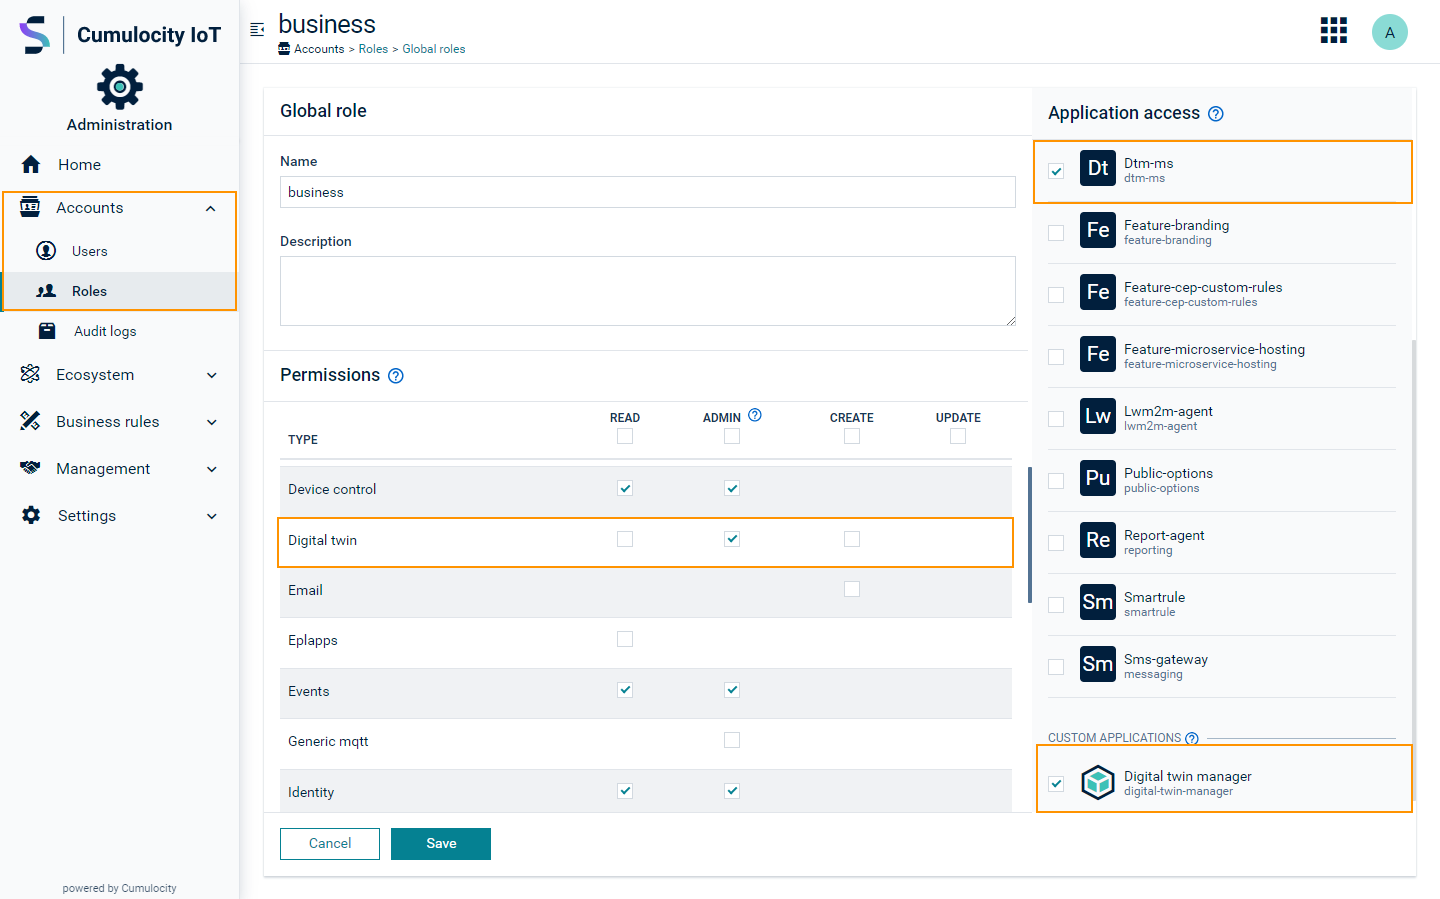
To use the Bulk import feature, you must enable the Digital Twin permission for the user’s role, following these steps:
-
Navigate to the Administration application via the application switcher in the top right corner.
-
Under Quick links click Roles.
-
In the Global roles tab, select the role to which permissions are to be provided.
-
Select the “Admin” permission for “Digital Twin” in the “Permissions” section.
-
Enable access to the DTM application by selecting the following checkboxes:
-
Under Application access, select “Dtm-ms”.
-
Under Custom applications, select “Digital twin Manager”.
-
-
Click Save.
Once the permissions are assigned, the bulk import feature can be used.
Info
If the permissions are not assigned, the CSV template will not be downloaded correctly.
To download a CSV template for bulk import
Follow the steps below:
-
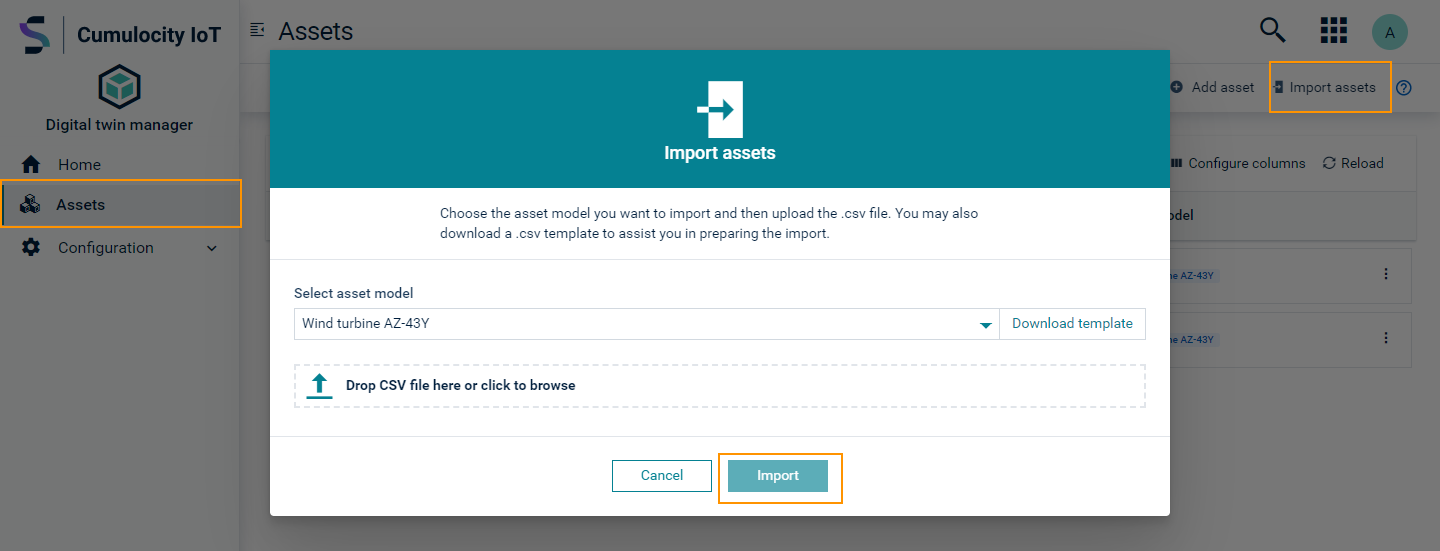
Navigate to the Assets page and click Import assets.
-
The Import assets dialog has a dropdown Select asset model. If you have added the asset models, all the root asset models are listed in the dropdown.
-
Select the asset model for which you want to create the asset hierarchy.
-
On selection, the following options become available:
- Drop CSV file here or click to browse - upload the CSV template as a file, for importing assets in bulk.
- Download Template - download the CSV template for the selected asset model.
-
Click Download Template to download the CSV template.
CSV template parameters
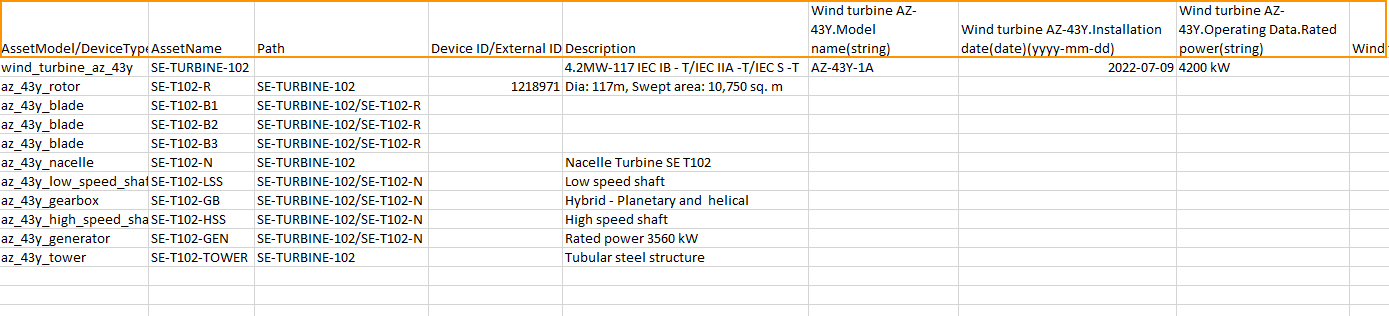
The CSV template has the following fields:
| Field | Description | Mandatory / Optional |
|---|---|---|
| AssetModel / DeviceType | Enter the key of the asset model. | Mandatory |
| AssetName | Provide the name of the asset you want to create. | Mandatory |
| Path |
Path denotes the location of the asset within the asset hierarchy. For a root asset, it remains blank. For a subasset, provide a path up to the root asset. Example: For an asset called "SE-T101-Blade 1" in the hierarchy "Wind turbine > Rotor > Blade" the path value is "SE-Turbine-101/SE-T101-Rotor", where "SE-Turbine-101" and "SE-T101-Rotor" each represent the respective asset models. In case of partial import, the path is defined in relation to the asset from which the file is imported. For the immediate children of the asset, the path remains blank. Example: In the hierarchy, "Wind turbine > Rotor > Blade", to import a new Rotor, "SE-T102-Rotor," and a Blade, "SE-T101-Blade2," under the existing Turbine "SE-Turbine-101", the path value for the Rotor remains blank, and the path value for the Blade is "SE-T102-Rotor." |
Mandatory (for all subassets) Mandatory (for subassets except immediate children in the context of partial import) |
| Device ID / External ID | If the asset being created has a device associated with it, then provide the Device ID of the device here. Note that you can use a list of semi-colon separated Device IDs or External IDs to associate multiple devices to the asset. |
Optional |
| Description | briefly describes the asset being created. | Optional |
| Asset properties for the asset model | 6th column onwards (in the CSV template), all the asset properties for the root asset models and all its subsequent child asset models are listed. Note that the Asset property type is also mentioned as a label, for better understanding. |
Mandatory (If the property is set as required in the asset model. For details, see To add an asset property to an asset model). |
Info
Use only comma (,) as a separator when entering values in the CSV template.
Modify the excel settings to provide the date in a YYYY-MM-DD format. This prevents auto-correction of the date on input.
To provide a file input as an asset property value, the file must first be uploaded to a Cumulocity IoT tenant using the Cumulocity IoT API.
Refer to the Binaries API in the Cumulocity IoT OpenAPI Specification for details on how to upload a file to Cumulocity IoT.
The binary ID in the API response must be provided as input for the asset property field with type “file” in the CSV template.
Info
During the bulk import, the file size validation is skipped as the file is already uploaded to the tenant.
If the type is “Boolean”, the input field must be either “true” or “false”. If the type is “enumeration”, then the input field must be in the list of values specified during creation of the asset property. If the type is “text” or “number” and custom criteria were provided during asset property creation, then the input value in CSV template must fulfill all the asset property criteria.
Fill in details for all the assets which must be created as part of the asset hierarchy.
Start with the asset details for root asset model. Then enter the asset details for child a models under the root asset. Next, enter the details for the next level in the hierarchy of subassets and repeat until the details for all the assets are entered in the CSV template. Save the CSV template in your system.
Info
It is recommended to import a maximum of 5000 assets at a time for a better user experience.
To upload a CSV template
To upload the CSV template follow the steps below:
-
Click Import assets in the Assets page.
-
Select the asset model in the Import assets dialog.
-
Upload the previously filled and saved CSV template in the Drop file here section and click Import.
-
If all the inputs are provided correctly, the bulk import is successful, resulting in a success notification. The asset hierarchy and its assets are created successfully.
-
View the newly created assets in the Assets page.
If the inputs are not provided in the correct format, the bulk import fails with validation errors, resulting in a Failed asset imports notification, showing the issue types, for example, an invalid template or an incorrect asset hierarchy. No assets are created.

If the bulk import fails, review the reported issues and try again.
Partial import
If the asset hierarchy already exists, and you want to import more assets, it can be achieved by a partial import.
To import subassets or the subasset hierarchy:
-
Navigate to the Asset tree page of the subasset and download the template using Import assets.
-
Fill in the details for the subasset hierarchy in the CSV template. See CSV template parameters for more details.
InfoFrom any hierarchy level, the template will be downloaded only for its child hierarchy. Assets must only be imported for the child hierarchy. -
Click Import assets.
-
Upload the CSV template in the Drop file here section in the Import assets dialog and click Import.
If all details are mentioned correctly in the CSV template, the subasset hierarchy is created successfully.
An unsuccessful partial import will result in a Failed asset imports notification, showing the validation issues. Review the reported issues and try again.
Viewing assets
Once the asset hierarchy is created by adding assets, they can be viewed in the Assets page.
To view an asset
-
Select an asset from the hierarchy on the Assets page.
-
The Subassets page contains the asset details, created and last updated time displayed at the top right.
-
Optionally assign devices from the top bar.
-
The asset name and description along with the icon are displayed at the top. All subassets and devices for this asset will get listed in the Subassets section.
-
All the asset properties for this asset will be displayed on the right.
-
In the Asset tree tab you see the asset hierarchy.
-
Optionally add subassets, or import assets using the options on the top right.
Info
The buttons Import assets, and Add asset are not visible for the last hierarchical level.
If you edit an asset property or an asset model associated with the selected asset, you see a warning icon next to the asset model name.
You see a warning message if one or more properties associated with the asset are not present.
If you edit an asset property or an asset model associated with the selected asset, you see a warning icon next to the asset model name.
You see a warning message if one or more properties associated with the asset are not present.
To modify an asset
Fields are marked editable by an edit icon. To modify any of the asset details, click the edit icon, enter new details and save.
To delete an asset
To delete a subasset or device in the hierarchy:
-
Click the delete icon next to it.
InfoThe delete icon appears on hover of each row under the subassets section.
In the following dialog box, click Confirm to continue. Optionally select the checkbox in the dialog box to delete all subassets and devices for the selected asset.
To search for an asset
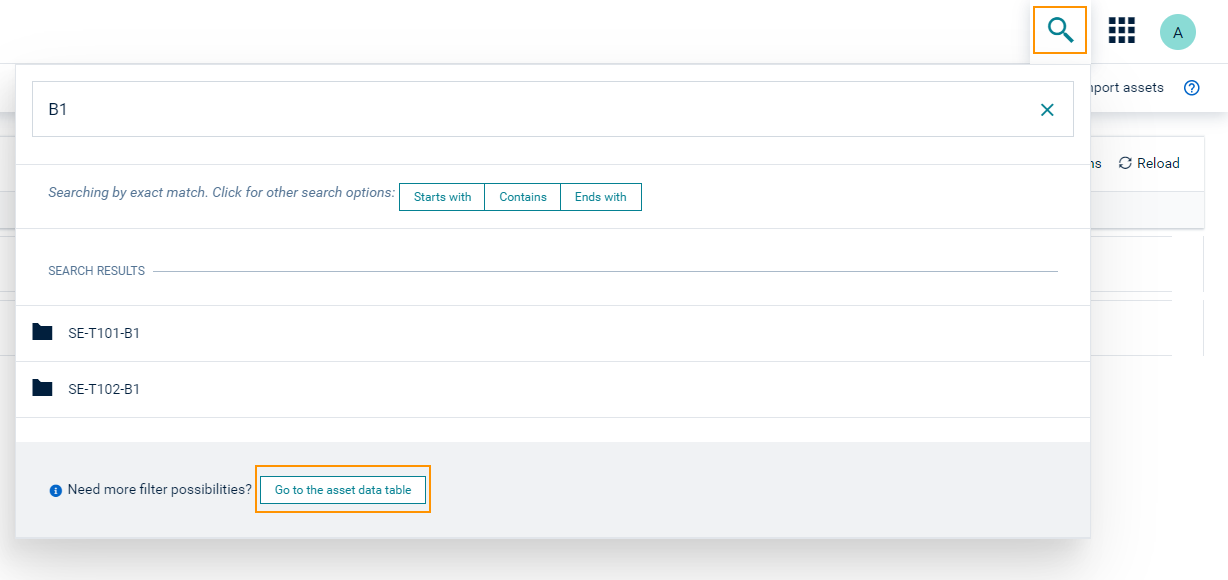
You can search for assets through the Search button at the right of the top bar. Enter a search term into the textbox at the top of the Search window to see all assets matching the search criteria in the section Search results.
To see more details click Go to the asset data table at the bottom. This will show the entire search results in a table format.
The Search page only shows a limited number of matches. In case of more matches, switch to the asset data table to see the complete results.
Important
The search results include all assets containing the search term in any property (name, model or any fragment), that is, the search results do not only include assets matching the search criteria with their names.
The DTM application extends the full text search capability of Cumulocity IoT for searching assets. See Getting Started > UI functionalities and features > Search and filter functionality in User guide to know more about available search options.
To move assets
Use the assets move feature to relocate assets within hierarchies. To move one or more assets, follow the steps below:
- Select one or more assets of same type in the Assets page to move.
- Click Move selected in the top banner.
- In the resulting dialog, you see a list of assets which allow selected assets as its children. Click the radio button to the left of each asset to select it.
- Click Move to complete the relocation.
Info
Only a maximum of 10 assets can be moved at a time.
The Move selected option in the banner is disabled in the following scenarios:
- One or more root assets are selected.
- Assets of different asset models are selected. Only assets of same asset model can be moved.
- The selected asset’s asset model is no longer a child of its parent asset model.
- One or more assets with the same name are selected.
