Developing apps
An EPL app is a monitor (*.mon) file. You can develop EPL apps in two different ways:
- You can use Apama EPL Apps which is available from Cumulocity IoT’s application switcher and develop your EPL apps within Cumulocity IoT.
- Or you can install Apama on your local machine and then develop your EPL apps (as monitor files) in Software AG Designer, that is, in a separate environment.
See also Using the Apama Event Processing Language (EPL) in the Concepts guide.
Developing apps with Apama EPL Apps
Apama EPL Apps provides an interface for interactively editing new or existing EPL apps (*.mon files) as well as importing and activating (deploying) EPL apps.
Any user on the tenant wishing to use Apama EPL Apps will need to be a CEP Manager. See Managing permissions in the User guide.
Info: To be able to develop apps with Apama EPL Apps and/or to import monitor files from Software AG Designer into Cumulocity IoT, your tenant needs to be subscribed to both the Apama-ctrl microservice and the Apama EPL Apps web application provided in Cumulocity IoT. If you have the Apama Starter microservice or the Apama Smart Rules-only microservice, Apama EPL Apps is not available in the application switcher. If you want to have this capability, contact product support.
Step 1 - Invoke Apama EPL Apps
Open the application switcher and click the icon for the Apama EPL Apps application.
When you invoke Apama EPL Apps, the EPL app manager is shown first, listing any existing EPL apps. Each app is shown as a card. You can add new EPL apps and manage existing EPL apps from here.
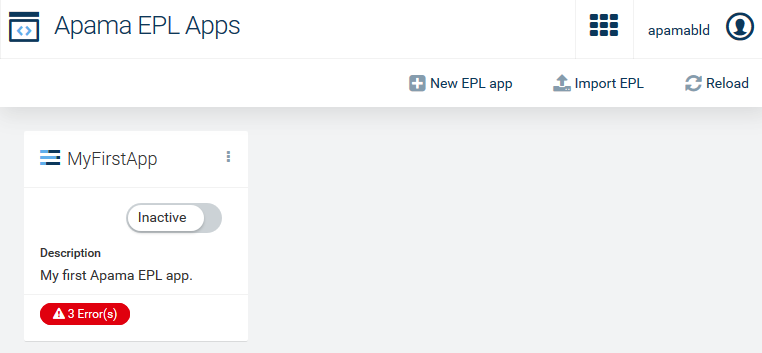
Each card that is shown for an app has an actions menu at the top which allows you to edit or remove the app.
From this page, you can:
-
Edit existing EPL apps. Either use the Edit command from the actions menu or simply click on the card that is shown for the app.
-
Create new EPL apps. See below.
-
Import EPL apps. If you prefer to develop your apps outside of Cumulocity IoT (for example, using Software AG Designer), click Import EPL in the top menu bar to upload an Apama monitor (*.mon) file as an app into Apama EPL Apps.
-
Deploy existing EPL apps. On the card that is shown for an app, change the mode from Inactive to Active. For more information, see Deploying apps.
When activating an app, any syntax errors are reported back immediately. The error state is shown on the card, helping you to ensure your app is in good shape. Click on the error to display information on what went wrong. It is not possible to activate an app if it has syntax errors. The errors are shown on the card until they have been fixed and the app has been activated again.
-
Reload all EPL apps. Click Reload in the top menu bar to refresh the display to show any changes other users have made since the page loaded, including any errors that have been introduced in the meantime.
Step 2 - Create an EPL app
Click New EPL app in the top menu bar. Give the app a unique name. You can also enter a description which will be shown on the card that is created for the new app.
The EPL editor is shown next. The EPL code for the new app already contains the typical basic event definitions and utilities that are required for working with Cumulocity IoT. You can adapt them as required for your app. Consult the documentation and samples for more details.
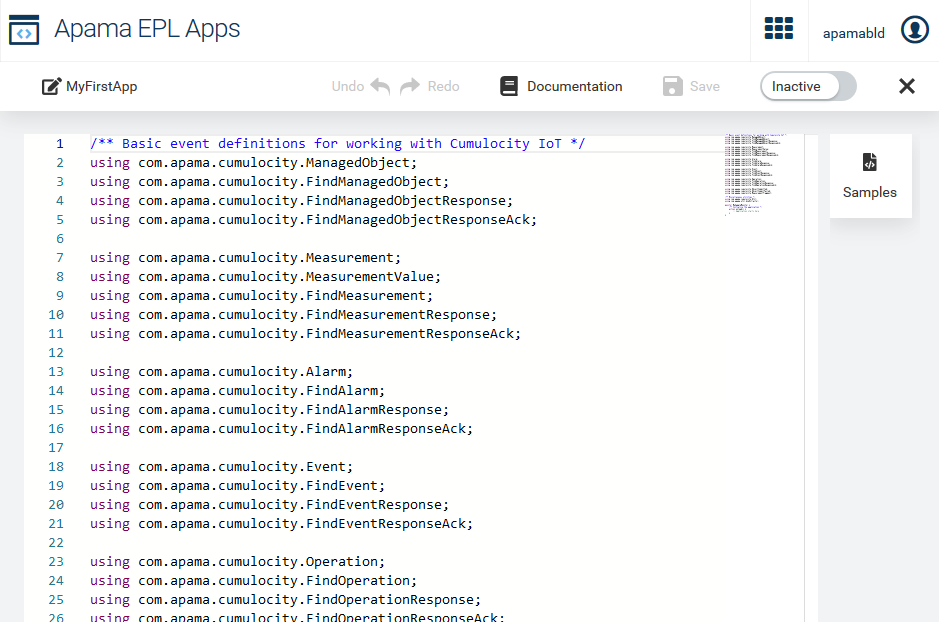
To help you get started, several samples are available. To see them, click Samples which is shown to the right of the editor. Click on a sample to see a preview of its contents. You can select part of the sample code and copy it over into your own code using the standard key combinations Ctrl+C and Ctrl+V. You can also use the command buttons to copy the entire code to the clipboard and insert it at an appropriate position in your own code, or to replace all of your existing code with the sample code.
Using the buttons in the top menu bar, you can undo/redo your last changes in the current session and you can save your changes.
It is also possible to change the mode from Inactive to Active (or vice versa) in the EPL editor. Again, when there is an error in your EPL code, it is not possible to activate the app. The errors are highlighted within the code.
Keep the following in mind while creating (or importing) an EPL app: When an EPL app is activated, it is possible that some EPL operations are performed that are not allowed for the user who created the app. For example, you may only have ADMIN permission for “CEP management” for injecting EPL and creating Analytics Builder models. However, when the app is activated, it is also possible that the injected EPL can create or clear an alarm and that an Analytics Builder model can create an operation.
Side note: Be aware that the EPL editor makes use of a standard web component. It provides many generic developer functions, some of which are not relevant to EPL, including but not limited to Quick Fix and Show Hover.
Click X in the top menu bar to leave the EPL editor and thus to return to the list of EPL apps.
Caution: All unsaved changes are lost when you navigate to a different URL or close the browser window.
Step 3 - Test the EPL app
Once your app is activated, you should be able to see the results of it running. This may include sending measurements, receiving data, creating alarms, and logging in the Apama-ctrl microservice. For information on how to check the log files of the Apama-ctrl microservice, see Managing applications in the User guide.
See also Deploying apps.
Developing apps with Software AG Designer
Software AG Designer provides a full development environment and is the tool of choice when you have a complex EPL application. When your EPL app (that is, the monitor file) is ready, you then need to import it into Cumulocity IoT.
Step 1 - Install Apama
If you have licensed Apama, install it using Software AG Installer.
You can also use a freemium version of Apama which runs with reduced capabilities and several restrictions. If you want to use this, download the Apama Community Edition from http://www.apamacommunity.com/downloads/ and install it.
Both versions, the licensed version and the freemuim version, include Software AG Designer.
Step 2 - Create a project
Once installed, create an Apama project in Software AG Designer and enable it for Cumulocity IoT connectivity. For instructions on how to create an Apama project, refer to Creating Apama projects in the Apama documentation.
Step 3 - Add Apama bundles to the project
Add the following Apama bundles to the newly created Apama project. These are required by Cumulocity IoT so that it can activate your app. For instructions on how to add bundles to a project, refer to Adding bundles to projects in the Apama documentation.
- Cumulocity IoT > Event Definitions for Cumulocity
Provides event APIs required for sending and receiving data to/from Cumulocity IoT. - Cumulocity IoT > Utilities for Cumulocity
Provides helper utility functions for working with data received from Cumulocity IoT. - Any Extractor
Provides support for extracting values from theanytype. - Time Format
Required to access all the methods of the Time Format plug-in. Useful for formatting and parsing time. - HTTP Client Generic Events
Exposes predefined generic events used by the HTTP client connectivity plug-in. - Automatic onApplicationInitialized
This starts all connectivity plug-ins immediately on start up. - HTTP Client > JSON with generic request/response event definitions
Allows EPL apps to make HTTP calls. - Cumulocity IoT > Cumulocity Client
Exposes the Cumulocity IoT client to EPL apps.
The bundles above are the only ones that are permissible in an EPL app, so be careful not to add any other bundles or your app may not work when activated in Cumulocity IoT.
Step 4 - Create a monitor file
To create a new Apama monitor file, refer to Creating new monitor files for EPL applications in the Apama documentation.
Before you import the newly created monitor file as an EPL app into Cumulocity IoT and activate it there, you might want to test if the monitor file works as expected from within Software AG Designer.
For further information, see The Cumulocity IoT Transport Connectivity Plug-in in the Apama documentation.
Step 5 - Run and test the monitor file
When running the project locally, you will need to provide your Cumulocity IoT credentials in the project configuration. Configure the credentials in the CumulocityIoT.properties file under the Cumulocity IoT client. For example:
CUMULOCITY_USERNAME=user@example.com
CUMULOCITY_SERVER_URL=http://exampleTenant.cumulocity.com
CUMULOCITY_PASSWORD=examplePassword
CUMULOCITY_APPKEY=apamaAppKey
Info: You need to create an application in Cumulocity IoT to get a value for
CUMULOCITY_APPKEY.
Note that the above description assumes that you are connecting to a tenant where the URL identifies the tenant. If that is not true (for example, if you are connecting by an IP address), you may need to set this in the CumulocityIoT.properties file:
CUMULOCITY_TENANT=my_custom_tenant
You can now proceed with testing your EPL in Software AG Designer.
Once the EPL app is ready, refer to Deploying apps to find out how to deploy it to Cumulocity IoT.
Deploying apps
You can deploy the following to Cumulocity IoT:
- EPL apps. You can develop or import a single *.mon file with Apama EPL Apps. This is the simplest mechanism for deploying an EPL app.
- Apama applications. You can upload complex Apama applications (that is, Apama projects developed with Software AG Designer) to Cumulocity IoT and deploy them as custom microservices using the Cumulocity IoT Microservice SDK.
Info: In Apama EPL Apps, the term “activate” is used for deploying an app.
Deploying EPL apps as single *.mon files with Apama EPL Apps
Info: To be able to deploy single *.mon files with Apama EPL Apps, your tenant needs to be subscribed to both the Apama-ctrl microservice and the Apama EPL Apps web application provided in Cumulocity IoT. If you have the Apama Starter microservice or the Apama Smart Rules-only microservice, Apama EPL Apps is not available in the application switcher. If you want to have this capability, contact product support.
When an Apama EPL app (that is, a *.mon file) is activated in Cumulocity IoT, the *.mon file is assigned a unique package name. This prevents conflicts when multiple modules are activated. For this reason, you should not specify a package statement in a *.mon file. If you need to share events between different parts of your application, then write the event definitions and monitors that use it in a single *.mon file.
There is a restricted set of utilities and base events available for your EPL app. At the time of writing, these include the Time Format and HTTP Client > JSON with generic request/response event definitions bundles.
When any EPL app signals a runtime error, this will be raised as an alarm. Runtime errors include uncaught exceptions, as well as any explicit logging of warnings and errors that your EPL app chooses to do. Health issues that relate to the Apama runtime in general will also be raised as alarms.
For more detailed diagnostics of the Apama runtime and any active EPL apps, you can look at the logs for the Apama-ctrl microservice. See Managing applications in the User guide for more information on log files. However, some familiarity with Apama is necessary to get the most out of an Apama log file.
Deploying Apama applications as microservices
Using Software AG Designer, you can also develop more complex projects which:
- are spread across multiple *.mon files
- need to be isolated from other Apama applications
- use connectivity plug-ins or EPL plug-ins that are not enabled by default
These kinds of applications should be deployed as microservices to Cumulocity IoT.
Info: This only applies if you are using Apama 10.3 or later.
Required settings in the microservice manifest
The microservice manifest provides the required settings to manage microservice instances and the application deployment in Cumulocity IoT. For detailed information, see Microservice manifest in the Microservice SDK guide.
Apama can only be used in a single-tenant microservice. Therefore, the microservice manifest must set the isolation level to PER_TENANT. The reason for this is that Apama’s Cumulocity IoT transport connectivity plug-in can only communicate with the tenant to which it is deployed. Therefore, having an Apama shared between multiple tenants is invalid.
The following permissions are required by the microservice in order to start up and and use all features in the Cumulocity IoT transport from EPL. These are set with requiredRoles in the microservice manifest.
- ROLE_APPLICATION_MANAGEMENT_READ
- ROLE_INVENTORY_READ
- ROLE_INVENTORY_ADMIN
- ROLE_INVENTORY_CREATE
- ROLE_MEASUREMENT_READ
- ROLE_MEASUREMENT_ADMIN
- ROLE_EVENT_READ
- ROLE_EVENT_ADMIN
- ROLE_ALARM_READ
- ROLE_ALARM_ADMIN
- ROLE_DEVICE_CONTROL_READ
- ROLE_DEVICE_CONTROL_ADMIN
- ROLE_IDENTITY_READ
- ROLE_OPTION_MANAGEMENT_READ
- ROLE_BULK_OPERATION_READ
- ROLE_SMS_ADMIN
Info: The above is the minimum list of permissions that a custom Apama microservice needs. If you are developing a custom microservice, you may add more permissions to the microservice manifest.
To deploy an Apama application as a microservice
-
Develop your application in Software AG Designer in the usual way.
-
You can use Apama’s Docker support to turn the entire project into a microservice. In the Project Explorer view, right-click the project and select Apama > Add Docker Support, which will add a Dockerfile to the root of your project directory.
When used for building, it will make use of the Apama images available on Docker Hub. You will need Docker Hub credentials that give you access to the Apama images. Apama Docker images are exclusively Linux-based.
-
Add any custom steps to the Dockerfile that might be necessary, for example, building a custom plug-in, or copying your license file into the image.
-
Use the Cumulocity IoT microservice utility tool for packaging and deploying the project; for detailed information, see Microservice utility tool in the Microservice SDK guide. When creating the directory structure for the microservice utility tool to build from, copy your entire project directory inside that directory with the name “docker/”. For example:
docker/monitors/
docker/eventdefinitions/
docker/Dockerfile
docker/…
cumulocity.jsonYou have to create the microservice manifest manually, but there is no need for anything special in the microservice manifest; no roles or probes are required. However, if you want to configure a liveness or readiness probe, you can configure an
httpGetprobe for the path /ping on port 15903 (Apama’s default port). Enabling auto-scaling is not recommended, as Apama applications are usually stateful and do not automatically partition their input.You can pack, deploy and subscribe from this directory, resulting in your Apama application being turned into a running microservice. The behavior of the application when being run outside of Cumulocity IoT (from Software AG Designer or your test environment) will be near-identical to its behavior inside Cumulocity IoT. When deployed as a microservice doing requests to the Cumulocity IoT API, Apama will automatically pick up the credentials to connect to the tenant you deployed it to, overwriting any other credentials provided to Apama. However, if you wish to receive real-time events, you will need to have valid credentials specified in the project configuration as you do when connecting to Cumulocity IoT from an external Apama environment.
-
When you are ready to deploy to Cumulocity IoT, upload the application as a microservice. For details, refer to Administration > Managing applications in the User guide.
Testing apps
You can use the Apama EPL Apps Tools on GitHub to script uploads of your EPL apps and manage them for CI/CD (continuous integration and continuous delivery) use cases. This tooling also provides extensions to the PySys test framework to allow you to simply write tests for your EPL apps and to run them automatically.
Apama EPL Apps Tools is available from https://github.com/SoftwareAG/apama-eplapps-tools. See the documentation in GitHub for detailed information.
For more information on PySys, see the API Reference for Python that you can access from the Apama documentation.
Supported REST services
Apama EPL Apps is designed to listen for REST (Representational State Transfer) services and supports all GET, POST, PUT and DELETE operations. Example requests for the different operations are listed below.
To perform these operations, you must have READ and ADMIN permissions for “CEP management” (see also Managing permissions in the User guide).
Info: This API requires version 10.6.0 or above of the Apama-ctrl microservice.
Request headers for all operations
Each request must be authenticated to Cumulocity IoT.
| Name | Description |
|---|---|
| Accept | “application/json”. This is a mandatory parameter. |
Common response codes
The following common error response codes can be expected for all requests:
| Code | Description |
|---|---|
| 401 | Unauthorized. |
| 403 | Forbidden. Apama EPL Apps is not available with Apama Starter. |
Any other response codes that can be expected from a specific request are given below.
Common field descriptions
The following common fields are available with the responses, depending on the operation:
| Field | Description |
|---|---|
| contents | The full contents of the EPL file. |
| description | A description of the file. |
| eplPackageName | The package name of the EPL file. If the name contains special characters (including spaces), these characters are escaped to make them valid EPL identifiers and avoid injection errors. |
| errors | A list of all compilation errors in the file, if any, with line numbers and text. |
| id | A unique identifier of the file. |
| name | The name provided for this bit of EPL. |
| state | Whether the EPL is injected into the correlator and running. This can either be active or inactive. |
| warnings | A list of all compilation warnings in the file, if any, with line numbers and text. |
GET - Retrieve all available EPL files
Endpoint: /service/cep/eplfiles
Example request
GET /service/cep/eplfiles
Responses
| Code | Description |
|---|---|
| 200 | Successful operation. See also the example value below. |
| 400 | Bad request. Header contents has unexpected value. |
Example value for response code 200:
{
  "eplfiles":[
    {
      "description":"",
      "eplPackageName": "eplfiles.Ordinal1",
      "errors":[

      ],
      "id":"39615",
      "name":"Ordinal1",
      "state":"active",
      "warnings":[

      ]
    }
  ]
}
GET - Retrieve all available EPL files with their contents
Endpoint: /service/cep/eplfiles
Request parameters
| Name | Description |
|---|---|
| contents | Boolean type. Fetches the EPL files with their contents. This is an optional query parameter. |
Example request
GET /service/cep/eplfiles?contents=true
Responses
| Code | Description |
|---|---|
| 200 | Successful operation. See also the example value below. |
Example value for response code 200:
{
  "eplfiles":[
    {
      "contents":"monitor M0 { action onload() { on wait(1.0) { log \"Hello\" at INFO; }}}",
      "description":"",
      "eplPackageName": "eplfiles.Ordinal1",
      "errors":[
      ],
      "id":"39615",
      "name":"Ordinal1",
      "state":"active",
      "warnings":[
      ]
    }
  ]
}
GET - Retrieve EPL file by identifier
Endpoint: /service/cep/eplfiles/{id}
Request parameters
| Name | Description |
|---|---|
| id | Identifier of the EPL file to be fetched. This is a mandatory parameter. |
Example request
GET /service/cep/eplfiles/{{id}}
Responses
| Code | Description |
|---|---|
| 200 | Successful operation. See also the example value below. |
| 404 | File with identifier not found. See also the example value for this response code at the end of this section. |
Example value for response code 200:
{
      "contents":"monitor M0 { action onload() { on wait(1.0) { log \"Hello\" at INFO; }}}",
      "description":"",
      "eplPackageName": "eplfiles.Ordinal1",
      "errors":[
      ],
      "id":"39615",
      "name":"Ordinal1",
      "state":"active",
      "warnings":[
      ]
}
POST - Create a new EPL application
Endpoint: /service/cep/eplfiles
Example request
POST /service/cep/eplfiles
The following is an example of a request body:
{
  "name": "Ordinal1",
  "contents": "monitor M1 { action onload() { on wait(1.0) { log \"Hello\" at INFO; }}}",
  "state": "active",
  "description": ""
}
Note the following:
- The
nameis used for the package of the file (thus the EPL file must not contain apackagestatement) and must be unique across all EPL files. The name is prefixed and certain characters are escaped. The actual package name used is returned in theeplPackageNamefield for convenience (you can search for this in the microservice log file to find log statements). - Make sure to provide safely escaped
contents. descriptionis optional and can be empty.
Responses
| Code | Description |
|---|---|
| 201 | Successfully created / Created with errors in file / Created with warnings in file. See also the examples below. |
| 405 | Invalid input. |
Example for response code 201 when successfully created:
{
  "description":"",
  "eplPackageName": "eplfiles.Ordinal1",
  "errors":[

  ],
  "id":"39615",
  "name":"Ordinal1",
  "state":"active",
  "warnings":[

  ]
}
Example for response code 201 when created with warnings or errors:
{
  "description":"",
  "eplPackageName": "eplfiles.Ordinal1",
  "errors":[
    {
      "line":5,
      "text":"assigning a float to an integer variable"
    }
  ],
  "id":"39651",
  "name":"Ordinal1",
  "state":"inactive",
  "warnings":[
    {
      "line":10,
      "text":"\"assert\" may become a reserved word in future versions of EPL"
    }
  ]
}
PUT - Update EPL file by identifier
Endpoint: /service/cep/eplfiles/{id}
Request parameters
| Name | Description |
|---|---|
| id | Identifier of the EPL file to be updated. The identifier has to be included in the path. This is a mandatory parameter. |
Example request
PUT /service/cep/eplfiles/{id}
The following is an example of a request body:
{
  "name": "Ordinal1",
  "contents": "monitor M1 { action onload() { on wait(1.0) { log \"Hello\" at INFO; }}}",
  "state": "active",
  "description": ""
}
See also the information given for the POST request.
Responses
| Code | Description |
|---|---|
| 200 | Successfully updated. See also the example values below. |
| 404 | File with identifier not found. See also the example value for this response code at the end of this section. |
Example value for response code 200 when successfully updated with no errors:
{
  "description":"",
  "eplPackageName": "eplfiles.Ordinal1",
  "errors":[

  ],
  "id":"39615",
  "name":"Ordinal1",
  "state":"active",
  "warnings":[

  ]
}
Example value for response code 200 when updated with errors or warnings:
{
  "description":"",
  "eplPackageName": "eplfiles.Ordinal1",
  "errors":[
    {
      "line":5,
      "text":"assigning a float to an integer variable"
    }
  ],
  "id":"39651",
  "name":"Ordinal1",
  "state":"inactive",
  "warnings":[
    {
      "line":10,
      "text":"\"assert\" may become a reserved word in future versions of EPL"
    }
  ]
}
DELETE - Delete EPL file by identifier
Endpoint: /service/cep/eplfiles/{id}
Request parameters
| Name | Description |
|---|---|
| id | Identifier of the EPL file to be deleted. The identifier has to be included in the path. This is a mandatory parameter. |
Example request
DELETE /service/cep/eplfiles/{{id}}
Responses
| Code | Description |
|---|---|
| 200 | Successfully deleted. |
| 404 | File with identifier not found. See also the example value for this response code at the end of this section. |
Example value for response code 404
The response code 404 indicates that a file with a specific identifier was not found.
{
  "error":"Not Found",
  "exception":"com.apama.in_c8y.FileNotFoundException",
  "message":"File with id 39613 not found",
  "path":"/eplfiles/39613",
  "status":404,
  "timestamp":"2020-01-17T12:21:42.457+0000"
}
where
erroris the error message.exceptionspecifies the exception that was raised.messageis a description of the exception message.pathis the path that was requested.statusis the status of the application.timestampis the timestamp in ISO format.
Events and channels
In Apama EPL, interactions with the rest of the Cumulocity IoT ecosystem are done via events. A number of event definitions is provided for accessing Cumulocity IoT data.
Info: Apama and Cumulocity IoT use different “event” concepts. Apama events are used for all interactions with Cumulocity IoT, such as listening for and creating device measurements, alarms and (Cumulocity IoT) events. For more information on Apama events, see Defining event types in the Apama documentation. For more information on Cumulocity IoT events, see Events in the Reference Guide.
Predefined event types
There are some predefined event types to interact with several Cumulocity IoT APIs. Events are sent to Apama applications automatically when a new measurement, alarm or event is created. For interacting with the Cumulocity IoT backend, you can create an event and send it to the relevant channel. Cumulocity IoT will automatically execute either the database query or create the API calls necessary for sending mails, SMS, or similar.
Look at the data model in the API Reference for EPL (ApamaDoc) to see how the events for each stream are structured.
Sending events to a channel
Sending an event is done by constructing the event, either with new <type> followed by assignments to the fields, or with a constructor specifying all of the fields. The send statement is then used to send the event to Cumulocity IoT. The send statement requires a channel - this is the SEND_CHANNEL constant on the event type.
Listening to events
You can trigger your EPL by listening to events on channels. You can subscribe to channels with the monitor.subscribe("string name") method. This can be done in the startup of your monitor, or if you only need to receive events some of the time, called as needed, followed by monitor.unsubscribe("string name").
Listen for events using the on statement, followed by the event type that you are listening to, open and close parentheses, and as <identifier> to name a variable that will hold the event.
By default, a listener will fire once; to make it repeat for all events, use the all keyword before the event type.
Filters
Adding filters can be done by specifying one or more fields between the parentheses for a listener. Only top-level fields can be filtered for. Use if statements for more complex filtering, or for filtering on subproperties of events (for example, in dictionaries).
Standard event types and channels
For the standard Cumulocity IoT events, there are constants that contain the channels for sending and receiving events, for example:
monitor.subscribe(Measurement.SUBSCRIBE_CHANNEL);
send msmnt to Measurement.SEND_CHANNEL;
| Event | Channel for sending | Channel for receiving |
|---|---|---|
| Operation | Operation.SEND_CHANNEL | Operation.SUBSCRIBE_CHANNEL |
| Measurement | Measurement.SEND_CHANNEL | Measurement.SUBSCRIBE_CHANNEL |
| Event | Event.SEND_CHANNEL | Event.SUBSCRIBE_CHANNEL |
| Alarm | Alarm.SEND_CHANNEL | Alarm.SUBSCRIBE_CHANNEL |
| ManagedObject | ManagedObject.SEND_CHANNEL | ManagedObject.SUBSCRIBE_CHANNEL |
| MeasurementFragment | MeasurementFragment.SEND_CHANNEL | MeasurementFragment.SUBSCRIBE_CHANNEL |
Measurement fragments
Measurement and MeasurementFragment events are always published.
You can generate listeners in EPL that will match on the contents of MeasurementFragment events rather than Measurement events. For example:
on all MeasurementFragment(type="c8y_SpeedMeasurement", valueFragment = "c8y_speed", valueSeries = "speedX", value > SPEED_LIMIT) as mf {
}
See also Measurement fragments.
Distinguishing between create and update notifications
You can use the NOTIFICATION_CREATED and NOTIFICATION_UPDATED values of the PARAM_NOTIFICATION constant to distinguish whether a managed object, operation, alarm or event has been created or updated.
Example
This example listens for new measurements using the MeasurementFragment API. It filters incoming measurements to find speed values above a given maximum speed and raises an alarm if the limit is breached.
- Subscribe to the
MeasurementFragment.SUBSCRIBE_CHANNELchannel. - Listen to the measurement fragment and filter on
type, which isc8y_SpeedMeasurement. Ensure thatvalueFragmenthas the valuec8y_speedand thatvaluesSeriesfilters onspeedXonly. Also filter onvaluewhen it is greater thanSPEED_LIMIT. - Create the event using the constructor specifying all of the fields.
- Send the event to the correct channel -
Alarm.SEND_CHANNEL.
The resulting *.mon file can look like this:
using com.apama.cumulocity.Alarm;
using com.apama.cumulocity.MeasurementFragment;

monitor TriggerAlarmForSpeedBreach {
    constant float SPEED_LIMIT := 30.0;
    action onload() {
        monitor.subscribe(MeasurementFragment.SUBSCRIBE_CHANNEL);
        // Everytime a measurement fragment with the specific details of the match criteria is triggered then we should raise an alarm
        on all MeasurementFragment(type="c8y_SpeedMeasurement", valueFragment = "c8y_speed", valueSeries = "speedX", value > SPEED_LIMIT) as mf {
            send Alarm("", "c8y_SpeedAlarm", mf.source, currentTime,
                        "Speed limit breached", "ACTIVE", "CRITICAL", 1,
                        new dictionary<string,any>) to Alarm.SEND_CHANNEL;
        }
    }
}