Administration
The Administration application enables account administrators to manage their users, roles, tenants, applications and business rules and lets them configure a number of settings for their account.
The Administration application enables account administrators to manage their users, roles, tenants, applications and business rules and lets them configure a number of settings for their account.
The following sections will walk you through all functionalities of the Administration application in detail. For your convenience find an overview on the content of this document below.
| SECTION | CONTENT |
|---|---|
| Home Screen | Providing information on your capacity usage and subscribed applications. |
| Managing Users | How to create users, edit, disable or delete them. |
| Managing Permissions | How to add and edit global roles and inventory roles, how to assign them to users, and how to grant application access. |
| Managing applications | How to manage subscribed applications and how to manage and configure own applications in your Cumulocity IoT account. |
| Managing business rules | How to set up real-time event processing scripts and reprioritize alarms by alarm mappings. |
| Managing data retention | How to manage and configure retention rules for your data and how to manage stored files in the file repository. |
| Two-factor authentication | How to activate/deactivate two-factor authentication for a user. |
| Changing settings | How to change account settings like application settings or authentication settings, how to manage the properties library and how to configure single sign-on. |
The Home screen of the Administration application provides
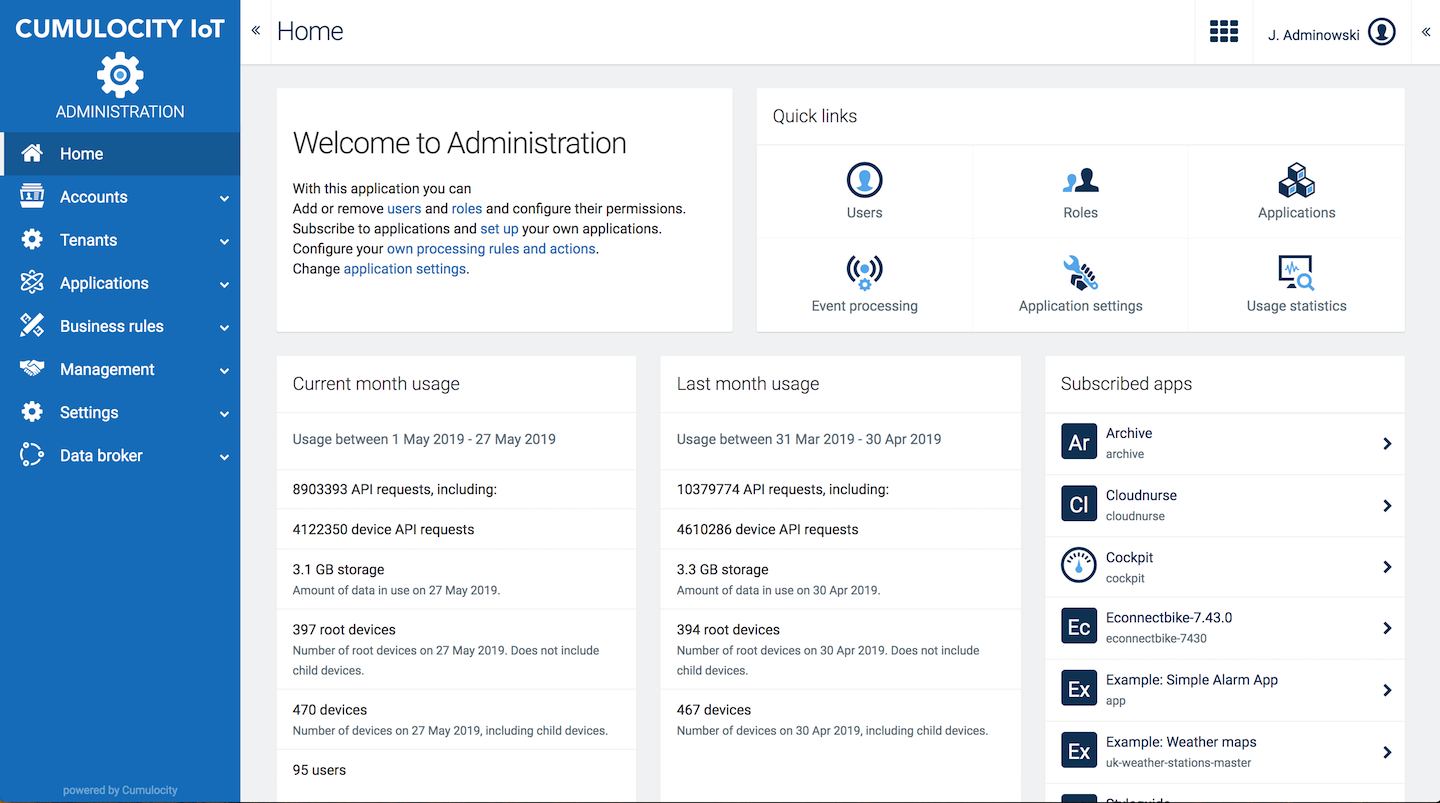
The capacity sections show:
The user management feature allows you to manage the users within your tenant. With this functionality you may:
Info: The user needs to have a role with the user management permission ADMIN or CREATE to be able to do so.
If your tenant is configured for using single sign-on (SSO) in SAG Cloud, new users should be created under My Cloud, accessible through the application switcher in the upper right corner, so that they are able to use the single sign-on feature.
For users created via an external authorization server, updating the following settings in Cumulocity IoT will have no effect (will be reset on the next user re-login):
Moreover, password reset in Cumulocity IoT is disabled for users created through an external authentication server.
Info: Users which are using single sign-on cannot change the password of users which are managed by the platform.
To view all users in your tenant, click Users in the Account menu in the navigator.
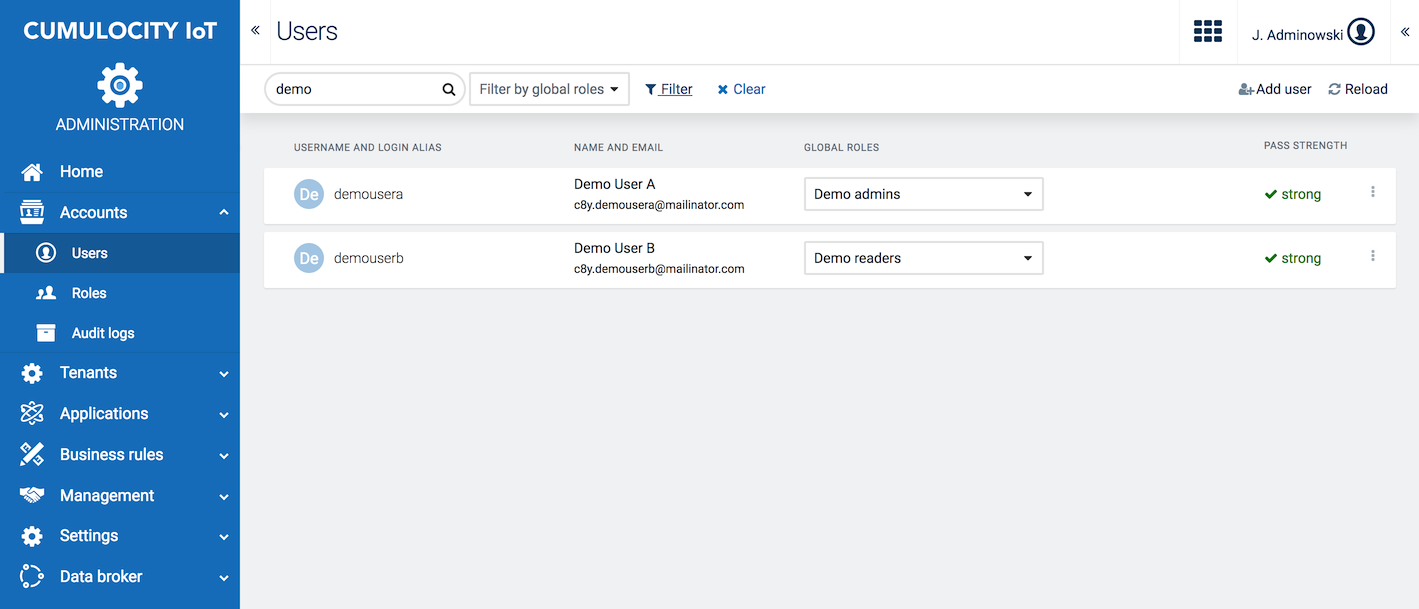
A user list will be displayed, providing the following information for each user:
To filter the list, you can use the search field at the left of the top menu bar. For details on the search functionality, refer to Searching in the Introduction.
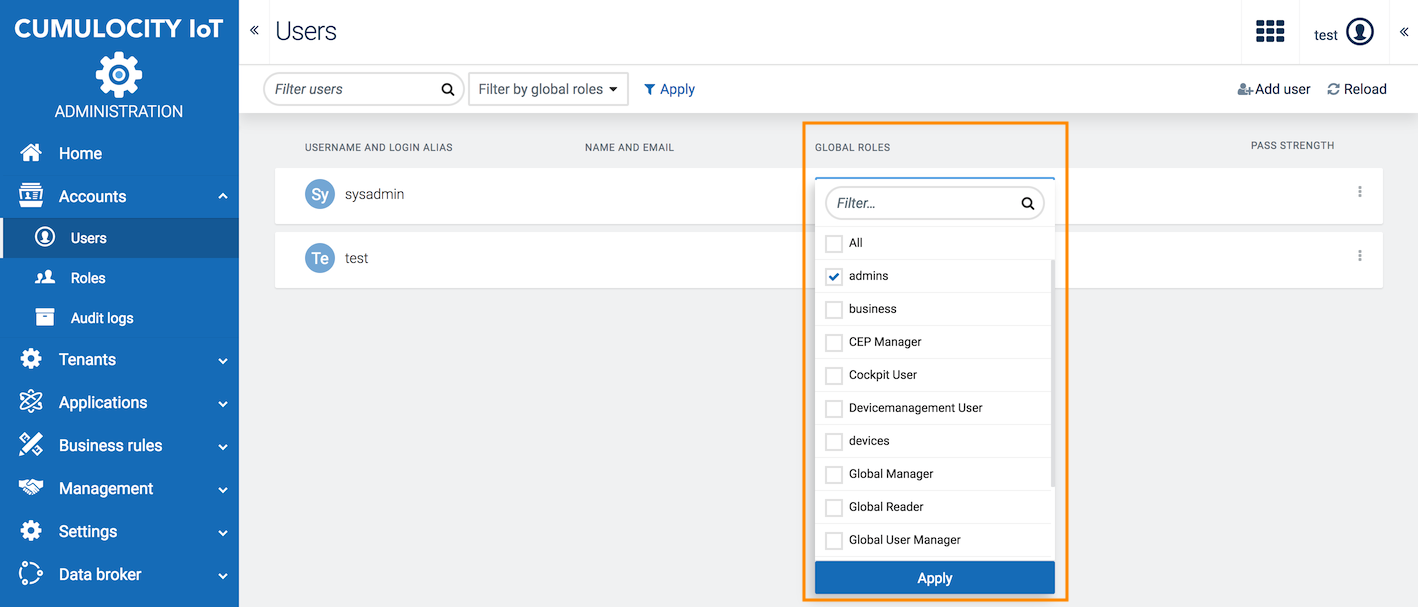
Moreover you can filter by global roles. Select the desired roles from the dropdown list and click Apply to limit the users shown in the list to users with the selected roles.
Initially, the User page only shows the top-level users. To see all users in your account at once, click Expand all at the right of the top bar. This will expand all top-level users, showing their sub-users. Click Collapse all to just show the top-level users again. For details on user hierarchies, refer to Managing user hierarchies.
Click Add user at the right of the top menu bar.
Info: If single sign-on is enabled for your tenant, a message will show up which reminds you that you are about to create a local user which will not be able to login via single sign-on. Create new users in My Cloud instead, accessible through the application switcher in the upper right corner, to enable them using the single sign-on feature.
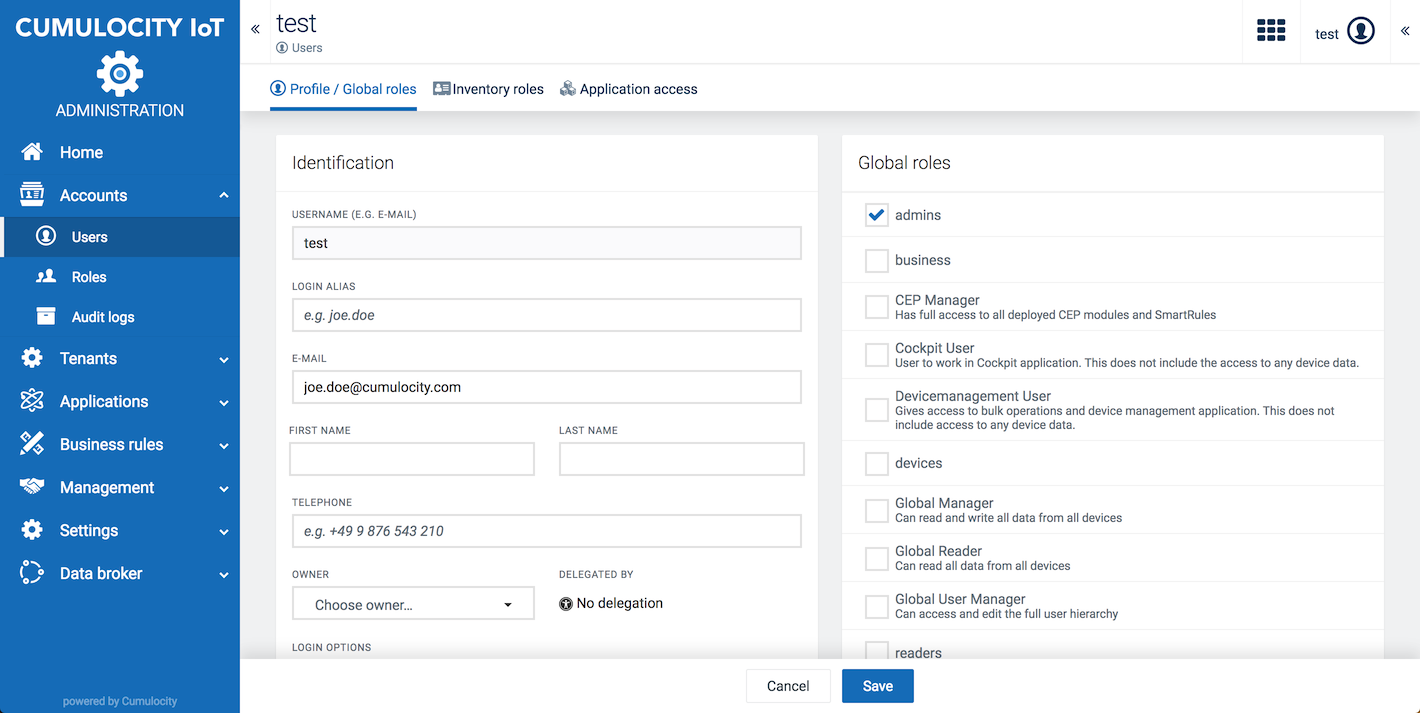
At the left of the New user window, provide the following information to identify the user:
| Field | Description |
|---|---|
| Username | Serves as a user ID to identify the user at the system. Note that the username cannot be changed once the user has been created. This field is mandatory. |
| Login alias | In addition to the user name, an optional alias can be provided to be used to log on. In contrast to username, this alias may be changed if required. User alias is not supported for devices. |
| Active | Enable/disable the user account here. If the user account is disabled the user cannot login. |
| A valid email address. This is required to enable the user to reset the password. This field is mandatory. | |
| First name | First name of the user. When the user is logged in, this name appears at the right of the top bar on the User button. |
| Last name | Last name of the user. |
| Telephone | A valid phone number. The phone number is required if the user is configured to use two-factor authentication. |
| Owner | Another user that manages ("owns") the new user. Select a user from the dropdown list and click Done to confirm. Refer to Managing user hierarchies for details on user hierarchies. |
| Delegated by | Can be activated to delegate user hierarchies and permissions to the user. Refer to Managing user hierarchies for details on delegation. |
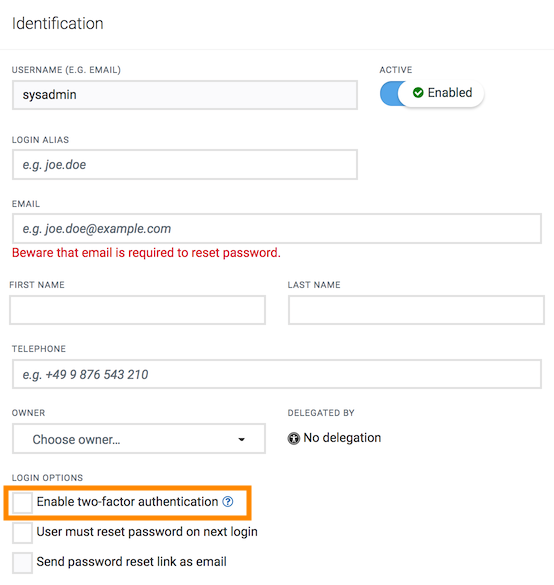
Select the login options for the user.
On the right of the page, select the global roles for the user. Details on global roles are described in Managing Permissions.
Click Save to save your settings.
The new user will be added to the user list.
Info: By default, manually created users always have the “Own_User_Management” permissions set to active.
Info: You need a role with user management permission to perform this option.
The inventory roles will be copied from the selected user.
Info: You need a role with user management permission to perform this option.
Click the menu icon at the right of the respective row and then click Delegate to delegate your user hierarchies and permissions to a user.
Click Undelegate to remove a delegation.
Refer to Managing User Hierarchies for details on delegation.
Info: You need a role with user management permission to perform this option.
Click the menu icon at the right of the respective row and then click Disable to disable an active user, or click Enable to enable a user that has been disabled.
Info: You need a role with user management permission to perform this option.
Click the menu icon at the right of the respective row and then click Delete.
Info: You need a role with user management permission to perform this option.
Permissions define what a user is allowed to do in Cumulocity IoT applications. To manage permissions more easily, they are grouped into so-called “roles”. Every user can be associated with a number of roles, adding up permissions of the user.
The following types of roles can be associated with users:
Moreover, application access can be granted to enable a user to use an application.
Click Roles in the Account menu to display a list of configured roles.
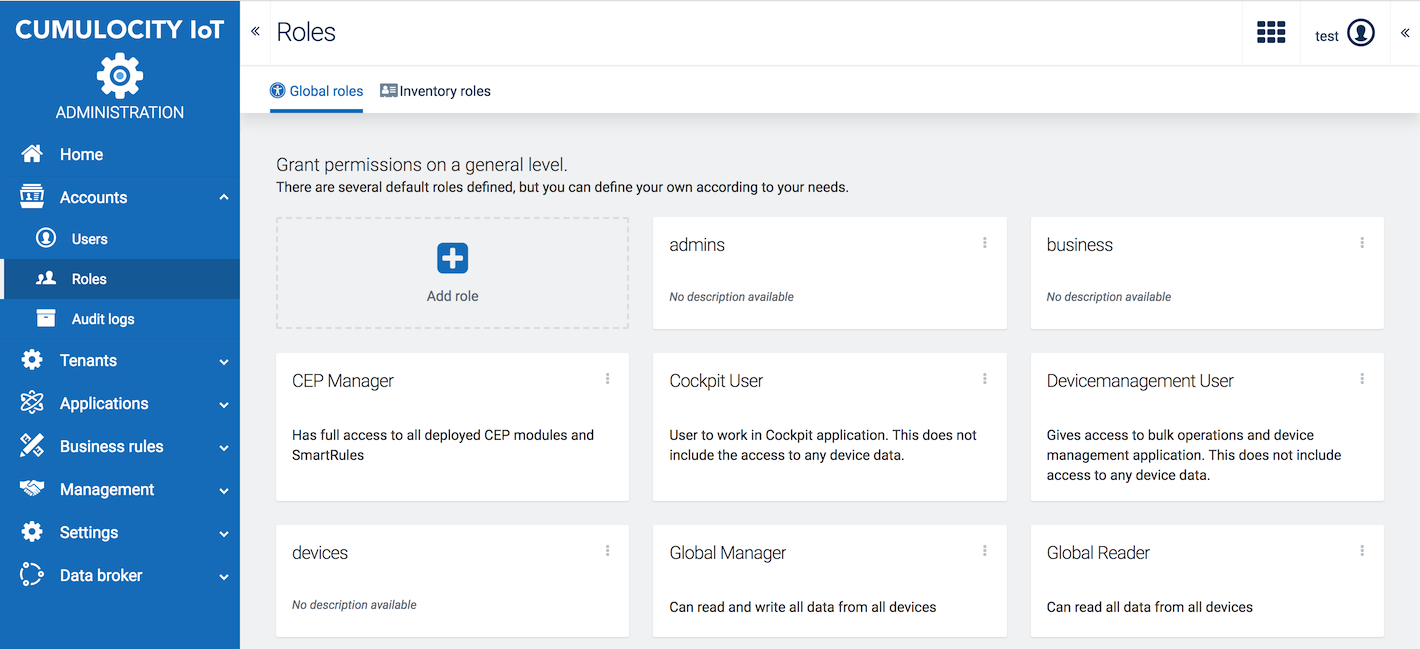
In the Global roles tab you can find the roles which grant permissions on a general level. There are several global roles pre-defined, but you can define your own according to your needs.
Info: The pre-defined roles are not fully configured. They can be seen as samples which are pre-configured for a particular purpose. You may use them as a starting point and further adapt them to your individual needs.
On creating a new user, make sure that the global roles you assign to the user cover all permissions relevant for this particular user. If, for example, a user only has the role “Cockpit User” (see below), the user will only be able to access the Cockpit application and nothing more.
The roles “admins” and “devices” have a special status:
| Role | Description |
|---|---|
| admins | All permissions are enabled. The initial administrator, the first user created in a tenant, has this role. |
| devices | Typical permission setup for devices. After registration, a device automatically has this role. Edit this role if your devices require less or more permissions, or assign other roles to your devices. |
Furthermore, the following pre-configured roles are initially provided.
| Role | Description |
|---|---|
| CEP Manager | Can access all smart rules and event processing rules. |
| Cockpit User | Can access the Cockpit application. In addition, you should add a role providing access to devices. |
| Device management User | Can access the Device Management application. The user will be able to use the simulator and to run bulk operations. In addition, you should add a role providing access to devices. |
| Global Manager | Can read and write all devices. |
| Global Reader | Can read all devices. |
| Global User Manager | Can manage all users. |
| Shared User Manager | Can manage sub-users. The subscription plan needs to include user hierarchies to be able to manage sub-users. |
| Tenant Manager | Can manage tenant-wide settings, such as own applications, data brokerage, data retention, options and tenant statistics. |
You may also see the following legacy roles:
| Role | Description |
|---|---|
| business | Can access all devices and their data but has no management permission in the tenant. |
| readers | Can read all data (including users, in contrast to “Global Readers”). |
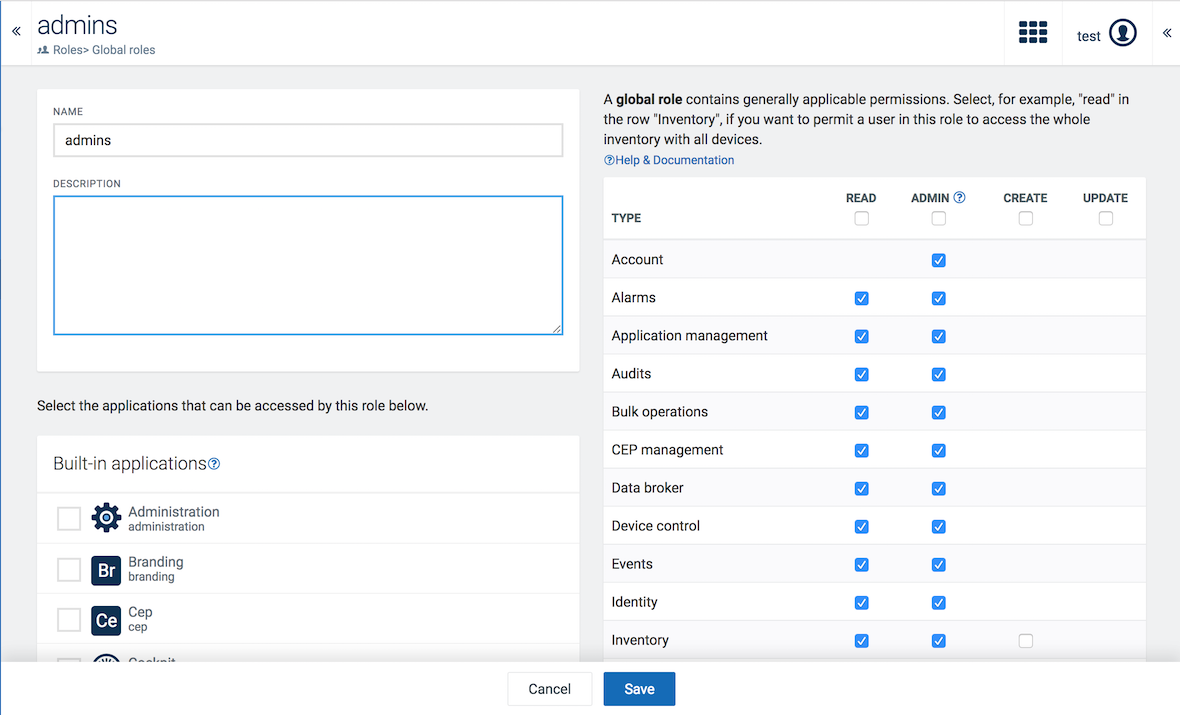
Click Add Role in the Global roles tab.
In the New global role page you will see a list of permission types at the left and a list of applications to be accessed at the right.
The following screenshot shows the settings for the “admins” role.
Permission levels
For each type, you can select the following permission levels:
Info: CREATE permissions are related to the concept of ownership in Cumulocity IoT. If you have created an object, you are the owner of it and can manage it without requiring any further permissions. For example, if you have CREATE permission for “Inventory”, you can create devices and groups, and fully manage these devices and groups. You cannot manage any devices or groups that you did not create yourself, unless you also have the UPDATE permission or an additional inventory role (see below). This concept helps to assign minimal permissions to devices. It also enables you to limit user management permissions to sub-users, if you subscribed to user hierarchies.
Select the checkbox at the top of a column to set the respective level to all permission types.
Permission categories
The following permission categories are available by default:
| Category | Description |
|---|---|
| Alarms | View or edit alarms. |
| Application management | View or edit the applications available in this account. |
| Audits | View or create audit logs. |
| Bulk operations | View or create bulk operations. |
| CEP management | View or edit CEP rules. |
| Data broker | Send data to other tenants or receive data from other tenants. |
| Device control | View or edit commands for devices resp. send commands to devices. Also used for device registration. |
| Events | View or create events. |
| Global Smart Rules | Configure global smart rules. |
| Identity | View or edit identifiers for devices. |
| Inventory | View or edit inventory data. |
| Measurements | View or create measurements. |
| Option management | View or edit account options such as password policies. |
| Retention rules | View or edit retention rules. |
| Schedule reports | Manage the schedule of report exporting. |
| Simulator | Configure simulated devices. |
| Sms | Configure SMS. |
| Tenant management | View, create, edit or delete subtenants. |
| Tenant statistics | View the usage data for this account, as shown on the Home screen of the Administration application. |
| User management | View or edit users, global roles and permissions. |
| Own user management | View or edit your own user. |
There may be additional permissions visible depending on the features in your subscription plan. These are documented along with the respective feature.
Important: When new features with new permissions are added to Cumulocity IoT, these are not automatically added to existing roles. If you notice that you cannot use a new feature that was recently announced, check your permissions.
You can assign global roles to users either directly in the user list, or by opening the page for a particular user and adding them there.
Click on the row of the respective user in the user list. In the user page, select or clear the checkboxes for the relevant global roles at the right. Click Save to save your settings.
Inventory roles contain permissions that you can assign to groups of devices. For example, an inventory role can contain the permission to restart a device. You can assign this inventory role to a group of devices “region north” and to a user “smith”. The result is that the user “smith” can restart all devices that are in the group “region north” or any of its subgroups.
To view the currently configured inventory roles, click Roles in the Account menu and switch to the Inventory roles tab.
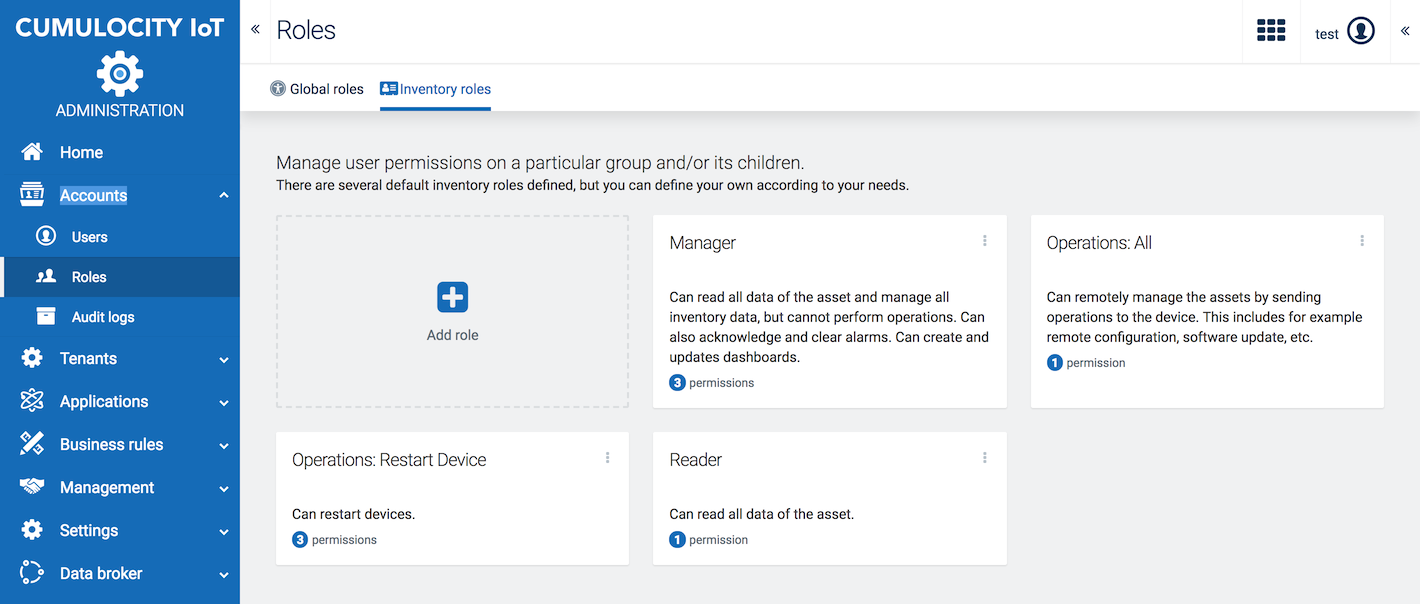
In the Inventory roles tab you can manage user permissions for particular groups and/or its children. There are several default inventory roles defined, but you can define your own according to your needs.
The following default inventory roles are initially available in new tenants:
| Role | Description |
|---|---|
| Manager | Can read all data of the asset and manage all inventory data but cannot perform operations. In addition, can manage inventory data (including dashboards) and alarms. |
| Operations: All | Can remotely manage the assets by sending operations to a device (e.g. software updates, remote configurations). |
| Operations: Restart Device | Can restart devices. |
| Reader | Can read all data of the asset. |
Click Add Role in the Inventory roles tab.
At the top of the page you can edit the name of the inventory role. Click on the name, edit it and click the green checkmark to save your edits.

Permissions are grouped into the following categories:
| Category | Description |
|---|---|
| Alarms | Permissions related to working with alarms from devices. |
| Audits | Permissions related to audit logs. |
| Events | Permissions related to working with events from devices. |
| Inventory | Permissions for viewing and editing devices. |
| Measurements | Permissions related to measurements. |
| Device control | Permissions to remote control devices. |
| Full access | Complete access to the associated devices, mainly to simplify configuration. |
Info: Service providers will see an additional permission “Support” in their management tenant. This permission lets users of the service provider give support to their customer’s users, see Supporting users in other tenants.
Add a permission to the role by clicking the plus icon next to the desired category.
In the Type field, specify a type to further restrict the type of data that this permission applies to. Access will be only granted to objects that contain the specified Type.
For example, assume that your device sends measurements related to device management, such as “c8y_SignalStrength”, and actual production measurements. You want a user to only see the device management measurements. In this case, enter “c8y_SignalStrength” as type. This will allow the user to only see measurements that contain the type “c8y_SignalStrength”. Note that the user will be able to see the entire measurement object including other types that may be part of the same measurement object.
By default, the Type field contains an asterisk “*” selecting all types.
Info: For further information on possible types, check your device documentation, the Cumulocity IoT sensor library or the device management library. The type being used here is the so-called “fragment type”, not the “type” property. You need to enter all fragment types send in a measurement to make the measurement visible; similar for other types of data.
In the Permission field, select a permission level from the dropdown list:
Important: When you add a permission, you may see a small exclamation mark. The exclamation mark indicates that the permission that you have just added is not effective, because another, “higher” permission set for the user already includes the respective permission. Check if you have set, for example, “Full access” or if there is another permission in the same section with “*” as type and ALL as permission.
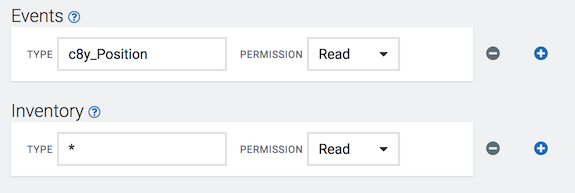
As another example, assume that you are using tracking devices. You want to allow your user to see all devices, but not to change anything. In addition, the user should be able to follow tracks of devices on a map. Tracks are recorded using an event with fragment type “c8y_Position” (see Sensor library). To do so, assign READ permission on inventory as well as on events with type “c8y_Position” as shown in the image below.
Inventory roles are assigned to a user and a group of devices.
To assign inventory roles, click User in the Account menu, select a user in the user list and switch to its Inventory roles tab.
In the Inventory roles tab you will see a tree of device groups. To assign an inventory role, click on the arrow right from a group. Select the relevant roles and click Apply. For details on the roles hover over the info icon next to it or refer to Viewing inventory roles.
Important: If a user already has a global role containing inventory permissions, the user will be able to see or change all devices regardless of what inventory roles you set here.
Inventory roles are inherited from groups to all their direct and indirect subgroups, and to the devices in these groups. If you select, for example, a role with read permissions on alarms for a group of devices, the user will be able to see alarms of all devices in this group and all its subgroups.
If a user has inventory access to a group of devices, the user will also have that access to all dashboards for that group of devices in the Cockpit application.
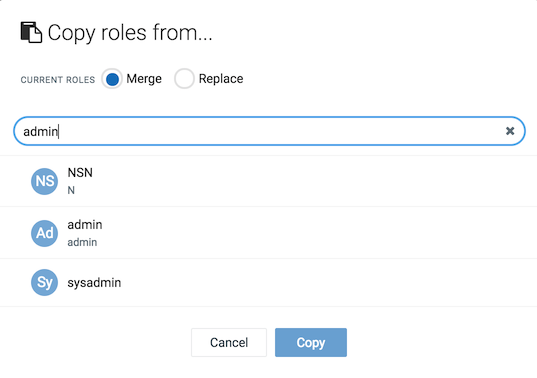
You can also copy inventory roles from another user. To copy roles, click Copy inventory roles from another user. In the upcoming window, select a user from the list and click Copy. At the top you can select if you want to merge the roles with the existing user roles (the default) or if you want to replace the existing user roles. Copying roles makes it easier to manage the permissions of many users as you can create a reference user and then copy the permissions from there.
If you try to perform actions without sufficient permissions, an error message will occur.
To help troubleshooting permissions, click the User button at the right of the top bar. From the context menu, select Access denied requests. In the resulting window details on the denied accesses are provided. An administrator user or the product support can help in fixing the permissions.
The Application Access tab shows a list of all available applications in your tenant in alphabetical order.
To assign applications to the user, simply select the respective applications and click Save.
For more information on application management, see Administration > Managing applications.
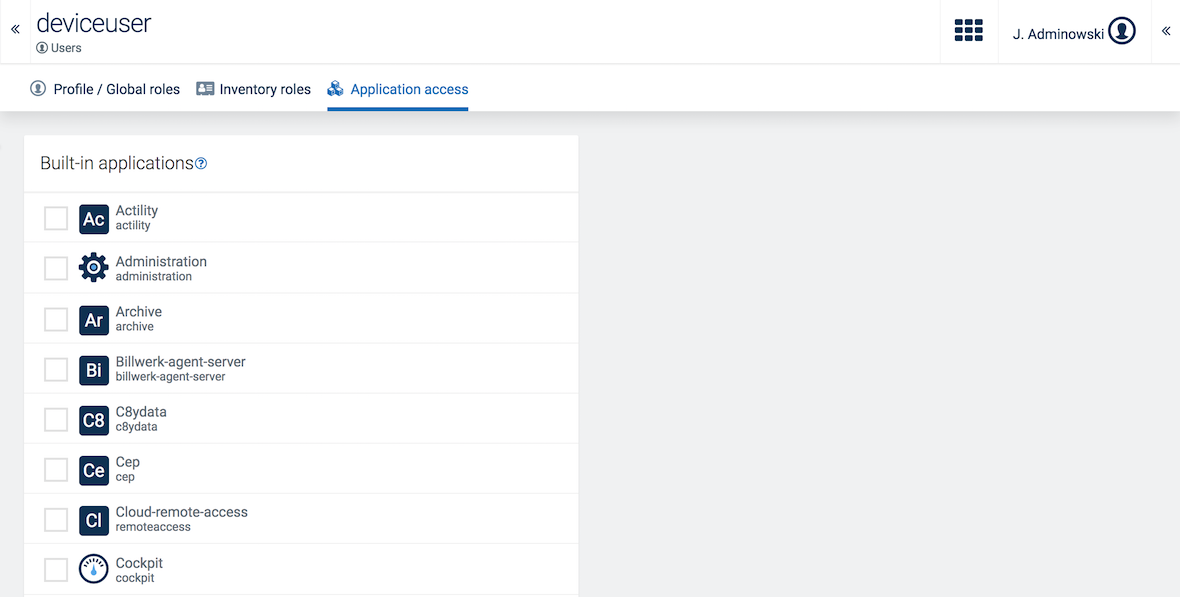
Info: If a user has global permission to read all applications, an information box will be shown.
Audit logs show the operations that users have carried out.
To view the audit log list, click Audit logs in the Account menu. For each log entry, the following information is provided:
| Column | Description |
|---|---|
| Server time | Server time when the operation was processed. |
| Change | Type of operation, e.g. “Alarm created”, Smart rule deleted”. Below it, the user who processed it is displayed. |
| Description | Provides further information depending on the operation, e.g. the device name, alarm text, operation status. |
| Device time | Device time when the operation was processed. This can differ from the server time. |
Only the last 100 logs are visible. Click Load more at the bottom of the list to view more log entries.
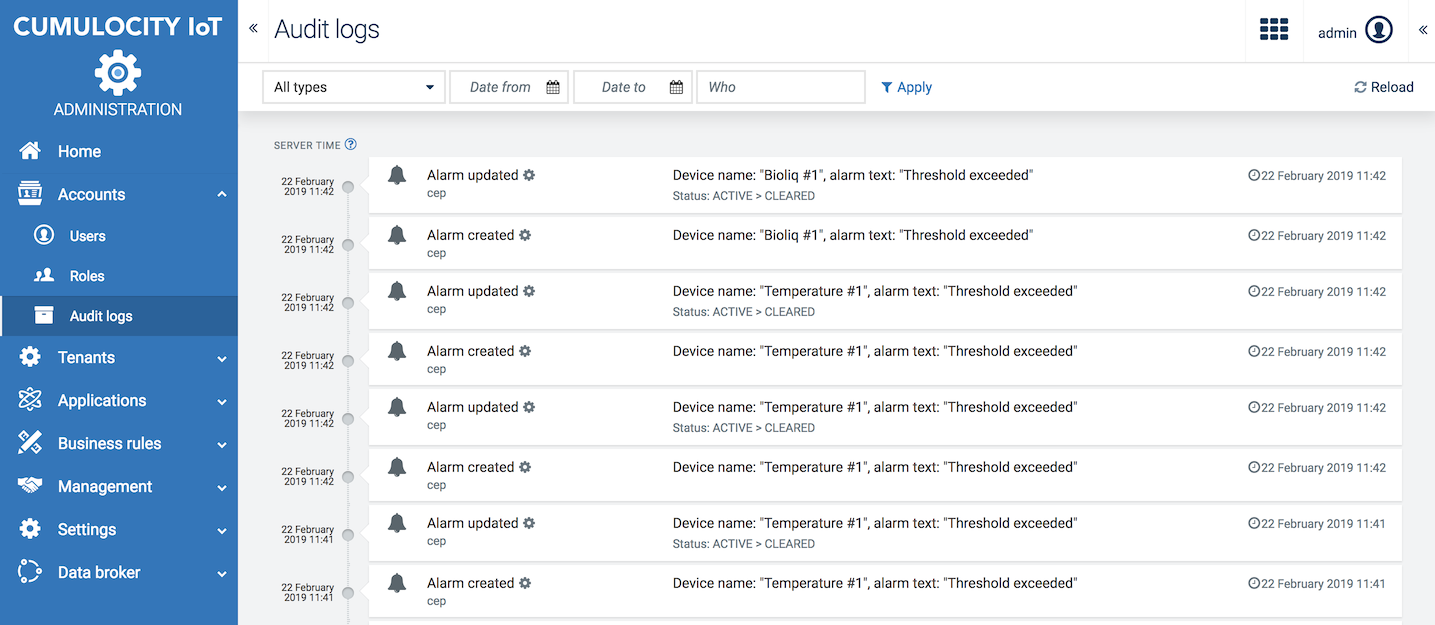
Info: The audit log list is not automatically refreshed after a realtime update for operations. Click Reload at the right of the top menu bar to update the list to the latest operations.
In order to easily search through logs, you may filter logs for
To apply filters, click the filter icon next to the filter fields. To discard filters, click the delete icon (only visible if filters are set).
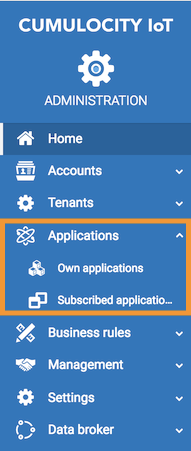
In the Cumulocity IoT platform we distinguish between two kinds of applications:
Click Own applications or Subscribed applications in the Applications menu in the navigator to display a list of all respective applications in your account.
Click on an application card to view the application properties.
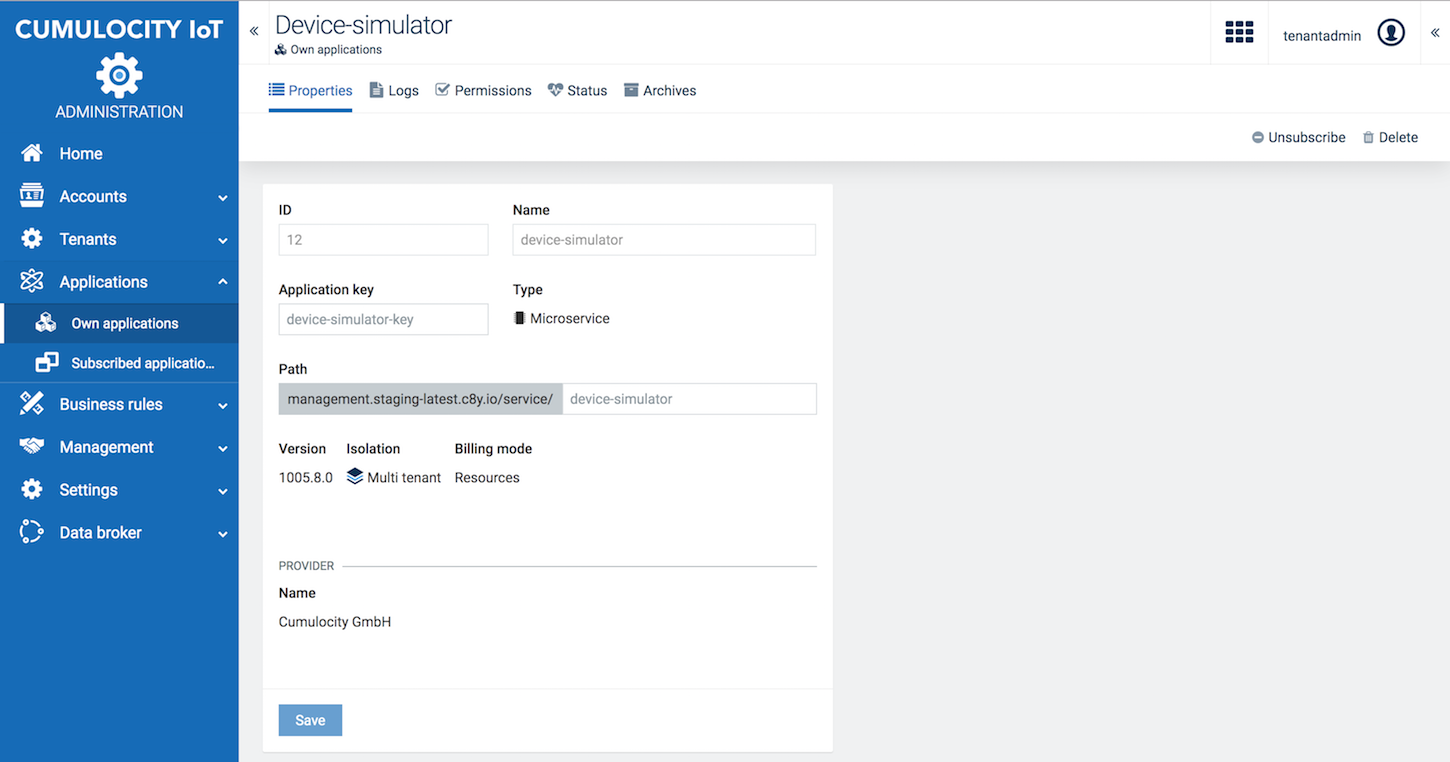
Each application will show the following properties, depending on the application type:
| Field | Description | Hosted (Web app) | Microservice | External |
|---|---|---|---|---|
| ID | Unique ID to identify the application | Automatically provided | Automatically provided | Automatically provided |
| Name | Application name. Will be shown as title of the application in the top bar and in the application switcher. | Automatically created | Automatically created, based on the ZIP file name | Specified by the user |
| Application key | Used to identify the application and to make the application available for subscription, see the Concepts Guide. | Automatically created | Automatically created based on the ZIP file name | Specified by the user |
| Type | Application type | Hosted application | Microservice | External |
| Path | Part of the URL invoking the application | Automatically created | Automatically created as .../service/<microservice name> | Specified by the user. For example, if you use "hello" as application path, the URL of the application will be "/apps/hello". |
In case of applications of the type “microservice”, you will additionally find information on its version, as well as on its isolation level and billing mode, see Enterprise Tenant > Managing tenants > Microservice usage for details on these parameters.
Cumulocity IoT provides a variety of applications for different purposes.
Depending on your installation and/or optional services your tenant will show a selection of the potentially available applications listed below.
The columns show the following information:
In the Standard Tenant you will find the following default applications:
| Application | Functionality | Name (as used in the API) | Type |
|---|---|---|---|
| Administration | Lets account administrators manage users, roles, tenants and applications. | administration | Web app |
| Apama-ctrl* | Runtime for Apama EPL Apps, smart rules and Analytics Builder. | apama-ctrl-* (different strings for different size/capability options) | Microservice |
| Apama Analytics Builder | Analytics Builder model manager and editor – allows models to be built graphically to process and react to data from devices. | Apama Analytics Builder | Web app |
| Cep | This application is deprecated and no longer a default application in the Standard Tenant. Apama now is the standard CEP engine. Define business operations based on realtime data by using the Esper CEP engine. This CEP variant uses a shared instance for multiple tenants. See "Cep-small" for a per-tenant approach. |
cep | Microservice |
| Cockpit | Manage and monitor IoT assets and data from a business perspective. | cockpit | Web app |
| Device Management | Manage and monitor devices, and control and troubleshoot devices remotely. | devicemanagement | Web app |
| Device simulator | Simulate all aspects of IoT devices. | device-simulator | Microservice |
| Report agent | Allows to schedule data exports from within the Cockpit application. | report-agent | Microservice |
| Smart Rules | Use the Smart Rule engine and create Smart Rules to perform actions based on realtime data. Requires one of the following applications: "Cep", "Apama" | smartrule | Microservice |
| Application | Functionality | Name (as used in the API) | Type |
|---|---|---|---|
| Branding | Customize the look of your tenants to your own preferences. | feature-branding | Feature |
| Data Broker | Lets you share data selectively with other tenants. | feature-broker | Feature |
| SSL management | Activate your own custom domain name by using a SSL certificate. | sslmanagement | Microservice |
| User hierarchies | Reflect independent organizational entities in Cumulocity IoT that share the same database. | feature-user-hierarchy | Feature |
| Application | Functionality | Name (as used in the API) | Type |
|---|---|---|---|
| Actility | Interface with LoRa devices through the Actility ThingPark. | actility | Microservice |
| Apama EPL Apps | This application is an optional service in Cumulocity IoT Core but standard in Cumulocity IoT Edge. Manager and editor for Apama Event Processing Language (EPL) apps, for immediate processing of incoming data. |
Apama EPL Apps | Web app |
| CEP custom rules | This application is deprecated. Upload your own CEP rules created with Esper in a per-tenant deployment. You need to be subscribed to the application "Cep-small" to be able to use this feature. |
feature-cep-custom-rules | Feature |
| Cep-small | This application is deprecated. CEP variant. Lets you work with CEP rules based on Esper in a per-tenant deployment (as opposed to "Cep" which uses a shared instance). You need to be subscribed to "CEP custom rules" to upload your own Esper CEP rules. |
cep-small | Microservice |
| Cloud Fieldbus | Collect data from fieldbus devices and remotely manage them in Cumulocity IoT. | feature-fieldbus4 | Feature |
| Cloud Remote Access | Implements Virtual Network Computing (VNC) to remotely access operating panels and other devices via a web browser. | cloud-remote-access | Microservice |
| Connectivity | Interface with mobile devices through various SIM providers like Jasper, Ericsson and Comarch. | connectivity-agent-server | Microservice | Microservice hosting | Host your own microservices on top of Cumulocity IoT. | feature-microservice-hosting | Feature |
| OPC UA | Communicate with OPC UA servers through an OPC UA device gateway. | opcua-mgmt-service | Microservice |
| Sigfox | Interface with Sigfox devices through the Sigfox cloud. | sigfox-agent | Microservice |
Own applications may be
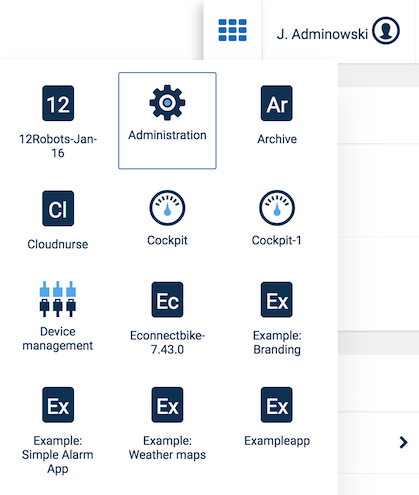
Your applications are available through the application switcher in the top bar which allows to easily switch between applications.
You manage your applications under Own applications, accessible through the Applications menu.
In the Own applications page you will find a list of the applications available in your account.
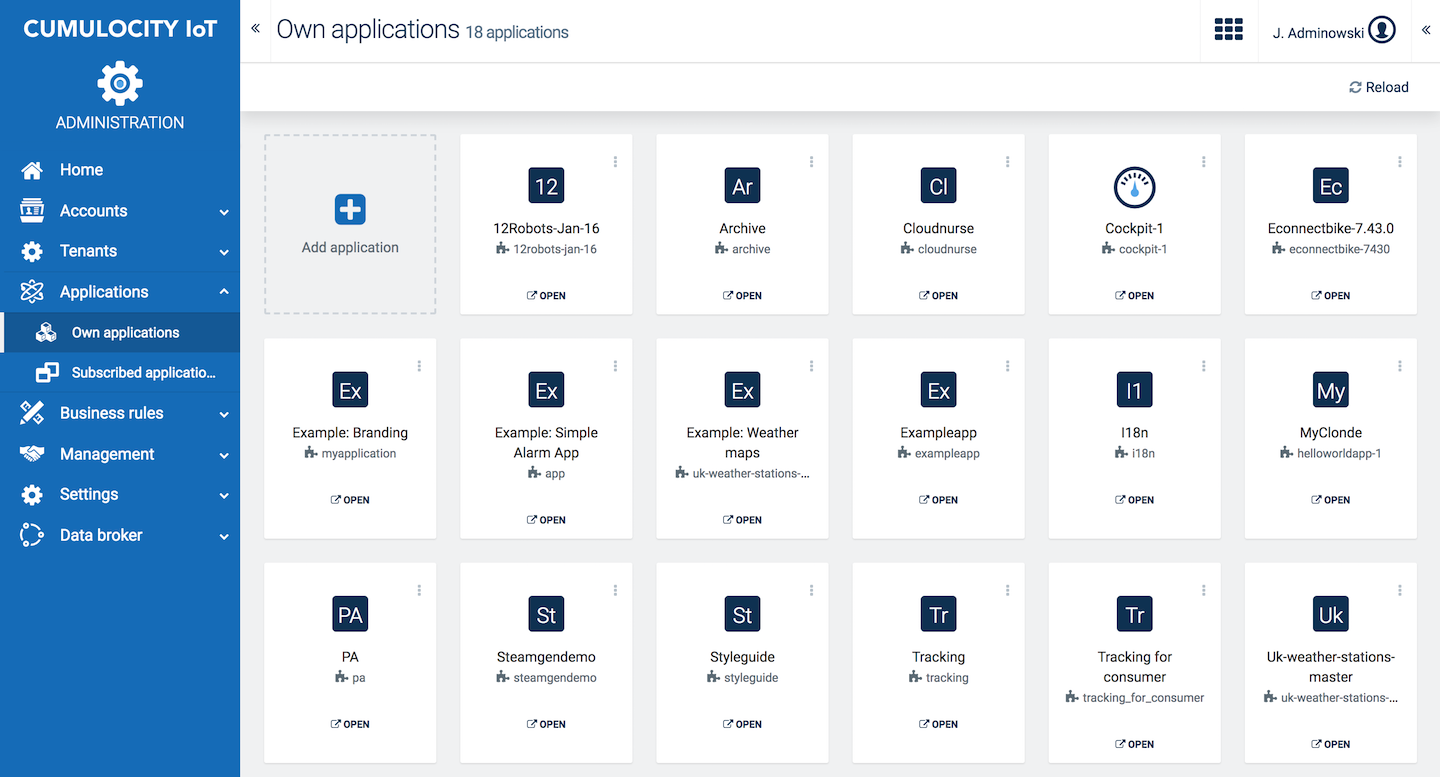
To display further information on the application, simply click its card. For details on the fields, refer to Application properties.
To directly open an application from here, click Open on the respective application card.
Click Add application in the Own applications page.
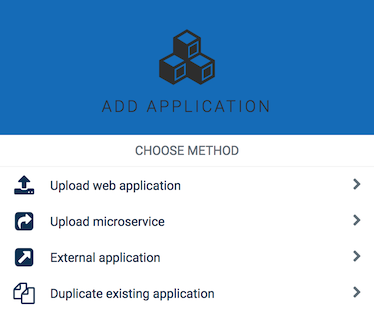
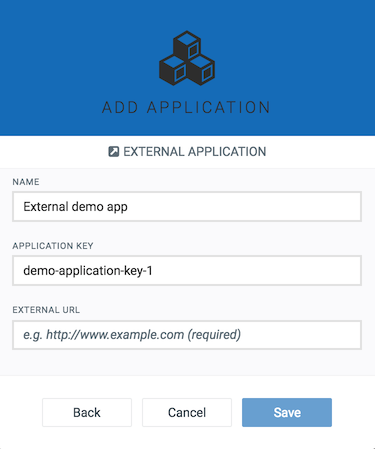
In the resulting dialog box, choose one of the following methods:
The application is created once the ZIP file has been successfully uploaded.
Important: The ZIP file must contain the index.html and cumulocity.json in its root directory, otherwise the application will not work.
The microservice application is created once the ZIP file has been successfully uploaded.
Important: The ZIP file must contain the application manifest and the Docker image of the microservice. Refer to Packing in the Microservice SDK guide under General aspects in order to prepare and deploy the microservice package.
For details on the fields, see also Application properties below.
Duplicating an application might be useful if you want to customize a subscribed application according to your needs. Duplicating a subscribed application creates a copy of the application as an own application, with a link to the original application.
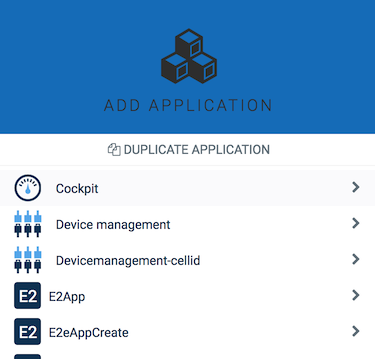

For details on the fields, see also Application properties below.
Info: If you want your “own application” to overrule a subscribed standard application, the path of the “own application” needs to be set to the path of the original subscribed application.
Simply click the application or click the menu icon at the right of an entry and then click Edit.
In the Properties tab, several fields can be modified, depending on the application type (see Application properties).
Important: Never change the system application names (e.g. “Device Management”, “Cockpit”). Otherwise, tenant initialization will fail.
Click the menu icon at the right of an entry and then click Remove.
If you remove an application that overwrites a subscribed application, the currently subscribed application becomes available to all users. Additionally, the users will then also benefit from future upgrades of the subscribed application.
It is not possible to remove subscribed applications. This can only be done by the owner of the subscribed application.
Multiple archive file versions can be stored in Cumulocity IoT when they were created by uploading either a ZIP file or a MON file. Each version is called an archive. You can upload different versions at the same time and switch between these versions.
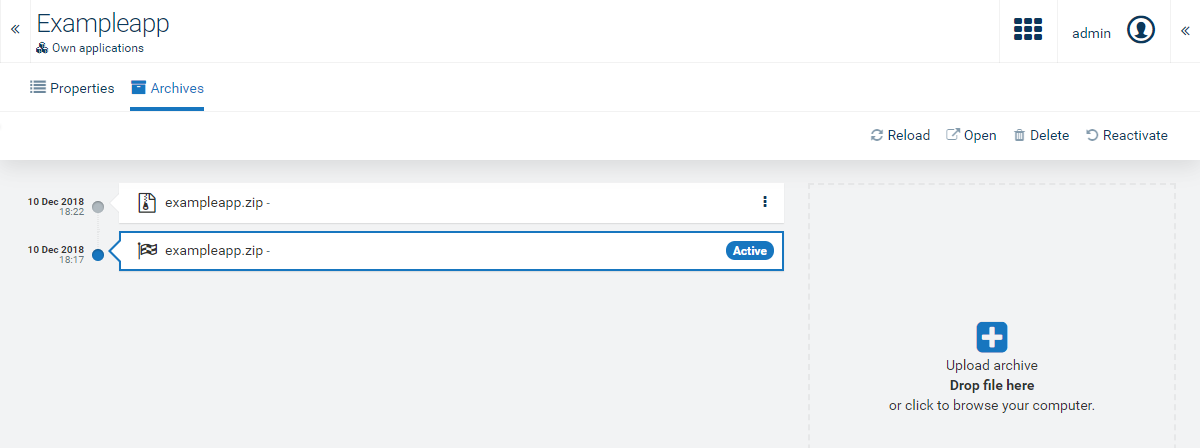
Once uploaded, the recently uploaded version is automatically the active version, i.e. the version of the application that is currently being served to the users of your account. This version cannot be deleted.
Info: The Archive tab is not available for subscribed applications, as only the owner of the application can perform this action.
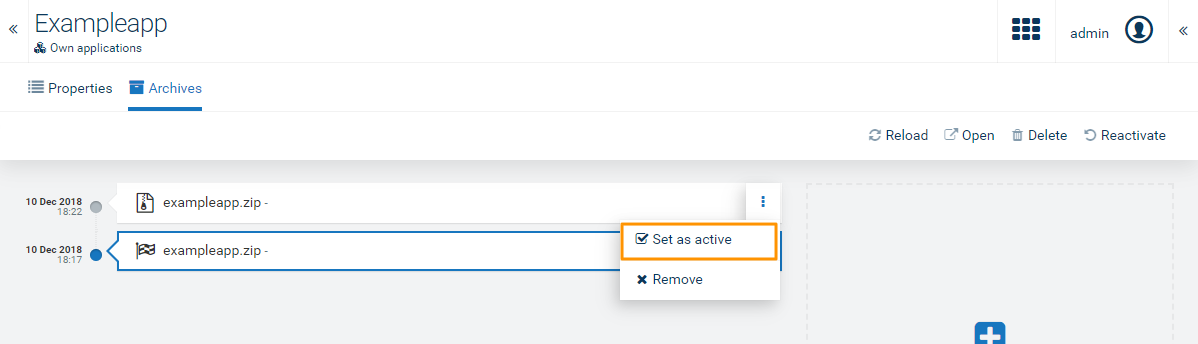
Users can restore previous versions of an application from an archive.
If a hosted application is not deployed correctly, users may reactivate it.
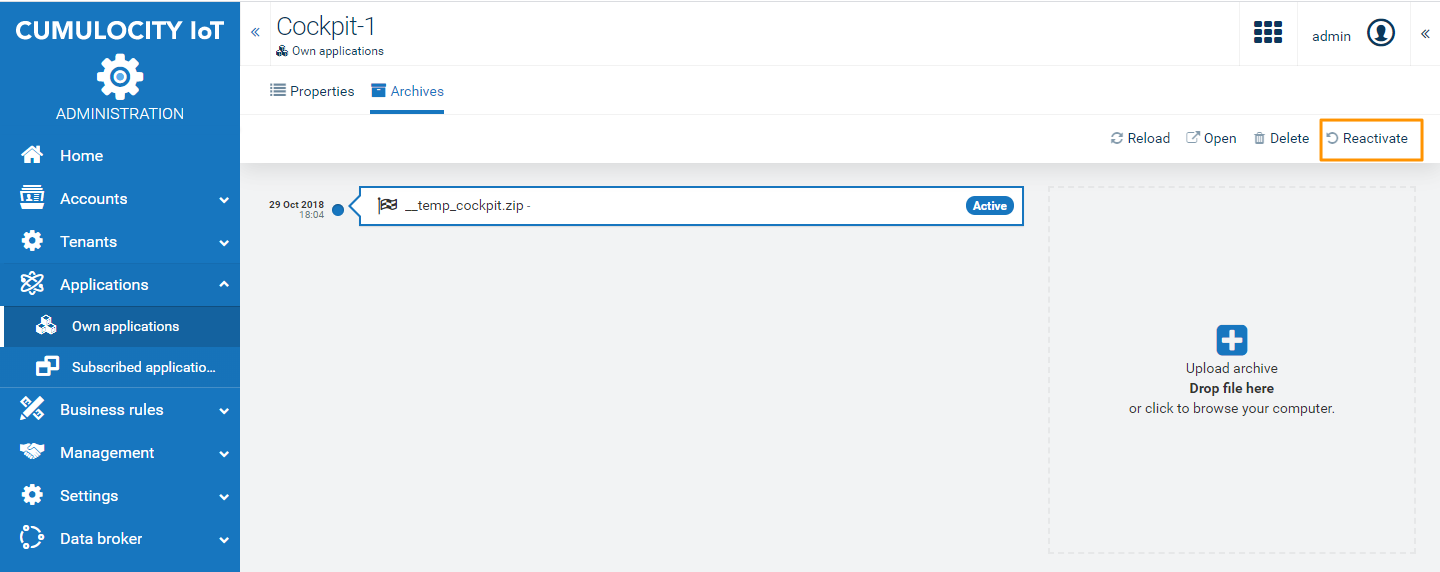
The selected application will be reactivated by removing the respective files from the application directory and unpacking the host application package again.
You can monitor microservices hosted by Cumulocity IoT in two ways.
The status of the microservice can be checked on the Status tab of the respective application.
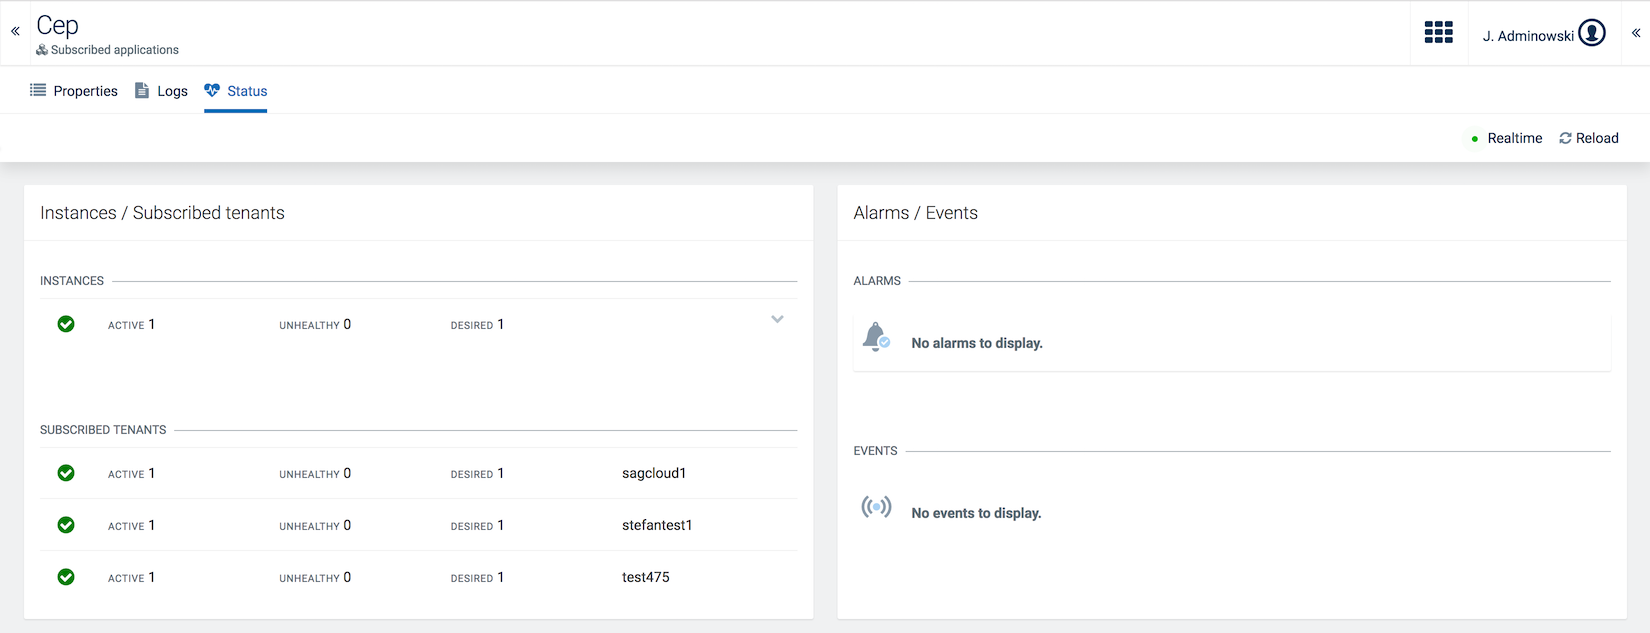
The following information is provided on the Status tab:
The status information is available for subscribed applications as well as for own applications. Information on subscribed subtenants is only visible for the application owner.
To view the status you need the following permissions: ROLE_APPLICATION_MANAGEMENT_READ and ROLE_INVENTORY_READ
Most of the alarms and events visible in the Status tab are strictly technical descriptions of what’s going on with the microservice.
There are two user-friendly alarm types:
c8y_Application_Down - critical alarm which is created when no microservice instance is availablec8y_Application_Unhealthy - minor alarm which is created when there is at least one microservice instance working properly, but not all of them are fully operatingUser-friendly alarms are created for the microservice owner tenant only. They are also automatically cleared when the situation gets back to normal, i.e. all the microservice instances are working properly.
User-friendly alarms can be used to create smart rules. For details on creating smart rules of various types, see Smart rules.
For example, to send an email, if a microservice is down, create an “On alarm send email” Smart Rule.
In the On alarm matching section, use c8y_Application_Down as an alarm type. As a target asset select the microservice which you would like to monitor, for example “echo-agent-server”.
Cumulocity IoT offers viewing logs which provide more details on the status of microservices.
To view logs, open the Logs tab of the respective microservice.
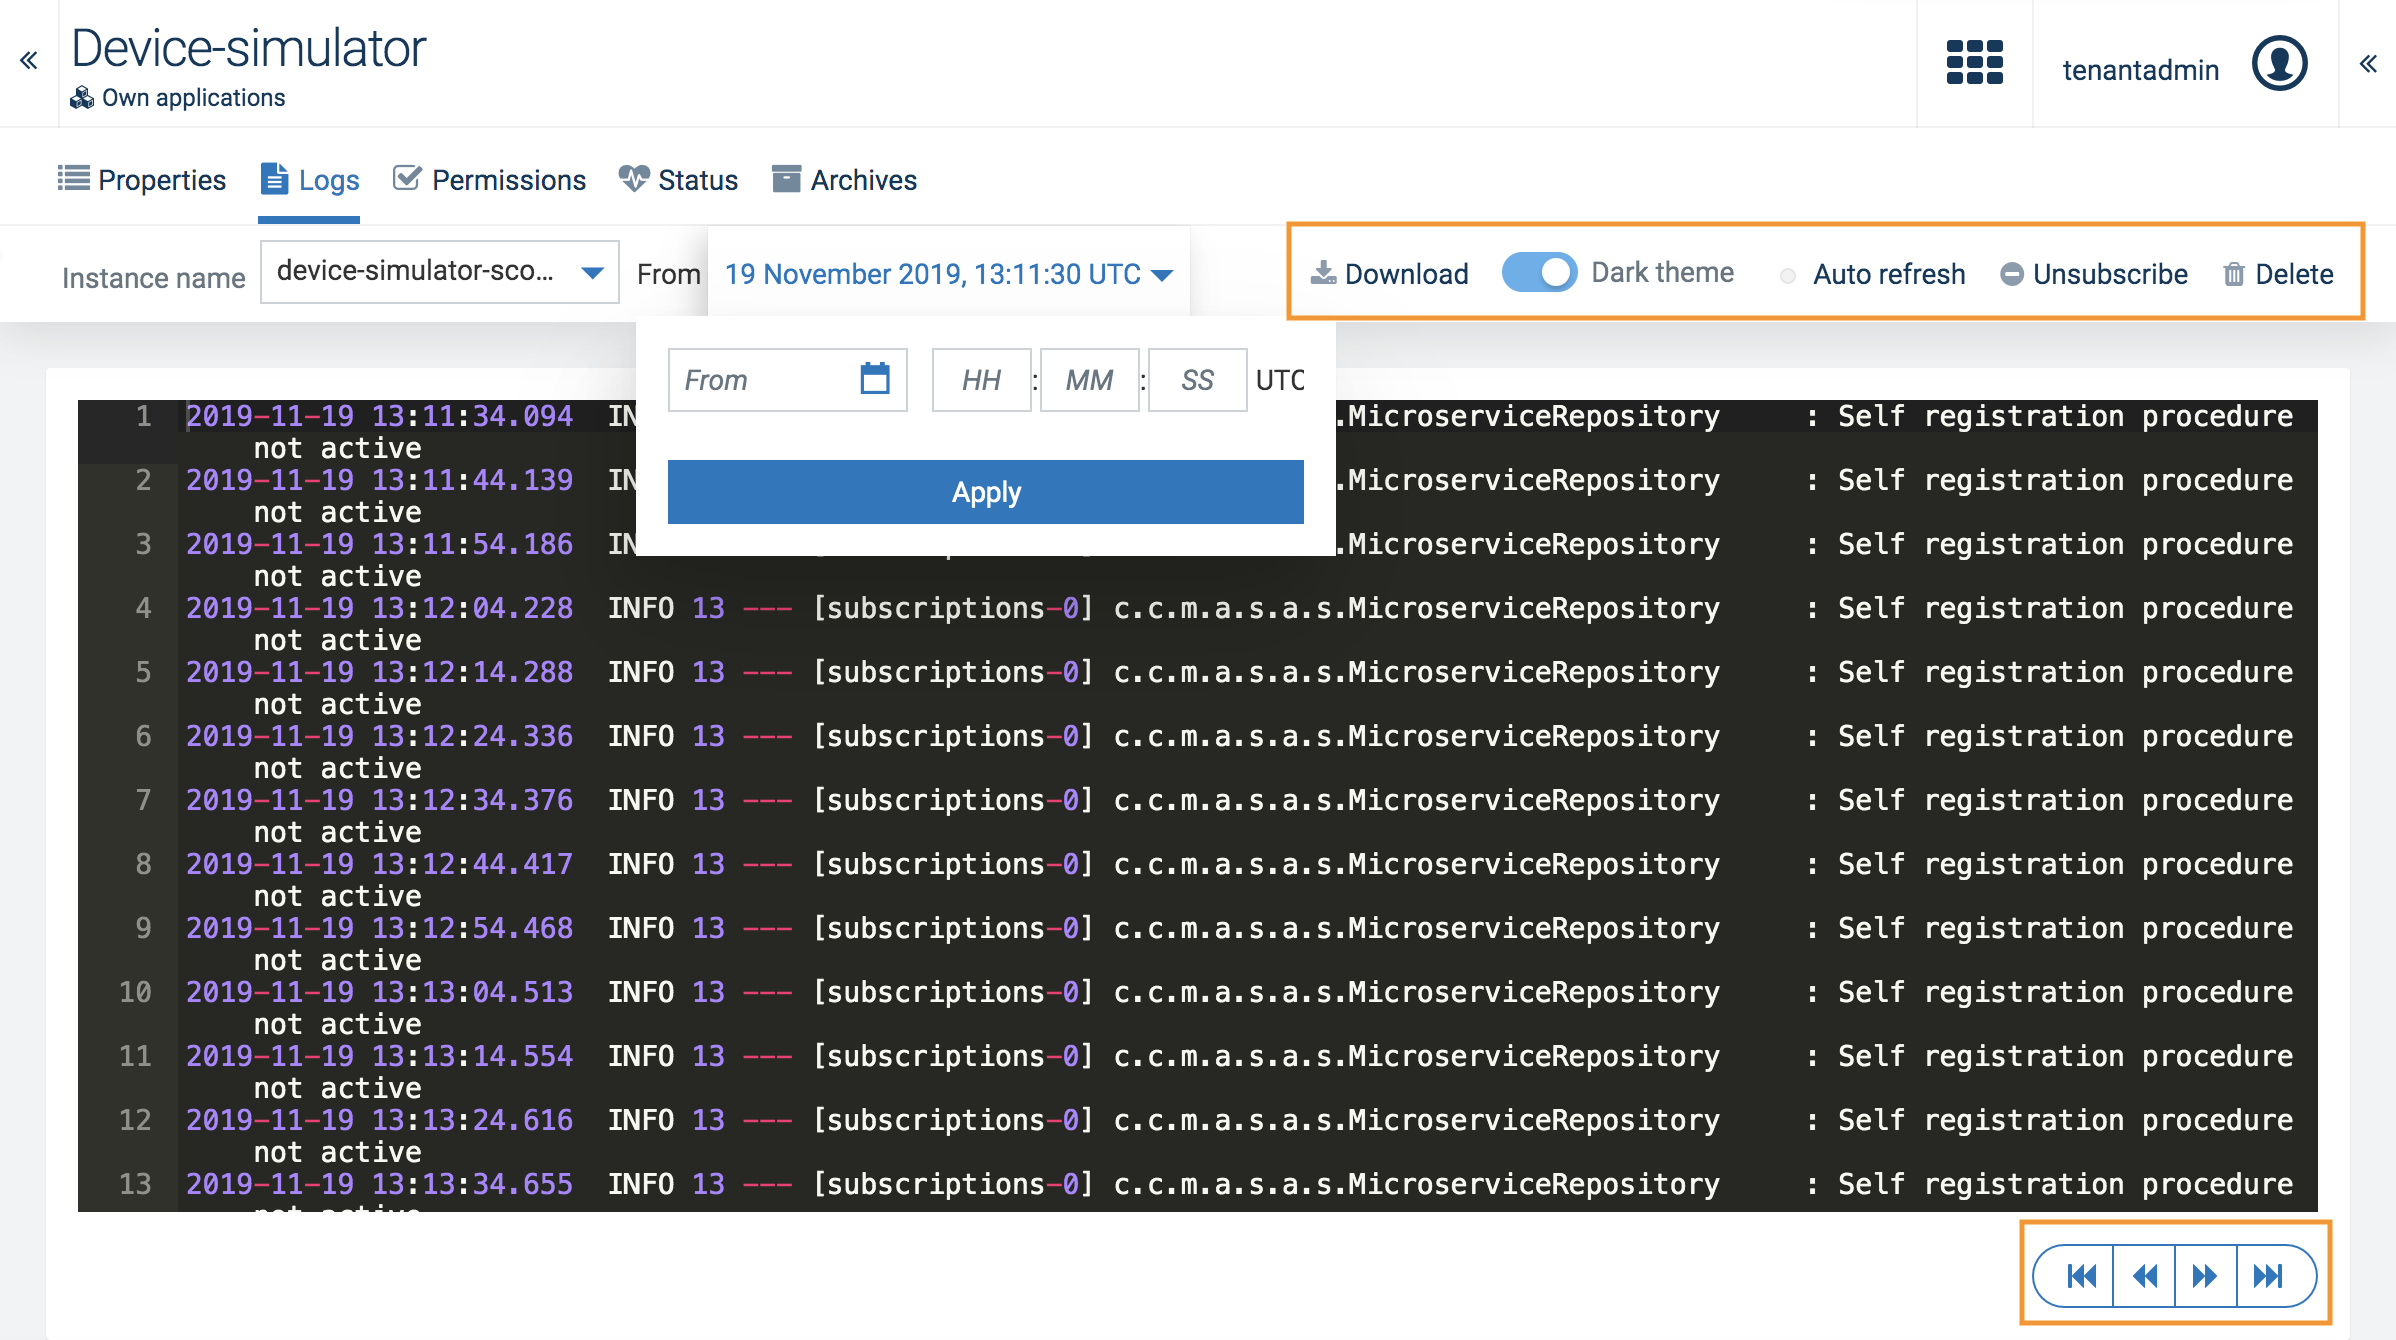
At the top of the page, you can select the instance of the microservice, for which you want to view the logs.
Info: If your microservice was re-scaled into two instances you should be able to switch between them, but it is not possible to see the logs from both instances at once.
Next to the instance dropdown you can select the time range for the log entries to be shown by selecting a date from the calendar and entering a time.
Info: The time entered here may differ from the server time due to different time zones.
At the top right, additional functionality is provided:
Initially, the Logs tab shows the latest logs of the microservice instance.
At the bottom right you find navigation buttons:
If no logs are available in the selected time range, a message is shown accordingly:

Info: There is no possibility to see the logs from the previously running instances. However, inside the instance there is a Docker container running, and if only this one was restarted (not the whole instance) you should see the logs from the currently running and also lately terminated Docker container.
Logs are always loaded from the Docker container using both
stdoutandstderrsources, and there is no possibility to distinguish/filter by the source.
To define default applications for subtenants, a tenant policy with the following options can be created and used when creating new tenants:
Using event processing, you can specify real-time business logic that is automatically run by Cumulocity IoT as soon as new data arrives or existing data is modified. The logic is deployed in so-called “rules” which consist of a set of CEP statements.
Info: A user-friendly way to specify real-time business logic is provided in the Cockpit application through the so-called “Smart Rules”. Smart rules are “under the hood” also implemented as CEP statements, and you can see them in the Event Processing page. However, you cannot edit smart rules from here.
Click Event processing in the Business rules menu to view all rules.
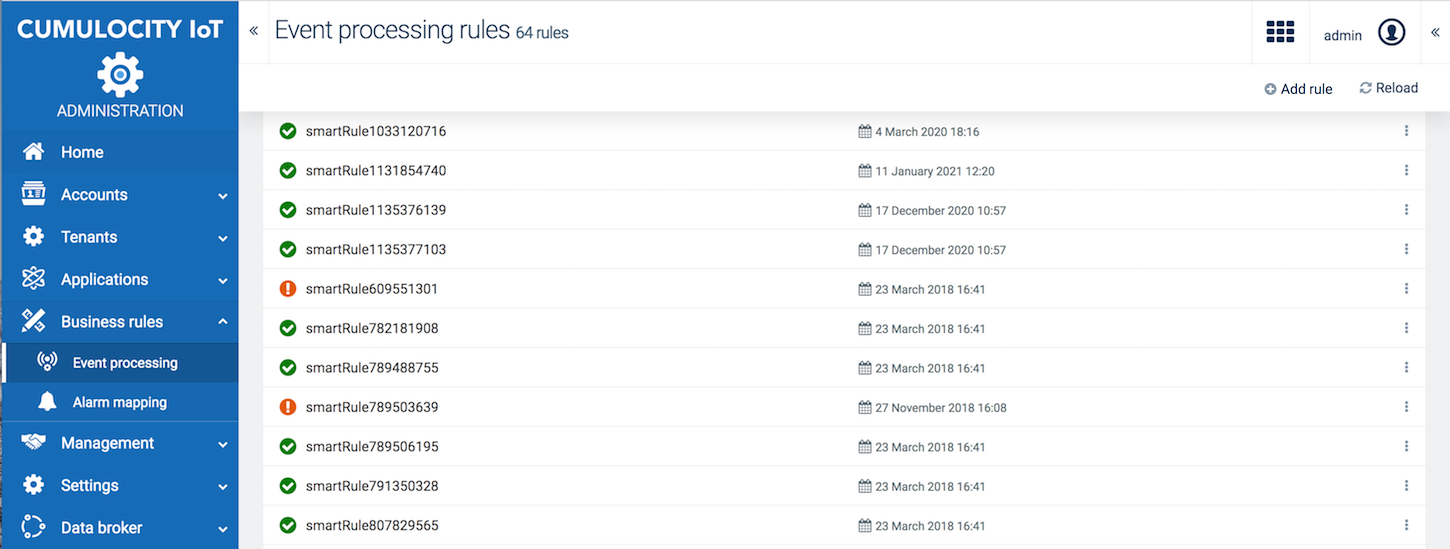
For each rule in the list, the status (deployed = indicated by a green checkmark / not deployed = indicated by an exclamation mark), the name and the date when is was last updated is provided.
If the status of a rule is set to Deployed, you will see the output produced by the statement below the checkmark icon. Clicking a line of output unfolds the detailed output of the statement. Clicking Clear all removes the output from the screen.
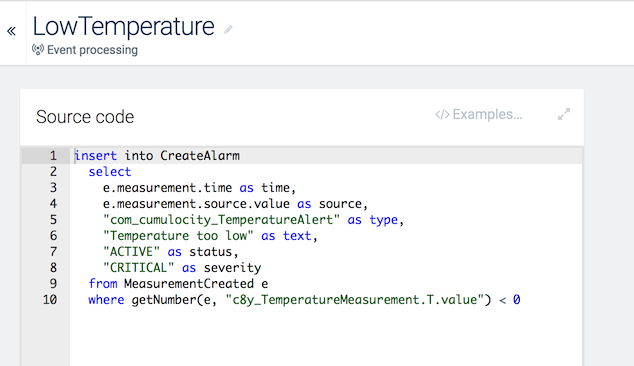
The following example rule creates an alarm if the temperature goes below 0 degree.
Simply click the row of the rule you want to edit or click the menu icon at the right of the respective row and then click Edit.
For details on the fields, see To add a rule.
Click the menu icon at the right of the respective row and then click Delete.
Instead of deleting the rule you can also disable it temporarily by setting its status to “Not deployed”.
Alarm mapping enables you to change the severity and text of alarms to adapt them to your business priorities. For example, a loss of the connection to a device is by default a MAJOR alarm but may be critical to you. To change this, add an alarm mapping to change alarms related to connection losses to CRITICAL.
Click Alarm mapping in the Business Rules menu to see a list of all alarm mappings.
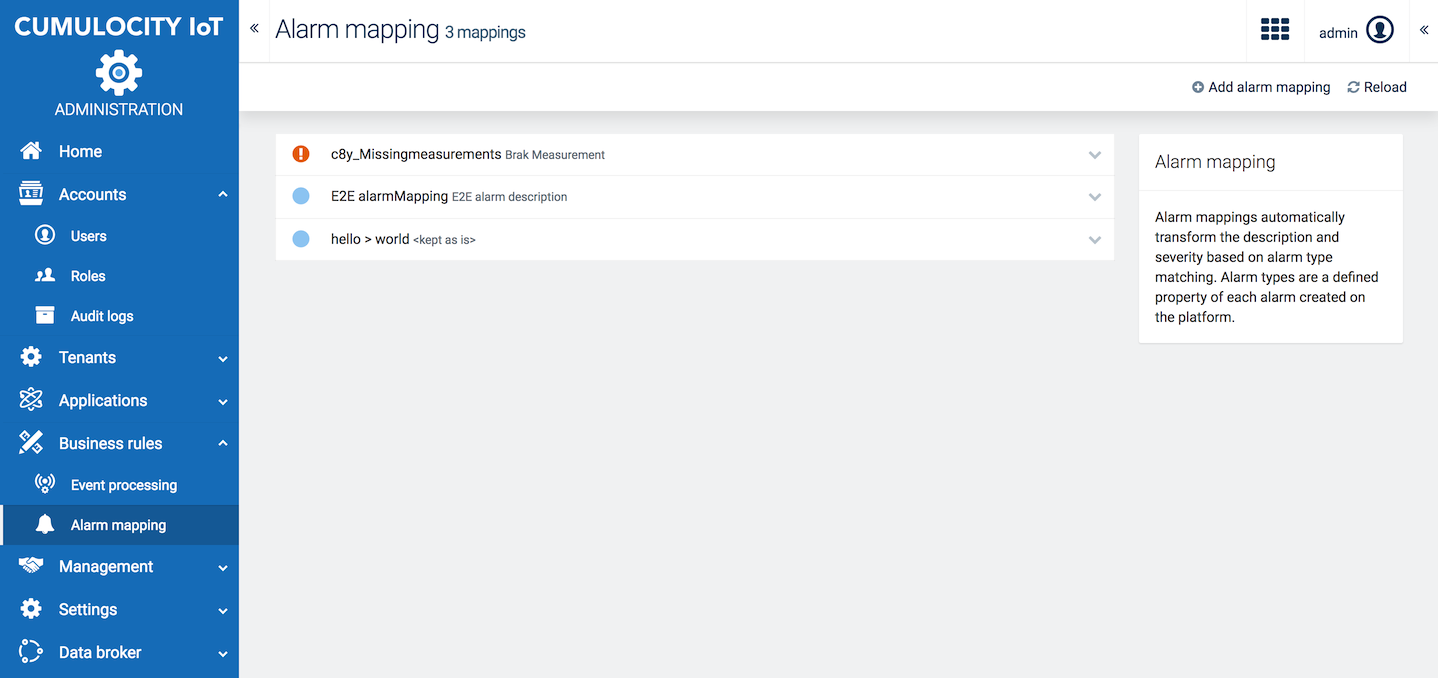
For each alarm mapping, the alarm severity, the alarm type and a description (optional) are shown.
Info: The alarm type set in an alarm mapping is interpreted as "<type>*". If you create for example an alarm mapping to address alarms of type "crit-alarm", the mapping is effective for any type of alarm that starts with this value e.g. "crit-alarm-1", "crit-alarm-2", or "crit-alarm-xyz".
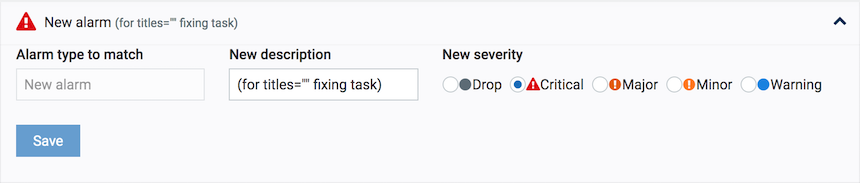
Expand an alarm mapping to edit it. You may modify the description and the alarm severity. The alarm type is not editable.
To delete an alarm mapping, hover over it and click the delete icon.
Retention rules gives you control on how long data is stored in your account. By default, all historical data is deleted after 60 days (configurable in the system settings).
You might however want to store measurements for 90 days for example, but delete alarms already after 10 days.
Retention rules are usually run during the night. When you edit a retention rule, you will not see an immediate effect in the Usage section on the Home screen of the Administration application.
Click Retention rules in the Management menu to view a list of retention rules configured for your account.
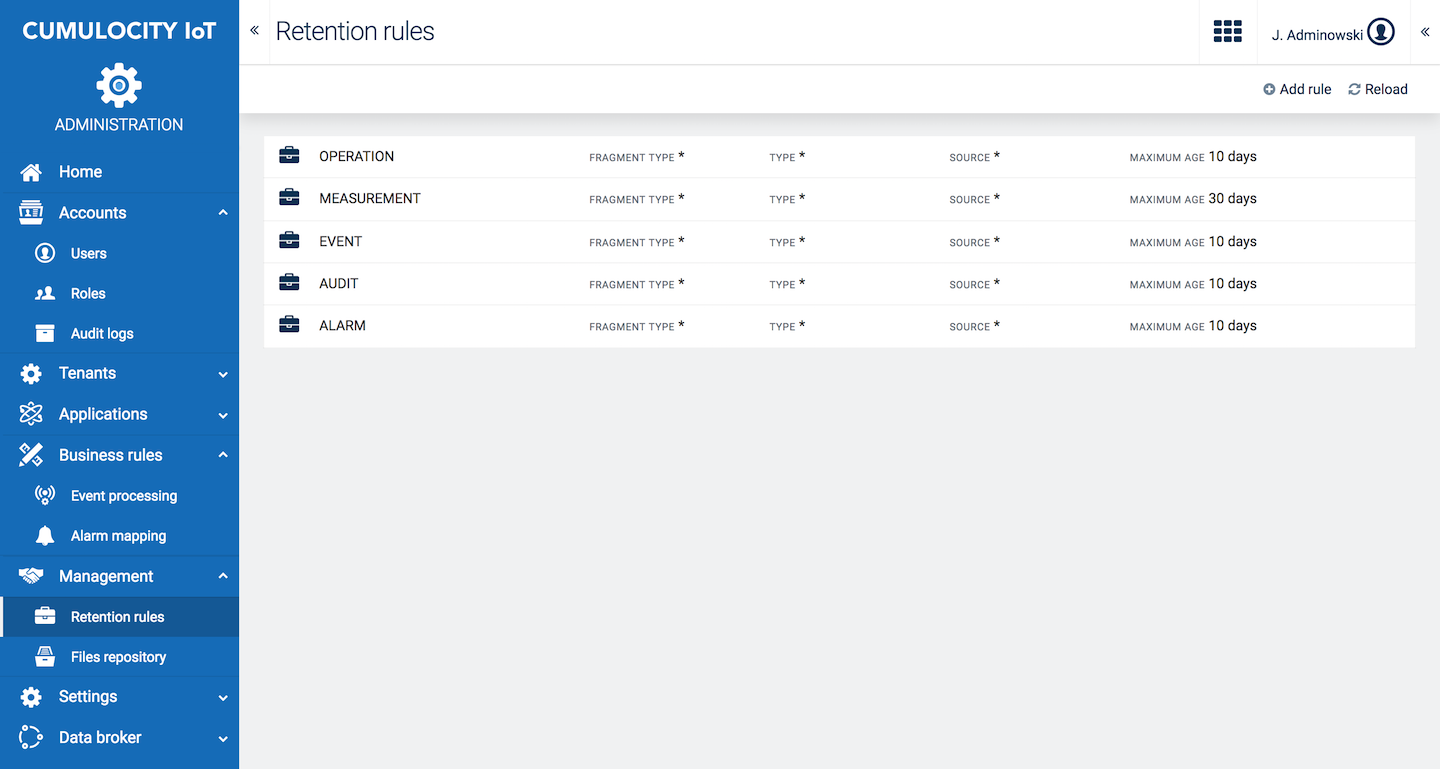
For each rule, the rule name, details on the data to be deleted (fragment type, type and source, see below) and the maximum age in days is provided.
The asterisk ("*") indicates that data with any value will be cleaned up.
The retention rule will be added to the list.
Info: Per default, an asterisk ("*") is set in all fields except the Maximum age field, to include all values.
Info: Alarms are only removed if they have a status of CLEARED.
Simply click the row of the rule you want to edit or click the menu icon at the right of the respective row and then click Edit.
For details on the fields, see To add a retention rule.
Hover over the rule you want to delete and click the delete icon at the right.

Info: All retention rules are executed sequentially and independent of each other. So if we have two retention rules, a more specific one with a greater maximum age that defines a subset of the documents that are defined by a more common rule with a lower maximum age, then effectively it will work as if we had a single, more common rule.
For example given the two following rules:

All measurements with the type
c8y_Temperaturewhich are older than 30 days will be removed, including those where the source equals12345.On the other hand when we have the following retention rules defined:

The retention process removes the measurements with the type
c8y_Temperaturewhich are older than 30 days, all other measurements will be removed when they are older than 60 days.
Info: The source parameter is the ID of the device. When it is defined, the retention process only removes the documents directly related to the device represented by the source, not its children or groups it belongs to.
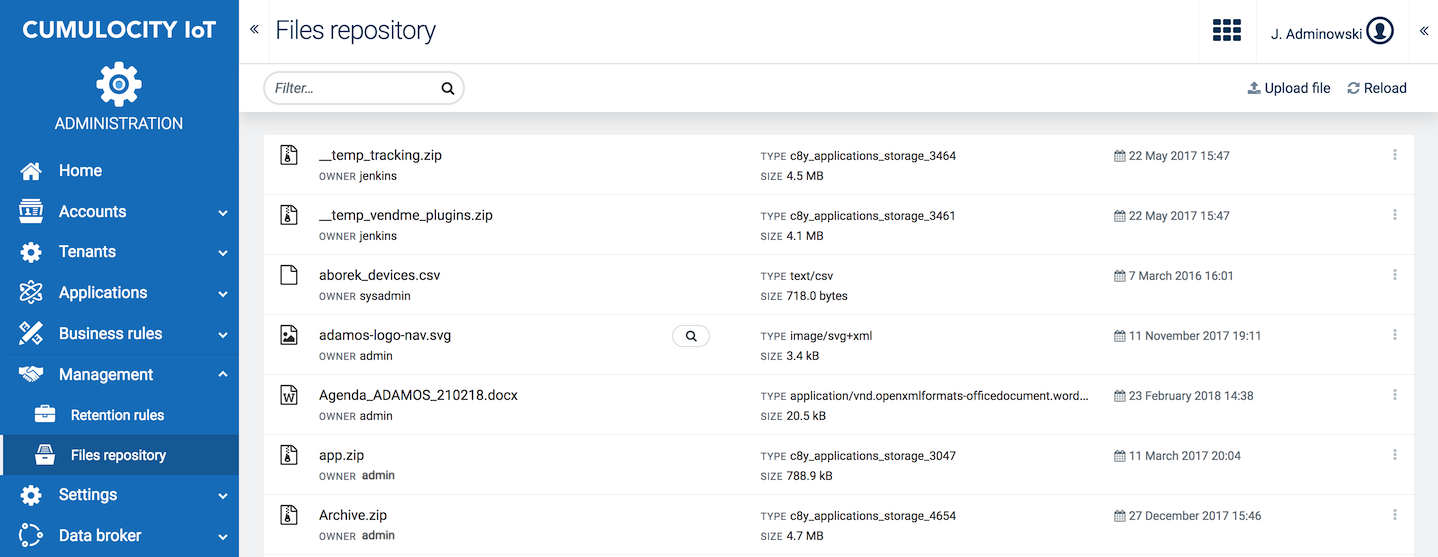
The file repository provides an overview of the files stored in your account.
Click Files repository in the Management menu to see a list of files.
The files listed can come from various sources. They can be software images, configuration snapshots taken from devices, log files from devices or web applications uploaded from the Own applications page.
For each file, the name of the file, its owner, the file type (i.e. image/bmp, text/csv), its size and the date when it was last updated is provided.
Click Upload file in the top menu bar.
Click the menu icon at the right of the respective row and then click Download.
Click the menu icon at the right of the respective row and then click Delete.
Info: If the file corresponds to an active application, it cannot be deleted. You first need to remove or upgrade the application to be able to delete it.
The Two-factor authentication (TFA) is an extra layer of security that only completes authentication with a combination of two different factors: something the users know (username and password) and something they have (for example, smartphone) or something they are (for example, fingerprint). You can read more on how to configure TFA in the authentication settings section.
There are two possible TFA strategies: SMS and TOTP. Only one of them can be active at a time.
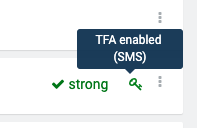
To check whether TFA is enabled for a certain user, go to the Users page and see the TFA status column right from the password strength column. A key icon indicates that TFA is enabled and by hovering over it you can see the strategy that is being used.
When adding a user and TFA is enabled, a mobile phone number must be specified. Without a valid phone number a login is impossible.
Info: This process can only be executed in the Administration application and is not available under User settings.
Users have to install a TOTP application on their smartphone (Google Authenticator recommended), freely available both on App Store and Play Store.
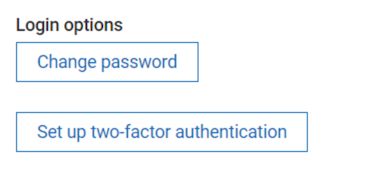
Opposed to the SMS strategy TOTP has to be set up by each user. By opening User settings in the top right corner and then clicking Set up two-factor authentication they can start the setup process.
IF TFA is enabled, the user will be presented a QR code at login, that needs to be scanned with the previously installed TOTP mobile application.
Alternatively, the secret can also be inserted manually in case scanning the QR code is not an option.
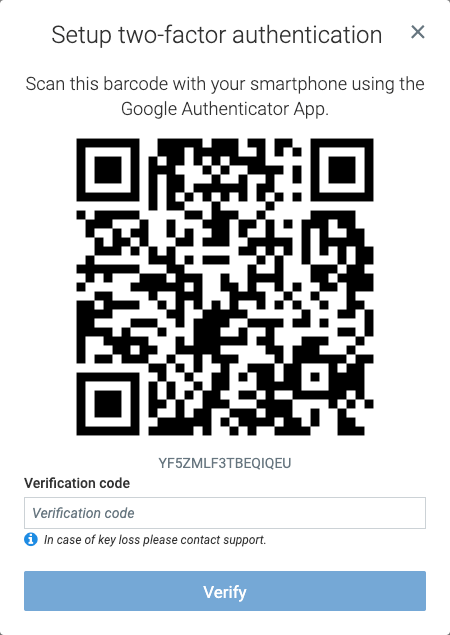
After this process the mobile application will generate a new code every 30 seconds that can be used to complete the authentication process.
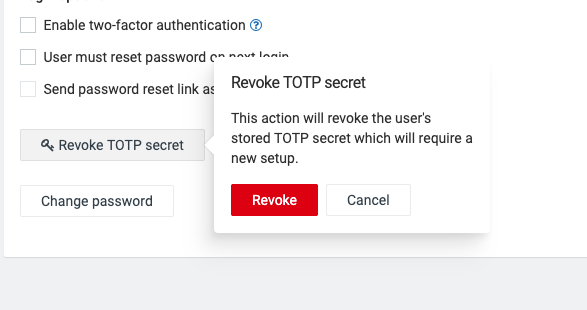
Info: Although the setup must be done by each individual user, revoking the secret can only be done by a user with “user management ADMIN” permission via the Administration application. As so, if the user loses the phone or uninstalls the application they must contact a user with this particular permission.
To revoke the key follow these steps:
From the Settings menu, administrators can manage various settings for the account:
Click Authentication in the Settings menu if you want to view or change the Login or TFA settings.

Info: If the menu is not visible, confirm the user has one of the following roles:
ROLE_TENANT_ADMINorROLE_TENANT_MANAGEMENT_ADMIN.
In the Preferred login mode field, you can select one of the following options:
This login mode will be used by the platform’s applications as the default method to authenticate users. Device authentication stays unchanged.
Info: If OAuth Internal is enforced, Basic Auth cannot be used to login to applications anymore. Older applications might fail to display the login correctly and need to be updated.
In the field Limit password validity for, you can limit the validity of user passwords by specifying the number of days after which users have to change their passwords. If you do not want to force your users to change passwords, use “0” for unlimited validity of passwords (default value).
Info: The password validity limit and the enforcing of strong passwords may not be editable, if configured by the platform administrator.
Info: The password validity limit is not imposed on users with a “devices” role. This prevents devices passwords from expiring.
By default, users can use any password with eight characters or more. If you select Enforce that all password are “strong” (green), your users must provide strong passwords as described in Getting Started > Accessing and logging into the Cumulocity IoT platform.
Strong (green) passwords must have “M” characters. By default, the system restricts the use of passwords already used in the past. The last “N” passwords provided by a user are remembered by the system and the system does not allow to use them. The default value for “N” is 10.
Info: “M” and “N” can be configured by the platform administrator.
Click Save to apply the settings.
Important: Each time you change the login mode you will be forced to log out. Other users will need to log out and log in again so that the change is applied.
Select the checkbox Allow two-factor authentication if you want to allow TFA in your tenant (only possible for administrators).
You may choose one of the following options:
SMS-based, supporting the following settings:
Info: An SMS gateway microservice must be configured for the tenant. Naturally only users with a valid phone number associated can use this functionality.
Google Authenticator (Time-based One-Time Password = TOTP), supporting the following setting:
Info: The TOTP method is only available with the login mode “OAuth Internal”.
Click Save TFA settings to apply your settings.
Important: Each time you change the TFA method you will be forced to log out. Users TFA settings are cleared and need to be configured again.
Info: Users with a “devices” role are excluded from TFA and TOTP. This is also true when TOTP is enforced for all users.
Cumulocity IoT OAuth Internal is based on JWT stored in a browser cookie. However, it doesn’t support refresh and after the token validity time has ended, the user will have to log in again.
The default token validity time is two weeks and this can be changed with tenant options: oauth.internal.basic-token.lifespan.seconds. The minimum allowed value is 5 minutes.
Cookies used to store a token in a browser have their own validity time that can be changed with tenant options: oauth.internal.basic-user.cookie.lifespan.seconds. The default value is two weeks. It can also be set to a negative value so that the cookie will be deleted when the user closes the browser.
Cumulocity IoT provides single sign-on functionality, that allows a user to login with a single 3rd-party authorization server using the OAuth2 protocol, for example Azure Active Directory. Currently authorization code grant is supported only with access tokens in form of JWT.
Info: This feature is built on top of cookies technology. To be able to use it, you must have cookies enabled in the settings of your browser.
This feature is enabled since Cumulocity IoT version 10.4.6. For correct behavior any microservice needs to use the microservice SDK with version 10.4.6 or later.
Before switching to the single sign-on option it is mandatory that:
Info: In order to use the single sign-on feature for Enterprise Tenants, the enterprise domain must be set up as redirect URI in the basic configurations. If single sign-on providers have a list of allowed domains, the enterprise domain should be added to that list.
To enable the feature, the administrator has to configure a connection with the authorization server. This is done in the Administration application.
Click Single sign-on in the Settings menu in the navigator.
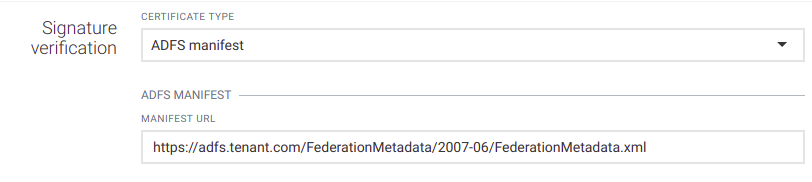
At the top left, you can choose a template. The chosen option has an effect on the look of the panel. The default template is “Custom” which allows for a very detailed configuration with virtually any authorization server using OAuth2 authorization code grant. Other templates provide simplified views for well known and supported authorization servers. In the next steps there will first be a definition of how to use the “Custom” template followed by a view dedicated to Azure Active directory.
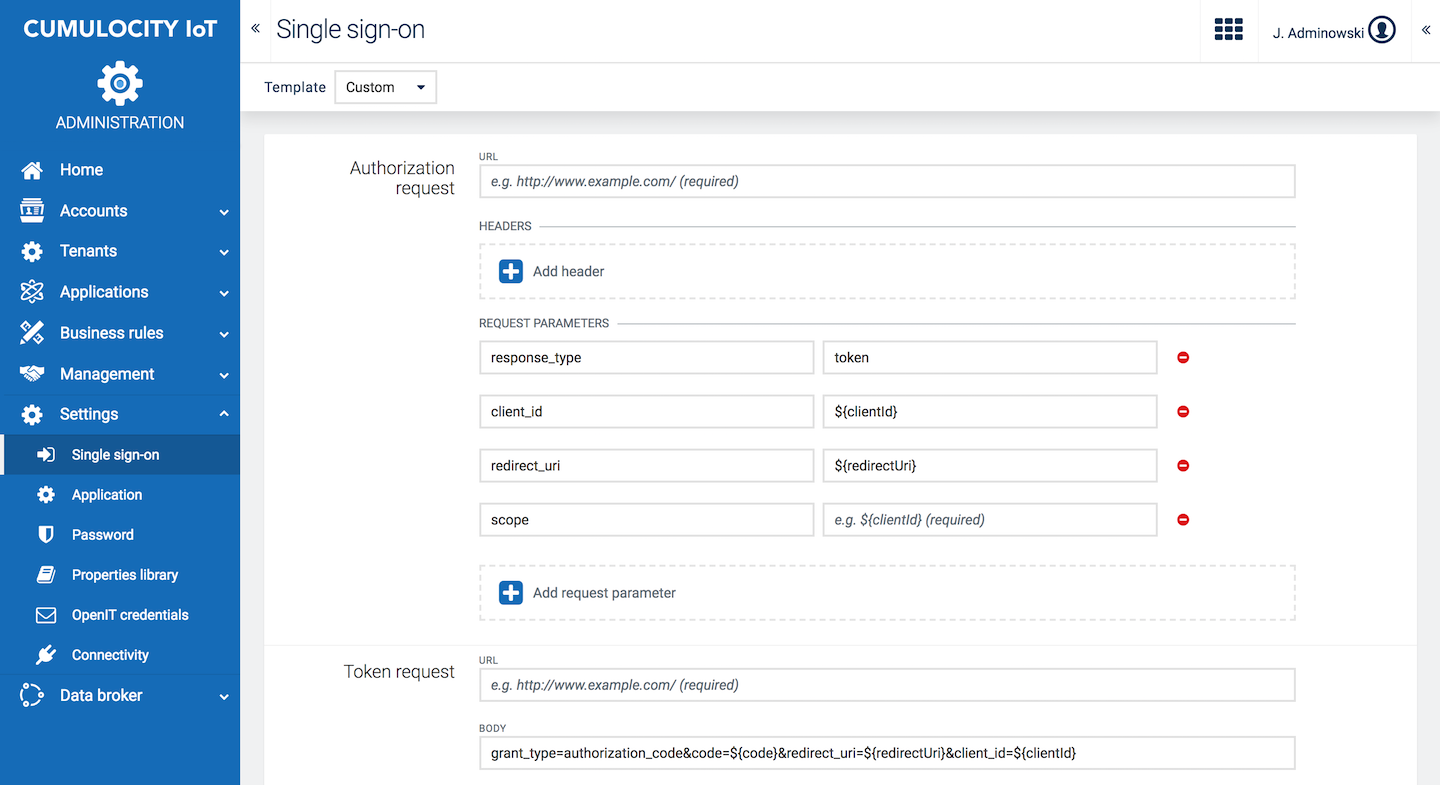
As the OAuth protocol is based on the execution of HTTP requests and redirects, a generic request configuration is provided.
The first part of the Single sign-on page consists of the request configuration. Here you can configure the HTTP request address, request parameters, headers and body in case of token and refresh requests. The authorize method is executed as a GET, token and refresh method by POST requests.
Specifying a logout request is optional. It performs front-channel single logout. If configured, the user is redirected to the defined authorization server logout URL after logging out from Cumulocity IoT.

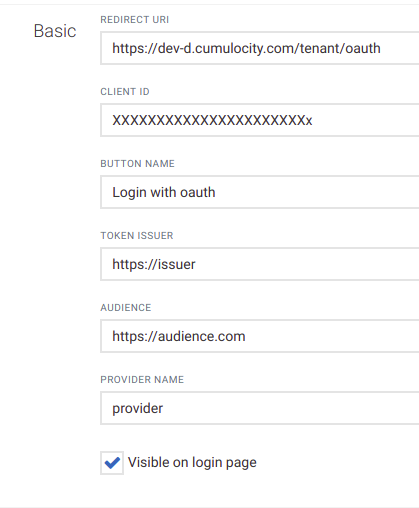
The Basic section of the Single sign-on page consists of the following configuration settings:
| Field | Description |
|---|---|
| Redirect URI | Redirect parameter. Can be used in request definitions as a ${redirectUri} placeholder |
| Client ID | OAuth connection client ID. Can be used in request definitions as a ${clientId} placeholder |
| Button name | Name displayed on the button on the Login page |
| Issuer | OAuth token issuer |
| Provider name | Name of the provider |
| Visible on Login page | Indicates whether the login option is enabled or not. |
| Audience | Expected aud parameter of JWT |
| Group | (Deprecated in favor of dynamic access mapping since 9.20)The initial group assigned to the user on first login |
| Applications | (Deprecated in favor of dynamic access mapping since 9.20)The initial applications assigned to the user on first login |
Each time a user logs in, the content of the access token is verified and is a base for user access to the Cumulocity IoT platform. The following section provides the mapping between JWT claims and access to the platform.
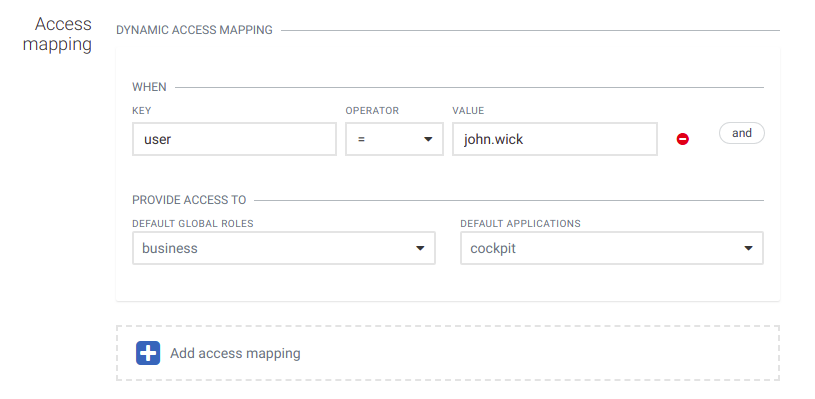
In the example above, if a user tries to login a decoded JWT claims look like:
{
...
"user": "john.wick",
...
}
The user will be granted access to the global role “business” and the default application “cockpit”.
If no access mapping matches the user access token, the user will get an “access denied” message when trying to log in. This will also happen if there is no access mapping defined causing all users to be unable to log in using SSO.
New rules can be added by clicking Add access mapping at the bottom. An access mapping statement can consist of multiple checks like in the image below. You can add a rule to an existing statement by clicking and. Click the Minus button to remove a rule.
New roles are added to the user from every matching access mapping. If one access mapping statement assigns the role “admin” and a second one assigns the role “business” and both meet the defined conditions, then the user will be granted access to the global roles “business" and “admin”."
When using “=” as operator you may use wildcards in the Value field. The supported wildcard is asterisk (*) and it matches zero or more characters. For example, if you enter “cur*” this matches “cur”, “curiosity”, “cursor” and anything that starts with “cur”. “f*n” matches “fn”, “fission”, “falcon”, and anything that begins with an “f” and ends with an “n”.
In case the asterisk character should be matched literally it has to be escaped by adding a backslash (\). For example, to match exactly the string “Lorem*ipsum” the value must be “Lorem\*ipsum”.
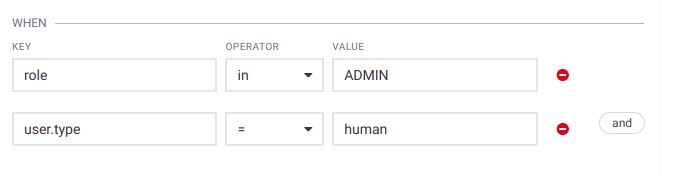
In this case the following claim will match the condition:
{
...
"user": {
   "type": "human"
},
"role": [
   "ADMIN"
],
...
}
As you can see, there is an option to verify if a value exists in a list via the “in” operator. Values can also be embedded in other objects. In this case a dot in the key implies looking into an embedded object.
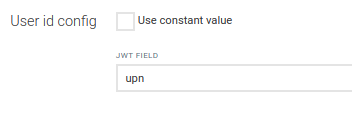
When a user logs in with an access token, the username can be derived from a JWT claim. The claim name can be configured in the User ID configuration window.
Each access token is signed by a signing certificate. Currently there are three options to configure the signing certificates.
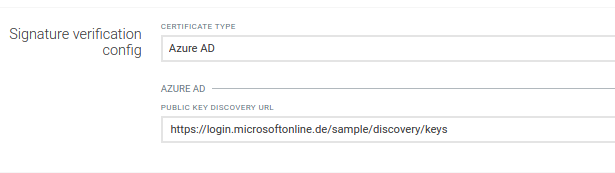
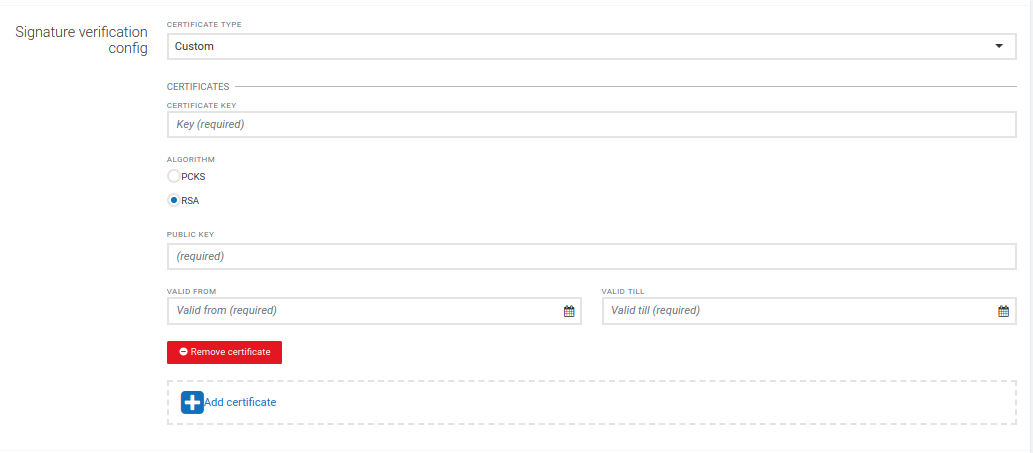
Info: Cumulocity IoT only supports certificates with RSA key, either as a (“n”, “e”) parameters pair or “x5c” certificate chain. Other key types (e.g. Elliptic-curves) are not supported.
Inside some fields you can use placeholders that are resolved by Cumulocity IoT at runtime. Available placeholders are:
| Placeholder | Description |
|---|---|
| clientId | Value of the Client ID field |
| redirectUri | Value of the Redirect URI field |
| code | Code returned by the authorization server in response to authorization request |
| refreshToken | Refresh token returned by the authorization server after token request |
These placeholders can be used in authorization requests, token requests, refresh requests and logout request in the fields: URL, body, headers and request parameters
To use a placeholder in a field, put it inside two curly brackets preceded with a dollar sign:

Placeholders can also be used as a part of text:

Placeholders are not validated for correctness. Any not recognized or misspelled placeholder will be left in text unprocessed.
The integration was successfully verified against Azure AD. The configuration steps are available in https://docs.microsoft.com/en-us/azure/active-directory/develop/v1-protocols-oauth-code.
When configuring your Azure AD, use your full domain address as redirect URI. For the purpose of this document we assume that it is “http://documentation.cumulocity.com/tenant/oauth”. The redirect URI must be set for a web application and not for a single-page application. There are no additional steps on Azure AD required.
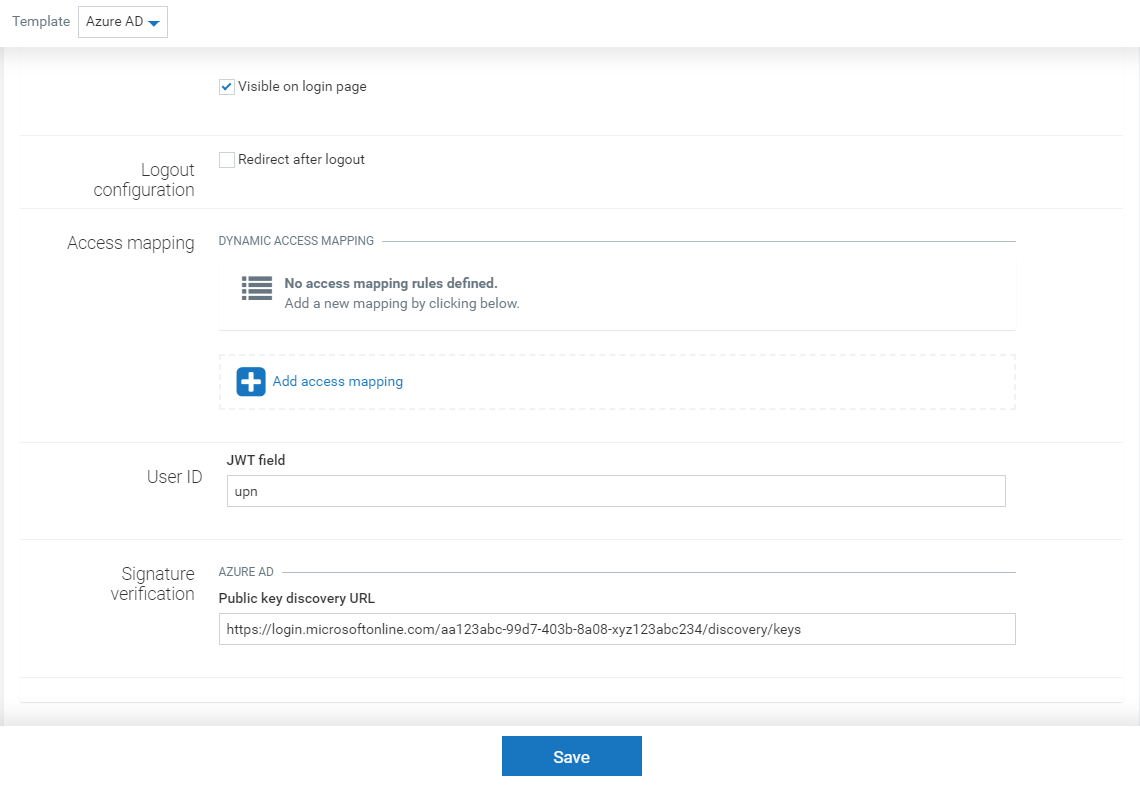
When the “Azure AD” template is selected the configuration panel will look similar to the following:

| Field | Description |
|---|---|
| Azure AD Address | Address of your Azure AD tenant |
| Tenant | Azure AD tenant name |
| Application ID | Application ID |
| Redirect URI | Address of your Cumulocity IoT tenant followed by /tenant/oauth |
| Client secret | Azure AD client secret if applicable |
| Button name | Button name |
| Token issuer | Token issuer value in form of a HTTP address |
Optionally single logout can be configured:

| Field | Description |
|---|---|
| Redirect after logout | Activates single logout by redirecting the user, after logout, to the authorization server logout endpoint |
| Redirect URL | Address to redirect the user to after successful logout from the authorization server |
The second part of the panel is the same as for the “Custom” template, where access mapping, user ID field selection and signature verification address are provided.

It can be particularly helpful to inspect the content of the authorization token sent to the platform as some of its fields contain the information required for the correct configuration described above.
In Administration application, after clicking on Accounts > Audit logs you can filter by the category “Single sign-on” and look for entries “Json web token claims”.
The contexts of the token will be presented in JSON format.

Click Application in the Settings menu to change applications settings.
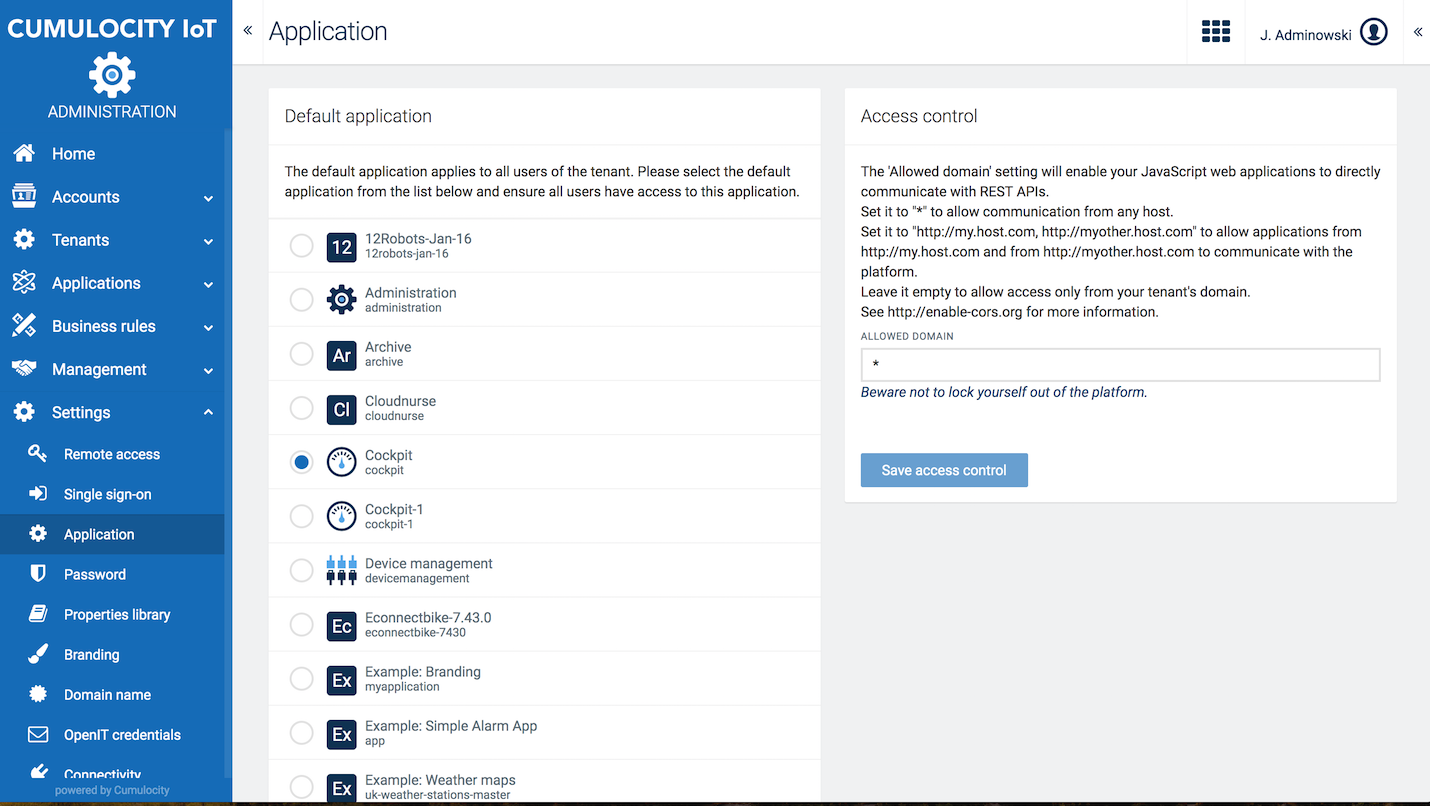
Under Default application, you can select a default application from the list which will apply to all users within the tenant.
Info: All users must have access to this application.
Under Access control, administrators can enable cross-origin resource sharing or “CORS” on the Cumulocity IoT API.
The Allowed Domain setting will enable your JavaScript web applications to directly communicate with REST APIs.
http://my.host.com, http://myother.host.com to allow applications from http://my.host.com and from http://myother.host.com to communicate with the platform.For further information, see http://enable-cors.org.
Click Properties library in the Settings menu, to add custom properties to inventory objects, alarms, events and tenants.
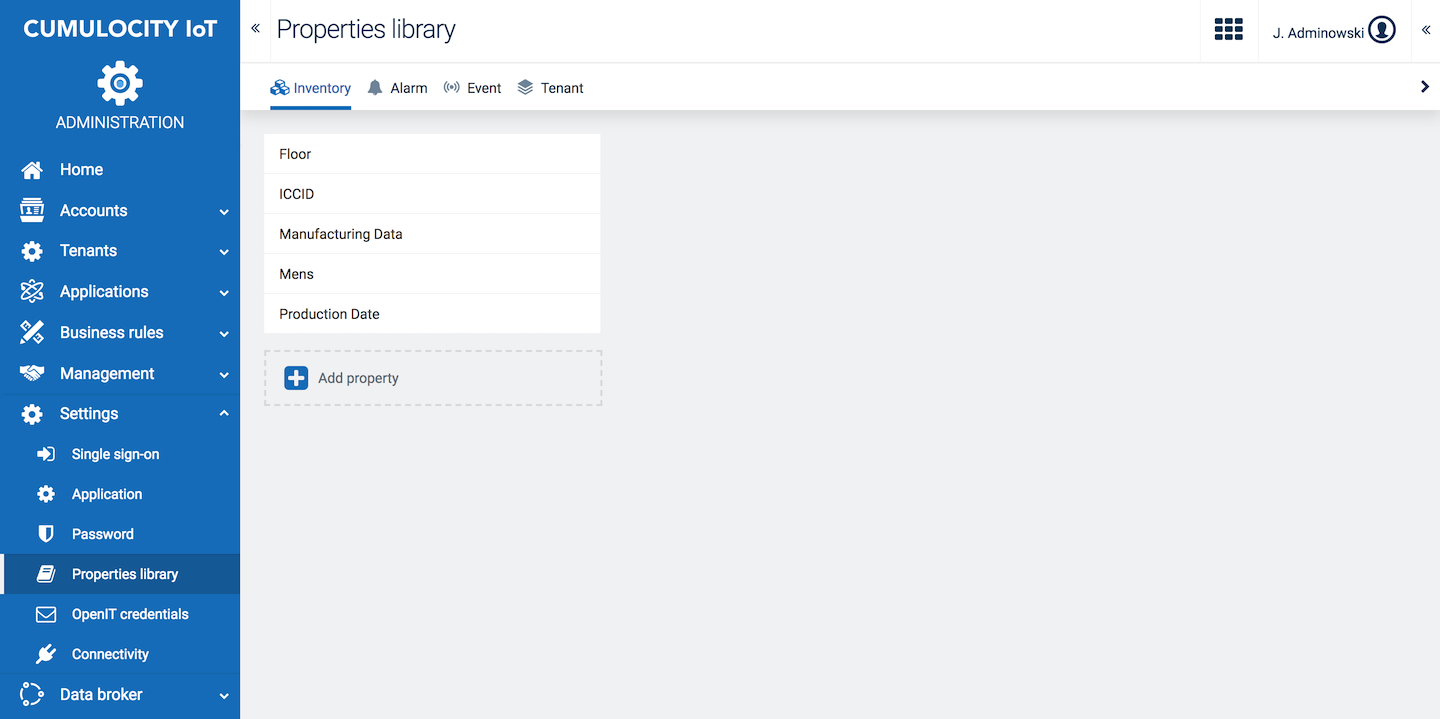
With custom properties, you can extend the data model of Cumulocity IoT built-in objects. You may create the following custom values:
Info: Custom properties are visible to all authenticated users of the tenant, regardless of their inventory role permission.
Select the tab for the desired property and click Add property.
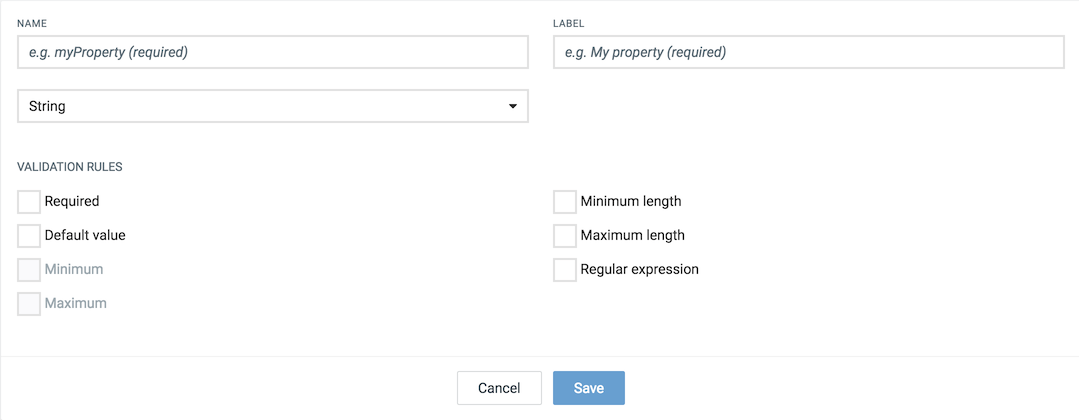
In the resulting dialog box, provide a unique name as identifier and a label for the property and select its data type from the dropdown list.
Additionally, select validation rules for the new property:
| Checkbox | Description |
|---|---|
| Required | If selected, the property needs to be provided, i.e. during alarm creation. Not available if the property type is “Boolean”. |
| Default Value | Provide a default value to be automatically filled in the custom property field. Only available for properties with type “String”. |
| Minimum | Enter a minimum integer value. |
| Maximum | Enter a maximum integer value. |
| Minimum length | Enter the minimum length required for the string. |
| Maximum length | Enter the maximum length required for the string. |
| Regular expression | Add a regular expression which will be required in order to fill the custom property field. |
Click Save to create the new property.
SMS are used throughout the platform for various features like two-factor authentication and user notifications, i.e. on alarms.
By providing your credentials you enable platform features that utilize SMS services.
Click SMS provider in the Settings menu.
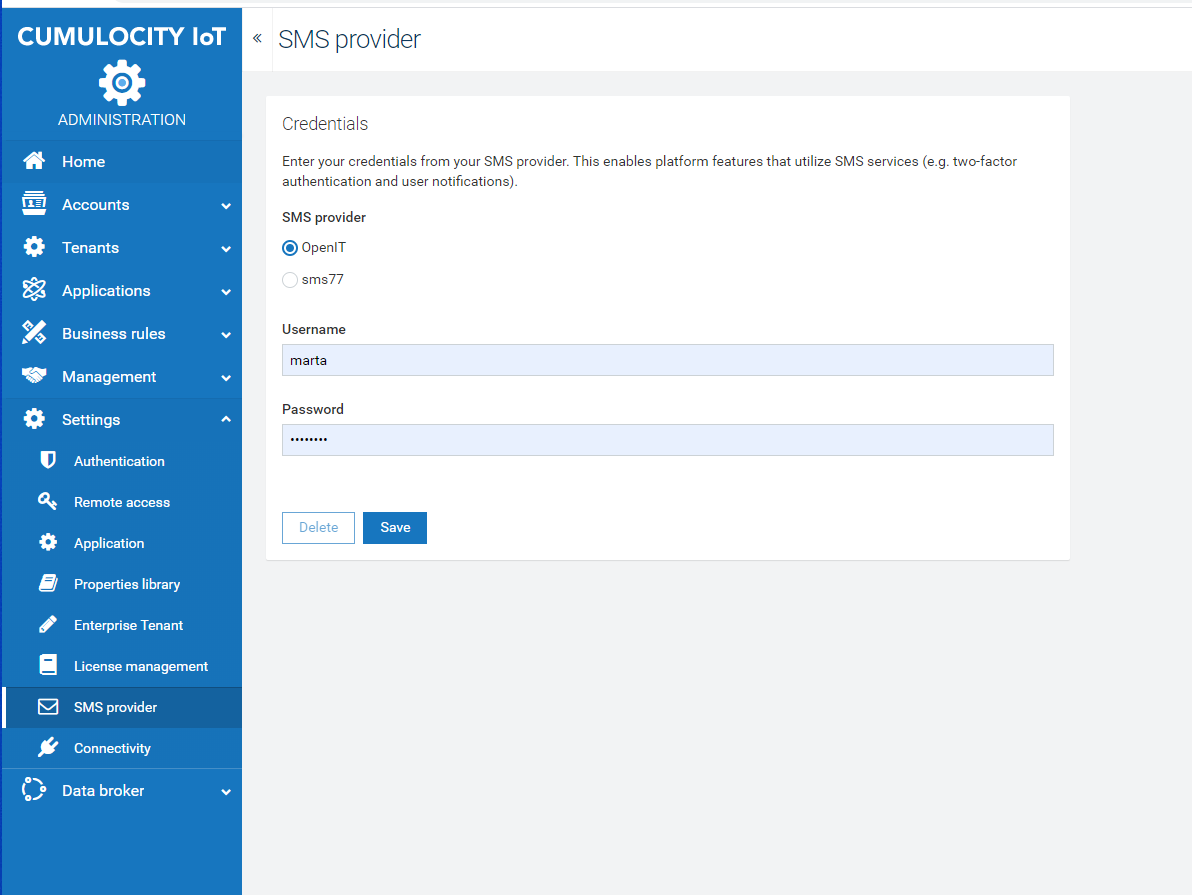
In the SMS provider page, select either OpenIT or sms77 as SMS provider.
Depending on the selected provider, enter the relevant credentials:
Click Save to save your settings.
Info: OpenIT does not serve new customers anymore and is in the process of shutting down their SMS provider business. We therefore recommend you to select sms77 as SMS provider.
In the Connectivity page, you can manage credentials for different providers. In order to add or replace credentials ADMIN permissions are required.
The following provider settings may currently be specified:
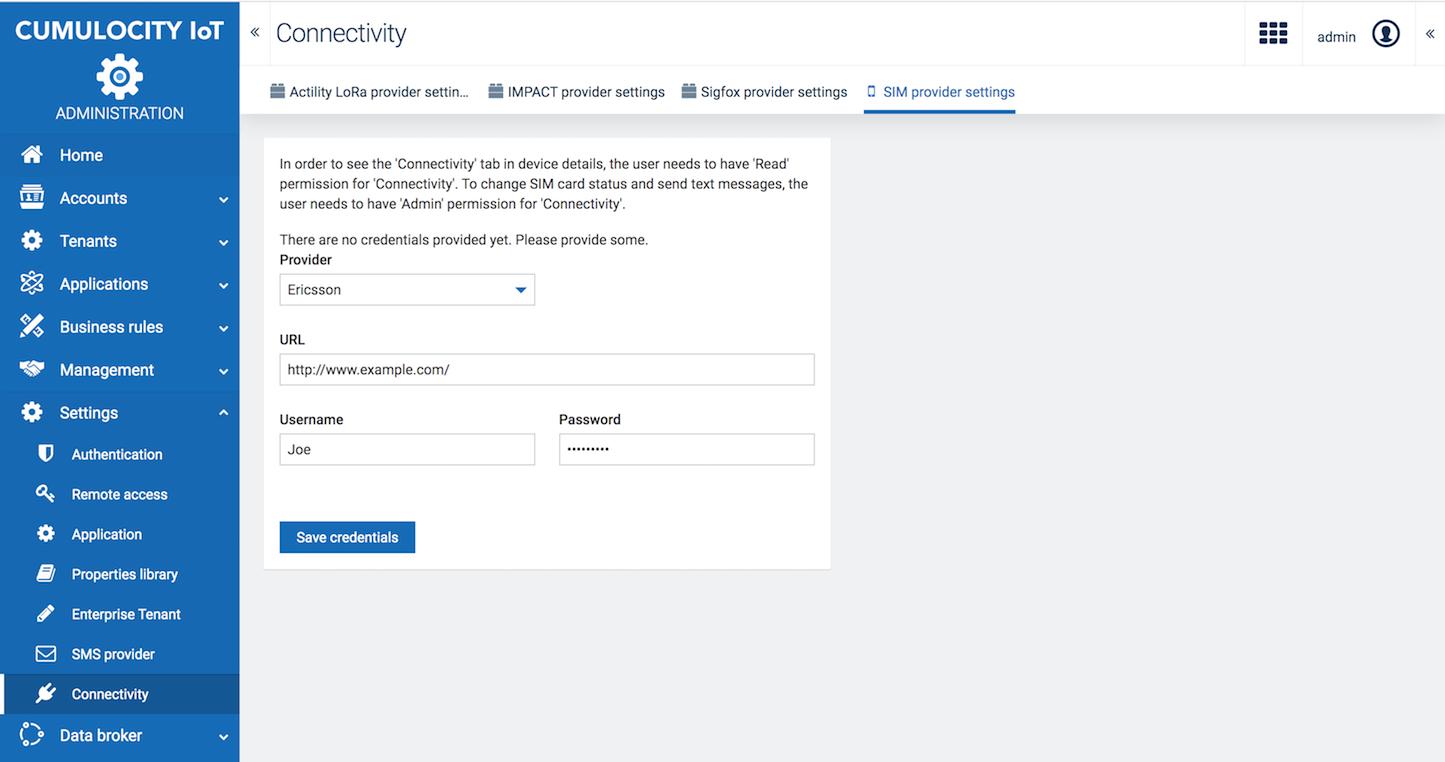
Depending on the provider you have selected, there may be additional fields, which will be explained in the respective agent documentation, see Protocol integration guide.
From the Management tenant, you can configure properties which apply globally to the whole Cumulocity IoT deployment.
Click Configuration in the Settings menu, to access the Configuration page.
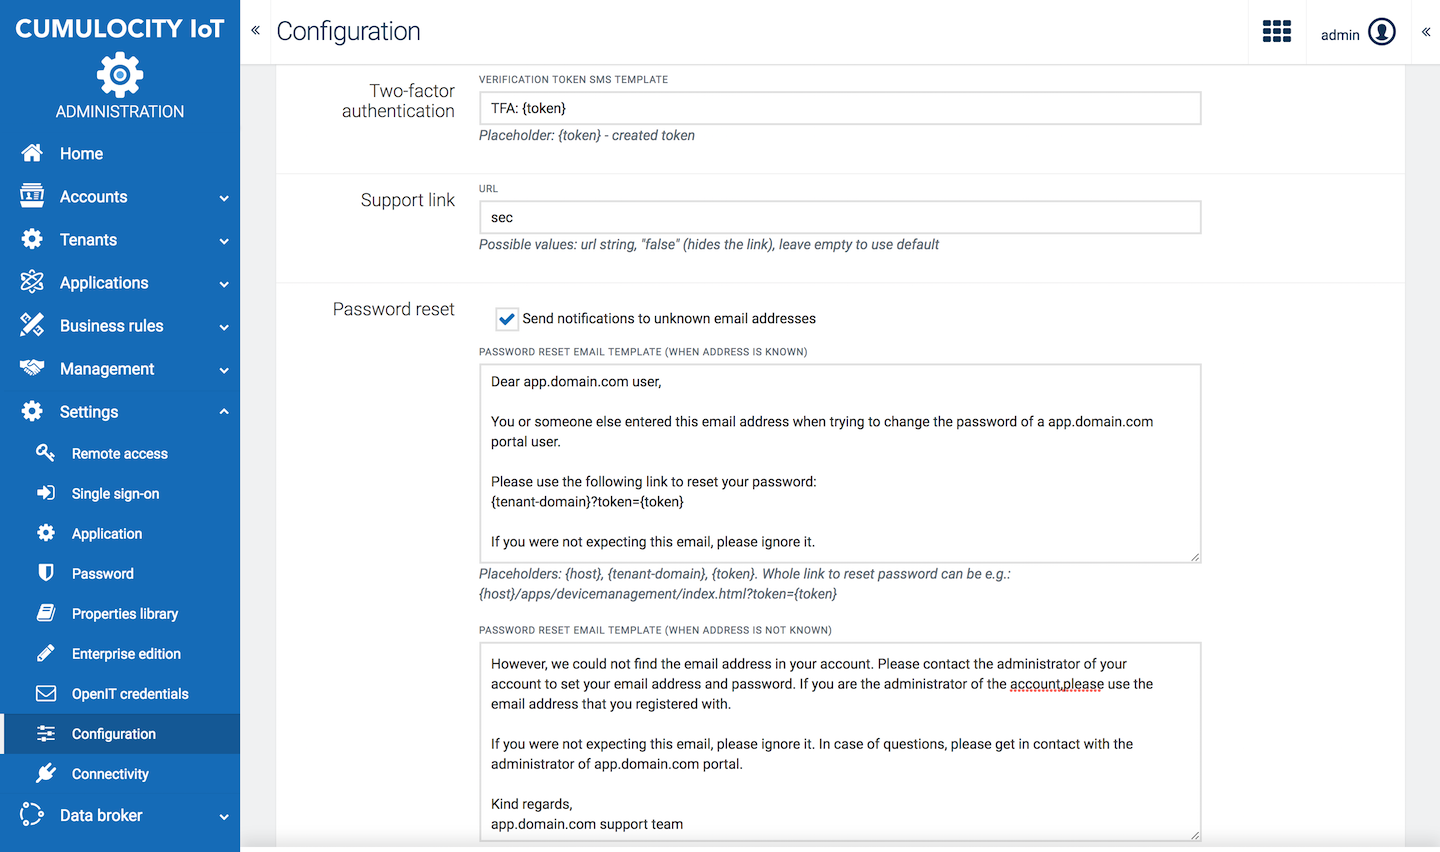
Most of the settings you can configure here are also available in the Enterprise tenant. For details, refer to Enterprise tenant > Customizing your platform.
In addition, the following settings can be configured in the Management tenant only.
In the Passwords section, you can specify password settings like default strength, length or validity for the users in your tenant.
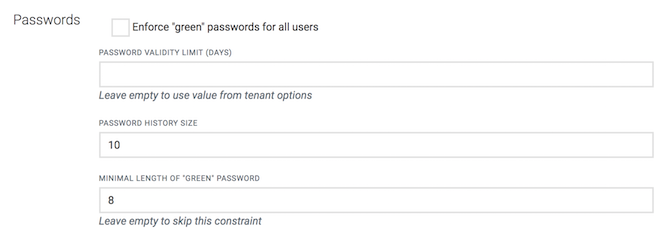
Select the checkbox Enforce “green” passwords for all users to enforce the users in your tenant to use passwords that meet the conditions for “green” passwords, see also Getting started > User options and settings.
In the Support user section you can configure the parameters for the support user access for subtenant users.
This feature enables Cumulocity IoT platform providers (Software AG in case of the public cloud instances or service providers with on-premise installations) to support their customers by accessing their users using a support user. A support user is a user in the Management tenant that has specific permissions, i.e. to access subtenant users in case of any issues. Refer to Support user access for more information.
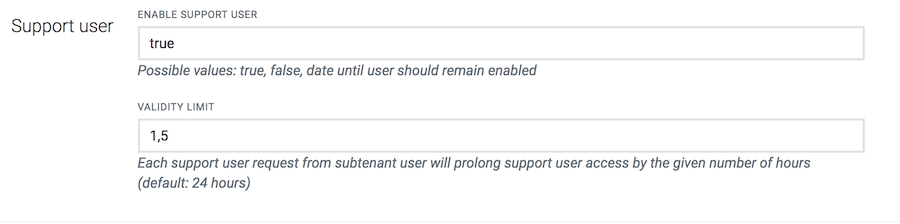
In the field Activate support user, specify if support user access is activated for subtenant users. Possible values you can enter here are:
In the Validity limit field, you can optionally specify the support duration, i.e. for how many hours support user access will be prolonged after each support user request from a subtenant user. Enter a number specifying the number of hours. The default value is 24 hours.
The expiry date-time will be updated based on the duration specified in the Validity limit field, e.g. if the current expiry date-time is 01/09/2018 15:00 and duration has been kept at 24 hours, the enabling support user will update the expiry date to 01/10/2018 15:00.
Details on the status of support requests and support user access for a tenant can be found in the Properties tab of the tenant, see Enterprise Tenant > Managing tenants.
A support user is a user in the Management tenant with specific permissions. This user can log in to the target tenant and impersonate the target user.
To configure a user in the Management tenant as support user, you need to assign the relevant roles to the user. This can either be done by using a global role or by inventory roles.
Using a global role
Using inventory roles
Using inventory roles, you can selectively assign a support user for specific subtenants.
Info: The support user feature does not work when the support user has two-factor authentication enabled, but no phone number is provided. The phone number has to be provided first, in order to login as a support user.