Overview
In this section, Hello MQTT provides an easy introduction to the Cumulocity MQTT protocol using a MQTT cross platform application.
It also contains examples on how to use the MQTT client with Cumulocity employing pre-defined messages (called “static templates”) using C, Java, JavaScript and Python.
Hello MQTT
In this tutorial, you will learn how to use MQTT with Cumulocity using pre-defined messages (called “static templates”).
Prerequisites
In order to follow this tutorial, check the following prerequisites:
- You have a valid tenant, a user and a password in order to access Cumulocity.
- You have installed MQTTBox or a similar MQTT tool.
Info: The screenshots in the tutorial use MQTTBox. Other tools may look slightly different.
Talking MQTT
Configuring the MQTT connection
To configure the MQTT connection, you need to pass the following connection parameters (see the screenshot below).
- Hostname: For this example, use TCP and Port 1883. You also need to pass the URL to your tenant (e.g. mqtt.cumulocity.com).
- Client ID: You can use the “Generate a random ID” button (most tools will offer such a button) or provide one yourself. This ID will be linked to your device. To reconnect to the same device, use the same ID.
- Username: You need to enter your tenant ID and username separated by a slash (tenantID/username). For this example, you can use the same username you use for login to Cumulocity.
- Password: The password of the user.
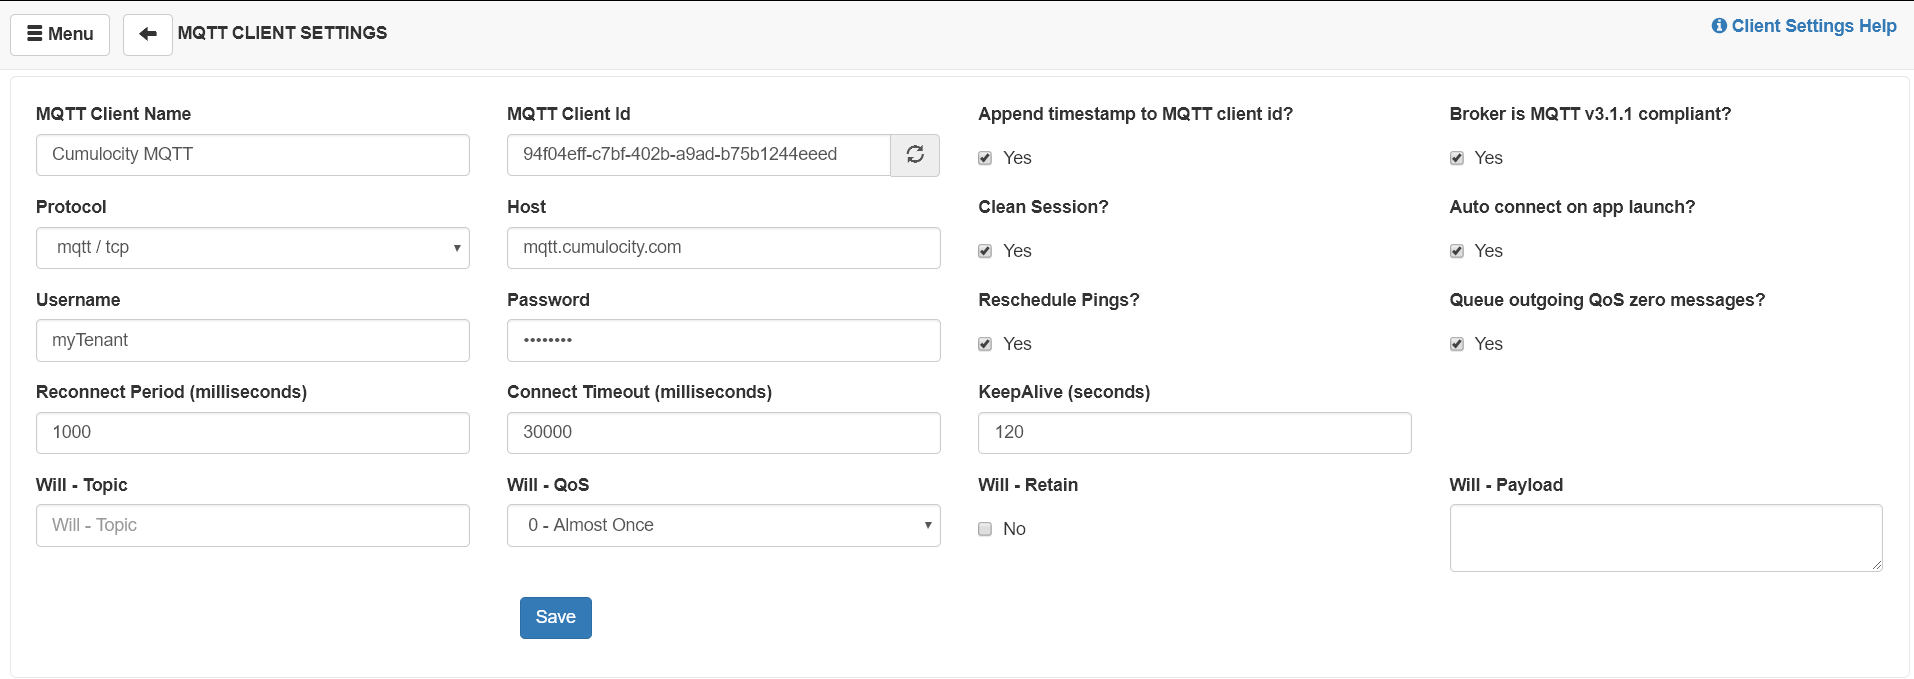
The other configurations like “clean session” are not important for this example. You can change them to your needs. After clicking Save, you will see a screen similar to the following screenshot.
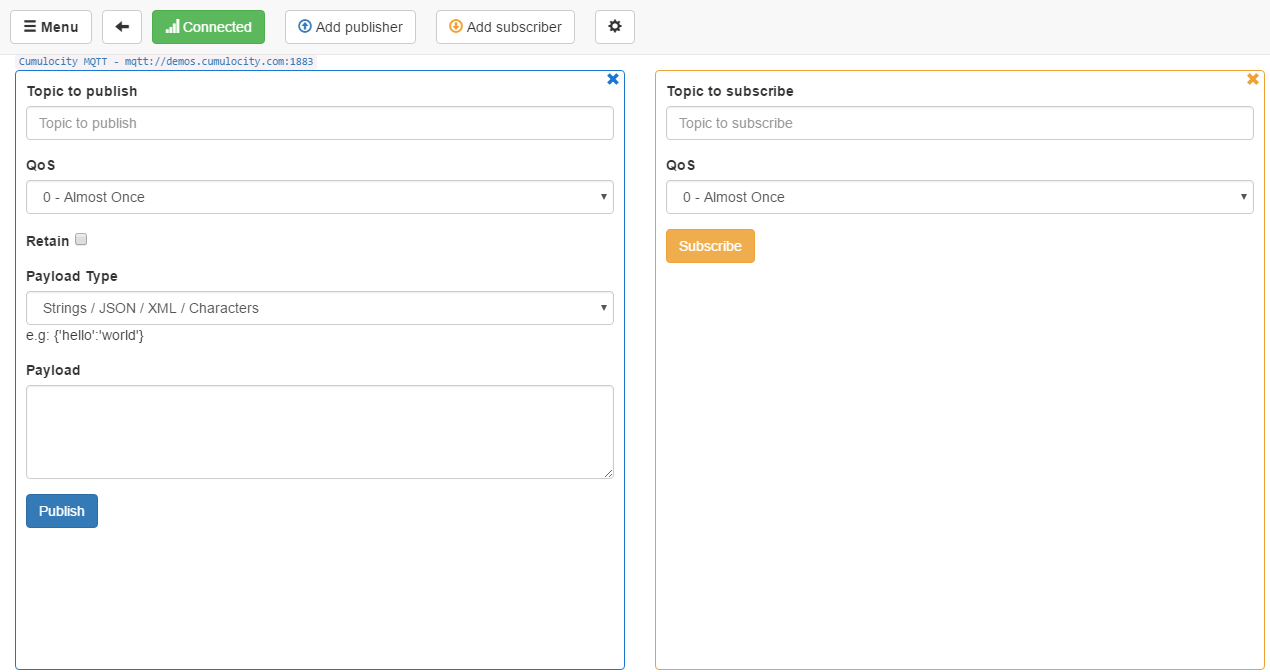
If there is a blue button on the top bar with a label Not Connected, verify your configuration (especially username and password). If the button is green, you successfully established an MQTT connection to Cumulocity.
Sending data
All MQTT publish messages in this tutorial will be sent to the topic s/us. This is the topic used for Cumulocity’s pre-provided static templates.
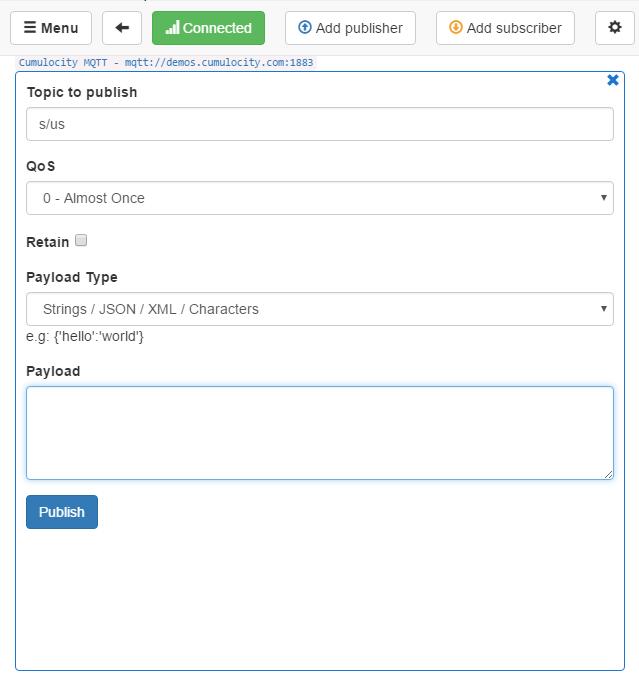
Creating the device
The first message sent will create our device. Although the static templates support automatic device creation, in this example we will create the device manually. The template 100 will create a new device. It can be used with two optional parameters (deviceName, deviceType).
100,My first MQTT device,c8y_MQTTdevice
Afterwards, you will find this device in the Device Management application as a new device. If you switch to the Identity tab of the device you will notice that there was an identity created automatically to link the device to the MQTT ClientId.
Besides the name and the type, the device does not have more information, so master data needs to be added.
You can use multiple static templates per publishing separated by a line break (one template per row). This feature is used to set the hardware and the required interval for the device in a single published message.
The hardware can be set with the template 110. It can take 3 parameters (serialNumber, model, revision). Optional parameters in static templates can be left empty if you don’t want to set them. For the hardware all parameters are optional.
The required interval can be set with the template 117 and just takes a single parameter (the interval in minutes).
110,,MQTT test model,1.2.3
117,10
After a reload of the Info page of your device in the Device Management application, you should see the information we just added.
Creating measurements
Now the device has some master data and we can start sending some measurements. There are a couple of measurements that can be created directly by using a static template:
- 210: Signal strength measurement
- 211: Temperature measurement
- 212: Battery measurement
The temperature and battery measurement just take the value and time as parameters. For the signal strength, you can pass two values (RSSI and BER).
Passing timestamps in the Cumulocity MQTT implementation is always optional. If you don’t pass them along, the server will automatically create a timestamp with the current server time.
We will make use of this feature in this example. Also, if you don’t set the last parameters, you do not need to enter the remaining commas.
210,-87
211,24
212,95
Besides the measurements above, we can also use the template 200 to create a more custom measurement. It will take the measurement fragment, series, value, unit and time as its parameters.
200,myCustomTemperatureMeasurement,fahrenheit,75.2,F
After a reload in the Device Management application, you should see 4 graphs with the newly added measurements in the Measurements tab of your device.
Creating alarms
Now we will create some alarms for this device. There are templates to create alarms for the 4 alarm severities:
- 301: CRITICAL
- 302: MAJOR
- 303: MINOR
- 304: WARNING
Each of them note a type (which is mandatory), a text and a time (both optional).
301,gpio_critical,There is a GPIO alarm
304,simple_warning
The alarm list of your device should now contain one critical alarm and one warning.
Note that we did not set any text for the warning, so it was created with a default alarm text.
Now we will clear the critical alarm again. To achieve this, we use the template 306 which refers to the type of the alarm that should be cleared.
306,gpio_critical
The critical alarm should be cleared afterwards.
Note that you did not have to handle any alarm IDs with the MQTT implementation. Cumulocity will take over this part so that the device communication can be as easy as possible.
Creating events
Next, we will create some location events for the device. If you wish, you may use the LatLong website to get the latitude and longitude of your city.
The template 401 lets you create location events and takes latitude, longitude, altitude, accuracy and the time as parameters, but for now we will just use the first two.
401,51.227741,6.773456
In the Device Management application, you can see one event in the event list but the location has not been updated. This is because on REST these are different requests. Instead of the template 401, you can use the template 402 in MQTT. It works exactly the same as 401 but additionally it also updates the position of the device itself.
402,51.227741,6.773456
Now you should see both the Location and the Tracking tab in the device with the Location tab having the same latitude and longitude as the last location event.
Receiving data
So far we have only used MQTT to send data from the client to the server. Now we will send data from the server to the client.
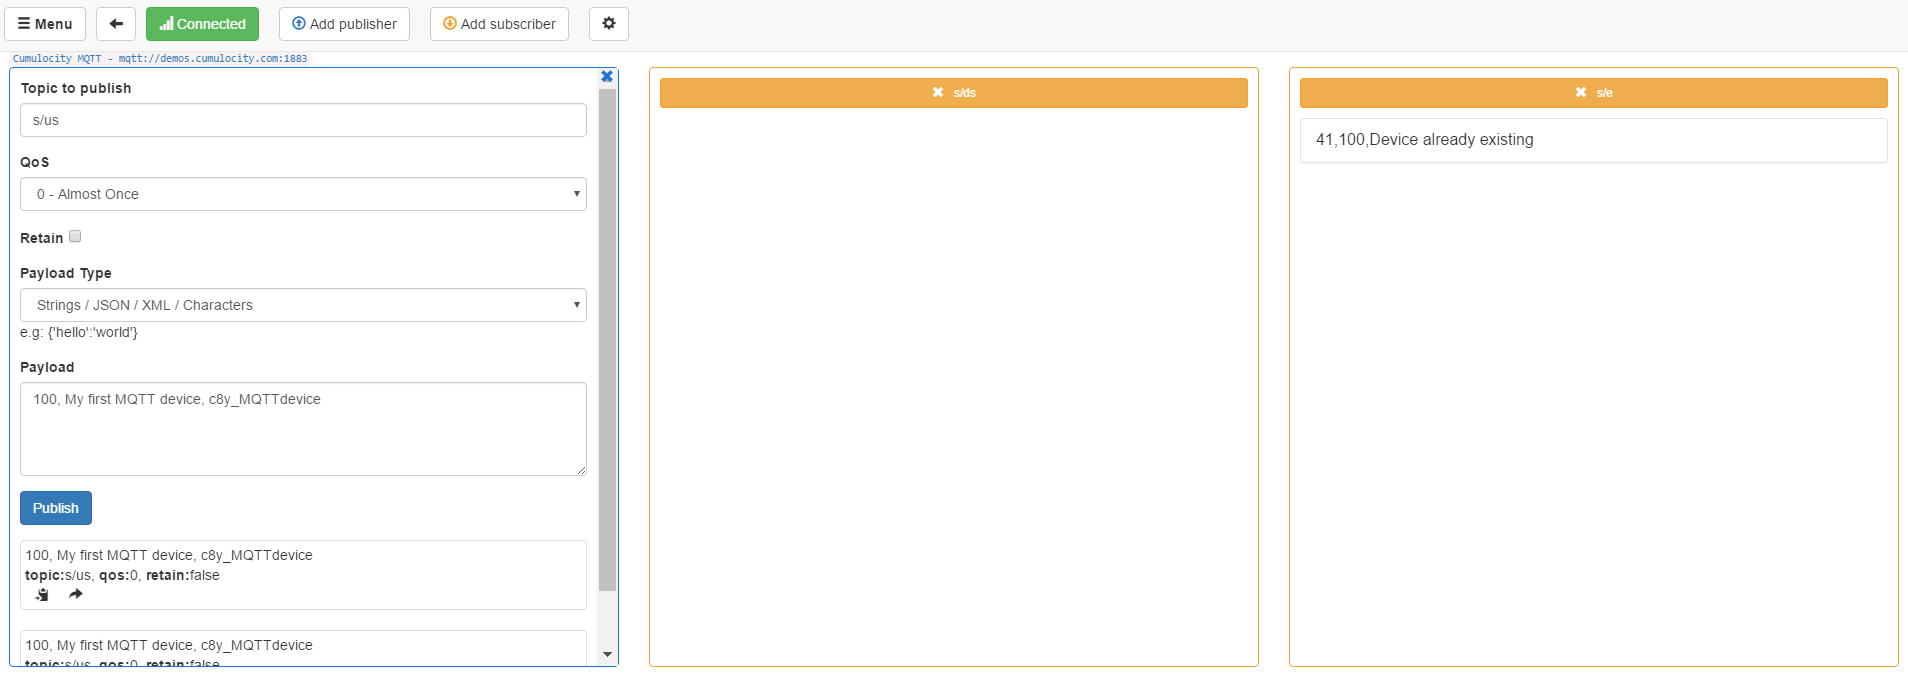
To achieve this, we first need to subscribe to the responsible topic. We will do two subscriptions:
- s/ds : This will subscribe to the static operation templates for the device
- s/e : This will subscribe to an error topic that can be used for debugging
You can enter both topics after another in the Subscribe field and click Subscribe. The QoS selection does not matter for this example.
Afterwards, your MQTTBox should look like this:
Receiving operations
At the current state, the UI does not show any tabs for operations. Up to this point, it was unknown what exactly the device supports, but the list of supported operations can be modified with the template 114. A list of supported operations can be added here.
We will add support for the configuration and shell.
114,c8y_Command,c8y_Configuration
After reloading the UI, the two new tabs will appear (Configuration and Shell).
We can now create a shell command from the UI and click Execute.
In the MQTTBox, you should now have received a new message for the s/ds subscription.
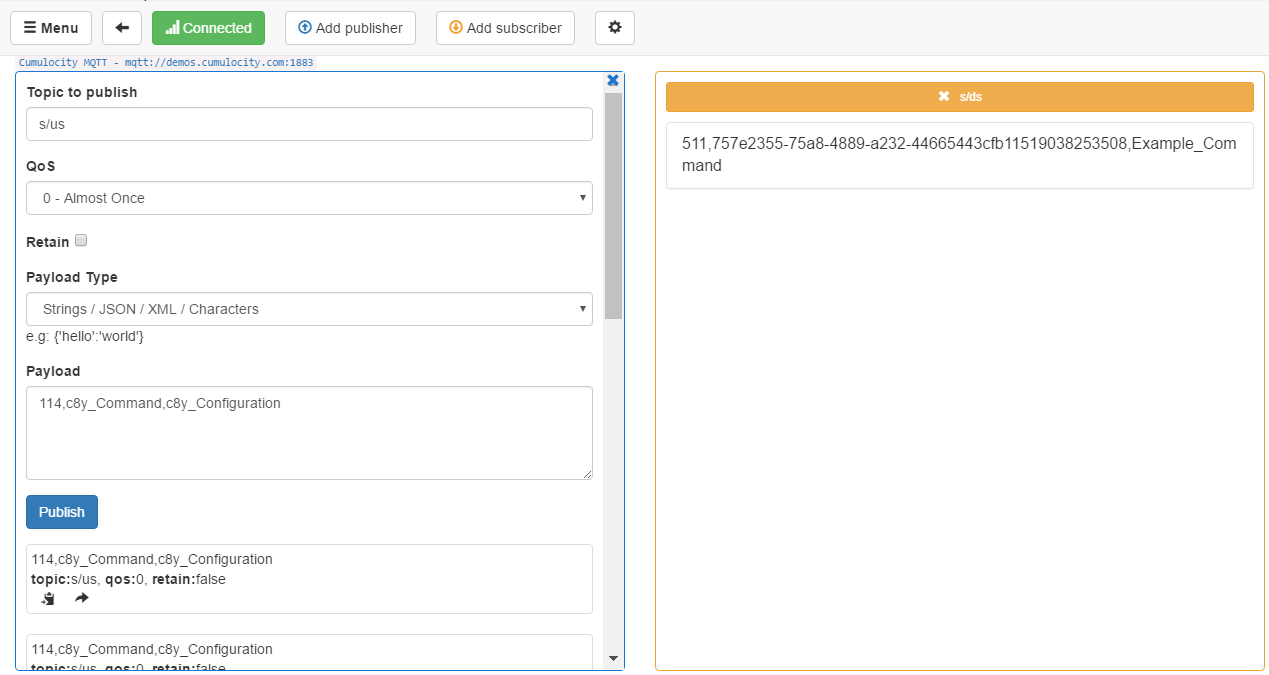
The 511 is indicating what kind of operation we received (in this case c8y_Command). This will be followed by the deviceIdentifier to locate the device with the dedicated operation. This is required if you have a hierarchy with multiple children. In such case, you need to know for which of the children the operation was dedicated. Finally, you have the operation specific parameters, which in the case of c8y_Command is only the command text.
After receiving the operation, we can start executing it to initiate the client’s handling the operation. Similar to changing the status of an alarm, you can add the type of operation to the template.
501,c8y_Command
After finishing the handling, the operation can be set to successful with the template 503.
Besides the operation type, this operation can also take additional parameters based on what kind of operation it was. We can return a result for the c8y_Command.
503,c8y_Command,Everything went fine
Learning from errors
The topic s/e can help you debugging in case something went wrong. For instance, if we try to send
999,I made this up
we can see a message on the topic because the template 999 is unknown.
40,999,No static template for this message id
Hello MQTT C
In this tutorial, you will learn how to use MQTT client in C with Cumulocity using pre-defined messages (called “static templates”).
Prerequisites
In order to follow this tutorial, check the following prerequisites:
- You have a valid tenant, a user, and a password in order to access Cumulocity.
- Verify that you have a gcc compiler installed:
$ gcc --version
gcc (Ubuntu 5.4.0-6ubuntu1~16.04.4) 5.4.0 20160609
Copyright (C) 2015 Free Software Foundation, Inc.
This is free software; see the source for copying conditions.  There is NO
warranty; not even for MERCHANTABILITY or FITNESS FOR A PARTICULAR PURPOSE.
- Download, compile and install the MQTT C Paho Client. You will find more details about Paho on the Paho website.
Developing the “Hello, MQTT world!” client
To develop a very simple “Hello, world!” MQTT client for Cumulocity, you need to
- create the application,
- build and run the application.
Creating the application
Create a source file, for example hello_mqtt.c with the following content:
#include "stdlib.h"
#include "string.h"
#include "unistd.h"
#include "MQTTClient.h"

#define ADDRESS     "<<serverUrl>>"
#define CLIENTID    "<<clientId>>"

void publish(MQTTClient client, char* topic, char* payload) {
    MQTTClient_message pubmsg = MQTTClient_message_initializer;
    pubmsg.payload = payload;
    pubmsg.payloadlen = strlen(pubmsg.payload);
    pubmsg.qos = 2;
    pubmsg.retained = 0;
    MQTTClient_deliveryToken token;
    MQTTClient_publishMessage(client, topic, &pubmsg, &token);
    MQTTClient_waitForCompletion(client, token, 1000L);
    printf("Message '%s' with delivery token %d delivered\n", payload, token);
}

int on_message(void *context, char *topicName, int topicLen, MQTTClient_message *message) {
    char* payload = message->payload;
    printf("Received operation %s\n", payload);
    MQTTClient_freeMessage(&message);
    MQTTClient_free(topicName);
    return 1;
}

int main(int argc, char* argv[]) {
    MQTTClient client;
    MQTTClient_create(&client, ADDRESS, CLIENTID, MQTTCLIENT_PERSISTENCE_NONE, NULL);
    MQTTClient_connectOptions conn_opts = MQTTClient_connectOptions_initializer;
    conn_opts.username = "<<tenant>>/<<username>>";
    conn_opts.password = "<<password>>";

    MQTTClient_setCallbacks(client, NULL, NULL, on_message, NULL);

    int rc;
    if ((rc = MQTTClient_connect(client, &conn_opts)) != MQTTCLIENT_SUCCESS) {
        printf("Failed to connect, return code %d\n", rc);
        exit(-1);
    }
    //create device
    publish(client, "s/us", "100,C MQTT,c8y_MQTTDevice");
    //set hardware information
    publish(client, "s/us", "110,S123456789,MQTT test model,Rev0.1");
    //listen for operation
    MQTTClient_subscribe(client, "s/ds", 0);

    for (;;) {
        //send temperature measurement
        publish(client, "s/us", "211,25");
        sleep(3);
    }
    MQTTClient_disconnect(client, 1000);
    MQTTClient_destroy(&client);
    return rc;
}
Replace <<clientId>>, <<serverUrl>>, <<tenant>>, <<username>> and <<password>> with your data.
The Cumulocity MQTT protocol supports both unsecured TCP and secured SSL connections (e.g. tcp://mqtt.cumulocity.com:1883 or ssl://mqtt.cumulocity.com:8883), so as the <<serverUrl>> you can pick the one which fits for you.
When using SSL remember to configure MQTTClient_SSLOptions and set it in the MQTTClient_connectOptions.
What does the code in main do?
- Configure an MQTT connection.
- Register a
on_messagecallback function which will print incoming messages. - Connect with Cumulocity via an MQTT protocol.
- Create a new device with
C MQTTname andc8y_MQTTDevicetype. - Update the device hardware information by putting a
"S123456789"serial, a"MQTT test model"model and a"Rev0.1"revision. - Subscribe to the static operation templates for the device - this will result in an
on_messagemethod call every time a new operation is created. - Send temperature measurement every 3 seconds.
What does the code in publish do?
- Create a new MQTT message and set a payload.
- Publish message via MQTT protocol.
- Wait maximum 1 second for a message delivered ACK from the server.
Note that the subscription is established after the device creation, otherwise if there is no device for a given clientId the server will not accept it.
Building and running the application
To build the application, enter
$ gcc hello_mqtt.c -o hello_mqtt -lpaho-mqtt3c
To run the application, enter
$ ./hello_mqtt
Message '100,C MQTT,c8y_MQTTDevice' with delivery token 1 delivered
...
After starting the application, you should see a new device in the Device Management application, listed in All devices.
Additionally, if there will be a new operation created for this device (for example c8y_Restart), information about it will be printed to the console.
Improving the agent
Now that you have done your first step, check out the section Hello MQTT to learn more about Cumulocity MQTT and improve your application.
Hello MQTT Java
In this tutorial, you will learn how to use the Java MQTT client with Cumulocity using pre-defined messages (called “static templates”).
Prerequisites
In order to follow this tutorial, check the following prerequisites:
- You have a valid tenant, a user and a password in order to access Cumulocity.
- Verify that you have Maven 3 and Java 7 installed. This example is also compatible with Java 8.
$ mvn -v
Maven home: /Library/Maven/apache-maven-3.6.0
Java version: 1.8.0_201, vendor: Oracle Corporation, runtime: /Library/Java/JavaVirtualMachines/jdk1.8.0_201.jdk/Contents/Home/jre
Default locale: en_GB, platform encoding: UTF-8
OS name: "mac os x", version: "10.14.2", arch: "x86_64", family: "mac"
Maven can be downloaded from the Maven website.
Developing the “Hello, MQTT world!” client
To develop a very simple “Hello, world!” MQTT client for Cumulocity, you need to
- create a Maven project,
- add a dependency to the MQTT Java client library to the pom.xml (in this example we will use Paho Java Client),
- create a Java application,
- build and run the Java application.
Creating a Maven project
To create a plain Java project with Maven, execute the following command:
$ mvn archetype:generate -DgroupId=c8y.example -DartifactId=hello-mqtt-java -DarchetypeArtifactId=maven-archetype-quickstart -DinteractiveMode=false
This will create a folder hello-mqtt-java in the current directory with a skeleton structure for your project.
Adding the MQTT Java client library
Edit the pom.xml in the hello-mqtt-java folder. Add a dependency to the MQTT Paho Java Client.
<dependency>
    <groupId>org.eclipse.paho</groupId>
    <artifactId>org.eclipse.paho.client.mqttv3</artifactId>
    <version>1.2.0</version>
</dependency>
Creating a Java application
Edit the App.java file in the folder hello-mqtt-java/src/main/java/c8y/example with the following content:
package c8y.example;

import org.eclipse.paho.client.mqttv3.*;
import java.util.concurrent.*;

public class App {

    public static void main(String[] args) throws Exception {

        // client, user and device details
        final String serverUrl   = "tcp://mqtt.cumulocity.com";     /* ssl://mqtt.cumulocity.com:8883 for a secure connection */
        final String clientId    = "my_mqtt_java_client";
        final String device_name = "My Java MQTT device";
        final String tenant      = "<<tenant>>";
        final String username    = "<<username>>";
        final String password    = "<<password>>";

        // MQTT connection options
        final MqttConnectOptions options = new MqttConnectOptions();
        options.setUserName(tenant + "/" + username);
        options.setPassword(password.toCharArray());

        // connect the client to Cumulocity
        final MqttClient client = new MqttClient(serverUrl, clientId, null);
        client.connect(options);

        // register a new device
        client.publish("s/us", ("100," + device_name + ",c8y_MQTTDevice").getBytes(), 2, false);

        // set device's hardware information
        client.publish("s/us", "110,S123456789,MQTT test model,Rev0.1".getBytes(), 2, false);

        // add restart operation
        client.publish("s/us", "114,c8y_Restart".getBytes(), 2, false);

        System.out.println("The device \"" + device_name + "\" has been registered successfully!");

        // listen for operations
        client.subscribe("s/ds", new IMqttMessageListener() {
            public void messageArrived (final String topic, final MqttMessage message) throws Exception {
                final String payload = new String(message.getPayload());

                System.out.println("Received operation " + payload);
                if (payload.startsWith("510")) {
                    // execute the operation in another thread to allow the MQTT client to
                    // finish processing this message and acknowledge receipt to the server
                    Executors.newSingleThreadScheduledExecutor().execute(new Runnable() {
                        public void run() {
                            try {
                                System.out.println("Simulating device restart...");
                                client.publish("s/us", "501,c8y_Restart".getBytes(), 2, false);
                                System.out.println("...restarting...");
                                Thread.sleep(TimeUnit.SECONDS.toMillis(5));
                                client.publish("s/us", "503,c8y_Restart".getBytes(), 2, false);
                                System.out.println("...done...");
                            } catch (MqttException e) {
                                e.printStackTrace();
                            } catch (InterruptedException e) {
                                e.printStackTrace();
                            }
                        }
                    });
                }
            }
        });

        // generate a random temperature (10º-20º) measurement and send it every 7 seconds
        Executors.newSingleThreadScheduledExecutor().scheduleWithFixedDelay(new Runnable() {
            public void run () {
                try {
                    int temp = (int) (Math.random() * 10 + 10);

                    System.out.println("Sending temperature measurement (" + temp + "º) ...");
                    client.publish("s/us", new MqttMessage(("211," + temp).getBytes()));
                } catch (MqttException e) {
                    e.printStackTrace();
                }
            }
        }, 1, 7, TimeUnit.SECONDS);
    }
}
Replace serverUrl, clientId and device_name as needed. Do not forget to specify the user credentials setting values for tenant, username and password.
Cumulocity MQTT protocol supports both unsecured TCP and secured SSL connections (i.e. tcp://mqtt.cumulocity.com:1883 or ssl://mqtt.cumulocity.com:8883), so you can pick the one which fits for you and use it in serverUrl.
What does the code in main do?
- Configure the MQTT connection.
- Connect with Cumulocity via a MQTT protocol.
- Create a new device with a name (
device_name) and a type (c8y_MQTTDevice). - Update the device hardware information by putting a
"S123456789"serial, a"MQTT test model"model and a"Rev0.1"revision. - Subscribe to the static operation templates for the device and print all received operations to the console. In case of a c8y_Restart operation, simulate a device restart.
- Create a new thread which sends temperature measurement every 7 seconds.
Note that the subscription is established after the device creation, otherwise if there is no device for a given clientId, the server will not accept it.
Building and running the application
Use the following commands to build the application:
$ cd hello-mqtt-java
$ mvn clean install
...
[INFO]
[INFO] --- maven-jar-plugin:2.4:jar (default-jar) @ hello-mqtt-java ---
[INFO] Building jar: /home/schm/Pulpit/hello-mqtt-java/target/hello-mqtt-java-1.0-SNAPSHOT.jar
[INFO]
[INFO] --- maven-install-plugin:2.4:install (default-install) @ hello-mqtt-java ---
[INFO] Installing /home/schm/Pulpit/hello-mqtt-java/target/hello-mqtt-java-1.0-SNAPSHOT.jar to /home/schm/.m2/repository/c8y/example/hello-mqtt-java/1.0-SNAPSHOT/hello-mqtt-java-1.0-SNAPSHOT.jar
[INFO] Installing /home/schm/Pulpit/hello-mqtt-java/pom.xml to /home/schm/.m2/repository/c8y/example/hello-mqtt-java/1.0-SNAPSHOT/hello-mqtt-java-1.0-SNAPSHOT.pom
[INFO] ------------------------------------------------------------------------
[INFO] BUILD SUCCESS
[INFO] ------------------------------------------------------------------------
[INFO] Total time: 2.642 s
[INFO] Finished at: 2017-03-14T09:16:25+01:00
[INFO] Final Memory: 14M/301M
[INFO] ------------------------------------------------------------------------
and this command to run it:
$ mvn exec:java -Dexec.mainClass="c8y.example.App"
...
[INFO]
[INFO] ------------------------------------------------------------------------
[INFO] Building hello-mqtt-java 1.0-SNAPSHOT
[INFO] ------------------------------------------------------------------------
[INFO]
[INFO] --- exec-maven-plugin:1.6.0:java (default-cli) @ hello-mqtt-java ---
Received operation 510,123456789
After starting the application, you should see a new registered device in the Device Management application, listed in All devices. In the Measurements tab, you will see the temperature measurements being sent by your client.
Additionally, if there will be a new operation created for this device (e.g. c8y_Restart), information about it will be printed to the console.
Improving the agent
Now that you have done your first step, check out the Section Hello MQTT to learn more about Cumulocity MQTT and improve your application.
Hello MQTT browser-based
In this tutorial, you will learn how to use the browser-based MQTT client with Cumulocity using pre-defined messages (called “static templates”).
Prerequisites
In order to follow this tutorial, check the following prerequisites:
- You have a valid tenant, a user, and a password in order to access Cumulocity.
Developing the “Hello, MQTT world!” client
To develop a very simple “Hello, world!” MQTT client for Cumulocity, you need to
- create an HTML file and include the MQTT JavaScript client (in this example we will use Paho JavaScript Client),
- create a JavaScript application,
- run the application.
Creating a JavaScript application
Create an HTML file, for example hello_mqtt_js.html with the following content:
<!DOCTYPE html>
<html>
<head>
    <meta charset="utf-8">
    <meta http-equiv="X-UA-Compatible" content="IE=edge">
    <title>Hello MQTT World</title>
    <meta name="viewport" content="width=device-width, initial-scale=1">
    <script src="https://cdnjs.cloudflare.com/ajax/libs/paho-mqtt/1.0.1/mqttws31.min.js"></script>
    <script src="main.js" defer></script>
</head>
<body>
    <div id="logger"></div>
</body>
</html>
Create a JavaScript file main.js with the following content:
// client, user and device details
var serverUrl   = "ws://mqtt.cumulocity.com/mqtt";     /* wss://mqtt.cumulocity.com/mqtt for a secure connection */
var clientId    = "my_mqtt_js_client";
var device_name = "My JS MQTT device";
var tenant      = "<<tenant>>";
var username    = "<<username>>";
var password    = "<<password>>";

var undeliveredMessages = [];
var temperature = 25;

// configure the client to Cumulocity
var client = new Paho.MQTT.Client(serverUrl, clientId);

// display all incoming messages
client.onMessageArrived = function (message) {
    log('Received operation "' + message.payloadString + '"');
    if (message.payloadString.indexOf("510") == 0) {
        log("Simulating device restart...");
        publish("s/us", "501,c8y_Restart");
        log("...restarting...");
        setTimeout(function() {
            publish("s/us", "503,c8y_Restart");
        }, 1000);
        log("...done...");
    }
};

// display all delivered messages
client.onMessageDelivered = function onMessageDelivered (message) {
    log('Message "' + message.payloadString + '" delivered');
    var undeliveredMessage = undeliveredMessages.pop();
    if (undeliveredMessage.onMessageDeliveredCallback) {
        undeliveredMessage.onMessageDeliveredCallback();
    }
};

function createDevice () {
    // register a new device
    publish("s/us", "100," + device_name + ",c8y_MQTTDevice", function() {
        // set hardware information
        publish("s/us", "110,S123456789,MQTT test model,Rev0.1", function() {
            publish('s/us', '114,c8y_Restart', function() {
                log('Enable restart operation support');
                //listen for operation
                client.subscribe("s/ds");
            })

            // send temperature measurement
            setInterval(function() {
                publish("s/us", '211,'+temperature);
                temperature += 0.5 - Math.random();
            }, 3000);
        });
    });
}

// send a message
function publish (topic, message, onMessageDeliveredCallback) {
    message = new Paho.MQTT.Message(message);
    message.destinationName = topic;
    message.qos = 2;
    undeliveredMessages.push({
        message: message,
        onMessageDeliveredCallback: onMessageDeliveredCallback
    });
    client.send(message);
}

// connect the client to Cumulocity
function init () {
    client.connect({
        userName: tenant + "/" + username,
        password: password,
        onSuccess: createDevice
    });
}

// display all messages on the page
function log (message) {
    document.getElementById('logger').insertAdjacentHTML('beforeend', '<div>' + message + '</div>');
}

init();
Replace serverUrl, clientId and device_name as needed. Do not forget to specify the user credentials setting values for tenant, username and password.
The Cumulocity MQTT protocol supports both unsecured TCP and also secured SSL connections (i.e. ws://mqtt.cumulocity.com/mqtt or wss://mqtt.cumulocity.com/mqtt), so you can pick the one which fits for you and use it in serverUrl.
What does the code do?
- Configure the MQTT connection.
- Register
onMessageArrivedcallback function which will display all incoming messages. In case of a c8y_Restart operation, simulate a device restart. - Register
onMessageDeliveredcallback function which will be called after a publish message has been delivered. - After the page is fully loaded, the function
initis called and it connects with Cumulocity via a MQTT protocol. - When the connection is established, call a
createDevicefunction. - Create a new device with a name (
device_name) and a type (c8y_MQTTDevice). - Update the device hardware information by putting a
"S123456789"serial, a"MQTT test model"model and a"Rev0.1"revision. - Subscribe to the static operation templates for the device – this will result in
onMessageArrivedmethod call every time a new operation is created. - Send a temperature measurement every 3 seconds.
Note that the subscription is established after the device creation, otherwise if there is no device for a given clientId, the server will not accept it.
Running the application
Open the hello_mqtt_js.html file in a browser. You should see a new registered device in the Device Management application, listed in All devices. In the Measurements tab, you will see the temperature measurements being sent by your client.
Additionally, if there will be a new operation created for this device (e.g. c8y_Restart), related information will be displayed in the browser page.
Improving the agent
Now that you have done your first step, check out the section Hello MQTT to learn more about Cumulocity MQTT and improve your application.
Hello MQTT Node.js
In this tutorial, you will learn how to use the Node.js MQTT client with Cumulocity using pre-defined messages (called “static templates”).
Prerequisites
In order to follow this tutorial, check the following prerequisites:
- You have Node.js and the package manager (npm) installed.
- You have a valid tenant, a user, and a password in order to access Cumulocity.
Developing the “Hello, MQTT world!” client
To develop a very simple “Hello, world!” MQTT client for Cumulocity, you need to
- create a Node.js application,
- install the MQTT middleware (in this example we will use the library MQTT.js),
- run the application.
Creating a Node.js application
Create the package.json file to list down the dependencies and other basic information about your application.
{
  "dependencies": {
    "mqtt": "*"
  },
  "scripts": {
    "start": "node app.js"
  }
}
Create the start script (app.js) specified in the package.json file with the following content:
// MQTT dependency https://github.com/mqttjs/MQTT.js
const mqtt = require("mqtt");

// client, user and device details
const serverUrl   = "tcp://mqtt.cumulocity.com";
const clientId    = "my_mqtt_nodejs_client";
const device_name = "My Node.js MQTT device";
const tenant      = "<<tenant>>";
const username    = "<<username>>";
const password    = "<<password>>";

var temperature   = 25;

// connect the client to Cumulocity
const client = mqtt.connect(serverUrl, {
    username: tenant + "/" + username,
    password: password,
    clientId: clientId
});

// once connected...
client.on("connect", function () {
    // ...register a new device with restart operation
    client.publish("s/us", "100," + device_name + ",c8y_MQTTDevice", function() {
        client.publish("s/us", "114,c8y_Restart", function() {
            console.log("Device registered with restart operation support");
        });

        // listen for operations
        client.subscribe("s/ds");

        // send a temperature measurement every 3 seconds
        setInterval(function() {
            console.log("Sending temperature measurement: " + temperature + "º");
            client.publish("s/us", "211," + temperature);
            temperature += 0.5 - Math.random();
        }, 3000);
    });

    console.log("\nUpdating hardware information...");
    client.publish("s/us", "110,S123456789,MQTT test model,Rev0.1");
});

// display all incoming messages
client.on("message", function (topic, message) {
    console.log('Received operation "' + message + '"');
    if (message.toString().indexOf("510") == 0) {
        console.log("Simulating device restart...");
        client.publish("s/us", "501,c8y_Restart");
        console.log("...restarting...");
        setTimeout(function() {
            client.publish("s/us", "503,c8y_Restart");
        }, 1000);
        console.log("...done...");
    }
});
Replace serverUrl, clientId and device_name as needed. Do not forget to specify the user credentials setting values for tenant, username and password.
The Cumulocity MQTT protocol supports both unsecured TCP and secured SSL connections. No matter which connection type you choose, your serverUrl should stay the same (like mqtt.cumulocity.com).
What does the code do?
- Configure the MQTT connection.
- When the connection is established, register a new device with a name (
device_name) and a type (c8y_MQTTDevice). - Add restart capabilities to the device.
- Subscribe to listen for operations.
- Send a random temperature measurement every 3 seconds.
- Update the device hardware information by putting a
"S123456789"serial, a"MQTT test model"model and a"Rev0.1"revision. - Listen to all incoming messages. In case of a c8y_Restart operation, simulate a device restart.
Note that the subscription is established after the device creation, otherwise if there is no device for a given clientId, the server will not accept it.
Running the application
Before running the application, the MQTT middleware must be installed. To achieve this, execute the following command:
$ npm install
Installation has to be done only once. Afterwards, you only need to execute the following command:
$ npm start
You should see a new registered device in the Device Management application, listed in All devices. In the Measurements tab, you will see the temperature measurements being sent by your client.
Additionally, if there will be a new operation created for this device (e.g. c8y_Restart), related information about it will be printed to the console.
Improving the agent
Now that you have done your first step, check out the section Hello MQTT to learn more about Cumulocity MQTT and improve your application.
Hello MQTT Python
In this tutorial, you will learn how to use the Python MQTT client with Cumulocity using pre-defined messages (called “static templates”).
Prerequisites
In order to follow this tutorial, check the following prerequisites:
- You have a valid tenant, a user, and a password in order to access Cumulocity.
- Verify that you have Python installed:
$ python --version
Python 2.7.12
Python can be downloaded from www.python.org.
- Install the Paho client:
$ pip install paho-mqtt
Info: On macOS you may need to execute
sudo easy_install pipin case thepipcommand is not found.
Developing the “Hello, MQTT world!” client
To develop a very simple “Hello, world!” MQTT client for Cumulocity, you need to
- create a python script,
- run the script.
Creating a python script
Create a script file, for example hello_mqtt.py with the following content:
#!/usr/bin/env python
# -*- coding: utf-8 -*-
import paho.mqtt.client as mqtt
import time, threading, ssl, random

# client, user and device details
serverUrl   = "tcp://mqtt.cumulocity.com"
port        = 1883
clientId    = "my_mqtt_python_client"
device_name = "My Python MQTT device"
tenant      = "<<tenant>>"
username    = "<<username>>"
password    = "<<password>>"

receivedMessages = []

# display all incoming messages
def on_message(client, userdata, message):
    print("Received operation " + str(message.payload))
    if (message.payload.startswith("510")):
        print("Simulating device restart...")
        publish("s/us", "501,c8y_Restart");
        print("...restarting...")
        time.sleep(1)
        publish("s/us", "503,c8y_Restart");
        print("...done...")

# send temperature measurement
def sendMeasurements():
    try:
        print("Sending temperature measurement...")
        publish("s/us", "211," + str(random.randint(10, 20)))
        thread = threading.Timer(7, sendMeasurements)
        thread.daemon=True
        thread.start()
        while True: time.sleep(100)
    except (KeyboardInterrupt, SystemExit):
        print 'Received keyboard interrupt, quitting ...'

# publish a message
def publish(topic, message, waitForAck = False):
    mid = client.publish(topic, message, 2)[1]
    if (waitForAck):
        while mid not in receivedMessages:
            time.sleep(0.25)

def on_publish(client, userdata, mid):
    receivedMessages.append(mid)

# connect the client to Cumulocity and register a device
client = mqtt.Client(clientId)
client.username_pw_set(tenant + "/" + username, password)
client.on_message = on_message
client.on_publish = on_publish

client.connect(serverUrl, port)
client.loop_start()
publish("s/us", "100," + device_name + ",c8y_MQTTDevice", True)
publish("s/us", "110,S123456789,MQTT test model,Rev0.1")
publish("s/us", "114,c8y_Restart")
print "Device registered successfully!"

client.subscribe("s/ds")
sendMeasurements()
Replace serverUrl, clientId and device_name as needed. Do not forget to specify the user credentials setting values for tenant, username and password.
Cumulocity MQTT protocol supports both unsecured TCP and secured SSL connections, so when configuring a port remember to use the correct one. No matter which connection type you choose, your serverUrl should stay the same (like mqtt.cumulocity.com).
The above example uses a TCP connection. If you would like to use an SSL connection, remember to use the proper configuration from the Paho MQTT client. Further information can be found at www.eclipse.org.
What does the script do?
- Configure a MQTT connection.
- Register an
on_messagecallback function which will print incoming messages. In case of a c8y_Restart operation, it will simulate a device restart. - Register an
on_publishcallback function which will be called after a publish message has been delivered. - Connect with Cumulocity via the MQTT protocol.
- Create a new device with a name (
device_name) and a type (c8y_MQTTDevice). - Update the device hardware information by putting a
"S123456789"serial, a"MQTT test model"model and a"Rev0.1"revision. - Subscribe to the static operation templates for the device –this will result in an
on_messagemethod call every time a new operation is created. - Call the
sendMeasurementsmethod which sends a temperature measurement every 7 seconds.
What does the publish message do?
- Publish a given message about the given topic via MQTT.
- When publishing the message it uses QoS 2. So to be sure that the message was delivered, it will wait for server ACK (until the
on_publishmethod is called with the matching message ID).
Note that the subscription is established after the device creation, otherwise if there is no device for a given clientId, the server will not accept it.
Running the script
To run the script just use the command:
$ python hello_mqtt.py
After starting the application you should see a new registered device in the Device Management application, listed in All devices. In the Measurements tab, you will see the temperature measurements being sent by your client.
Additionally, if there will be a new operation created for this device (e.g. c8y_Restart), information about it will be printed to the console.
Improving the agent
Now that you have done your first step, check out the section Hello MQTT to learn more about Cumulocity MQTT and improve your application.