Overview
The asset definition is a blueprint or template to create one or multiple assets. It defines how the asset will look like after it is created. An asset definition consists of one or more property definitions and/or subasset definitions.
To quickly get started using the DTM application, import pre-defined asset definitions from the Asset definition samples page. These asset definitions and associated property definitions are defined based on best practices. For details on importing asset definitions from samples, see To import asset definition samples.
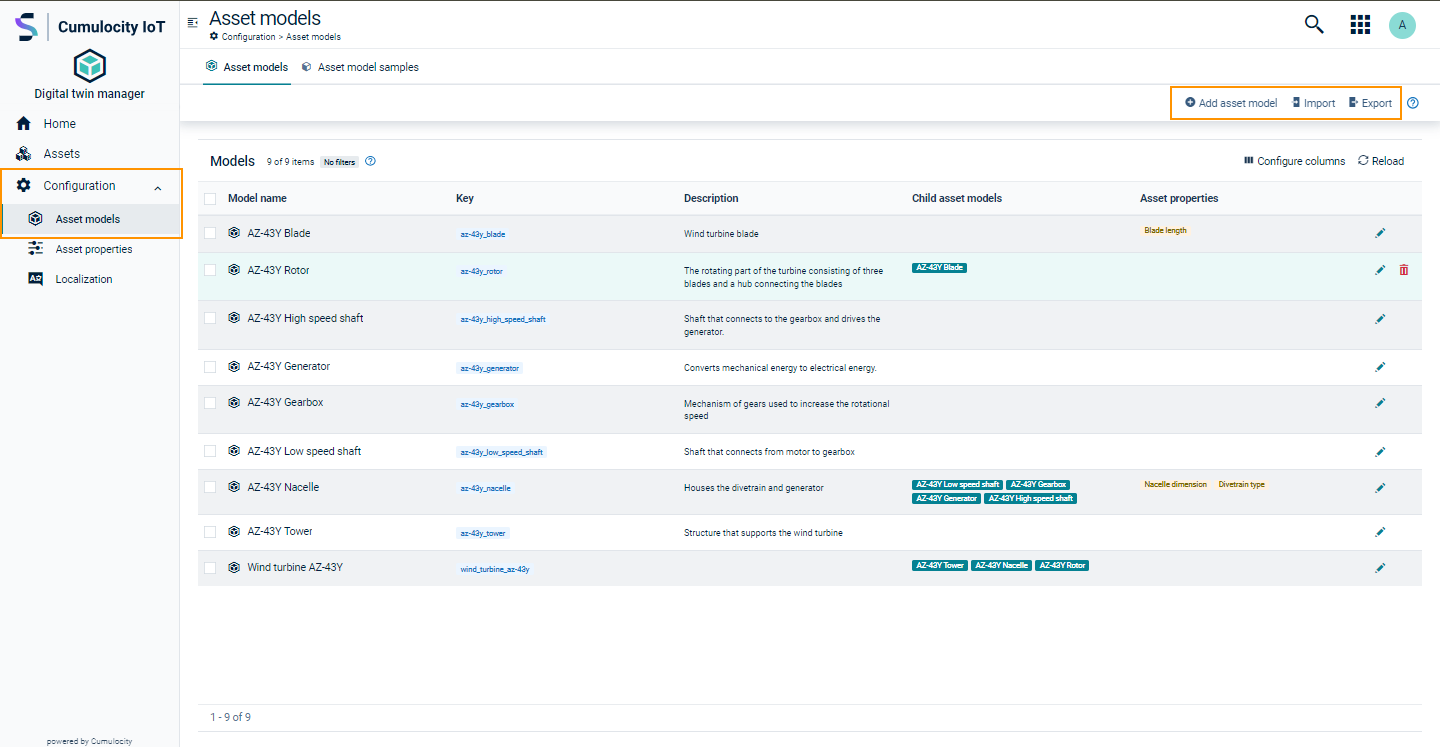
To reach the Asset definitions page, navigate to Libraries > Asset definitions.
When you create an asset definition, you see the details of this asset definition in the overview.
In the overview you see the following four categories:
- Definition name: Name of the asset definition
- Key: Unique identifier for the asset definition
- Description: Brief description of the asset definition
- Subassets: List of child asset definitions
- Properties: List of property definitions
Click Configure columns to configure the displayed columns.
Click Reload to reload the screen. The total number of asset definitions is displayed on the bottom left of the page.
Use the Export asset definitions and Import asset definitions feature to transfer asset definitions between tenants. This is useful for replicating the asset definitions in multiple tenants. By exporting and importing asset definitions, you can ensure consistency and reduce the time and effort required for manual configuration. See To export asset definitions and To import asset definitions on how to export or import asset definitions.
Requirements
ROLES & PERMISSIONS
- To add/update/delete/import asset definitions: CREATE/ADMIN permission for permission type “Inventory”
Using generic asset definitions for flexibility
Traditional asset definitions require a strict, sequential process where you must fully define definitions, data schemas, and hierarchical relationships before creating asset instances. You can make this more flexible by selecting the Allow any asset option when creating an asset definition. This creates a generic asset definition, which allows you to build your asset hierarchy without enforcing a predefined structure. Generic asset definitions are useful for:
- Rapid prototyping: Create asset representations quickly without predefining formal structures.
- System integration: Integrate data from external systems (such as MES or ERP) where the full schema is not yet known.
- Evolving requirements: Start with a flexible “container” and add structure as the project matures.
To create an asset definition
Click Add asset definition on the top right to create a new asset definition. This opens the New asset definition page. Here, provide the following parameters:
| Field | Description | Mandatory / Optional |
|---|---|---|
| Definition name | Refers to the name of the asset definition. This name is used for the asset definition throughout the application. |
Mandatory |
| Key | Used to uniquely identify and store the asset definition in the DTM application. Note that the key is automatically generated based on the label. You can modify the automatically generated key to suit to your needs only during the asset definition creation. You cannot edit the key after the asset definition is created. |
Mandatory |
| Description | Provides a brief description of the asset definition. | Optional |
| Icon | Displayed next to the label for each asset definition. By default, no icon is selected. |
Optional |
| Subassets | Restricts the asset assignment to the defined definitions. By default, no subassets are allowed if this field is not set. |
Optional |
| Allow any asset | When selected, allows any asset to be added as a subasset, along with the ones set in the **Subassets** section. | Optional |
| Properties | Parameters that define an asset definition. By default, no asset definitions are selected. |
Optional |
| Allow any property | When selected, allows any property to be added to an asset, along with the ones set in the **Properties** section. | Optional |
Once all required asset definitions are created, you can start creating assets using these asset definitions.
To select an icon
- Click the Select icon button on the left.
- In the following dialog window, search or filter icons by type or select an icon from the predefined list.
- Select the desired icon.
- Click Save.
To add a child asset definition
- Click Add asset definition to add an allowed child asset definition.
- In the dropdown select one or multiple asset definitions.
- The selected child asset definitions are then displayed under Subassets with the checkbox Required on the right. If the asset definition requires this subasset definition, select the checkbox. By default, it is clear.
- Click the remove icon next to the checkbox to remove the subasset definition from the selected asset definition.
- Select Allow any asset to make the asset definition generic to create asset hierarchy without enforcing a predefined structure.
Info
If you do not select any subasset definition or select Allow any asset, then the asset cannot have any subassets.
If one or more child asset definitions are checked as required, an asset created with this asset definition can have only subassets belonging to the selected subasset definitions.
Example:
If the asset definition is “Rotor” and you select “Blade” as an allowed subasset definition, then the newly created asset “AZ-43Y Rotor” can only have “Blade” assets as subassets.
To add a property definition to an asset definition
- Click Add property definition to add a property definition to the asset definition.
- In the resulting dialog box, select one or multiple property definitions from the dropdown field. To search for specific property definition, type the respective name in the dropdown field.
- The selected property definitions are then displayed on the Properties segment with the checkbox Required on the right. If the asset definition requires this property definition, select the checkbox. By default, it remains clear.
- Reorder the property definitions via drag and drop.
- To remove the property definition from the asset definition, click the remove icon next to the checkbox.
- Select Allow any property to allow any property to be added to an asset, in addition to the property definitions set in the Properties section.
- Click Save to save your settings.
Info
To assign a location to an asset, add the default property definition Location to the asset definition. For more info on default property definitions, see Default property definitions.
If there are any validation errors for a field, it is highlighted in red with a validation error message asking you to fill in the required information. Enter the necessary information and click Save.
If there are any validation errors for a field, it is highlighted in red with a validation error message asking you to fill in the required information. Enter the necessary information and click Save.
If there is no property definition meeting your requirements when you search, click New property definition. For more details on how to create a new property definition, see To create a property definition.
Root asset definition
To create a root asset definition, follow a bottom-up approach by defining all subasset and property definitions in the provided templates first.
This root asset definition can then be used to create an asset hierarchy, which then defines all the assets, subassets, asset properties and devices in the DTM application.
As a result you can use the asset hierarchy in other Cumulocity applications, such as the Cumulocity Cockpit.
To create an asset definition for the entire hierarchy
- Create all required property definitions.
- Then create the asset definitions in a bottom-up approach, that is, all the subasset definitions are created first, followed by the root asset definition at the end.
- Create assets for the new asset hierarchy.
This approach allows you to create the desired hierarchy, including all asset and property definitions in one process.
To modify an asset definition
- Click the edit icon at the right of each asset definition.
- Make your changes in the editor.
- Click Save.
- If this asset definition is used by any asset, select Confirm in the resulting confirmation dialog to continue saving your changes.
Important
An existing strictly-typed asset definition can be converted to a generic asset definition by selecting the Allow any asset option.
This conversion is not bidirectional. Once you make an asset definition generic, you cannot revert it to a strictly-typed asset definition. Evaluate the modeling requirements before applying this change.
To delete an asset definition
There are two ways to delete an asset definition:
Delete each asset definition individually
On the Asset definitions page, click the delete option from the actions menu on the right of the desired definition. Alternatively, click the name of the definition to view the details and click Delete.
Delete the asset definitions in bulk
On the Asset definitions page, select the checkboxes next to the desired asset definitions. Click Delete to delete the selected asset definitions.
To sort asset definitions
To sort columns, hover over the respective column header and click the sort icon for an ascending or descending order.
To filter asset definitions
- Use the filter option to filter asset definitions based on text in the respective asset group.
- Hover over a column title for the filter icon to appear on the right.
- Click the icon to filter the asset definitions in this column.
- To clear all applied filters click Clear filters at the top.
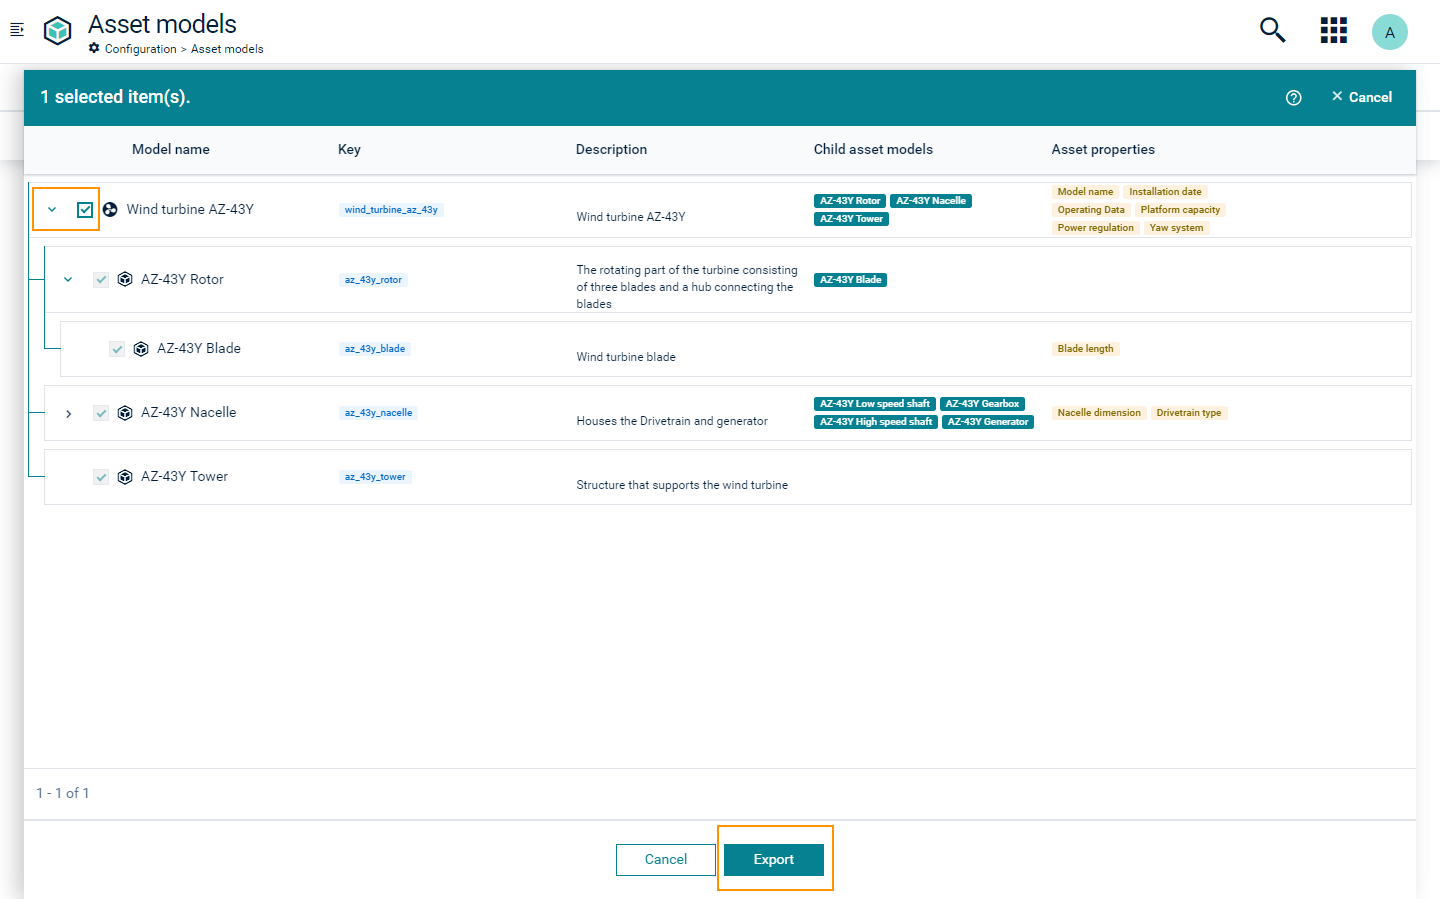
To export asset definitions
To export asset definitions to add in another tenant, follow the steps below:
- On the Asset definitions page, click Export.
- In the resulting dialog, you see the list of asset definitions. Initially, all the asset definitions are collapsed. Click the expand icon to the left of each asset definition to view the next level of asset definitions.
- Select one or more desired asset definitions.
- Click Export to export the selection.
- The dialog window closes and a JSON file named ‘Export-asset-models.json’ downloads.
Use the downloaded file to import the asset definitions into the DTM application on another tenant.
Info
You can select a maximum of 30 asset definitions to export at one time.
When you select an asset definition with subasset and property definitions, all the definitions are selected automatically. You cannot unselect a subasset definition of an asset definition that is already selected. You can export a total of 250 asset definitions and 500 associated property definitions at one time.
You can select a subasset definition to export without selecting its parent. This gets exported as a root asset definition.
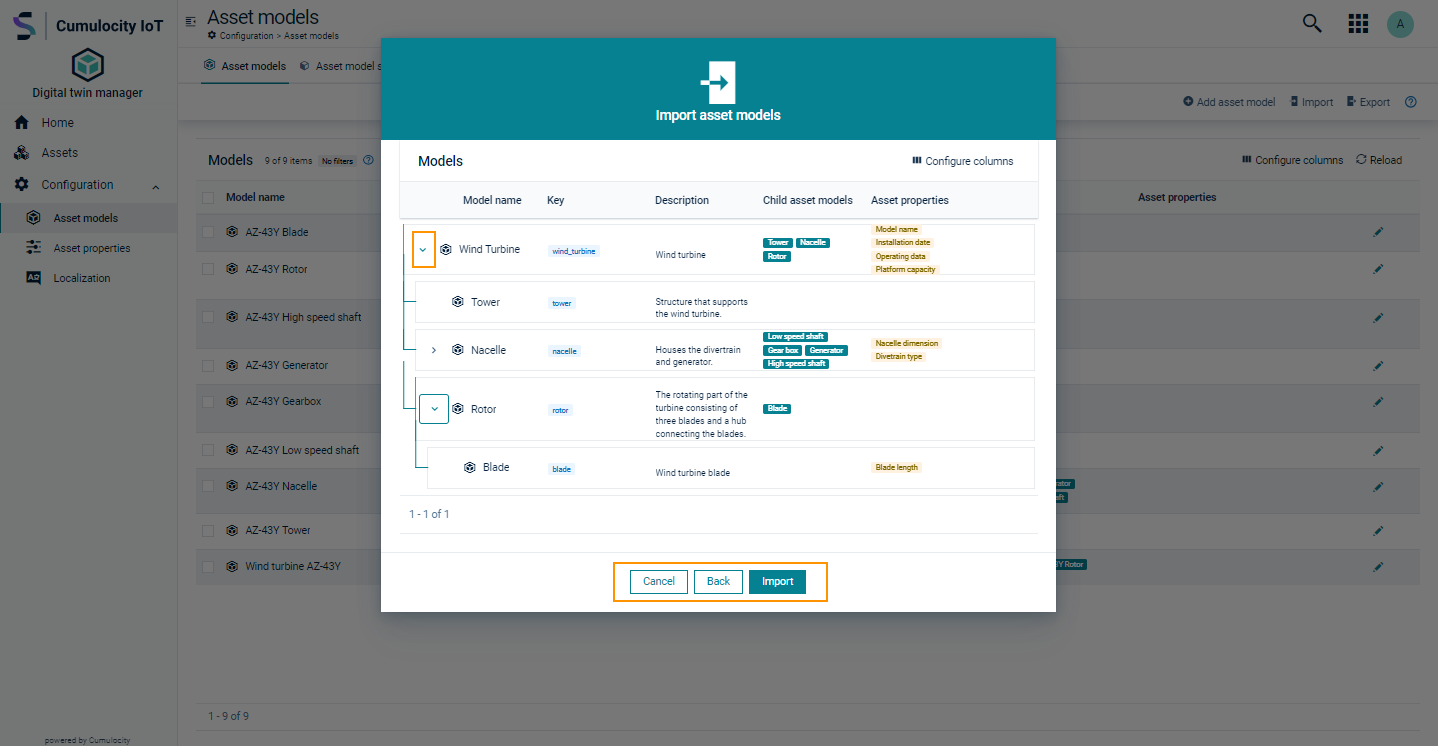
To import asset definitions
To import asset definitions, follow the steps below:
- On the Asset definitions page, click Import.
- Upload the JSON file in the drop file area of the resulting dialog. The JSON file is the file containing exported asset definitions from a DTM application on another tenant.
- Click Next to preview the asset definitions. Initially, all the asset definitions are collapsed. Click the expand icon to the left of each asset definition to view the next level of asset definitions.
- Click Import to import the asset definitions.
- Alternatively, click Back to go to previous step. Hover over the file name and click the remove icon to remove the current file and upload a different one.
- The newly imported asset definitions are listed on the Asset definitions page.
Info
When you upload the JSON file, it undergoes a validation process. If the validation fails, you see a corresponding message in the resulting dialog box. Click Download log file to view the errors. Review the errors that are reported, resolve them, and attempt the import again.
You can import a maximum of 250 asset definitions and 500 associated property definitions at one time.
To import asset definition samples
When you navigate to the Asset definition samples page following Libraries > Asset definitions > Asset definition samples, you see a list of samples with name, description and tags associated with it.
To view the sample, click the menu icon at the top right of sample name and click View. In the resulting dialog, you see a list of asset definitions. Initially, the asset definitions in the list are collapsed. Click the expand icon to the left of each asset definition to view the complete hierarchy. Click Import to import the asset definitions in the sample.
Alternatively, to import the asset definitions in the sample without a preview, click the menu icon at the top right of sample name and then click Convert to asset definition.
Info
When you select View or Convert to asset definition, the asset definition sample undergoes a validation process. If the validation fails, you see a corresponding message in the resulting dialog box. Click Download log file to view the errors.
Review the errors that are reported, resolve them and attempt the action again.
Default asset definitions
Group asset definition
Groups are used in Cumulocity to organize devices or other groups. The default group asset definition allows any group to be treated as an asset, providing a unified, flexible, and consistent approach to managing assets. Unlike other asset definitions in the Digital Twin Manager application, the group asset definition does not enforce hierarchical relationships.
Characteristics of the group asset definition
- Available by default, it cannot be deleted.
- Allows updating of label, description, and icon for the definition. This can be restricted by setting the value of the flag isDefaultGroupEditDisabled to “true” in the application options. For details, refer to Application options.
- Does not support custom asset properties.
- Since the definition doesn’t enforce a hierarchy, it does not require the definition of subassets.
- The definition can be easily identified by the “(Default)” suffix throughout the Digital Twin Manager application.
Generic asset definition
The default generic asset definition allows you to create asset hierarchies without first configuring a strict definition hierarchy. This is helpful when your requirements are still evolving, and you want to prototype your asset structure.
Characteristics of the default generic asset definition
- The Generic Asset asset definition is identified with the key
c8y_GenericAsset. - Available by default, it cannot be deleted.
- Allows modifying the label, description, and icon.
- Allows defining subasset definitions and property definitions.
Asset definition for groups
The default group asset definition allows any group to be treated as an asset, providing a unified, flexible, and consistent approach to managing assets.
To create an asset from the default group asset definition in the New asset page, select the Group (Default) option from the Choose asset definition dropdown menu on the top left. For information on how to create an asset, refer to To create an asset.
Characteristics of a group asset
Since the default Group asset definition does not enforce hierarchy, any group asset can be added to another group asset. However, only root assets created using definitions other than the default Group asset definition are allowed under a group asset.
Any asset added to a group asset can be moved out of it using the Move to the root option in the Move assets dialog.
Info
- Groups created in the Cumulocity Cockpit application are not listed in the Digital Twin Manager application.
Property definitions
Property definitions are the parameters that define an asset definition. One or more property definitions are used to define an asset definition. Property definitions are created in the Property definitions page.
To reach the Property definitions page, navigate to Libraries > Property definitions.
In the Property definitions page, you see tabs for different contexts: All, Asset, Alarm, Measurement, Operation, and Event. The All tab displays property definitions applicable to all contexts, while each other tab displays property definitions specific to that context.
When you open the DTM application, default property definitions are readily available for use. See Default property definitions to view the list of properties available.
In the overview you see the following categories:
- Name: Name of the property definition.
- Key: Unique identifier for the property definition.
- Description: Brief description of the property definition.
- Data type: The data type of the property definition, for example, String, Number, or Complex.
- Default: Default value for the property definition.
- Min-Max: Minimum and maximum values allowed for the property definition.
- Applicable to: The asset types, alarms, measurements, operations, or events contexts to which the property definition applies.
- Last updated: Date and time of the last update.
- Actions: Available actions for the property definition.
Click Configure columns to configure the displayed columns.
Click Reload to reload the page. The total number of property definitions is displayed on the bottom left of the page.
Use the Export and Import feature to transfer property definitions between tenants. This is useful for replicating property definitions in multiple tenants. By exporting and importing property definitions, you can ensure consistency and reduce the time and effort required for manual configuration. See To export property definitions and To import property definitions for details.
Requirements
ROLES & PERMISSIONS
- To add/update/delete/import property definitions: CREATE/ADMIN permission for permission type “Inventory”
To create a property definition
When you navigate to the Property definitions page for the first time, there will be no property definitions present in the system except the default property definitions. See Default property definitions to view the list of property definitions available.
To create a property definition, click Add property definition on the top menu bar. Enter the required data in the form (see description below) and click Save.
Asset properties have the following parameters:
| Field | Description | Mandatory / Optional |
|---|---|---|
| Label | Refers to the name of the property definition. The property definition is further addressed using the information provided here. | Mandatory |
| Key | Used to uniquely identify and store the property definition in the DTM application. Note that the key is automatically generated based on the label. You can modify the automatically generated key to suit to your needs only during property definition creation. You cannot edit the key after the definition is created. |
Mandatory |
| Description | Provides a brief description of the property definition. | Optional |
| Applicable to | The context the property definition is applicable to. Available contexts: Asset, Alarm, Measurement, Operation and Event. |
Mandatory |
| Type | Defines the type of the property definition. It can be any of the following categories – Text, Number, Date picker, Enumeration, Boolean, File upload or Complex. | Mandatory |
| Default value | Defines the default value for the property. You can modify this value when creating an asset. If this field is left empty in the property defintion and marked as required in the asset definition, you must enter a value during the asset creation. |
Optional |
| Advanced validation rules | When selected, displays validation rules to apply to validate the property value whenever it is created or updated. | Optional |
Info
The Default value field is only shown if the selected Type is either “Text” or “Number”.
The default value must adhere to all validations provided beforehand.
The default value must adhere to all validations provided beforehand.
Once you have defined all necessary property definitions for your project, you must define the asset definitions.
Property definition types
To further define the type of content a property definition holds, you can select one of the following options listed under Type:
Text
Select Text if the value is a string, for example, a wind turbine manufacturer name. Enter a valid text.
If you select Advanced validation rules for text, the following fields appear:
-
Min Length - If selected, enter the minimum length of the text that must be provided for this asset property during the asset creation. Any text below the minimum length is not accepted.
-
Max Length - If selected, enter the maximum length of the text that must be provided for this asset property during the asset creation. Any text above the maximum length is not accepted.
-
RegExp - If selected, enter a valid regular expression. During the asset creation, you must provide the asset property value, which adheres to the regular expression.
Example:
If the property definition is “Generator code” with a Min length of 8, a Max length of 20, and the RegExp defined as “^MCGEN[a-zA-Z0-9]*$”, the value must fulfill all three criteria: it must start with “MCGEN”, be at least 8 characters long, and not exceed 20 characters.
If you do not select any of the restrictions above, it is not applicable for the asset property during asset creation.
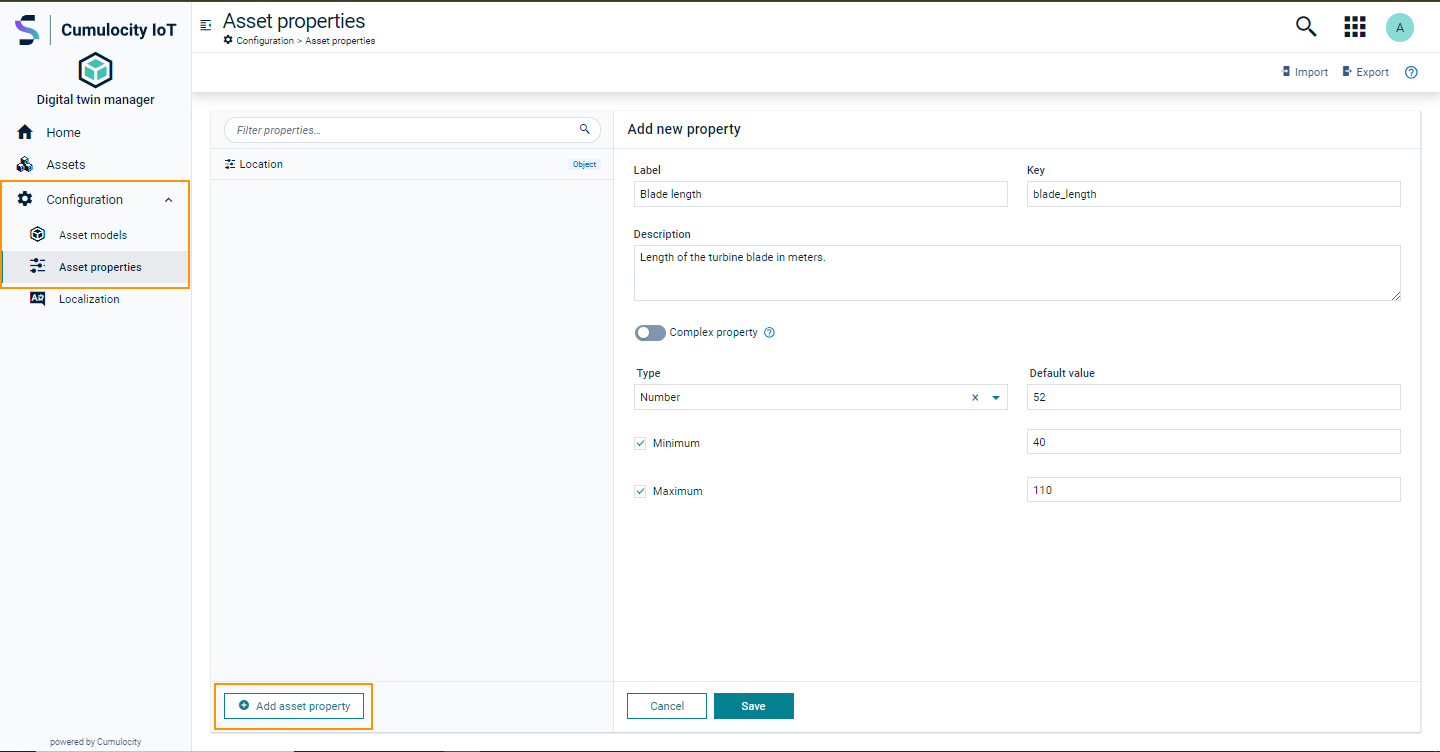
Number
For this type, you must provide a numeric value during the asset creation, for example, the height of a wind turbine tower.
The type Number contains the following fields for additional validation rules:
-
Minimum - If selected, enter a number in the field Minimum on the right. When you create the asset, the asset property value cannot be lower or less than provided in the field.
-
Maximum - If selected, enter a number in the field on the right. When you create the asset, the asset property value cannot exceed the Maximum provided.
Example:
If the asset property is “Tower height” with a Minimum of 80 and a Maximum of 110, the property value must be between 80 and 110.
Date Picker
If selected, you must select a date from the calendar displayed in the dialog window during the asset creation.
Example:
If “Installation date” is a property of the “Wind turbine” asset, then you must select the installation date of the wind turbine when creating the asset.
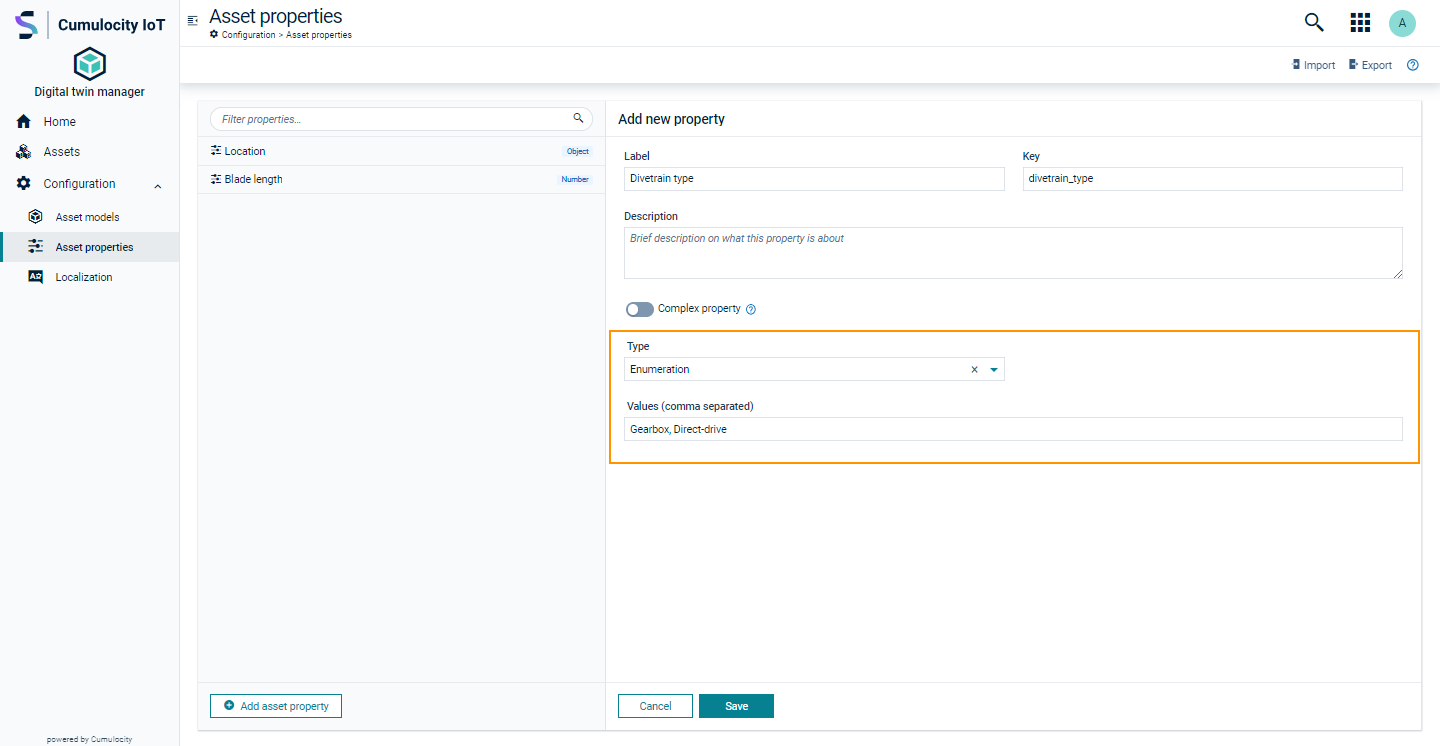
Enumeration
Select Enumeration to list several values that apply to this property definition.
If selected, a second field appears below. Here, enter all desired information separated by a comma.
During asset creation, these values appear as options in the dropdown menu. Select one of the options to initialize the asset property with that option.
Example:
To create an asset property for a wind turbine “drivetrain type” and the type must be either Gearbox or Direct-drive, you must provide these options separated by a comma when creating the property definition.
Boolean
If selected, the value of the asset property can either be true or false during the asset creation.
An asset with this asset property shows a checkbox. Selecting this checkbox sets the asset property value to true.
Example:
If you create an asset property called “Yaw system” to identify wind turbines that rotate towards the wind direction during upwind conditions, the property definition must be created with the type “Boolean”. When you create an asset for a wind turbine with a yaw system present, it is then initialized to “true”. If there is no yaw system present, the asset is initialized to “false”.
File upload
This option allows you to upload a file during the asset creation.
Requirements
ROLES & PERMISSIONS
- To add/update files: CREATE/ADMIN permission for permission type “Inventory”
If selected, enter the allowed file types separated by a comma in the Allowed file types field. Provide the maximum file size for uploads in the Max file size in MB field. When you create an asset with this property definition, you can only upload files that adhere to the allowed file types with their file size not exceeding the set limit.
Info
If there is a file size limit set for the tenant, you see the limit along with the field name for Max file size in MB.
To prevent security threats, sanitize your files beforehand.
To prevent security threats, sanitize your files beforehand.
Example:
To upload the schematic diagram for a wind turbine, you name the property definition “Wind turbine schematic” and specify the file type of the schematic file. Then upload the respective file. Once the asset is created, you can view this file for future reference.
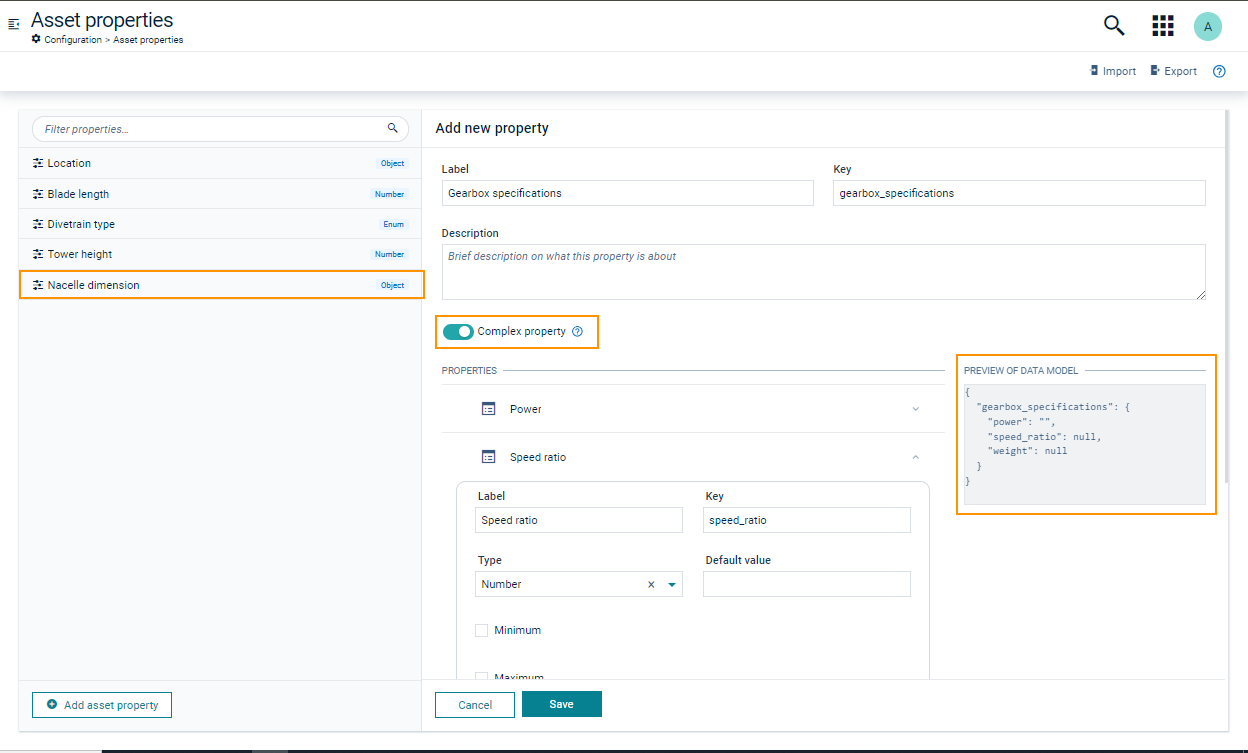
Complex
A complex property definition consists of multiple key-value pairs, which means it contains a root object followed by one or more key-value pairs. You must define each key-value pair and provide a type for each pair. You can arrange the properties in the required order by dragging and dropping them. Hover over the row to see the drag icon. Click and drag the drag icon for reordering. On the right side of each key-value pair, you see an expand icon . Click the expand icon to see a specific property. Note that when you add a new key-value pair, it automatically expands. To hide it, click the collapse icon .
You see the preview of the data model on the right of the Properties section.
Example:
If the asset property is called “Gearbox specifications” with the key “gearbox_specifications”, then power, speed increasing ratio and weight are the multiple key-value pairs defining the property “Gearbox specifications”. Select the type Complex, enter the required information for all key-value pairs and click Save.
To edit a property definition
- Click the name of the property definition to view or edit the details. Alternatively, click Edit in the action menu to the right.
- Edit any content of the definition.
- Click Save to save your changes.
To delete a property definition
In the Property definitions page to delete a definition individually, click the delete option from the actions menu on the right of the desired definition. Alternatively, click the name of the definition to view the details, then click Delete.
Select the checkboxes next to the desired asset definition, click Delete to delete the selected property definitions in bulk.
In the resulting confirmation dialog, click Confirm to continue.
Info
If the property definition you want to delete is part of an existing asset or an asset definition, you see an error notification and the property definition is not deleted.
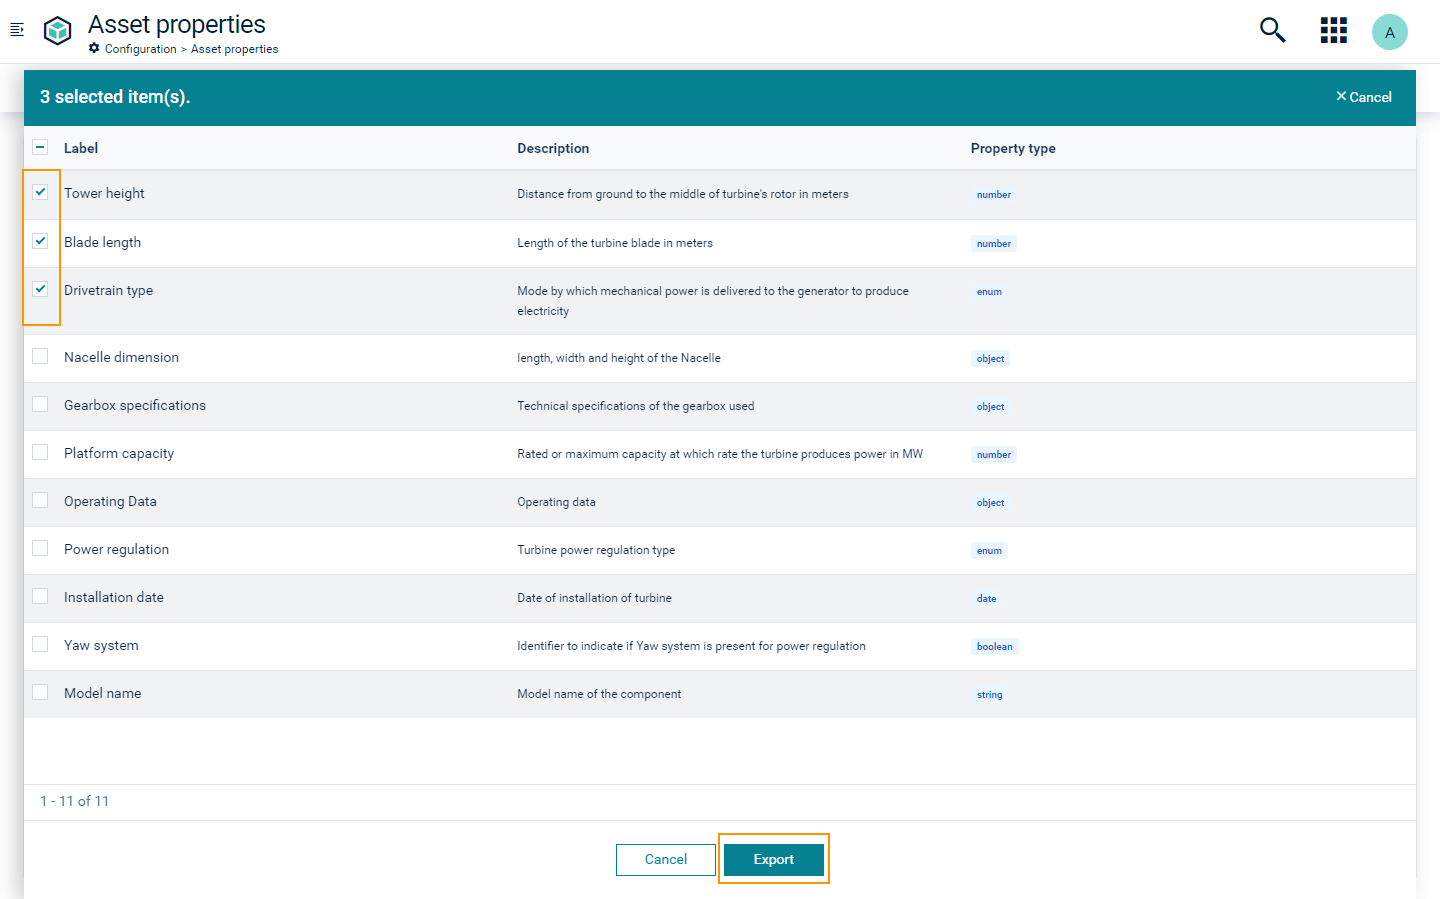
To export property definitions
Follow the steps below:
- On the Property definitions page, click Export. In the resulting dialog box, you see the list of property definitions along with their description and type.
- Select one or more desired definitions and click Export.
- The dialog closes and a JSON file named Export-properties.json downloads.
Use the downloaded file to import the property definitions into a DTM application on another tenant.
Info
Default property definitions are not listed under Export. See Default property definitions to view the list of definitions available.
You can export a maximum of 500 property definitions at a time.
When exporting from a specific context tab, only definitions from that context are listed. To export definitions from all contexts, select the All tab.
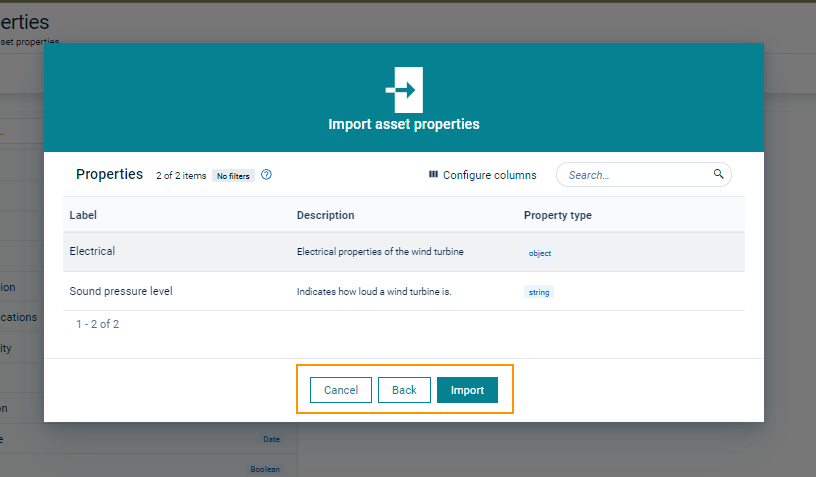
To import property definitions
To import asset properties into the DTM application, follow the steps below:
- On the Property definitions page, click Import.
- Upload the JSON file in the drop file area of the resulting dialog. The JSON file is the file containing exported property definitions from a DTM application on another tenant.
- Click Next to preview the property definitions before importing them.
- Click Import to import the property definitions.
- Alternatively, click Back to go to previous step. Hover over the file name and click the Delete icon to remove the current file and upload a different one.
- View newly imported definitions in the Property definitions page.
Info
When you upload the JSON file, it undergoes validation. If the validation fails, you see a corresponding message in the dialog. Click Download log file to view the errors. Review the errors that are reported, resolve them, and attempt the upload again.
You can import a maximum of 500 property definitions at a time. You can import property definitions from any context, regardless of which tab you are currently viewing.
Default property definitions
Characteristics
- Default property definitions are readily available when you open the application.
- Default property definitions cannot be deleted.
- Only selected fields within a default property definition are editable and the editable fields vary depending on the specific property.
- Default properties cannot be exported.
Location
The Location property definition enables you to assign location (latitude and longitude) to an asset. You can set the default values of the latitude and longitude by entering the corresponding values or alternatively using the map view.
To set the default values for the latitude and longitude using the map view, click anywhere on the map. Click the full screen icon at the top right corner of the map to view it in full screen. Without values for latitude and longitude, the marker is hidden. To see the marker, click anywhere on the map. Click or drag the marker to the preferred position to select the default value for latitude and longitude.
Info
The valid range for the latitude is -90 to +90 and valid range for the longitude is -180 to +180.
The marker on the map is only visible when both values for latitude and longitude are provided.
The default values of both latitude and longitude are automatically updated whenever a new location is selected on the map and vice-versa. The Altitude value is not represented on the map.
The marker on the map is only visible when both values for latitude and longitude are provided.
The default values of both latitude and longitude are automatically updated whenever a new location is selected on the map and vice-versa. The Altitude value is not represented on the map.