Introduction
Cumulocity provides single sign-on (SSO) functionality, that allows a user to login with a single 3rd-party authorization server using the OAuth2 protocol, for example Azure Active Directory (AAD). Currently authorization code grant is supported with access and ID tokens in form of JWT. SAML is not supported. On top of standard SSO, Cumulocity also allows you to access the platform resources using access tokens from your authorization server directly as a Bearer token. For details refer to Using access tokens from the authorization server.
Requirements
To use the SSO feature the following requirements must be met:
- The authorization server you use supports OAuth2 authorization code grant.
- The token is issued as JWT and you know what goes into the token content.
- The JWT must consist of a unique user identifier, “iss” (issuer), “aud” (audience) and “exp” (expiration time) fields.
- All microservices are built with Microservice Java SDK version 10.4.6 but preferably higher. For custom-built microservices, refer to Security.
- For on premises installation the domain-based tenant resolution is configured properly.
- For Enterprise tenants, the enterprise domain must be set up as redirect URI in the basic configurations. If SSO providers have a list of allowed domains, the enterprise domain should be added to that list.
- You must assign a role to the user with at least READ permission for “Own user management”, otherwise the user cannot log in.
- Users must have cookies enabled in the browser settings, as the SSO feature is built on top of cookies technology.
Configuration settings
To enable the SSO feature, the administrator must configure a connection with the authorization server. This is done in the Administration application.
Configuration access
SSO configurations can be configured to be exclusively accessible by the Management tenant, thus preventing other tenants from accessing the configurations. Users of such tenants are unable to update the configuration. This removes the risk of an incorrectly configured SSO, which can prevent other users from logging in via SSO. The Management tenant can grant or restrict access to SSO configurations for specific tenants. For more information about configuration access, refer to the Login options API in the Cumulocity OpenAPI Specification.
Configuration view
Click the Single sign-on tab in the Authentication page. Note that the tab is only visible for tenants which have access to the SSO configuration.
At the top left, you can select a template. The selected option has an effect on the look of the panel. The default template is “Custom” which allows for a very detailed configuration with virtually any authorization server using OAuth2 authorization code grant. Other templates provide simplified views for well known and supported authorization servers. In the next steps there will first be a definition of how to use the “Custom” template followed by a view dedicated to Azure Active directory.
Custom template configuration
On the Single sign-on tab in the Authentication page, select “custom” (the default) as template to configure a connection with any authorization server using OAuth2 authorization code grant.
As the OAuth protocol is based on the execution of HTTP requests and redirects, a generic request configuration is provided.
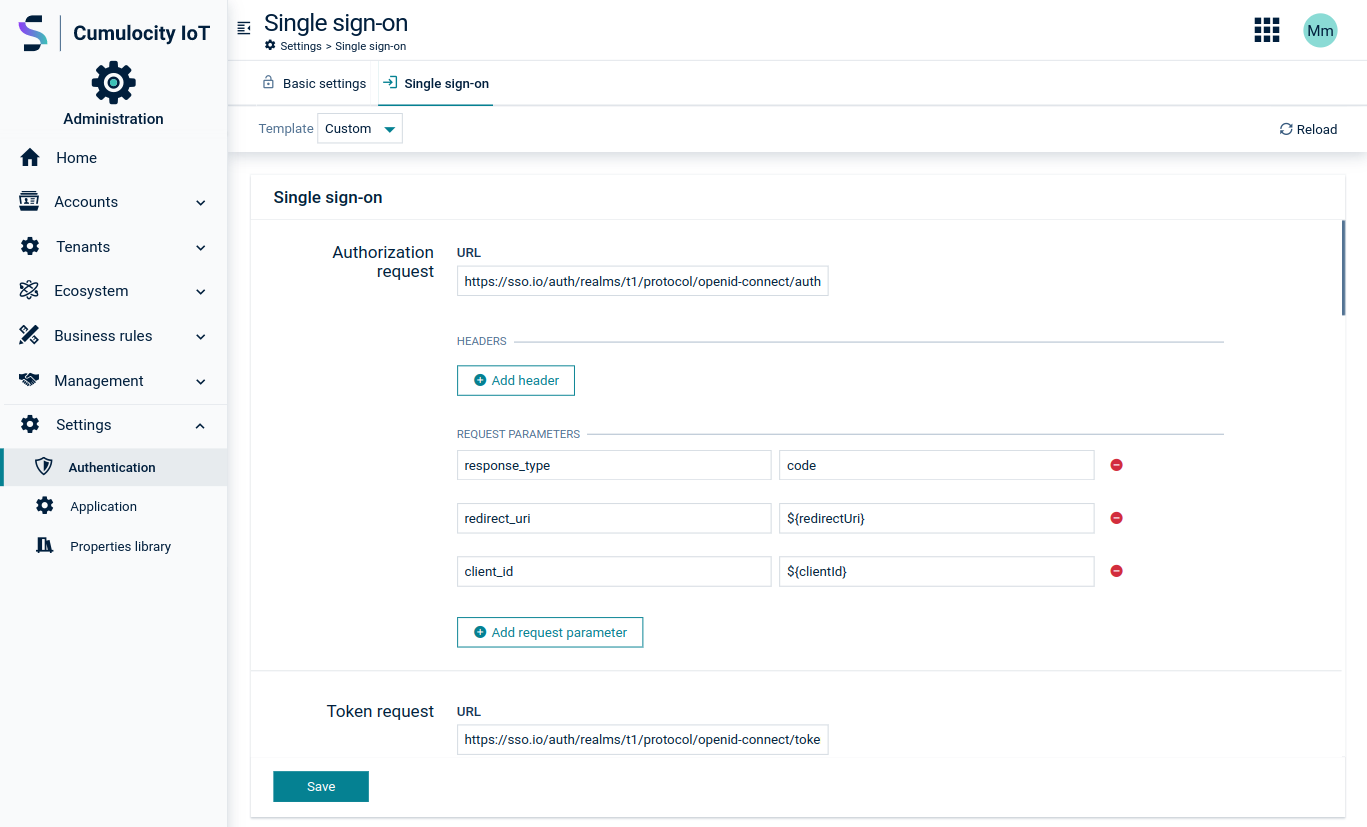
To configure a connection
The first part of the Single sign-on page consists of the request configuration. Here you can configure the HTTP request address, request parameters, headers and body in case of token and refresh requests. The authorize method is executed as a GET, token and refresh method by POST requests.
Info
Be aware that the body field of each request, after filling placeholders with values, is sent in the request ‘as is’. This means it is not encoded by Cumulocity. Many authorization servers require values inside the body to be URL-encoded (x-form-urlencoded). This can be achieved by entering already encoded values in a body field.
Specifying a logout request is optional. It performs a front-channel single logout. If configured as a request parameter, you are redirected to the defined authorization server logout URL after logging out from Cumulocity. If you use the OpenID Connect standard for the integration with the authorization server, the ID token should be passed as the id_token_hint parameter in the logout request.

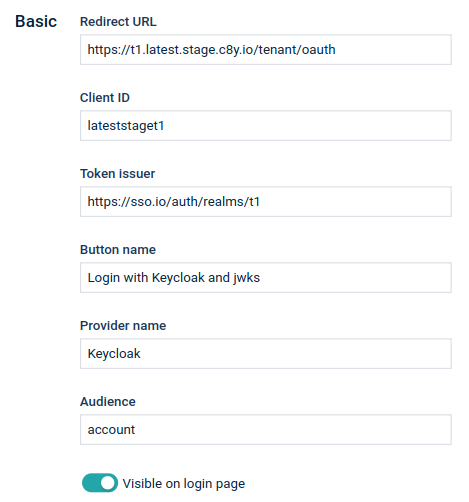
The Basic section of the Single sign-on page consists of the following configuration settings:
| Field | Description |
|---|---|
| Redirect URI | Redirect parameter. Can be used in request definitions as a ${redirectUri} placeholder. If Redirect to the user interface application is enabled then the redirect URI is not required. The redirect URI will be set automatically to the currently used application. |
| Redirect to the user interface application | The redirect URL is automatically set to the application used by the user during login. If enabled remember to set valid redirect URIs in the authorization server, for example, “https://cumulocity.com/apps/*”. The advantage of enabling this option is that any errors that occur during the SSO configuration are displayed properly in the UI application. |
| Client ID | OAuth connection client ID. Can be used in request definitions as a ${clientId} placeholder |
| Token issuer | OAuth token issuer |
| Button name | Name displayed on the button on the Login page |
| Provider name | Name of the provider |
| Audience | Expected aud parameter of JWT |
| Enable mTLS authentication | Enables mutual TLS (mTLS) authentication for requests sent to the authorization server. When enabled, the Certificate (PEM) and Private key (PEM) fields become visible. Disabled by default. |
| Certificate (PEM) | PEM-encoded X.509 client certificate used for mTLS authentication. The certificate must start with -----BEGIN CERTIFICATE----- and end with -----END CERTIFICATE-----. Visible only when Enable mTLS authentication is turned on. |
| Private key (PEM) | PEM-encoded PKCS#8 private key corresponding to the client certificate. After the first upload, the key is encrypted on the server side and can no longer be retrieved or displayed. Visible only when Enable mTLS authentication is turned on. |
| Visible on Login screen | Indicates whether the login option is enabled or not |
Mutual TLS (mTLS) authentication
Mutual TLS (mTLS) is an extension of the standard TLS protocol in which both the client and the server authenticate each other using certificates. Enabling mTLS allows Cumulocity to present a client certificate to the authorization server during token requests. Use this option only when the authorization server is configured to enforce certificate-based client authentication.
To configure mTLS authentication
-
In the Basic section of the Single sign-on page, turn on the Enable mTLS authentication toggle.
The Certificate (PEM) and Private key (PEM) fields appear.
-
Upload a PEM-encoded X.509 certificate in the Certificate (PEM) field and a PEM-encoded PKCS#8 private key in the Private key (PEM) field.
-
Click Save to apply the configuration.
Important
After the first save, the private key is encrypted and cannot be retrieved from Cumulocity. Store it securely before uploading. To replace it, use the Drop a new private key to replace control.
Each time you log in, the content of the access token and ID token is verified and serves as the basis for your access to the Cumulocity platform. The following section provides the mapping between JWT claims and access to the platform.
Under Source of dynamic access mapping, the administrator can specify the source from which the JWT claims are retrieved, either access token or ID token.
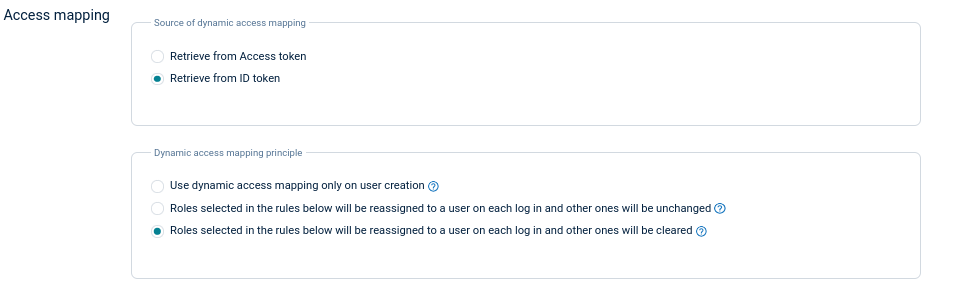
Under Dynamic access mapping principle you can select one of the following options:
-
Use dynamic access mapping only on user creation: When selected, dynamic access mapping will be used only when a new user logs in to fill in the initial roles. When a user already exists in Cumulocity, the roles will not be overwritten nor updated.
-
Roles selected in the rules above will be reassigned to a user on each log in and other ones will be unchanged: When selected, dynamic access mapping is used on every login, but the roles not listed in the access mapping configuration are not updated. Only the global roles, default applications and device groups that are listed in the defined access mapping rules are overwritten.
-
Roles selected in the rules above will be reassigned to a user on each log in and other ones will be cleared: This is the default. Dynamic access mapping assigns user roles, based on the token, on every user login. It is not possible to change the user roles inside Cumulocity as they would be overwritten on the next user login. To change this behavior, select one of the remaining options.
If you select either of the first two options mentioned above, this will also allow administrators to edit the roles of SSO users in the user management. For details, refer to Managing permissions and roles.
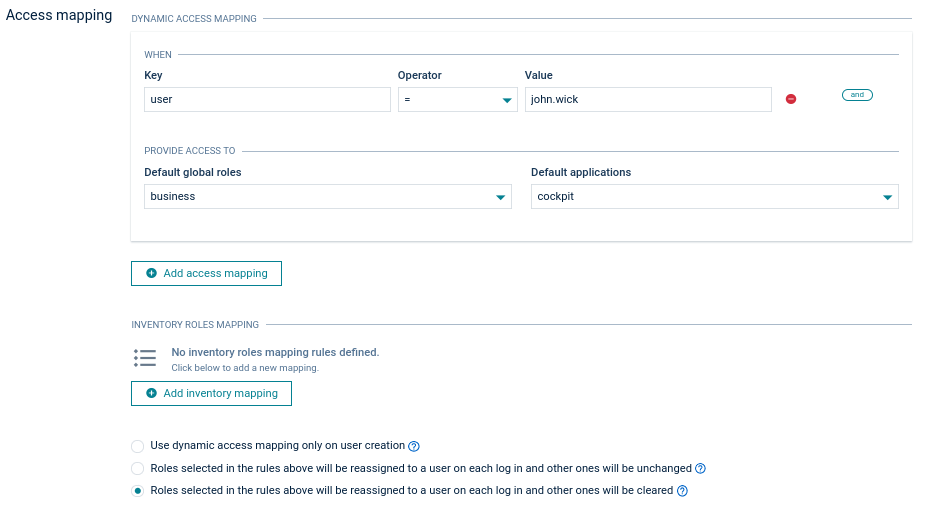
The dynamic access mapping configuration allows you to define the rules for assigning roles to users based on JWT claims. The rule that matches the token’s value is used to assign the appropriate set of roles to the user.
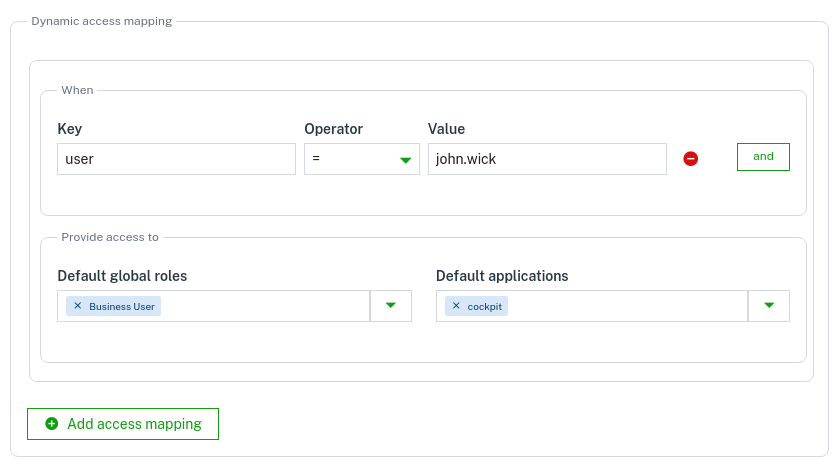
In the example above, if a user tries to login a decoded JWT claims look like:
{
...
"user": "john.wick",
...
}
The user will be granted access to the global role “business”, the default application “cockpit” and the inventory roles “Manager” and “Reader” for the device group named “region north”.
If no access mapping matches the user token, you will get an “access denied” message when trying to log in. This will also happen if there is no access mapping defined causing all users to be unable to log in using SSO.
New rules can be added by clicking Add access mapping or Add inventory roles at the bottom. An access mapping statement can consist of multiple checks like in the image below. You can add a rule to an existing statement by clicking and. Click the remove icon to remove a rule.
New roles are added to the user from every matching access mapping. If one access mapping statement assigns the role “admin” and a second one assigns the role “business” and both meet the defined conditions, then the user will be granted access to the global roles “business” and “admin”.
When using “=” as operator you may use wildcards in the Value field. The supported wildcard is asterisk (*) and it matches zero or more characters. For example, if you enter “cur*” this matches “cur”, “curiosity”, “cursor” and anything that starts with “cur”. “f*n” matches “fn”, “fission”, “falcon”, and anything that begins with an “f” and ends with an “n”.
In case the asterisk character should be matched literally it must be escaped by adding a backslash (\). For example, to match exactly the string “Lorem*ipsum” the value must be “Lorem\*ipsum”.
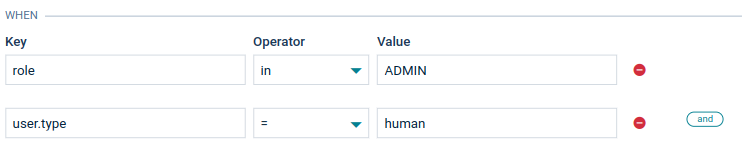
In this case the following claim will match the condition:
{
...
"user": {
   "type": "human"
},
"role": [
   "ADMIN"
],
...
}
On user login, user data like first name, last name, email and phone number can also be derived from JWT claims. Using the Source of user data mapping radio button, the administrator can decide whether the values should be retrieved from the access token or the ID token.
Based on that, the user data mappings can be configured:

Each field represents the claim name that is used to retrieve the data from JWT. The user data mapping configuration is optional and as admin manager you can only use the required fields. If the configuration is empty or the claim name cannot be found in the JWT token then the values in the user data are set as empty.
Mapping for alias is not available because it is not used in the context of SSO login.
The username claim name can be configured in the User ID configuration window. The user ID can be set to any top-level field of the authorization token payload sent from the authorization server to the platform during the login process. We recommend you inspect the authorization token in the audit logs to make sure the correct field is used (see Troubleshooting).
If you check the Use constant value checkbox, a constant user ID is used for all users who log in to the Cumulocity platform via SSO. This means that all users who log in via SSO share the same user account in the Cumulocity platform. We do not recommend you to use this option.
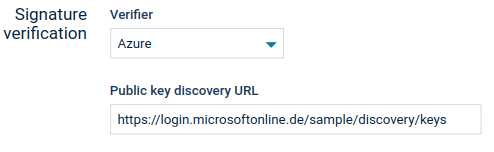
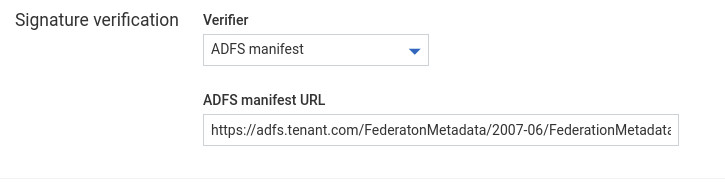
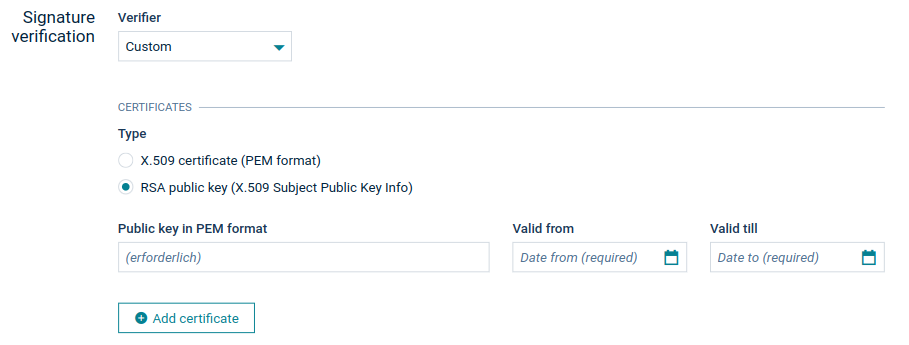
Each token is signed by a signing certificate. The following options are available to configure the signing certificates.
- By specifying the Azure AD certificate discovery address.
- By specifying the ADFS manifest address (for ADFS 3.0).
- By providing the public key of a certificate manually to Cumulocity. A certificate definition requires an algorithm information, public key value and validity period.
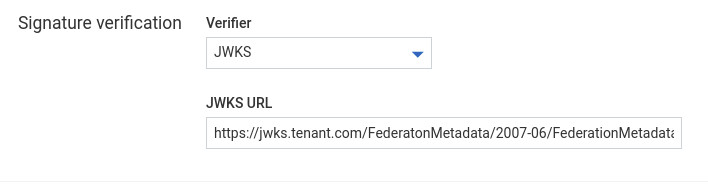
- By specifying the JWKS (JSON Web Key Set) URI. JWKS is a set of JWK objects containing a public key used to verify tokens issued by the authorization server.
Info
Cumulocity only supports certificates with RSA key, either as a (“n”, “e”) parameters pair or “x5c” certificate chain. Other key types (for example Elliptic-curves) are not supported.
Placeholders
Inside some fields you can use placeholders that are resolved by Cumulocity at runtime. Available placeholders are:
| Placeholder | Description |
|---|---|
| clientId | Value of the Client ID field |
| redirectUri | Value of the Redirect URI field |
| code | Code returned by the authorization server in response to authorization request |
| refreshToken | Refresh token returned by the authorization server after token request |
| id_token | A JWT token issued by the authorization server that contains claims about the authenticated user; can be used for logout from the authorization server |
| idp_hint | Value of the idp_hint parameter passed by the UI application, to select which IdP should be preselected during the authentication flow |
These placeholders can be used in authorization requests, token requests, refresh requests and logout request in the fields:
- URL
- Body
- Headers
- Request parameters
To use a placeholder in a field, put it inside two curly brackets preceded with a dollar sign:

Placeholders can also be used as a part of text:

Info
Placeholders are not validated for correctness. Any not recognized or misspelled placeholder will be left in text unprocessed.
Client suggested identity provider
When the default login mode is Single sign-on redirect, and the authentication server supports multiple identity providers, instead of requesting the user to select an identity provider, the idp_hint parameter can be collected by Cumulocity and forwarded to the authentication server as part of the initial authorization request. This ensures that the user is redirected directly to the specified IdP.
The idp_hint is a custom parameter supported by the application to improve the login experience in multi-identity provider (IdP) scenarios.
It allows a client application (for example, a custom welcome page) to suggest which IdP should be preselected during the authentication flow.
- A client custom application appends the
idp_hintparameter to the login URL:
https://cumulocity.com/apps/public/login/index.html?idp_hint=google
- The Cumulocity application extracts the value of
idp_hint(for example, “google”). - During the OAuth2/OIDC authorization request, this value is mapped and passed to the underlying authentication server.
Example with Keycloak
Keycloak supports an identity provider hinting feature using the kc_idp_hint parameter.
If the idp_hint value is “google”, and the authorization request headers are configured with key kc_idp_hint, value ${idp_hint}, Cumulocity will translate it into a Keycloak compatible parameter and forward it:
https://keycloak.com/realms/myrealm/protocol/openid-connect/auth
  ?kc_idp_hint=google
  &...
In this example:
- A custom “welcome page” provides
idp_hint=google. - Cumulocity translates this hint into Keycloak’s
kc_idp_hint=google. - The user is immediately redirected to the Google IdP without having to manually select it from the Keycloak login screen.
Integration with Keycloak
Global logout feature (available for Keycloak in version 12.0.0 and higher)
Integration with Keycloak allows administrators to use a global logout feature based on OpenId Connect. An event from the Keycloak authorization server is sent to all applications (including the Cumulocity platform) with a logout token that is verified in the same way as the token used in the login process. This feature allows ending sessions on both sides, applications and Keycloak, for the particular user.
To configure the global logout feature follow these steps:
- Go to the administrator console.
- Select the realm used in the SSO configuration for the tenant.
- Navigate to Clients in the Configure section.
- Select the client used in the SSO configuration.
- Set the Backchannel Logout URL field to “https://mytenant.cumulocity.com/user/logout/oidc”.
To use the global logout feature follow these steps:
- Go to the administrator console.
- Select the realm used in the SSO configuration for the tenant.
- Navigate to Users in the Manage section.
- Select the particular user.
- Navigate to the Sessions tab in the Manage section and click Logout.
Logout all users feature
Keycloak also provides a feature which allows administrators to logout all SSO users.
To configure the logout all users feature follow these steps:
- Go to the administrator console.
- Select the realm used in the SSO configuration for the tenant.
- Navigate to Clients in the Configure section.
- Select the client used in the SSO configuration.
- Set the Admin URL to “https://mytenant.cumulocity.com/user/keycloak”
To use the logout all users feature follow these steps:
- Go to the administrator console.
- Select the realm used in the SSO configuration for the tenant.
- Navigate to the Sessions tab in the Manage section and click Logout all.
Note that the logout event for all users is only performed in the scope of one Keycloak realm. Moreover, it is only sent for those tenants where the client being used as a configuration for the SSO feature has the correct Admin URL value.
In the Session tab, the Keycloak administrator can also check how many active sessions exist on the respective client and estimate how many tenants and users will be affected by the logout event.
To confirm if the logout event for all users or a single user has been received by the tenant, the Cumulocity administrator can verify if there is information about the logout event in the audit logs. The audit logs are available in the Administration application under Accounts in the Audit Logs tab.
Integration with Azure AD
The integration was successfully verified against Azure AD using OAuth2 and OpenID Connect (SAML is not supported). The configuration steps are available in https://docs.microsoft.com/en-us/azure/active-directory/develop/v1-protocols-oauth-code.
The following steps illustrate how to use Azure AD (Azure Active Directory) for SSO in Cumulocity.
Requirements
You need administrative access to your Azure AD.
To configure Azure AD
To connect Cumulocity to Azure AD, you must create an App registration in Azure AD.
- Select App Registrations under Manage on the left and at the top click New Registration.
- In the resulting window, provide a name for the new App registration.
- As Redirect URI type select “Web” and enter the URL to your tenant OAuth endpoint, for example “https://documentation.cumulocity.com/tenant/oauth”. You can derive this value from your Cumulocity tenant. Navigate to Administration > Settings > Authentication > Single sign-on. The redirect URL is prefilled by the platform.
Optionally, set for example, “https://<tenant_domain>/apps/*” if in the Cumulocity SSO configuration
Redirect to the user interface applicationis enabled. - Click Register to create the App registration.
The overview in the details page of your App registration contains several IDs and endpoints that you need later on, like the Application (client) ID and the Directory (tenant) ID (for your tenant in Cumulocity).
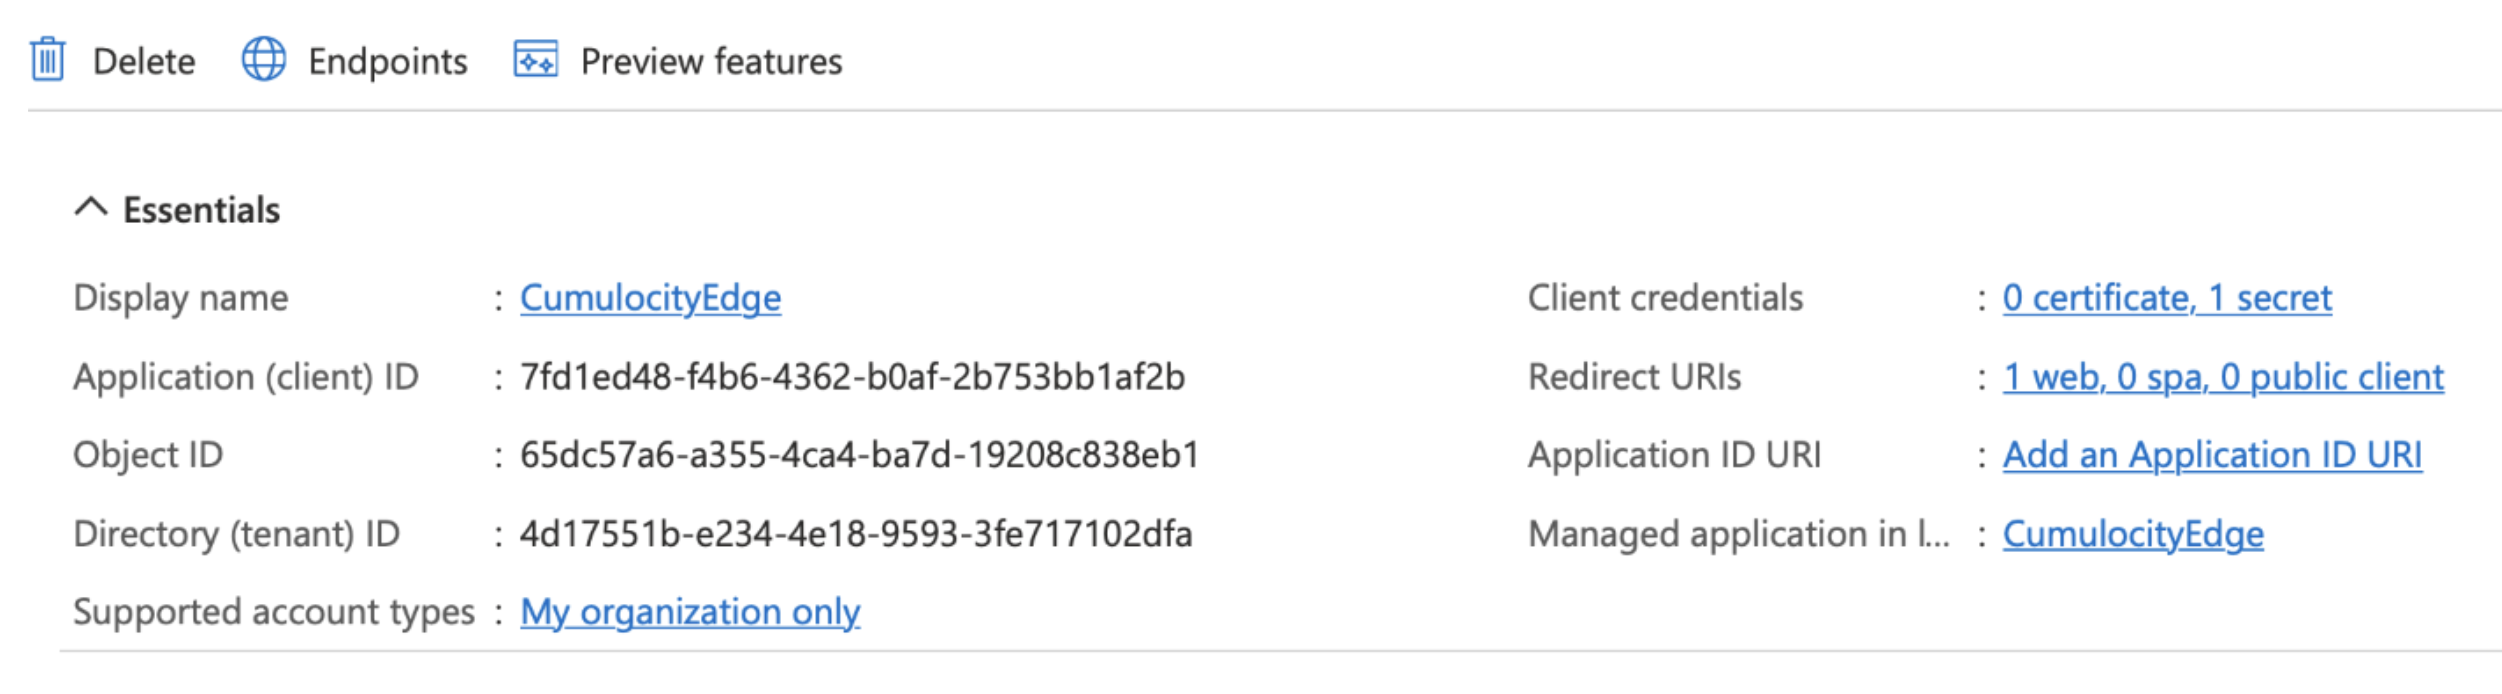
Moreover, the App registration requires a secret which is used by Cumulocity for the authentication.
- In the details page of your App registration, click Certificates & secrets under Manage on the left.
- Select New client secret.
- Enter a description and select an expiry time.
- Click Add to add the secret.
Caution
- Copy the value of the new secret to another location. It will no longer be visible once you have left the page.
- The secret string must not include a “=” character as this may conflict with the later usage in a URL. If it does, create a new one.
Optionally, create a user in Azure AD that you would like to use with Cumulocity.
To configure SSO for Azure AD in Cumulocity
Navigate to Settings > Authentication in the Administration application and switch to the Single sign-on tab.
Retrieve the relevant information by a GET request to:
https://login.microsoftonline.com/<Directory tenant ID>/.well-known/openid-configuration
The response will look like this:
  {
      "token_endpoint": "https://login.microsoftonline.com/4d17551b-e234-4e18-9593-3fe717102dfa/oauth2/token",
      "token_endpoint_auth_methods_supported": [
          "client_secret_post",
          "private_key_jwt",
          "client_secret_basic"
      ],
      "jwks_uri": "https://login.microsoftonline.com/common/discovery/keys",
      "response_modes_supported": [
          "query",
          "fragment",
          "form_post"
      ],
      "subject_types_supported": [
          "pairwise"
      ],
      "id_token_signing_alg_values_supported": [
          "RS256"
      ],
      "response_types_supported": [
          "code",
          "id_token",
          "code id_token",
          "token id_token",
          "token"
      ],
      "scopes_supported": [
          "openid"
      ],
      "issuer": "https://sts.windows.net/4d17551b-e234-4e18-9593-3fe717102dfa/",
      "microsoft_multi_refresh_token": true,
      "authorization_endpoint": "https://login.microsoftonline.com/4d17551b-e234-4e18-9593-3fe717102dfa/oauth2/authorize",
      "device_authorization_endpoint": "https://login.microsoftonline.com/4d17551b-e234-4e18-9593-3fe717102dfa/oauth2/devicecode",
      "http_logout_supported": true,
      "frontchannel_logout_supported": true,
      "end_session_endpoint": "https://login.microsoftonline.com/4d17551b-e234-4e18-9593-3fe717102dfa/oauth2/logout",
      "claims_supported": [
          "sub",
          "iss",
          "cloud_instance_name",
          "cloud_instance_host_name",
          "cloud_graph_host_name",
          "msgraph_host",
          "aud",
          "exp",
          "iat",
          "auth_time",
          "acr",
          "amr",
          "nonce",
          "email",
          "given_name",
          "family_name",
          "nickname"
      ],
      "check_session_iframe": "https://login.microsoftonline.com/4d17551b-e234-4e18-9593-3fe717102dfa/oauth2/checksession",
      "userinfo_endpoint": "https://login.microsoftonline.com/4d17551b-e234-4e18-9593-3fe717102dfa/openid/userinfo",
      "kerberos_endpoint": "https://login.microsoftonline.com/4d17551b-e234-4e18-9593-3fe717102dfa/kerberos",
      "tenant_region_scope": "EU",
      "cloud_instance_name": "microsoftonline.com",
      "cloud_graph_host_name": "graph.windows.net",
      "msgraph_host": "graph.microsoft.com",
      "rbac_url": "https://pas.windows.net"
  }
Now enter the following values in the configuration:
| Azure | Cumulocity | Value |
|---|---|---|
| Login URL; OpenID config; Beginning of token endpoint | Azure AD address | Address of your Azure AD tenant, for example “https://login.microsoftonline.com” |
| Home > Overview > Primary Domain | Tenant | <directoryName>.onmicrosoft.com, for example “admtest.onmicrosoft.com” |
| OpenID config “issuer” | Token issuer | Token issuer value in form of a HTTP address: “https://sts.windows.net/<Directory tenant ID>/”. Note that this won´t work without the tailing slash. |
| App registration > <app> > Application (client) ID | Application ID | for example “7fd1ed48-f4b6-4362-b0af-2b753bb1af2b” |
| Redirect URI | Address of your Cumulocity tenant followed by “/tenant/oauth”, or optionally followed by “/apps/*” when Redirect to the user interface application is enabled. |
|
| App registration - <app> > Certificates & secrets > Value | Client secret | Azure AD client secret, for example “hE68Q~uC1.BlSzGJSDC3_UEFvvyIZvRcCxbvV345” |
| From OpenID config | Public key discovery URL | “https://login.microsoftonline.com/common/discovery/keys” or “https://login.microsoftonline.com/ |
Optionally single logout can be configured:
| Field | Description |
|---|---|
| Redirect after logout | Activates single logout by redirecting the user, after logout, to the authorization server logout endpoint |
| Redirect URL | Address to redirect the user to after successful logout from the authorization server |
After configuring SSO in Cumulocity, you can try to login. You might get an “access denied” error, if this user has no access mapping yet. But you should see a “User login” event and a JSON web token in the audit logs (Administration > Accounts > Audit logs).
The content looks like this:
{
    "typ": "JWT",
    "alg": "RS256",
    "x5t": "2ZQpJ3UpbjAYXYGaXEJl8lV0TOI",
    "kid": "2ZQpJ3UpbjAYXYGaXEJl8lV0TOI"
} {
    "aud": "7fd1ed48-f4b6-4362-b0af-2b753bb1af2b",
    "iss": "https://sts.windows.net/4d17551b-e234-4e18-9593-3fe717102dfa/",
    "iat": 1660815959,
    "nbf": 1660815959,
    "exp": 1660820080,
    "acr": "1",
    "aio": "ASQA2/8TAAAAg0xPUeu6HKAlgK3vZJsW8TdejlNB3BGSz4XFmJLzPt0=",
    "amr": [
        "pwd"
    ],
    "appid": "7fd1ed48-f4b6-4362-b0af-2b753bb1af2b",
    "appidacr": "1",
    "family_name": "Doe",
    "given_name": "Jane",
    "ipaddr": "51.116.186.93",
    "name": "Jane Doe",
    "oid": "afbff765-592e-4ae1-9334-b968dad59c84",
    "rh": "0.AXkAG1UXTTTiGE6Vkz_nFxAt-kjt0X-29GJDsK8rdTuxryuUAAw.",
    "scp": "openid User.Read User.Read.All User.ReadBasic.All",
    "sub": "zRTnTukAjU11ME1aqiPMOdwk9jVNmInXbeuoUr_3cYk",
    "tid": "4d17551b-e234-4e18-9593-3fe717102dfa",
    "unique_name": "jane@admtest.onmicrosoft.com",
    "upn": "jane@admtest.onmicrosoft.com",
    "uti": "IcTqpKPIA0G_P1Lyw6xBAA",
    "ver": "1.0"
} [
    256 crypto bytes
]
You can now use the claims to map user attributes and give permissions in the same way as described in Custom template configuration.
Using access tokens from the authorization server
You can directly request Cumulocity to use OAuth2 access tokens from your authorization server. This way, your applications or users can access resources without logging in to the platform or using Basic authentication. This leverages your authorization server to get access tokens for your applications which you can send in subsequent request to Cumulocity.
Requirements
This feature requires the following on top of the general requirements:
- Your authorization server must support the OAuth2 client credentials grant type.
- All microservices are built with Microservice Java SDK version 1018.6.0 or higher. For custom-built microservices, refer to Security.
To configure authentication with access tokens from authorization servers
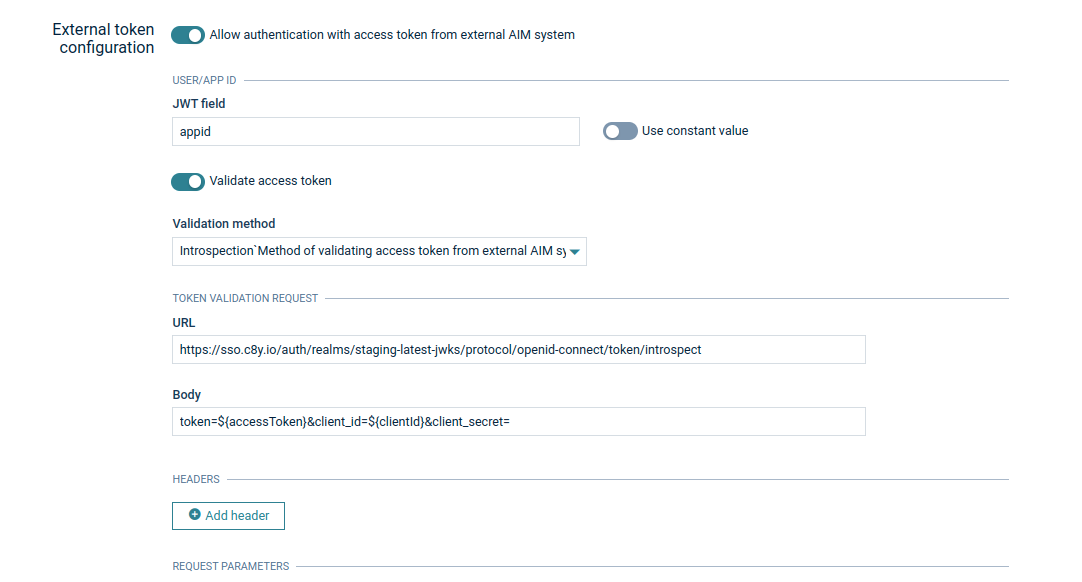
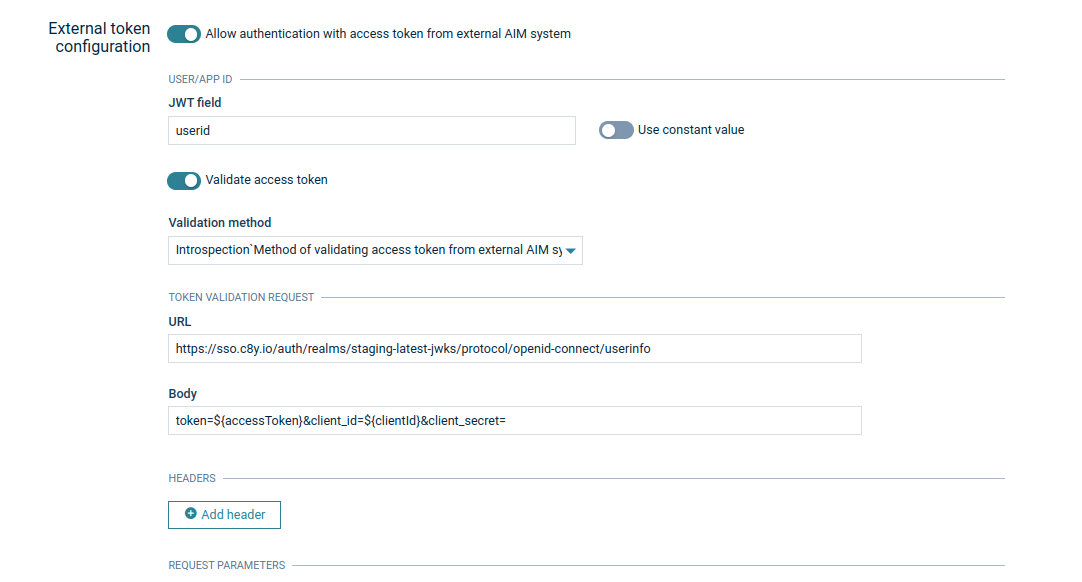
Enable or disable this authentication option in the External token configuration section.

If enabled, this authentication takes precedence over the standard JWT token authentication, which means, for example, that an HTTP request to Cumulocity with the header Authorization: Bearer {{access token}} assumes that the source of the access token is your authorization server instead of the token being issued by Cumulocity.
Configure the user ID or the application ID to any top-level claim in the access token.

Cumulocity creates a user which gets assigned the configured user ID or application ID. Additionally, this user is granted the roles to access to the applications defined in the Access mapping section.
Info
If it is set, the configuration allows you to create a Cumulocity user representing your applications (the access tokens are obtained via the client credentials flow),
or the users of your authorization server (the access tokens are obtained with the password grant type).
By default, Cumulocity verifies that the token is not expired and its signature matches the signature you have configured earlier. You can strengthen the validation of the token by configuring either an introspection or a user info validation with the necessary credentials. This way, the platform knows if the access tokens were intentionally invalidated or expired. You cannot access Cumulocity resources with an invalidated access token.
Introspection endpoint
Cumulocity uses token introspection to verify the validity of the access tokens of your applications. In general, this endpoint can be used for access tokens obtained via the client credentials flow or any other OAuth2 flow.
To configure the introspection, provide an introspection endpoint and a URL-encoded (x-form-urlencoded) body containing the access token, the client ID and the client secret, and an “Authorization” request header.
Cumulocity requests the introspection endpoint of your authorization server to query the status of the access token.
If the token is active, proceed with verifying the token signature.
You can configure the Access token validation frequency to set how often the introspection is performed as it may be costly to always call the authorization server for the same access token. The validation status of the token is cached internally for the specified time. If the token is revoked in the meantime, Cumulocity will only be aware during the next validation, that is, the token is still considered until the next validation. To avoid this, use a frequency. The default value is one minute.

User info endpoint
The user info request can also be used to check the validity of the access token of your users. Unlike introspection, a user info request requires a user context. This means you cannot use it to validate access tokens obtained with the client credentials flow.
Caution
If you use one of the two validation methods, make sure that your authorization server exposes the introspection or the user info endpoint.
Troubleshooting
Inspect token content
It can be particularly helpful to inspect the content of the authorization token sent to the platform as some of its fields contain the information required for the correct configuration described above.
In the Administration application, click Accounts > Audit logs, filter by the type “Single sign-on” and look for entries with “JSON web token claims”.
The contexts of the token will be presented in JSON format.

Enforce the use of the tenant domain in SSO login
If a tenant is configured to use the tenantId in the baseUrl (instead of a tenant domain), users may experience
unexpected redirect behavior after authenticating via SSO.
If a user opens an application by entering its URL directly and initiates login via SSO, they may not be returned to the intended application after authentication. Instead, they may be redirected to the default application configured for the tenant.
This can be changed by setting the following tenant options:
- category:
sso - key:
sso-redirect-default-application - value:
false
Setting this tenant option to false will enforce the use of the tenant domain during SSO login. This results in:
- Correctly scoped cookies being set for the intended application, ensuring the user is redirected back to the original application after successful authentication.
- Support for SSL certificates using Subject Alternative Name (SAN), eliminating the need for wildcard or tenant-specific certificates.
When to use:
Apply this setting when:
- The tenant environment is configured with base URLs that include
{tenantId}instead of{tenantDomain}. - Users are redirected to the wrong application after SSO login.
- You want to use a single SSL certificate with SAN entries instead of maintaining separate certificates for each domain.