Introduction
Cumulocity can interface with LORIOT Network Server through the Loriot agent microservice. You can:
- Register the device in two ways:
- Create a Loriot LNS connection and register the device using Cumulocity.
- Configure the Loriot Agent endpoint via Loriot Network Server and register the device via uplink message. In order to be able to send downlink messages, the devices created using this method must be re-registered via Cumulocity to be associated with a connection and device type.
- Assign a device protocol for the LoRa device for payload processing.
- Decode upstream payload packets using a web-based user interface.
- Post-process raw device data through Cumulocity events.
- Make use of existing Cumulocity features with LoRa devices, for example: connectivity monitoring, device management, data visualization with dashboards, real-time analytics and more.
The following illustration gives an overview of the Cumulocity Loriot LoRa integration.
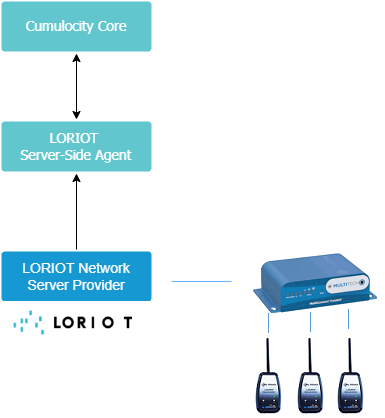
Device registration via uplink message
Before using LoRa devices with Cumulocity, you must configure the Cumulocity Loriot agent endpoint details in LORIOT Network Server.
Configuring the Loriot endpoint using basic authentication
In LORIOT Network Server you can create multiple applications. Each application allows you to configure LoRa devices.
To specify the Loriot agent endpoint with user credentials, navigate to one of the applications in your LORIOT Network Server account and select Output in the Application menu in the navigator.
LORIOT Network Server forwards the LoRa device messages to the external applications using different connectors which are available in the Output section.
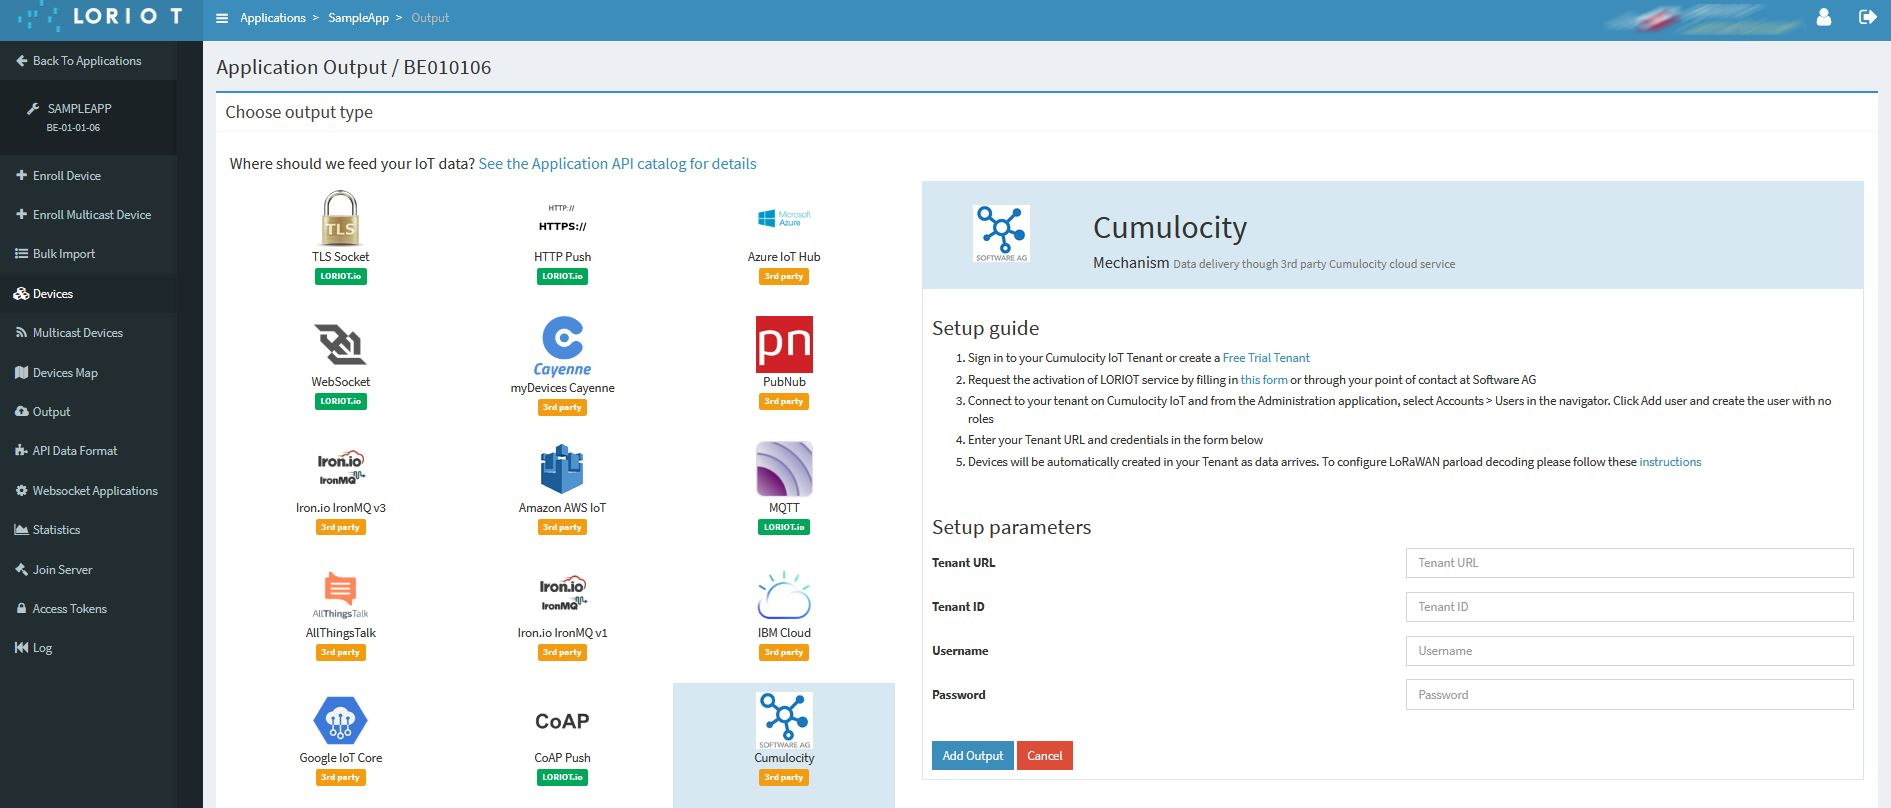
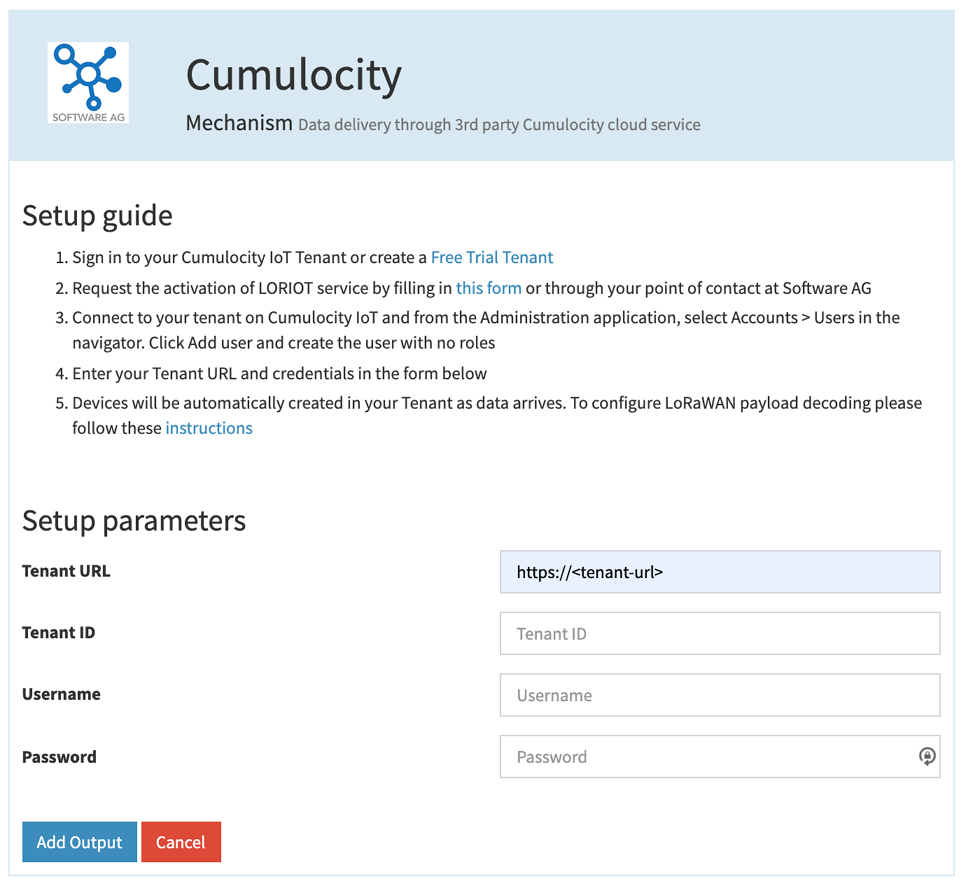
Use Cumulocity data forwarder for configuring the Loriot endpoint using basic authentication.
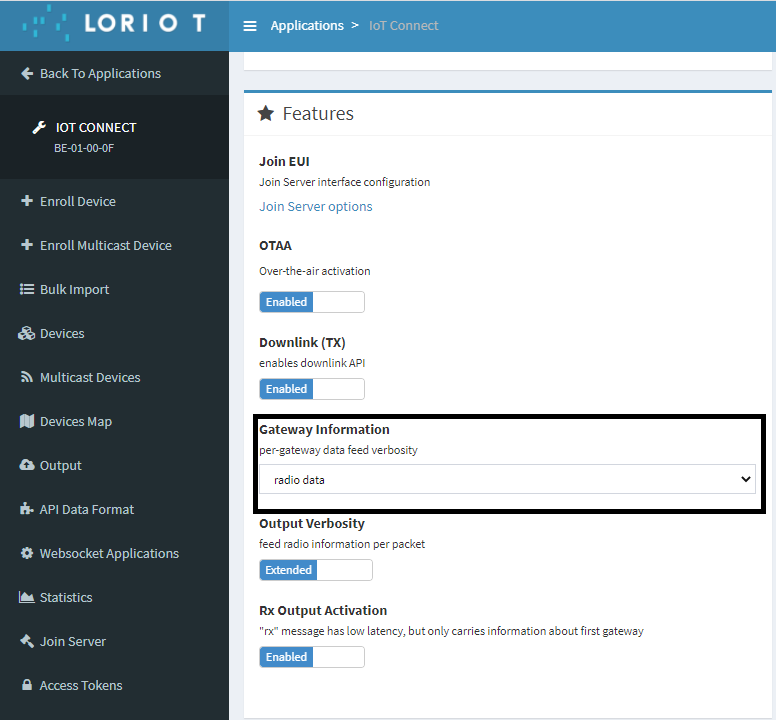
Always keep the Gateway Information option enabled because the Loriot agent only processes “gw” (gateway information) messages.
The Loriot devices can now be registered in Cumulocity when uplink messages are received.
Device creation via Loriot uplink message
While processing the Loriot LoRa device request, the Loriot agent automatically creates the device in the Cumulocity platform, if it does not yet exist. This means that you do not need to register the Loriot LoRa device explicitly.
LORIOT Network Server forwards two types of messages to the Loriot agent: “rx” (uplink message) and “gw” (gateway information).
The Loriot LoRa agent only processes “gw” messages to avoid duplicate measurements or events in Cumulocity, because most of the information matches with “gw” message whereas “gw” message also carries all gateway information.
In the Loriot LoRa device message below, gws represents a list of gateways involved in the network:
{
    "cmd"  : "gw",
    "EUI"  : "0102030405060708",
    "ts"   : 1470850675433,
    "ack"  : false,
    "fcnt" : 1,
    "port" : 1,
    "data" : "0102AABB",
    "freq" : 868500000,
    "dr"   : "SF12 BW125 4/5",
    "gws"  : [
        {
            "rssi"  : -130,
            "snr"   : 1.2,
            "ts"    : 43424140,
            "gweui" : "1122334455667788.0",
            "lat"   : 47.284687,
            "lon"   :  8.565746
        }
    ]
}
The Loriot LoRa agent picks gw with the oldest timestamp for processing.
The Loriot LoRa agent maps the rssi value to the standard Cumulocity SignalStrength object and updates the device managed object with the lat and lon values.
In order to be able to send downlink operations, the devices registered via uplink message must be re-registered using Cumulocity (see Device registration via Cumulocity), to be associated with a connection and a device type.
Device registration via Cumulocity
Creation of Loriot LNS Connection in Cumulocity
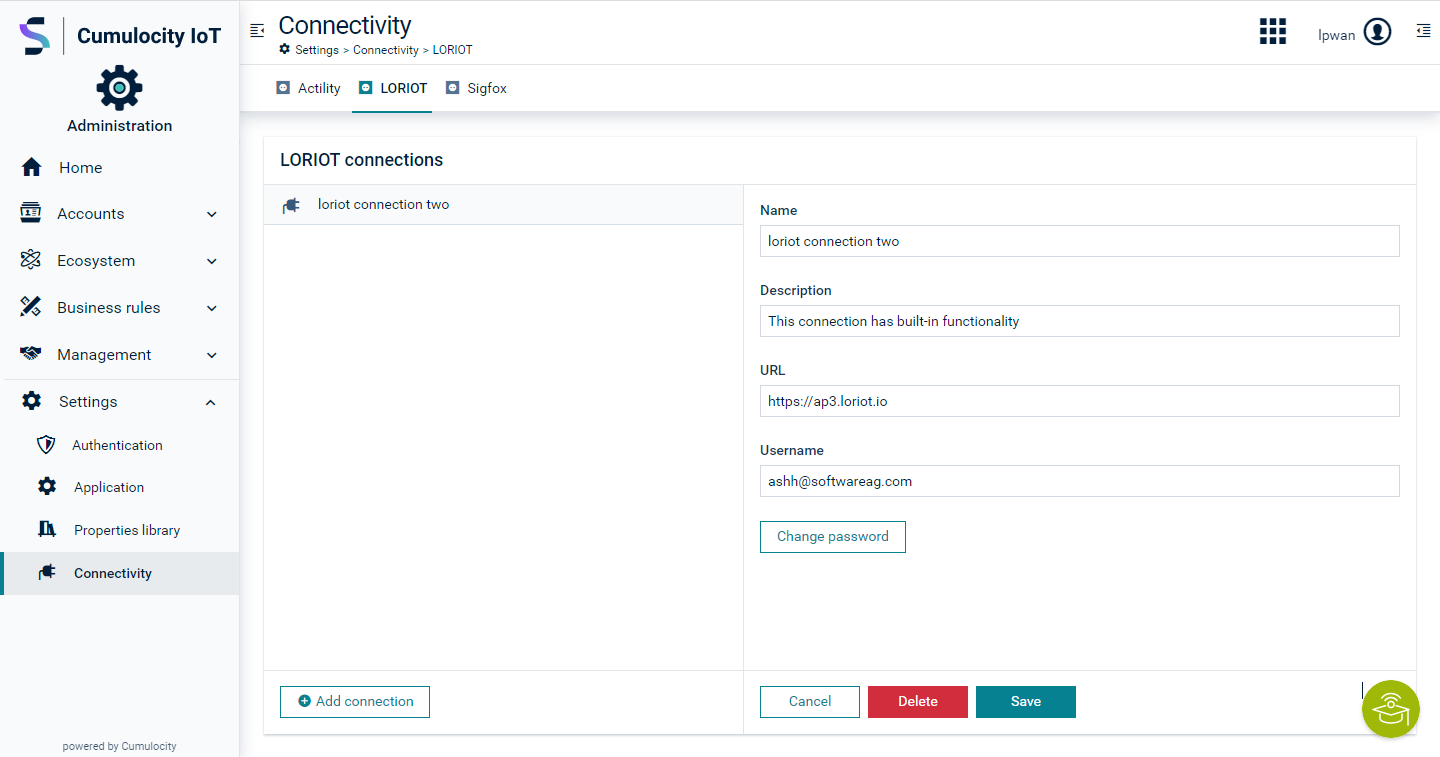
Before using LoRa devices with Cumulocity, you must configure the Cumulocity Loriot agent endpoint details in the Administration application. Click the Connectivity tab in the Settings menu to create, edit, delete or update multiple Loriot connections.
To add a new connection
When you select Connectivity for the first time, you are asked to create a connection. Click Add Connection.
Enter the following information:
- Name - the name of the Loriot connection being created
- Base URL - the URL associated with the Loriot provider account
- Username - your Loriot account username
- Password - your Loriot account password
Click Save. If the information you have entered is correct, the message “Connection created” appears.
To add another connection, click Add Connection and follow the steps above.

To update a connection
Select the connection to be updated, make your edits, and save the connection.
If there are devices associated with the connection, an error message appears, stating “Can not update the LNS Connection with <name of LNS Connection> as it’s associated with <number of devices>. Click the link to download the file with the details of the associated devices: /service/<agent-context-path>/lns-connection/<lns-connection-name>/device”.
To delete a connection
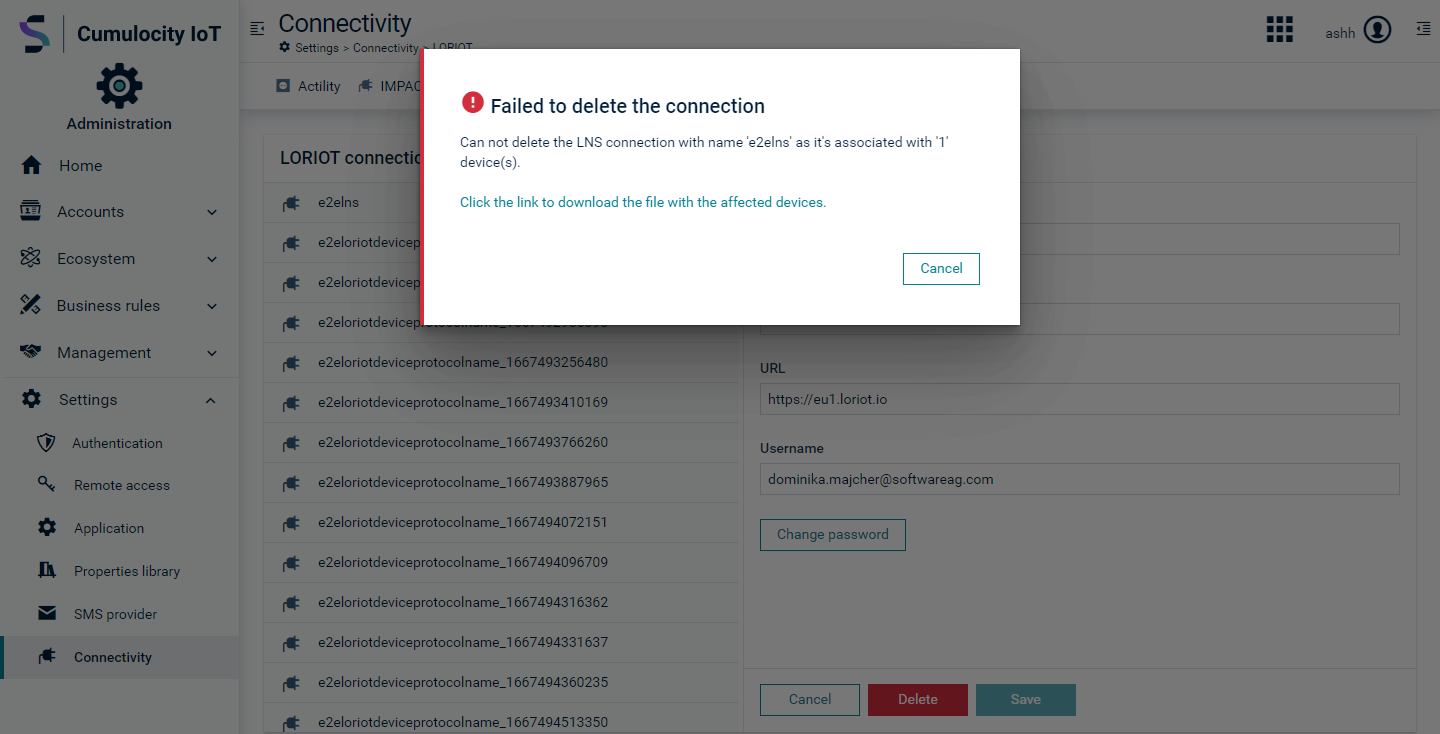
Select the connection to be deleted and click Delete.
If there are devices associated with the connection, an error message appears, stating “Can not delete the LNS Connection with <name of LNS Connection> as it’s associated with <number of devices>. Click the link to download the file with the details of the associated devices: /service/<agent-context-path>/lns-connection/<lns-connection-name>/device”.
Loriot device registration
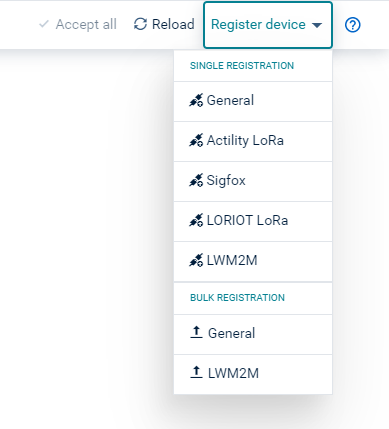
To register a Loriot device in Cumulocity navigate to Devices > Registration in the Device management application, click Register device at the top right and select Single device registration > LORIOT LoRa from the dropdown.
In the next window, fill in the required information:
- Title - title of the device to be registered.
- Device EUI - this is the unique identifier for the device. It is a 16 character (8 byte) long hexadecimal number. You can find it on the device itself.
- Application EUI - this is a global application ID in the IEEE EUI64 address space that uniquely identifies the application provider of the device. It is a 16 character (8 byte) long hexadecimal number.
- Application key - this is an AES-128 application key specific for the device that is assigned to the device by the application owner and is responsible to encrypt. The application key is a 32 character (16 byte) long hexadecimal number.
- Connection - lists all configured Loriot connections in the tenant. The Application name option (see below) is populated based on the selected Loriot connection.
- Application name - select the appropriate application name under which the device must be registered in the Loriot provider.
- Device protocol - select the appropriate device protocol from the dropdown list. For more information on how to create a device protocol refer to Creating device protocols.
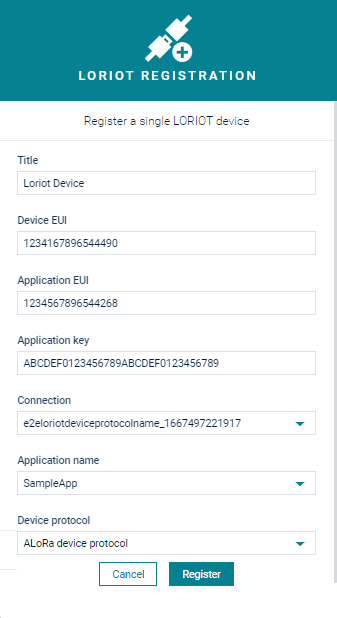
Click Register to submit the device registration request and create the device.
You can verify that the device is connected by incoming events. Click on a device and open its Events tab. All events related to this device are listed.
For more information on viewing and managing your connected devices, also refer to the Device management application.
In order to migrate the device from one LNS connection to another, the device must be re-registered:
- Navigate to the LPWAN tab of the Device.
- Click the Provider connection dropdown.
- A prompt will appear stating that in order to migrate the device from one LNS connection to another, you must re-register the device. Click the Re-Register button.
- You are directed to the device registration page where you can perform the re-registration following the steps above and selecting the desired LNS connection.
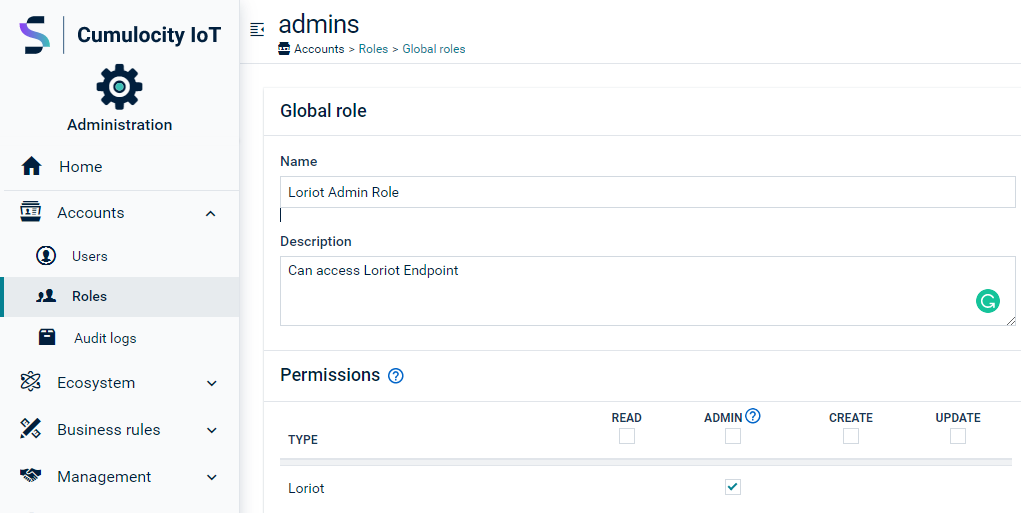
Assigning the Loriot admin role permission
In the Cumulocity platform, assign the Loriot admin role permission to the user configured in LORIOT Network Server.
In the Administration application, click Roles in the navigator and select the ADMIN checkbox for “Loriot”.
Creating device protocols
To process data from LoRa devices, Cumulocity needs to understand the payload format of the devices. Mapping payload data to Cumulocity data can be done by creating a LoRa device protocol.
During the device registration, you can associate this device protocol. The received uplink message for this device with a hexadecimal payload will then be mapped to the ones you have configured in your device protocol.
In order to create a device protocol, navigate to the Device management application and select Device protocols in the Device types menu in the navigator. You can either import an existing device protocol or create a new one.
Importing a predefined device protocol
- In the Device protocols page, click Import.
- Select the predefined device type, for example “LoRaWAN Demonstrator” or upload from a file.
- Click Import.
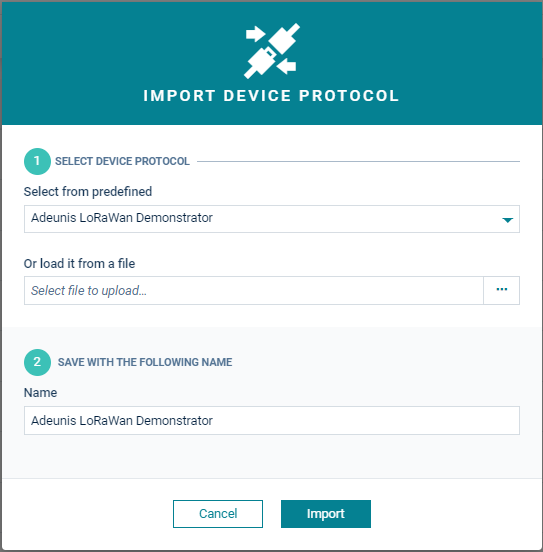
Alternatively, you may also load the device protocol from a file and import it.
Creating a new device protocol
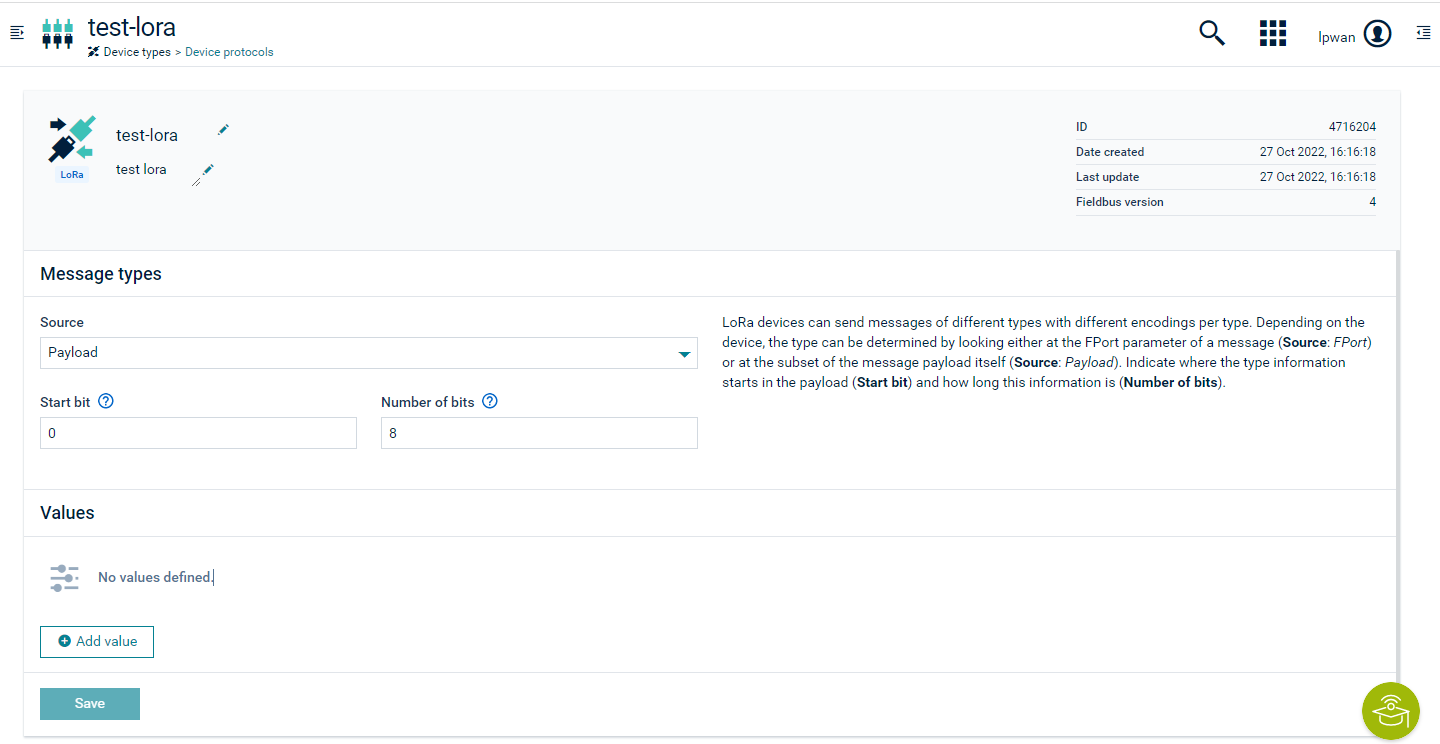
In the Device protocols page, click New device protocol in the top menu bar. The following window will open:
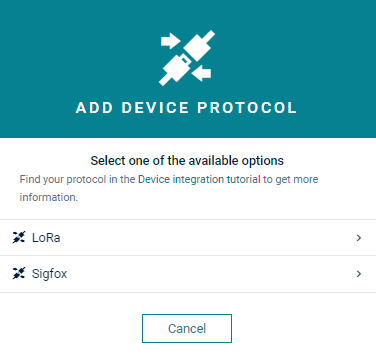
Select LoRa as the device protocol type, provide a name for it and click Create.
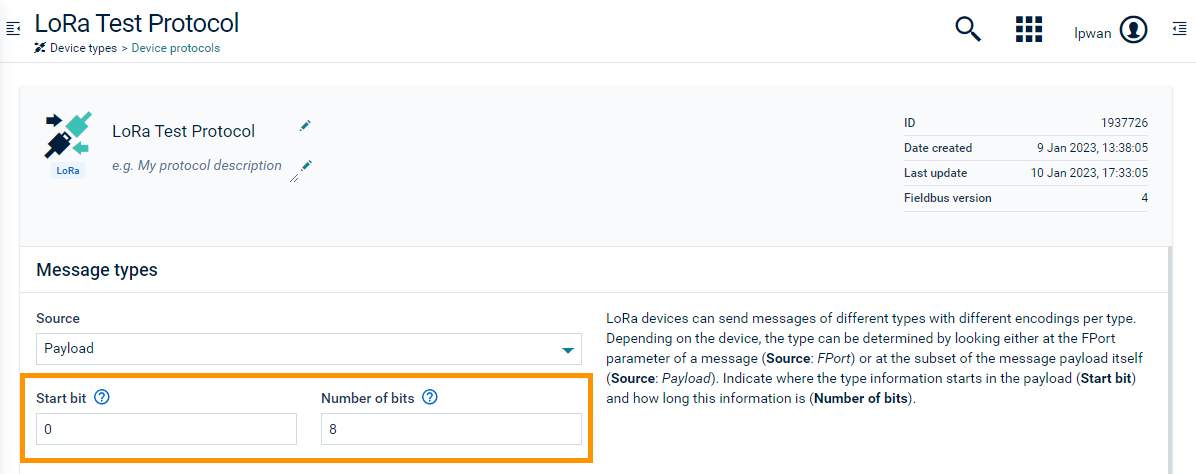
Under Message types, specify the message types. LoRa devices can send messages of different types with different encodings per type.
Select the way the message type is encoded in the Source dropdown box:
- FPort - if the message type can be determined by looking at the FPort parameter of a message.
- Payload - if the message type can be determined by looking at the subset of the message payload itself.
In the following example payload structure, the first byte indicates the message type source (as highlighted).

In the user interface you can enter this type of message type source information as follows: In the Start bit field, indicate where the message type information starts in the payload and in the Number of bits field, indicate how long this information is, for example start bit = “0” and number of bits = “8”.
Click Add value to create the value configuration.
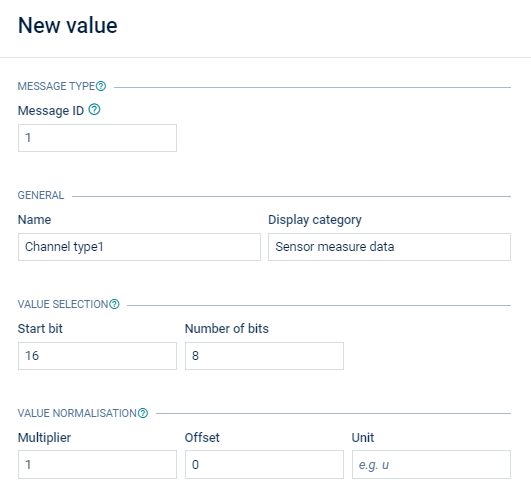
In the upcoming window, configure the relevant values as shown in this example.
New value window part 1
New value window part 2
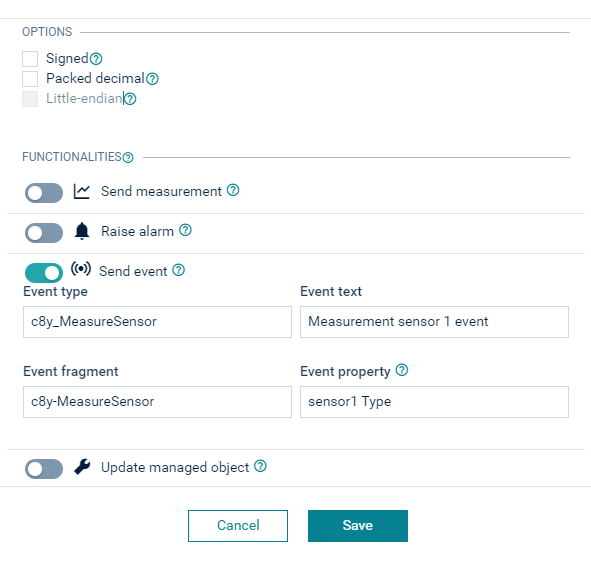
The value configuration maps the value in the payload of a message type to the Cumulocity data.
Under Message type, configure the Message ID according to your device message specification and map it to the Cumulocity data. The message ID is the numeric value identifying the message type. It will be matched with the message ID found in the source specified on the device protocol main page (that is, Payload or FPort). The message ID must be entered in decimal numbers (not hex).
In this example payload structure the message ID is “1”.

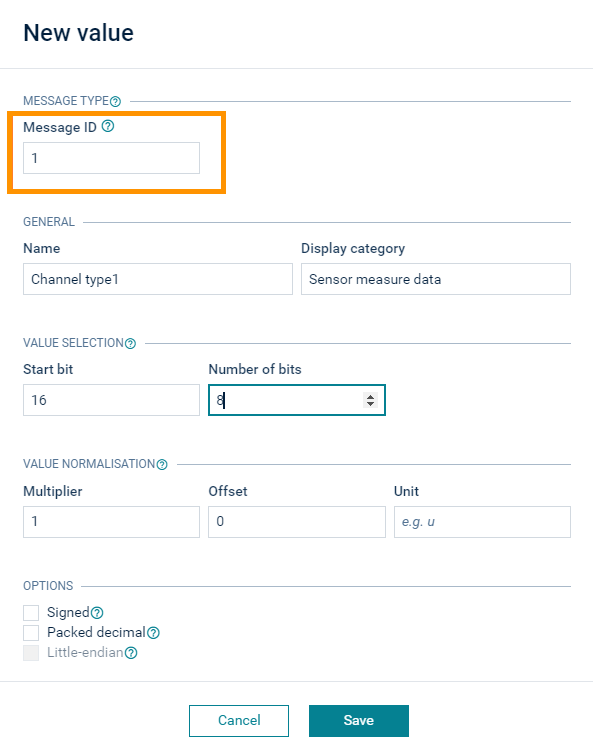
Under General, specify a name for the value and the category under which it will be displayed in the values list. The associated name for this value will be displayed under the Display category given.
Under Value selection, define from where the value should be extracted. In order to do so, indicate where the value information starts in the Start bit field and how long this information is in the Number of bits field. The maximum value for the number of bits is 32 bits (4 bytes).
In this example the “Channel 1 Type” information starts in byte 2 (that means, start bit = “16”) and is 1 byte long (that means, number of bits = “8”).

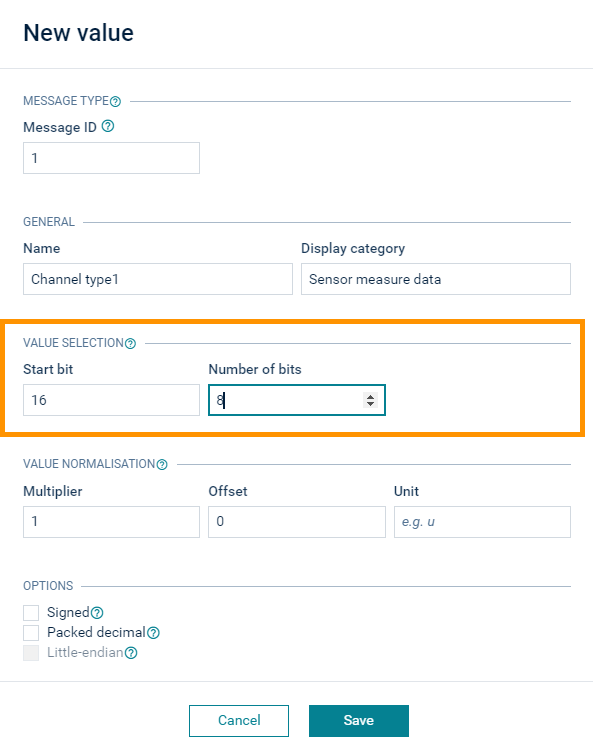
The hexadecimal value is converted to a decimal number and afterwards a “value normalisation” is applied.
Under Value normalisation define how the raw value should be transformed before being stored in the platform and enter the appropriate values for:
- Multiplier - this value is multiplied with the value extracted from the Value selection. It can be decimal, negative and positive. By default it is set to 1.
- Offset - this value defines the offset that is added or subtracted. It can be decimal, negative and positive. By default it is set to 0.
- Unit (optional) - a unit can be defined which is saved together with the value (for example temperature unit “C” for degree Celsius).
For detailed information on how to decode the payload, refer to the documentation of the device.
Under Options, select one of the following options, if required:
- Signed - if the value is a signed number.
- Packed decimal - if the value is BCD encoded.
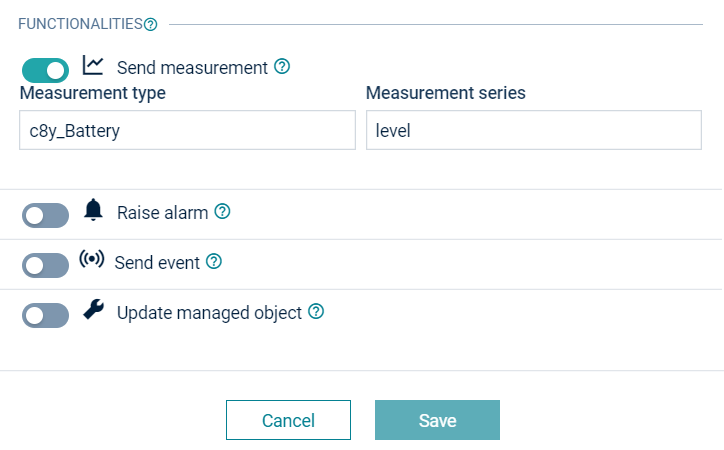
Under Functionalities, specify how this device protocol should behave:
- Send measurement - creates a measurement with the decoded value.
- Raise alarm - creates an alarm if the value is not equal to zero.
- Send event - creates an event with the decoded value.
- Update managed object - updates a fragment in a managed object with the decoded value.
You can also have a nested structure with several values within a measurement, event or managed object fragment. In case of a measurement all the properties of the same type will be merged to create a nested structure. In case of an event or a managed object all the properties with the same fragment are merged to create a nested structure. Also refer to the example of a nested structure for a “Position” device protocol below.
Click OK to add the values to your device protocol.
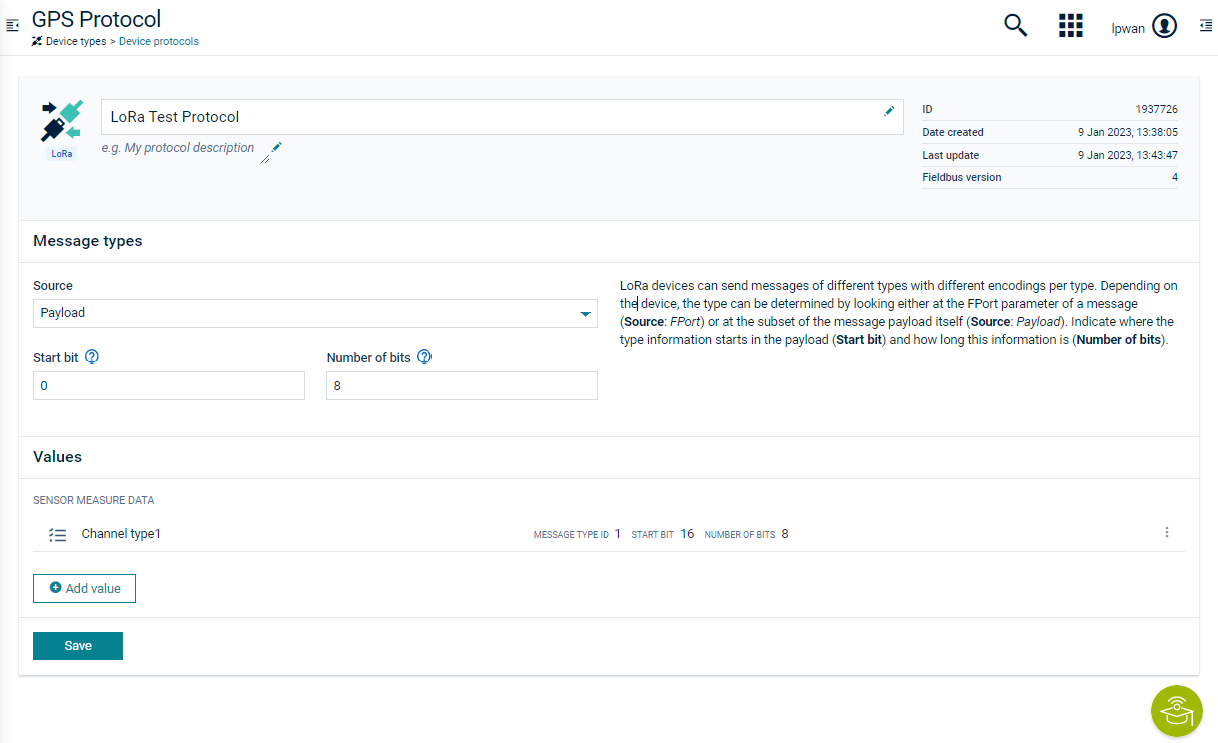
After clicking Save, your device protocol is created with the values you defined.
Example with single property
The following image shows an example for a message which sends a measurement when the battery level changes.
New value window part 1
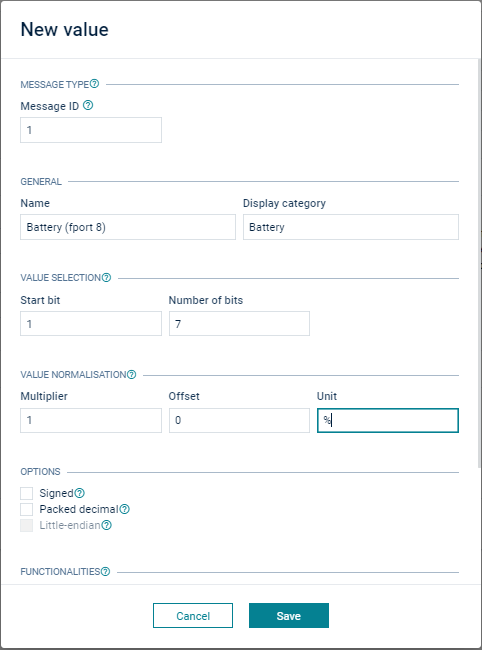
New value window part 2
Example with nested structure
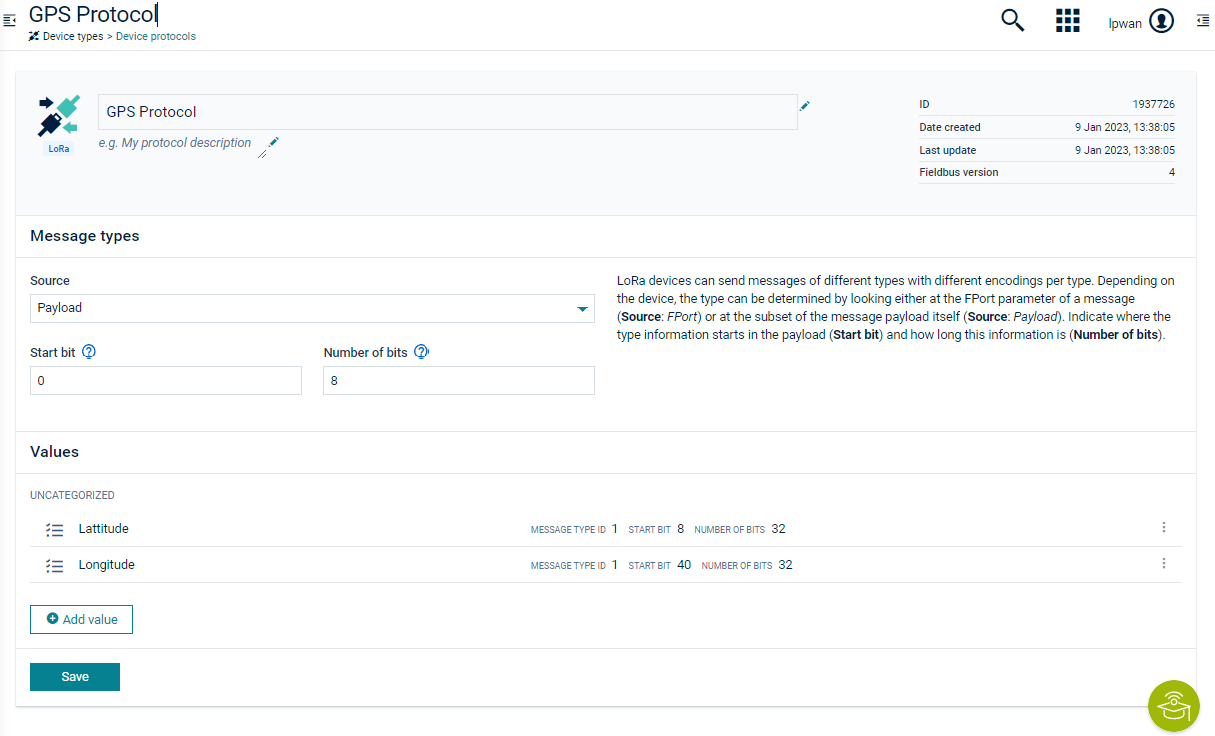
The following image shows an example of a nested structure for a device protocol reporting the current position of a GPS device. The display category is named “Position” and contains values for longitude and latitude.
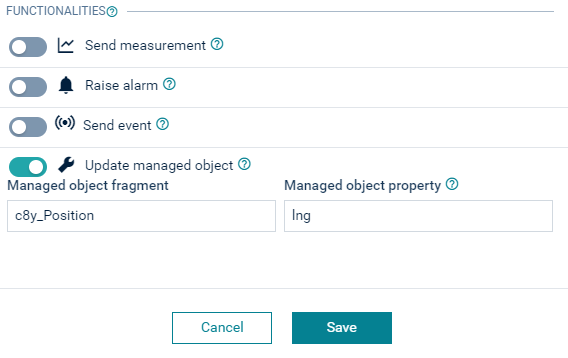
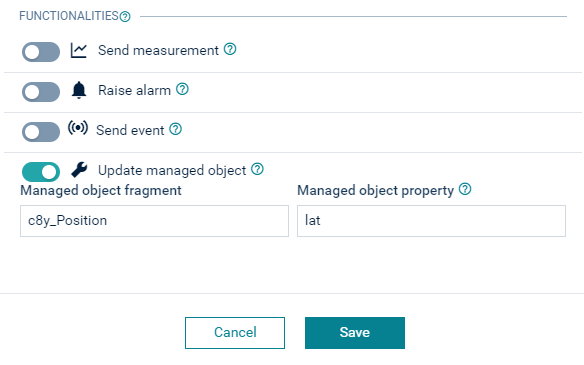
The message ID should be the same for all the values. Enter the rest of the parameters according to the instructions above. Enter “c8y_Position” in the Managed object fragment field and create a new value for each: longitude and latitude.
New value window, Longitude
New value window, Latitude
This will be the result:
Using Custom decoding
The Loriot agent also supports the decoding functionality by plugging in the custom microservice. Refer to LPWAN custom codec for further details.
Assign the Loriot LoRa device protocol
Once the Loriot LoRa device is available in the Cumulocity platform, you must assign a device protocol from the LPWAN tab.
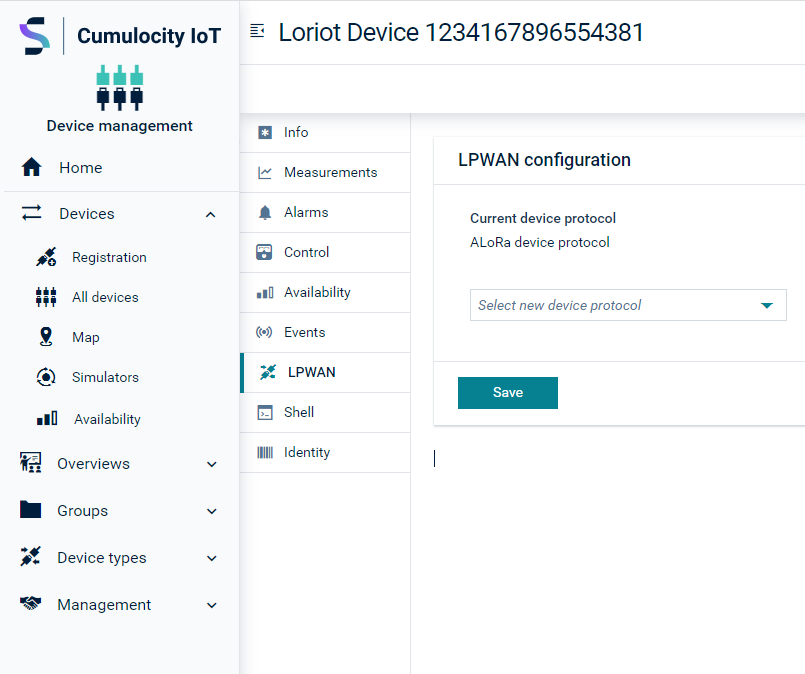
Select the respective protocol from the dropdown list and click Apply. If successfully applied, the message “Device protocol set” will show up.
Sending operations
If a Loriot device supports hexadecimal commands, you can send them using shell operations. Notice that these commands are not serial monitor commands. In order to send an operation, navigate to the device you want to send an operation to in the Device management application under All devices. Switch to the Shell tab.
In the following screenshot you can find some examples of a device protocol’s predefined commands and their format:
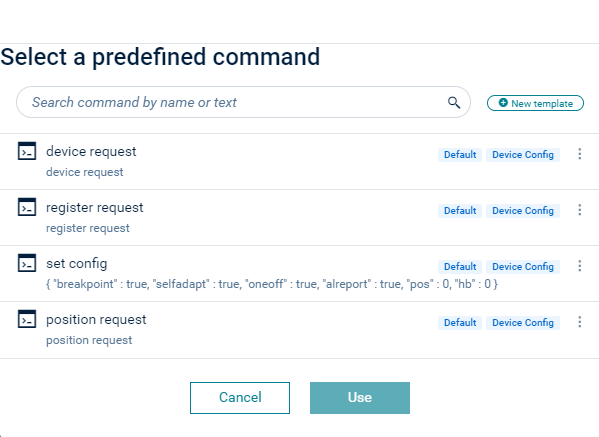
Enter the shell command or view/edit the predefined command in the Command field.
If you enter the command without defining a port, it will be sent to the default target port (that is, port 1) of the device. If you enter the command and define a port (format “command:port”), it will be sent to the specified target port instead of the default port.
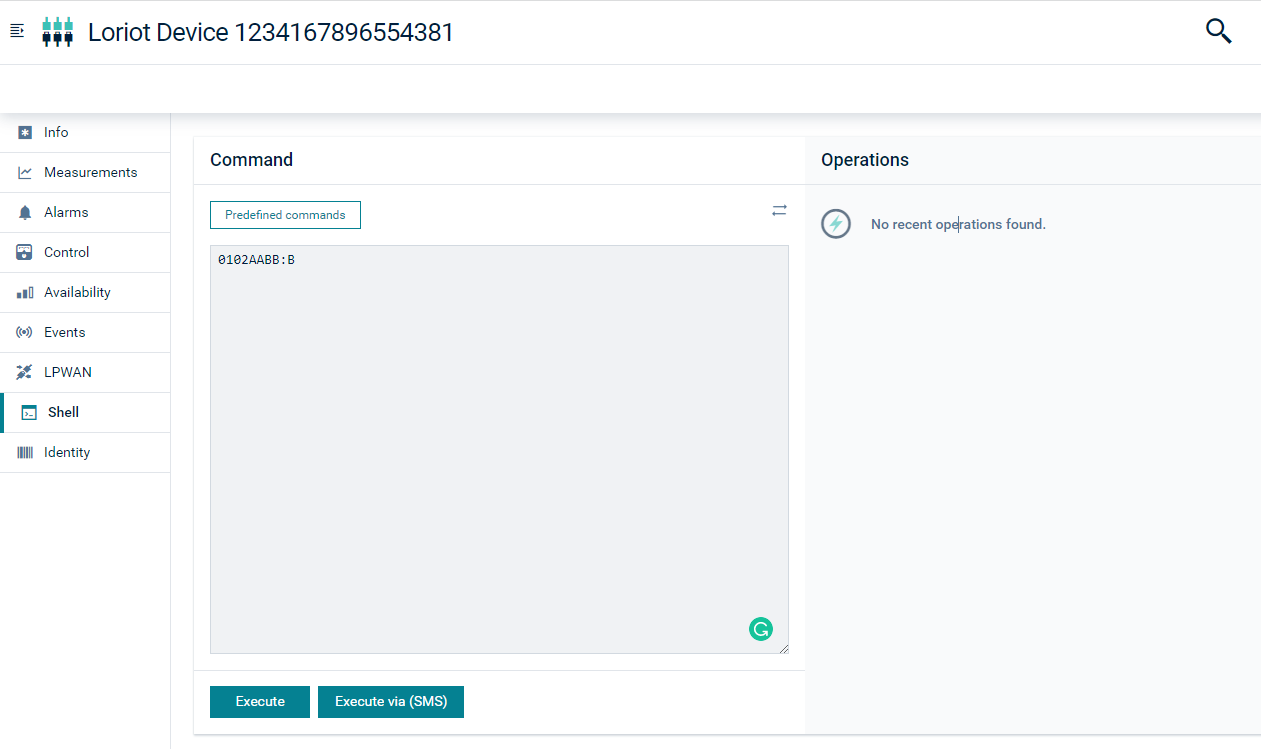
Click Execute. The operation will be sent to the device. The timing depends on Loriot platform.
The status of the operation is set to SUCCESSFUL when the operation has successfully been sent to the Loriot platform. The status of the operation is set to FAILED when a problem occurred with the validation of the command or after the operation has been sent to the Loriot platform.
Uplink message processing
On the receipt of an uplink message, the Cumulocity platform creates the following measurements and events, and updates the corresponding device managed object.
- Unprocessed data - an event of type
c8y_LoriotUplinkRequestis created with the unprocessed data. - Position - the
c8y_Positionfragment of the device managed object is updated to capture the latitude, longitude, altitude and accuracy information of the device. Also, an event is created with the position information. - Spreading factor - the
c8y_SpreadingFactorfragment of the device managed object is updated to capture the spreading factor of the device. - Signal strength - a measurement is created with RSSI and SNR values of the device signal strength.
Troubleshooting
Device registration
No LoRa device registered in Cumulocity after configuring the Loriot agent endpoint in the LORIOT Network Server account
Check whether the user configured in LORIOT Network Server has assigned the Loriot admin role since the Loriot agent verifies if the user has appropriate permissions.
Make sure that the Gateway Information is enabled in LORIOT Network Server since the Loriot agent only processes “gw” messages.
Device type error warning
The warning message “Device type error” shows up in the log if no device protocol has been assigned to the device. To assign a device protocol refer to the section Assign the Loriot LoRa device protocol.
