Introduction to building dashboard clients
This chapter introduces dashboards and the Dashboard Builder. It also describes how to run the tutorial application that is a companion to “Building dashboard clients”.
Web client requirements
Web clients can access Apama dashboards through their web browser. No Apama installation is required for web clients but they must satisfy the following requirements:
- A supported web browser version. See the Supported Platforms document for the current Apama version.
- Your browser must have cookies enabled for web pages served from the host where you are running your application server.
- If you have a pop-up blocker, be sure to set it to allow pop-ups for web pages served from the host where you are running your application server.
About dashboards
Dashboards provide the ability to view and interact with Apama applications that expose their state using DataViews. For more information about using DataViews to make application data available to clients, see Making application data available to clients. Dashboards contain charts and other objects that dynamically visualize the values of DataView fields. Dashboards can also contain control objects for creating, editing, and deleting DataView items.
An Apama project typically uses of one or more dashboards. Each dashboard defines a single display, or view, of information. Dashboards are created in the Dashboard Builder. Each dashboard is stored in a separate .rtv file. All .rtv files for a given project are stored in a single directory. This directory also contains a .dashboard file, which records various dashboard parameters, including the file that is to be used as the dashboard project’s main dashboard.
The contents of a dashboard, the charts displayed and the data shown, is determined when the dashboard is created in the Builder. The Dashboard Viewer provides the ability to use dashboards created in the Builder. Dashboards can also be deployed as simple web pages.
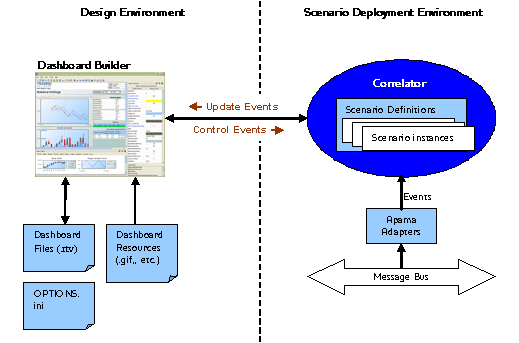
Deployed dashboards connect to one or more correlators via a dashboard data server or display server. As the DataView item’s fields are updated, update events are sent to all connected dashboards. When a dashboard receives an update event, it updates its display in real time to show the behaviour of the DataViews. User interactions with the dashboard, such as creating an instance, result in control events being sent via the data server or display server to the correlator.
Dashboard Builder communicates with running correlators so that you can see at design time what a dashboard will look like when deployed. Unlike a deployed dashboard, the Builder connects directly to the correlators it communicates with. The following diagram illustrates the design environment for dashboards:

In order to use Dashboard Builder to create a dashboard for a DataView, you need to start a correlator and inject the DataView into it. You should use a development correlator to initially develop dashboards, not a deployed correlator acting on live data.
Dashboard Builder does not support creating dashboards for DataViews that have not been injected into a correlator.
Starting Builder from the command line
Dashboard Builder can be started by running the dashboard_builder executable located in the bin directory of your Apama installation. This method of starting the Builder allows you to pass startup options on the command line. The Builder startup options are detailed in Command-line options for the Dashboard Builder.
To run the Builder from the command line
-
Do one of the following:
- Use an Apama Command Prompt or use the
apama_envwrapper as described in Setting up the environment using the Apama Command Prompt. - Set your current directory to the Apama
bindirectory.
- Use an Apama Command Prompt or use the
Scenario instance ownership
Scenario instances in a correlator include an attribute identifying the owner of the instance. When an instance is created through a dashboard, the current user ID is specified as the owner of the instance. For DataViews, the owner is provided by the EPL that sends the DataViewAddItem event.
By default, you are only allowed to see and operate on those scenario instances that you own, that is, the current user ID must match the owner attribute of the instance. There is one exception to this default: if the owner is specified as “*”, all users have access by default.
