Updating the Web SDK version
Version: 10.6.0.0 | Packages: @c8y/cli, @c8y/apps and @c8y/ngx-components
A UI build with an earlier version of the Web SDK is locked to the current version. A platform update doesn’t update the UI version, however a UI running against a newer backend always keeps working as all APIs are backwards compatible. That’s why an update makes mostly sense if a newer feature of the UI or the Web SDK needs to be used. Therefore, a new application needs to be built and deployed to the platform. This recipe describes best practices to do so.
Preparation
We recommend you to use a Source Control System to backup the data and to get better diffing of the code. If you are not using an SCM yet, see below for an introduction on how to use git to store your changes. If you are already using an SCM or you don’t want to use any, you can jump to the next section. If you decide not to use an SCM, backup your application before running the update.
Ensure that you have git installed on your system. Then open a terminal and run the following commands:
cd <<path/to-you-app>>
git init
git add .
git commit -m "init commit"
Now your code is committed to a local git repository stored in the .git folder.
Next this recipe explains you how to update the Web SDK.
If you don’t want to use git anymore after the update, you can simply erase the .git folder.
Updating
To update the Web SDK you can simply use the new command that is used for scaffolding:
c8ycli new <<app-name>> <<cockpit|devicemanagement|administration>> -a @c8y/apps@<<version>>
So for example if your current working directory is an application called “my-cockpit” based on Cumulocity’s Cockpit application and you want to update to version 10.6.2.0, you need to run the following command:
cd ..
c8ycli new my-cockpit cockpit -a @c8y/apps@1006.2.0
Info: The first two numbers of the version are combined (eg. 10.6 becomes 1006) as npm only supports semver version numbers. You can also remove the
-aflag to always update to the latest version (the version our cloud platform is running on).
The command simply copies over the files that are used for building a new application in the particular version. The following files are currently overwritten:
app.module.ts: The Angular module imports which might be aligned by your application to import custom Angular modules.index.ts: The bootstrapping file which is called first. This file is usually not changed.ng1.ts: The angularjs imports which might have been aligned to add or remove angularjs plugins.package.json: The npm dependencies, application options and names are stored in this file. This is very likely changed, e.g. when different options or a different dependency are used.polyfills.ts: The polyfills used to run our application in older browsers. This file is usually unchanged.tsconfig.json: The typescript configuration. It is usually unchanged.
These are the files that are overwritten by an update based on the version of that article. The list might change in later versions. Next, we need to reapply the changes that were made earlier to these files. A git diffing tool can be very helpful for that.
Diffing to reapply changes
A git diffing tool is useful to identify which changes have been made with the upgrade and which have been made earlier and now need to be reapplied. In the following screenshot we are using Visual Studio Code to identify the changes, as it has a well integrated diffing tool for git (mostly all other IDEs have support for git diffing as well):
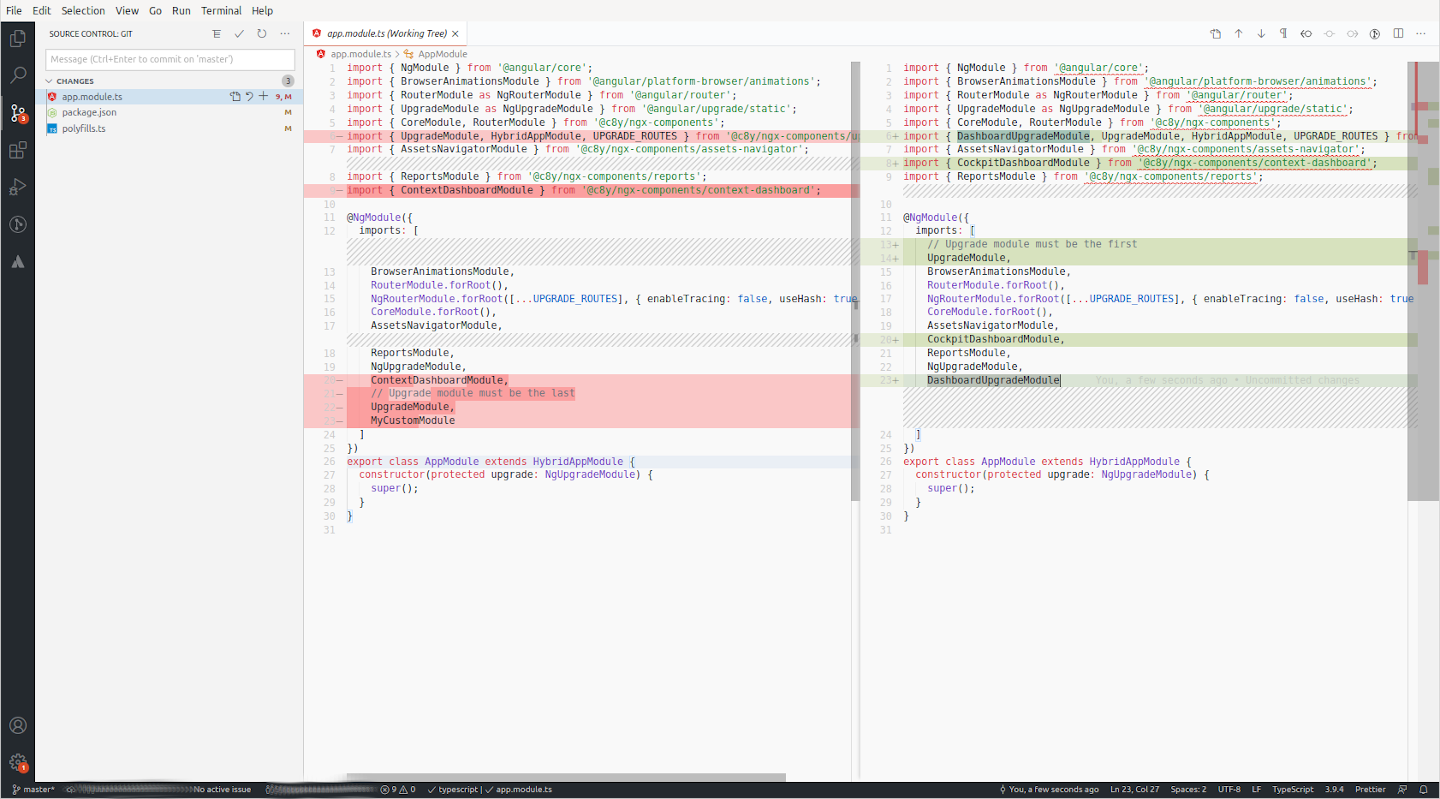
With that tool it is easy to compare which file was changed with the upgrade and where custom changes may need to be reapplied.
In this case MyCustomModule must only be placed in the upgrade app.module.ts.
When this change is done, the update can be verified.
Verifying the update
To check if the version update worked, it is usually a good practice to run it locally first.
Therefore, you need first to install the dependencies again.
Remove the current node_modules directory and run npm install (or yarn) again to refresh the dependencies.
After this, start the application with npm start. After login you can check the current UI version by clicking on you username.
If everything worked as expected, you can now deploy your application by running the commandnpm run deploy.
Conclusion
The update process is sometimes a bit tricky, especially if you have many changes in the app.module.ts.
However, with git and Visual Studio Code the visual diffing may help you to accomplish this task.
Also, it is a good practice to put your own Angular customizations into a module and only to make changes to the app.module.ts when it is absolutely necessary.
Migrating applications
This section targets developers who have either already developed a plugin with the AngularJS SDK for plugins or want to extend the existing default applications.
You should have read and understood the following concepts:
- Appendix: Migration history, explaining when to use which SDK.
- Migration history, explaining which versions you can use with the new SDK.
- c8y Command Line Tool (CLI), enabling you to install the new tooling.
Setting up a hybrid application
With a hybrid application AngularJS and Angular can be used at the same time. It allows to use not-migrated plugins written in AngularJS in an Angular context. The CLI automatically sets up a hybrid application, if you use one of our default applications as a template (cockpit, devicemangement or administration). The command to be used is c8ycli new <your-app-name> <template-name>.
For example, to override the default cockpit you use:
c8ycli new cockpit cockpit
When you run this command it provides you with a very simple file structure that contains the following files:
app.module.ts: An Angular entry module in which you can hook Angular routes. Note that for a Cumulocity IoT application you don’t get access to the root element and therefore there is no root template (index.html) which you can modify.package.json: The package.json describes the dependencies and the application itself. Thec8y.upgrade: trueflag tells our webpack plugins to allow AngularJS plugins.ng1.ts: Our default AngularJS plugins for the Cockpit application.index.ts: The bootstrapping which is setup to bootstrap a hybrid application.polyfills.ts: Polyfills setup to run in IE11.tsconfig.json: The typescript configuration.
Importing AngularJS plugins
If you want to integrate your custom plugin into an application, you first need to set up the hybrid application for the application into which you want to import the plugin. Then you simply copy the plugin to the hybrid application and reference the cumulocity.json of the plugin in the ng1.ts file with an import:
import 'my-custom-plugin/cumulocity.json';
Webpack now reads the manifest file and converts the content to CommonJS require imports so that the plugin will be loaded and applied to the application.
Custom bootstrapping and upgrading
In the app.module.ts file we bootstrap the hybrid application with the following code on the HybridAppModule.
import { UpgradeModule as NgUpgradeModule } from '@angular/upgrade/static';
import { ng1Modules } from './ng1';

export abstract class HybridAppModule {
  ng1Modules = ng1Modules;
  protected upgrade: NgUpgradeModule;

  ngDoBootstrap() {
    (window as any).bootstrap();
    this.upgrade.bootstrap(document.getElementById('app'), this.ng1Modules, { strictDi: false });
  }
}
This module not only bootstraps the upgrade module but also initializes the Angular application.
In the app.module.ts you can control the bootstrapping. For example, you can add another module to the bootstrapped ng1 modules:
constructor() {
  this.ng1Modules.push('my-custom-module');
}
This will also load your my-custom-module. You can use this to override the ngDoBootstrap() function to whatever fits your application needs, e.g. upgrade or downgrade Angular services as shown in the Angular docs.