Overview
This section describes specific aspects of developing microservices using the REST interface.
Cumulocity IoT employs REST for all external communication. Regardless whether the communication originates from IoT devices, from web applications or from back-office IT systems, the communication protocol is always REST.
REST is a very simple and secure protocol based on HTTP(S) and TCP. It is today the de-facto Internet standard supported by all networked programming environments ranging from very simple devices up to large-scale IT. One of the many books introducing REST is RESTful Web Services.
With this API description you will learn how to use Cumulocity IoT’s REST interfaces to develop microservice applications on top of the Cumulocity IoT platform.
The description is closely linked to the Reference guide, which describes each interface in detail. Relevant chapters in the reference guide are in particular:
- REST implementation is the reference for all general concepts.
- Device management library specifies the data model for device management.
- Sensor library specifies the data model for sensors and controls.
If you develop applications using Java or C#, check these relevant sections for even more convenient access to Cumulocity IoT’s functionality. For further information on REST interfaces in general and on integrating devices with REST, refer to the REST section in the Device SDK guide.
Using the REST interfaces
Nowadays, most programming environments have particular support for REST-based communication. For experimentation and for understanding Cumulocity IoT’s REST interfaces, it is helpful to use one of the numerous available command line tools or browser extensions.
For example, many operating systems come with pre-installed tools such as the cURL command. If you want to start browsing the Cumulocity IoT APIs, enter on a command line:
$ curl -u <username>:<password> https://<yourTenant>.cumulocity.com/platform
Replace <username> and <password> with the username and password that you used to register to Cumulocity IoT. Similarly, replace <yourTenant> with your tenant URL.
The command will return links to all basic interfaces of Cumulocity IoT:
...
"inventory": {
    "managedObjects": {
        "references": [],
        "self": "https://<yourURL>/inventory/managedObjects"
    },
    "managedObjectsForFragmentType": "https://<yourURL>/inventory/managedObjects?fragmentType={fragmentType}",
    "managedObjectsForListOfIds": "https://<yourURL>/inventory/managedObjects?ids={ids}",
    "managedObjectsForType": "https://<yourURL>/inventory/managedObjects?type={type}",
    "self": "https://<yourURL>/inventory"
},
...
To format the output to a more readable way, pass it to the python -mjson.tool command:
$ curl -u <username>:<password> https://<yourTenant>.cumulocity.com/platform | python -mjson.tool
From this point, you can navigate further to the different returned objects. For instance, retrieve the items in the inventory by following the managedObjects endpoint:
$ curl -u <username>:<password> https://<yourTenant>.cumulocity.com/inventory/managedObjects
You will notice that just a subset of the items in the inventory is actually returned, a so-called “page”. More information on page handling can be found under Query result paging.
Using Postman
Graphical REST clients such as Postman are a convenient way to explore REST interfaces and the Cumulocity IoT database content.
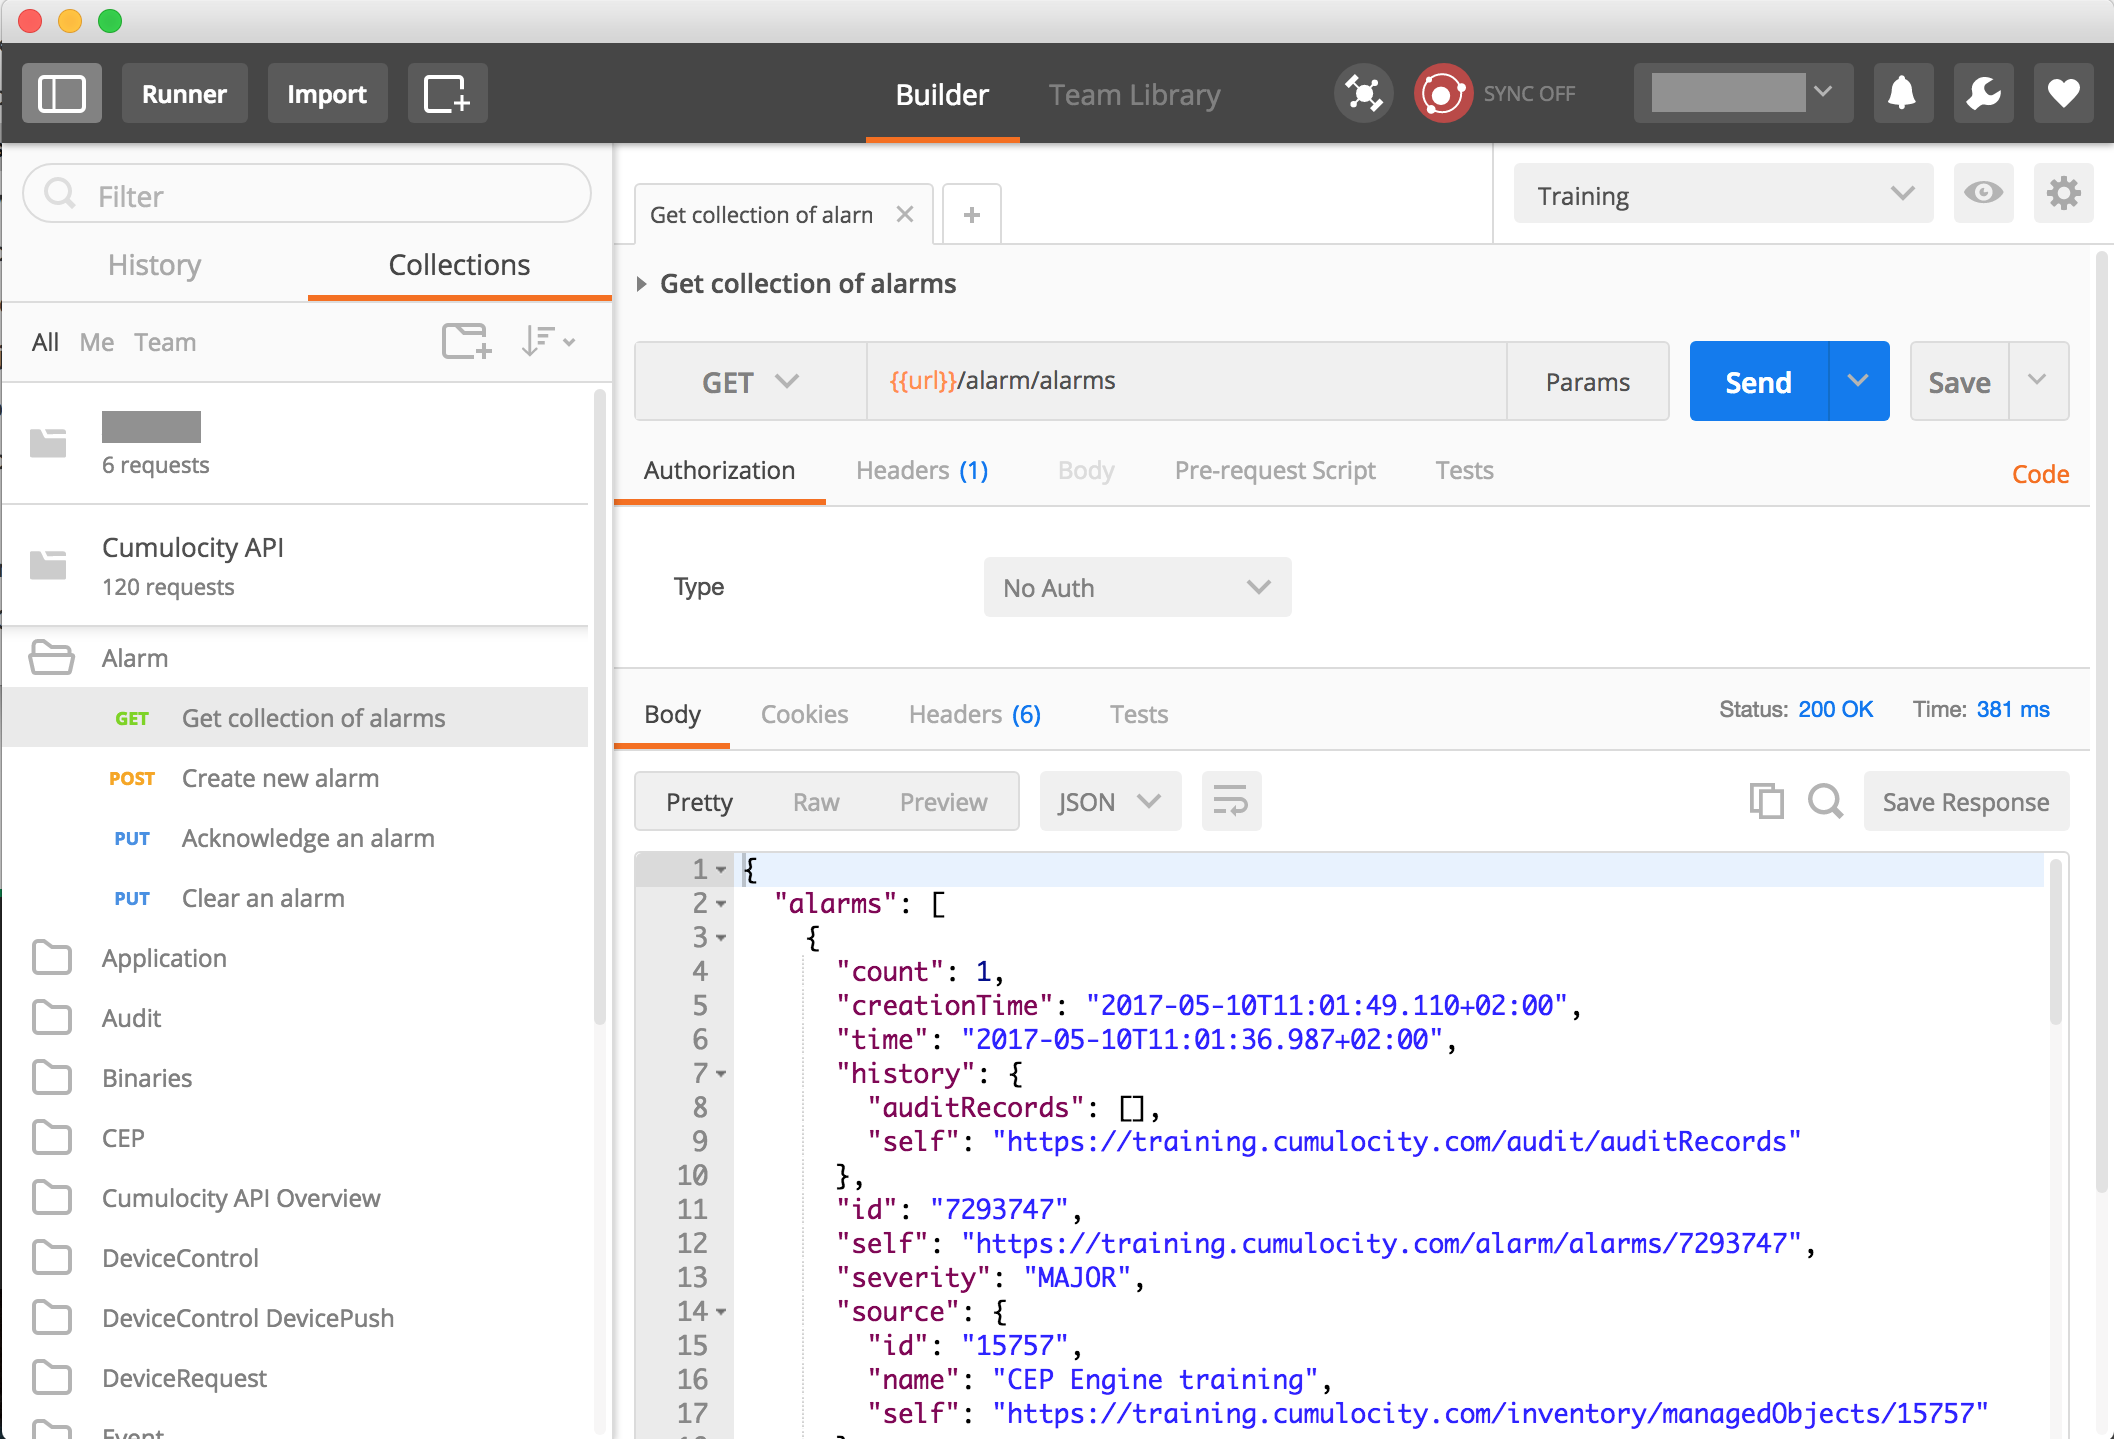
Cumulocity IoT provides numerous online API examples. If you want to make use of them, download and install Postman. After starting Postman, you can choose to either create an account or click Take me straight to the app. Then click the button below and choose the variant of Postman that you have just installed. You may see a browser security prompt asking you if you actually want to run Postman (on Windows “Electron”).
Import the APIs as a JSON file.
Now, click the Collections tab on the top left of Postman. You should see a folder Cumulocity API with the examples. Open that folder and the sub-folder Alarms, then click Get collection of alarms. This shows an example on how to get alarms from Cumulocity IoT.
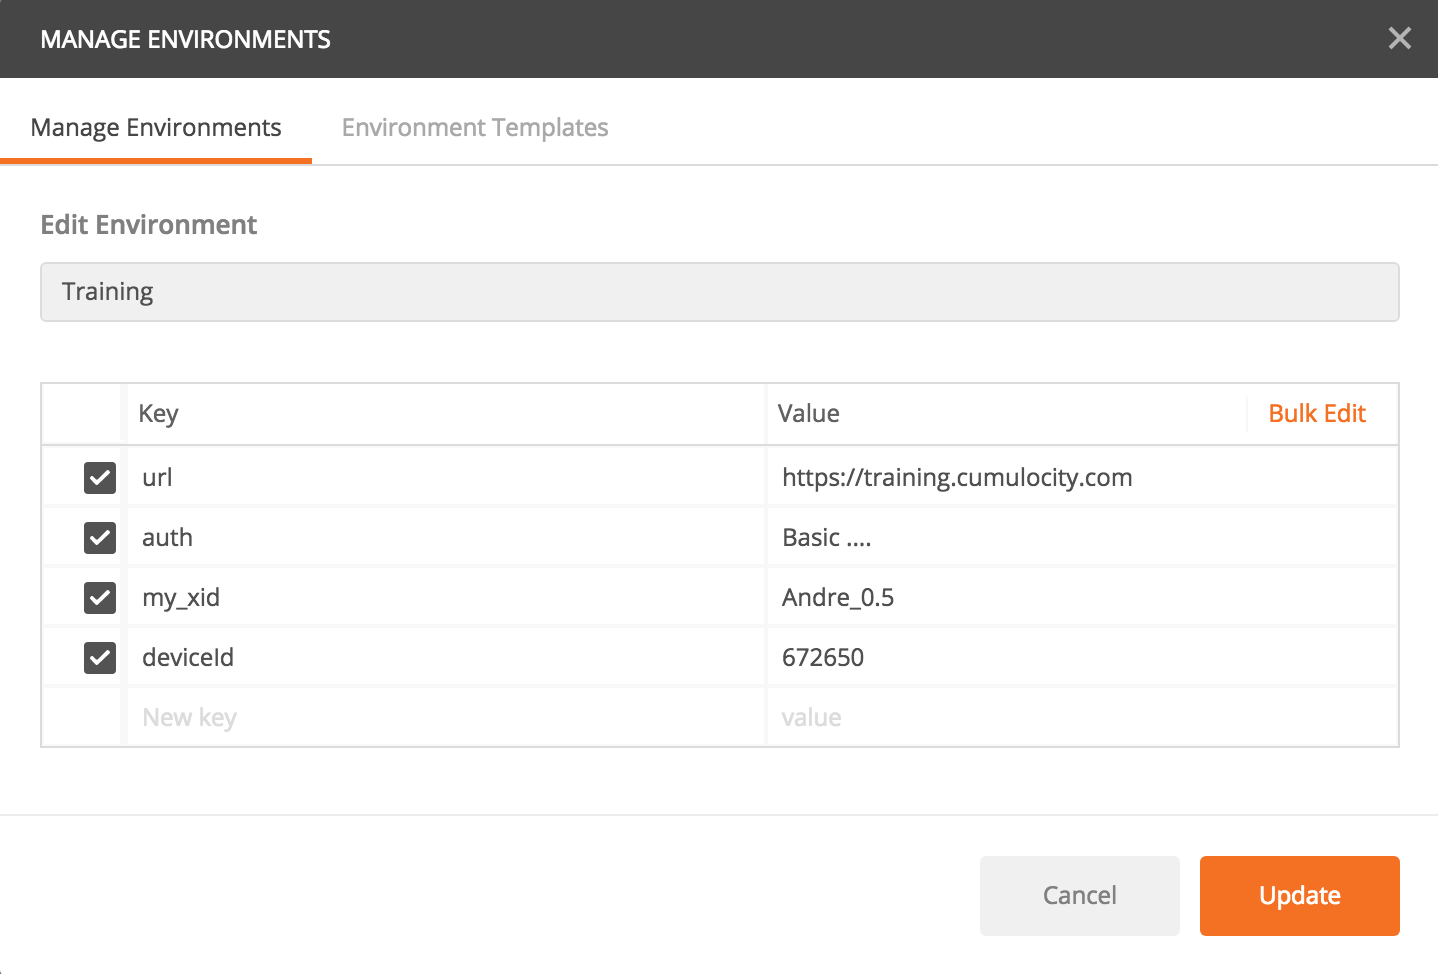
Note that the example contains placeholders, in this case a placeholder {{url}} in {{url}}/alarm/alarms. You need to tell Postman how to fill these placeholders and by this, how to connect to your Cumulocity IoT account. To do so, create an environment and configure the placeholders.
- Click on the cogwheel on the top right and choose Manage Environments, then click Add.
- Enter a name for the environment (e.g., your tenant ID), then add values for the placeholders.
- Configure a key url with a value of https://<yourTenant>.cumulocity.com. Click Submit.
- Configure a key auth with the value of the Authorization header for the REST requests.
- Click Add, then close the dialog. Now select your newly created environment from the drop-down box on the top right, that initially reads “No environment”.
For example, assume that your tenant ID is “t07007007”, your username is “winter” and your password is “jh0nS0nw”. A simple way to determine the correct value for the auth key is using the Base64 command as follows:
$ echo -n t07007007/winter:jh0nS0nw | base64
The resulting text is “dDA3MDA3MDA3L3dpbnRlcjpqaDBuUzBudw==” and you need to use Basic dDA3MDA3MDA3L3dpbnRlcjpqaDBuUzBudw== as value for the auth key. You can achieve the same result also by using an online Base64 encode/decode tool.
Now it is time to start exploring the API!
Microservice development
This section will introduce you to the basic REST endpoints required for developing microservices. You will also learn the basic use cases in which the Cumulocity IoT REST APIs can be employed to develop microservice applications.
Creating applications
In order to start working with microservices, an instance of an application must be created on the platform beforehand. It can be done using the following endpoint:
POST /application/applications
Host: ...
Authorization: Basic ...
Content-Length: ...
Content-Type: application/vnd.com.nsn.cumulocity.application+json
{
  "key": "<APPLICATION_NAME>-key",
  "name": "<APPLICATION_NAME>",
  "type": "MICROSERVICE",
  "requiredRoles": [ "ROLE_INVENTORY_READ" ],
  "roles": [ "ROLE_CUSTOM_MICROSERVICE" ]
}
A success response consists of a 201 status and a location header similar to <HOST>/application/applications/<APPLICATION_ID>.
The properties key, name and type from the above request body are self explanatory, and about the roles:
requiredRoles- A list of Cumulocity IoT permissions the microservice user needs in order to get data from Cumulocity IoT, e.g. if the microservice creates a managed object, one of the required roles shall beROLE_INVENTORY_ADMIN.roles- A list of microservice permissions. If the microservice exposes an own REST API, it can be secured with an own set of permissions, e.g. a SMS microservice would requireSMS_ADMINpermission to send SMS messages. These permissions become available in the tenant after microservice subscription. Afterwards, an admin user can grant such permission to another user that wants to send SMS messages via the Cumulocity IoT platform.
The application ID for existing applications can be obtained employing a GET request with the name of the application:
GET /application/applicationsByName/<APPLICATION_NAME>
Host: ...
Authorization: Basic ...
Accept: application/vnd.com.nsn.cumulocity.application+json
The success response will look similar to:
{
"applications": [
{
"activeVersionId": "329",
"availability": "MARKET",
"id": "174",
"key": "<APPLICATION_NAME>-microservice-key",
"manifest": {
"imports": [],
"noAppSwitcher": true
},
"name": "<APPLICATION_NAME>",
"owner": {
"self": "<HOST>/tenant/tenants/<TENANT>",
"tenant": {
"id": "<TENANT>"
}
},
"requiredRoles": [],
"roles": [],
"self": "<HOST>/application/applications/174",
"type": "MICROSERVICE"
}
],
"next": "<HOST>/application/applications?pageSize=5¤tPage=2",
"statistics": {
"currentPage": 1,
"pageSize": 5
},
"self": "<HOST>/application/applications?pageSize=5¤tPage=1"
}
The application can be updated afterwards by employing a PUT request:
PUT /application/applications/<APPLICATION_ID>
Host: ...
Authorization: Basic ...
Content-Length: ...
Content-Type: application/vnd.com.nsn.cumulocity.application+json
{
    "key": "<APPLICATION_NAME>-key",
    "name": "<APPLICATION_NAME>",
    "type": "MICROSERVICE",
    "requiredRoles": [ "ROLE_INVENTORY_READ" ],
    "roles": [ "ROLE_CUSTOM_MICSROSERVICE" ]
}
Deploying applications
A microservice application gets available for Cumulocity IoT platform users by uploading a binary ZIP file.
POST /application/applications/<APPLICATION_ID>/binaries
Host: ...
Authorization: Basic ...
Content-Type: multipart/form-data
The ZIP file must consist of:
- cumulocity.json - The application manifest file describing the deployment
- image.tar - An executable Docker image
Acquiring microservice credentials
The following section is a wrap up for user management as described under General aspects of microservices in Cumulocity IoT.
Microservice related endpoints require a microservice bootstrap user, which can be obtained by a service provider using:
GET /application/applications/<APPLICATION_ID>/bootstrapUser
Host: ...
Authorization: Basic ...
Response:
HTTP/1.1 200 Ok
Content-Type: application/vnd.com.nsn.cumulocity.user+json
{
    "tenant": "...",
    "name": "...",
    "password": "..."
}
These credentials allow access to the following endpoints:
GET /tenant/currentTenant
GET /user/currentUser
GET /application/currentApplication
GET /application/currentApplication/subscription
PUT /application/currentApplication
For example, to get the current application use:
GET /application/currentApplication
Authorization: Basic ...
Content-Type: application/json
Response:
{
    "activeVersionId": "329",
    "availability": "MARKET",
    "id": "...",
    "key": "...",
    "manifest": {
        "imports": [],
        "noAppSwitcher": true
    },
    "name": "hello-world",
    "owner": {
        "self": "...",
        "tenant": {
            "id": "..."
        }
    },
    "requiredRoles": [],
    "roles": [],
    "self": "...",
    "type": "MICROSERVICE"
}
Subscriptions
Subscription in this scope means tenant subscription to a microservice application. The subscription is an important step after deployment. When a microservice application is deployed it becomes available for subscription to other tenants. Subscribing to a microservice is the same as subscribing to any other application and it can be done in the Administration application. Also, a tenant can be subscribed employing a POST request:
POST /tenant/tenants/<TENANT>/applications
Host: ...
Authorization: Basic ...
Content-Length: ...
Content-Type: application/vnd.com.nsn.cumulocity.applicationreference+json
Accept: application/vnd.com.nsn.cumulocity.tenant+json
{
    "application": {
        "id": "<APPLICATION_ID>"
    }
}
A successful response will look similar to:
HTTP/1.1 201 Created
Content-Type: application/vnd.com.nsn.cumulocity.tenant+json
Content-Length: ...
{
    "application": {
        "id": "<APPLICATION_ID>",
        "key": "...",
        "name": "...",
        "owner": {
            "self": ".../tenant/tenants/<TENANT>",
            "tenant": {
                "id": "<TENANT>"
            }
        },
        "self": "...",
        "type": "MICROSERVICE"
    },
    "self": "..."
}
The subscriptions are available to microservice users through the authorized microservice bootstrap user.
GET /application/currentApplication/subscriptions
Host: ...
Authorization: Basic ...
Response:
HTTP/1.1 200 OK
Content-Type: application/vnd.com.nsn.cumulocity.applicationusercollection+json
{
    "users": [{
        "tenant": "...",
        "name": "...",
        "password": "..."
    }],
    "self": ".../applications/application/285/users"
}
The response consists of service user credentials dedicated for each tenant. A service user is a user account in the tenant that has the permissions (“roles”) that the microservice requested on registration time.
Settings
The microservice settings are available to microservice users through the authorized bootstrap or service user.
When using the bootstrap user, all settings are always loaded for the microservice owner.
The settings are stored in Cumulocity IoT as tenant options, where category is by default contextPath (or applicationName in case context path is not defined).
Request:
GET /application/currentApplication/settings
Host: ...
Authorization: Basic ...
Response:
HTTP/1.1 200 OK
Content-Type: application/vnd.com.nsn.cumulocity.option+json;charset=UTF-8;ver=0.9
{
   "email.protocol": "smtps",
   "password.enforce.strength": "true",
   "another.key.1": "$value15"
}
Basic use cases
Registering assets
Assets are the objects that your business and your application focuses on. For example, assets might be buildings and rooms if your business centers around building management or home automation. Or they might be routes and machines, if your business is about servicing machines.
Assets are stored in the inventory along with the devices, but they often have their own structure independent of devices. You create assets by POSTing them to the collection of managed objects in the inventory. For example, to create a new room in the inventory, use:
POST /inventory/managedObjects
Content-Type: application/vnd.com.nsn.cumulocity.managedobject+json
Accept: application/vnd.com.nsn.cumulocity.managedobject+json
Authorization: Basic ...
{
    "name": "Building 043",
    "type": "c8y_Building"
}
Response:
HTTP/1.1 201 Created
Content-Type: application/vnd.com.nsn.cumulocity.managedobject+json;charset=UTF-8;ver=0.9
...
{
    "owner": "admin",
    "id": "2549800",
    "self": "http://.../inventory/managedObjects/2549800",
    "type": "c8y_Building",
    "lastUpdated": "2018-09-05T16:38:31.250+02:00",
    "name": "Building 043",
    "assetParents": {
        "references": [],
        "self": "https://.../inventory/managedObjects/2549800/assetParents"
    },
    "childAssets": {
        "references": [],
        "self": "https://.../inventory/managedObjects/2549800/childAssets"
    },
    "childDevices": {
        "references": [],
        "self": "https://.../inventory/managedObjects/2549800/childDevices"
    },
    "deviceParents": {
        "references": [],
        "self": "https://.../inventory/managedObjects/2549800/deviceParents"
    }
}
If the device could be successfully created, a status code of 201 is returned. If the original request contains an “Accept” header just like in the example above, the complete created object is returned including the ID and URL to reference the object in future requests. The returned object also includes references to collections of child devices and child assets that can be used to add children to the device.
For example, assuming that we have also created a room, and that room’s “self” property is “https://…/inventory/managedObjects/2549700”, to link the room to the building, POST to the child assets collection of the building (see the “self” property of “childAssets” above):
POST /inventory/managedObjects/2549800/childAssets HTTP/1.1
Content-Type: application/vnd.com.nsn.cumulocity.managedobjectreference+json
{
    "managedObject" : {
        "self" : "http://.../inventory/managedObjects/2549700"
    }
}
Now querying the building again shows that the room has been registered as child of the building:
GET /inventory/managedObjects/2549800
Response:
HTTP/1.1 200 OK
Content-Type: application/vnd.com.nsn.cumulocity.managedobject+json; charset=UTF-8; ver=0.9
...
{
    "owner": "admin",
    "id": "2549800",
    "self": "http://.../inventory/managedObjects/2549800",
    ...
    "childAssets": {
        "references": [
            {
                "managedObject": {
                    "id": "2549700",
                    "name": "Room 042",
                    "self": "https://.../inventory/managedObjects/2549700"
                },
                "self": "https://.../inventory/managedObjects/2549800/childAssets/2549700"
            }
        ],
        "self": "https://.../inventory/managedObjects/2549800/childAssets"
    }
}
Linking devices to assets
Just like you link assets to other child assets, you can also link assets to devices that monitor and control the asset. For example, assume that you have a light sensor installed in the room, and that light sensor has the URL “https://…/inventory/managedObjects/2480500”. POST to childDevices of the room as follows:
POST /inventory/managedObjects/2549700/childDevices
Content-Type: application/vnd.com.nsn.cumulocity.managedobjectreference+json
{
    "managedObject" : {
        "self" : "https://.../inventory/managedObjects/2480500"
    }
}
Synchronizing assets with external systems
Often, Cumulocity IoT will not be the only IT system dealing with a company’s asset. The technical procedure for synchronizing assets stored in external IT systems is exactly the same as the procedure used for registering devices:
- Use the Identity API to link the asset ID of the external IT system to the asset ID of Cumulocity IoT.
- Use the Inventory API to create or update the assets in Cumulocity IoT’s inventory based on the external system’s data.
Querying particular capabilities
To decouple applications from the specifics of particular types of devices, applications can use fragments to query the inventory (see the Fragments section of Cumulocity IoT’s domain model). For example, to find all managed objects having a location, use:
GET /inventory/managedObjects?fragmentType=c8y_Position&withTotalPages=true
Response:
HTTP/1.1 200 OK
Content-Type: application/vnd.com.nsn.cumulocity.managedobjectcollection+json; charset=UTF-8; ver=0.9
...
{
"managedObjects": [{
"id": "2480700",
"lastUpdated": "2013-08-30T10:15:44.218+02:00",
"name": "RaspPi BCM2708 0000000017b769d5 Gps eM9",
"owner": "admin",
"self": "https://.../inventory/managedObjects/2480700",
"type": "c8y_TinkerForge_Gps",
"c8y_Position": {
"alt": 102.36,
"lng": 6.769717,
"lat": 51.267259
},
...
},
...
]
"next": "https://.../inventory/managedObjects?withTotalPages=true&fragmentType=c8y_Position&pageSize=5¤tPage=2",
"statistics": {
"currentPage": 1,
"pageSize": 5,
"totalPages": 4
},
"self": "https://.../inventory/managedObjects?withTotalPages=true&fragmentType=c8y_Position&pageSize=5¤tPage=1"
}
Now you could, for example, use the c8y_Position property to locate/pin the object on a map. Standard fragments are defined in the Device management library and in the Sensor library.
Querying the /platform resource will show you further possibilities for querying your data (see also Device integration using REST in the Device SDK guide).
Note that queries do not necessarily return all query results at once, but only a page of the results. For more information on paging, refer to REST implementation > REST usage > Query result paging in the Reference guide. The optional parameter withTotalPages will make the query contain full page statistics at the expense of slightly slower performance.
Querying readings from sensors
Similar to the inventory, you can also query for particular sensor readings. For example, you can query the light measurements of the past month (from the time of writing this text) as follows:
GET /measurement/measurements?dateFrom=2019-04-01&dateTo=2019-05-31&fragmentType=c8y_LightMeasurement
Response:
HTTP/1.1 200 OK
Content-Type: application/vnd.com.nsn.cumulocity.measurementcollection+json; charset=UTF-8; ver=0.9
...
{
    "measurements": [{
        "id": "2480900",
        "self": "https://.../measurement/measurements/2480900",
        "source": {
            "id": "2480500",
            "self": "https://.../inventory/managedObjects/2480500"
        },
        "time": "2013-08-29T21:19:52.321+02:00",
        "type": "c8y_LightMeasurement",
        "c8y_LightMeasurement": {
            "e": {
                "unit": "lux",
                "value": 169.2
            }
        }
    },
    ...
    ]
    ...
}
Sending operations to devices
To trigger an operation on a device, POST the operation to the Device Control API. The following example restarts the device with the ID “2480300” (which is the Raspberry Pi that is integrated in the section Device integration of the Device SDK guide.
POST /devicecontrol/operations
Content-Type: application/vnd.com.nsn.cumulocity.operation+json;
Accept: application/vnd.com.nsn.cumulocity.operation+json;
{
    "deviceId": "2480300",
    "c8y_Restart":{}
}
Response:
HTTP/1.1 201 Created
Content-Type: application/vnd.com.nsn.cumulocity.operation+json; charset=UTF-8; ver=0.9
...
{
    ...
    "deviceId": "2480300",
    "id": "2550200",
    "self": "https://.../devicecontrol/operations/2550200",
    "status": "PENDING",
    "c8y_Restart": {}
}
The POST command returns immediately when the operation has been queued for the device. The actual operation executes asynchronously. Since we added the optional “Accept” header in the example request, we will get the full queued operation in the response including its URL in the self property. Using a GET on that URL, you can check the current status of execution of the operation:
GET /devicecontrol/operations/2550200 HTTP/1.1

HTTP/1.1 200 OK
Content-Type: application/vnd.com.nsn.cumulocity.operation+json; charset=UTF-8; ver=0.9
{
    "status": "PENDING",
    ...
}
A status of PENDING means here that the device has not yet picked up the operation. EXECUTING means that the device is in the process of executing the operation. Finally, SUCCESSFUL or FAILED indicate that the operation is completed.
Listening for events
Besides querying the Cumulocity IoT data store, you can also process and receive events in real time as described in Real-time processing in Cumulocity IoT. For example, assume that you would like to display real-time location updates on a map. Use the Administration application (or the REST API) to create a new rule module “myRule”:
select *
from EventCreated e
where e.event.type = "c8y_LocationUpdate";
If you have a device that sends location updates, you should see them immediately in the user interface. To receive them in your own REST client, you can use the Notification API to subscribe to them. The API is based on the Bayeux protocol using HTTPS long-polling. The restrictions that apply are described in Real-time notifications in the Reference guide. First, a handshake is required. The handshake tells Cumulocity IoT what protocols the client supports for notifications and allocates a client ID to the client.
POST /cep/notifications
Content-Type: application/json
...
[ {
    "id": "1",
    "supportedConnectionTypes": ["long-polling"],
    "channel": "/meta/handshake",
    "version": "1.0"
} ]

HTTP/1.1 200 OK
...
[ {
    "id": "1",
    "supportedConnectionTypes": ["long-polling"],
    "channel": "/meta/handshake",
    "version": "1.0",
    "clientId": "71fjkmy0495rxrkfcmp0mhcev1",
    "minimumVersion": "1.0",
    "successful": true
}]
After the handshake, the client needs to subscribe to the output of the above rule. This is done using a POST request with the module name and the statement name as subscription channel. In our example, we used the module name “myRule” and did not give a name to the select statement ("@Name('')"), so the subscription channel is “/myRule/*”.
POST /cep/notifications
Content-Type: application/json
...
[ {
    "id": "2",
    "channel": "/meta/subscribe",
    "subscription": "/myRule/*",
    "clientId": "71fjkmy0495rxrkfcmp0mhcev1"
}]

HTTP/1.1 200 OK
...
[ {
    "id":"2",
    "channel": "/meta/subscribe",
    "subscription": "/myRule/*",
    "successful": true,
} ]
Finally, the client connects and waits for events to be sent to it.
POST /cep/notifications HTTP/1.1
Content-Type: application/json
...
[ {
    "id": "3",
    "connectionType": "long-polling",
    "channel": "/meta/connect",
    "clientId": "71fjkmy0495rxrkfcmp0mhcev1"
} ]
This request will hang until an operation is issued. Here is an example of a response with a single location update:
HTTP/1.1 200 OK
...
[
    {
        "id": "139",
        "data": {
            "creationTime": "...",
            "id": "2481400",
            "self": "https://.../event/events/2481400",
            "source": {
                "id": "2480700",
                "name": "RaspPi BCM2708 0000000017b769d5 Gps eM9",
                "self": "https://.../inventory/managedObjects/2480700"
            },
            "text": "Location updated",
            "time": "...",
            "type": "c8y_LocationUpdate",
            "c8y_Position": {
                "alt": 58.34,
                "lng": 6.769717,
                "lat": 51.267259
            },
            "channel": "/myRule/*"
        },
        "id": "3",
        "successful": true,
        "channel": "/meta/connect"
    }
]
Using SmartREST
The Cumulocity IoT REST APIs provide you with a generic IoT protocol that is simple to use from most environments. It can be ad-hoc adapted to any IoT use case and it uses standard Internet communication and security mechanisms. While this is a great leap forward over tailored IoT protocols with proprietary technologies, it poses some challenges to very constrained environments such as low-end microcontrollers or low-bandwidth communication channels.
For these environments, Cumulocity IoT offers the so-called SmartREST protocol. SmartREST combines the benefits of standard technology and tailored protocols:
- It continues to work on any network by using standard HTTP technology.
- It supports HTTP authentication and encryption.
- It still gracefully handles protocol versioning.
- Its network traffic usage is close to custom-optimized protocols by transferring pure payload data during normal operation.
- It is based on CSV (comma-separated values), hence, it is easy to handle from C-based environments.
- It supports server-generated timestamps for devices without clocks.
In the next section, we will discuss the concepts behind SmartREST and the basic protocol that is used. SmartREST is based on separating metadata from payload data by using templates, which are described below. Finally, we show how to send and receive data using SmartREST.
Info: The following sections assume a basic understanding of the SmartREST protocol. If you are not familiar with it yet, we recommend you to review the SmartREST reference.
How does SmartREST work?
The image below illustrates how SmartREST works. Devices and other clients connect to a dedicated SmartREST endpoint on Cumulocity IoT and send their data in rows of comma-separated values. These rows are expanded by Cumulocity IoT’s SmartREST proxy into standard Cumulocity IoT REST API requests. In the same way, responses from Cumulocity IoT are compressed by the proxy from their original JSON format into comma-separated values before sending them back to the device.
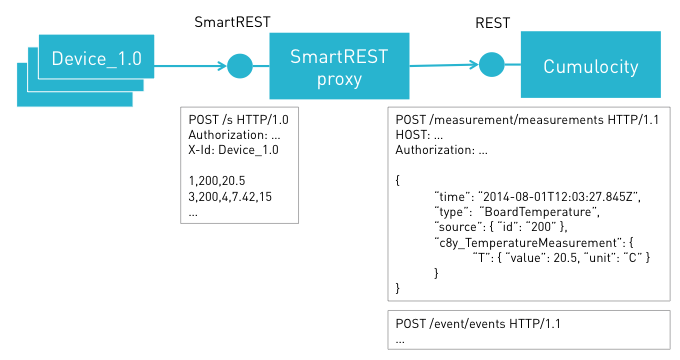
How can Cumulocity IoT interpret comma-separated values into meaningful REST requests?
For that purpose, devices register templates with Cumulocity IoT. The templates contain the expanded REST requests together with placeholders into which the Cumulocity IoT SmartREST proxy consecutively inserts the comma-separate values. For responses, the templates describe which values to pick from the structured REST response to construct comma-separated values.
Templates are associated with software or firmware versions of a device. Usually, a particular implementation of a device or application can only issue a particular set of well-defined types of requests. All devices with the same implementation share the same set of request types. Hence, the templates can be defined at implementation time. To make the templates available to Cumulocity IoT, the first device with a particular implementation will send its templates and makes them available for usage by all similar devices.
This process is illustrated in the image below. Assume that a device with an implementation version “Device_1.0” starts communicating through SmartREST. After retrieving its credentials, the device will ask the SmartREST proxy if its template is already known. If the template is not found on the server, the device will send its template in a single static text request to Cumulocity IoT. Once this procedure has been carried out, all similar devices using that template can start communicating using SmartREST without re-sending the template to the server.
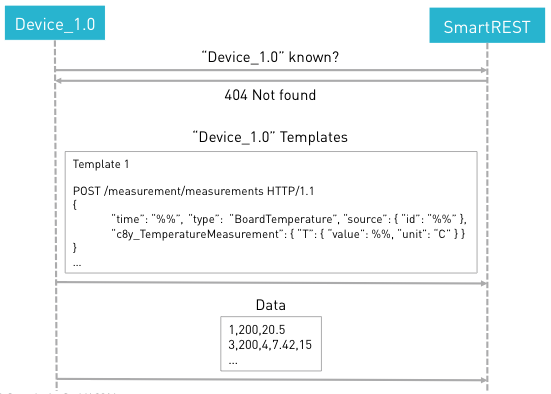
The example also roughly illustrates the translation process. In “Template 1”, "%%" is a placeholder to be filled by the SmartREST proxy. "time" is filled with a server-side timestamp (see below). The remaining placeholders are filled with request data. The line 1,200,20.5 in the example request is interpreted as follows:
- The first column references the template to be used, in this case Template 1.
200refers to the first free placeholder in the template, in this case the ID in the"source"element (The ID of the device that sends the measurement).20.5refers to the second free placeholder in the template, here the value of the temperature measurement.
The basic SmartREST protocol
The basic structure of all SmartREST requests is as follows:
- All requests are POST requests to the endpoint /s, regardless of what the requests finally translate to.
- The standard HTTP Basic Authorization header is used to authenticate the client.
- An additional “X-Id:” header is used to identify the implementation of the client, either as device type (such as “Device_1.0”) or as an identifier returned by the template registration process.
- A request body contains rows of text in comma-separated value format. Each row corresponds to one request to the standard Cumulocity IoT REST API.
- The response is always “200 OK”.
- The response body again contains rows of comma-separated values. A row corresponds to a response from the Cumulocity IoT REST API on a particular request.
Using the above example, a SmartREST request would be as follows:
POST /s HTTP/1.1
Authorization: <AUTHORIZATION>
X-Id: Device_1.0

1,200,20.5
And the corresponding response would be:
HTTP/1.1 200 OK
Transfer-Encoding: chunked

20,0
To match the requests and responses, a response line contains – next to the error code – the line of the request that the response answers. In this example, 20 indicates “OK” and 0 refers to the first line of the request.
How are templates registered?
As described above, a client using SmartREST will first ask if its SmartREST templates are already known to the server. This is done with an empty SmartREST request:
POST /s HTTP/1.1
Authorization: <AUTHORIZATION>
X-Id: Device_1.0
If the device implementation is known, the response will return an ID that can be used as “shorthand” in the “X-Id” header of later requests.
HTTP/1.1 200 OK

20,<id>
If the device implementation is unknown, the response will be:
HTTP/1.1 200 OK

40,"No template for this X-ID"
In this case, create all templates used in your device implementation.
POST /s HTTP/1.1
Authorization: <AUTHORIZATION>
X-Id: Device_1.0

10,1,POST,/measurement/measurements,application/vnd.com.nsn.cumulocity.measurement+json,,%%,NOW UNSIGNED NUMBER,{ "time": "%%", "type": ... }
In this example, 10 refers to a request template (whereas “11” would refer to a response template). The template is number 1, so SmartREST requests using this template have a “1” in their first column. The template refers to a POST request to the endpoint /measurement/measurements with a content type of application/vnd.com.nsn.cumulocity.measurement+json. The placeholder used in the template is %%. The placeholders are a time stamp (NOW), an unsigned number and a general number. Finally, the last column contains the body of the template to be filled in a POST request.
How are responses handled?
The above example illustrated the handling of requests and request templates. For responses, JSONPath expressions translate Cumulocity IoT REST responses into CSV. Assume, for example, that a device has a display and can show a message on it. An operation to update the message would look like:
{
	"c8y_Message": {
		"text": "Hello, world!"
	},
	"creationTime": "2019-02-25T08:32:45.435+01:00",
	"deviceId": "8789602",
	"status": "PENDING"
}
On the client side, the device mainly needs to know the text to be shown. In JSONPath, the "text" property is extracted using the following syntax:
$.c8y_Message.text
In this syntax, $ refers to the root of the data structure and the dot (.) selects an element from the data structure. For more details, refer to the JSONPath reference.
A device usually queries for all operations that are associated with it and that have a status of PENDING. The standard Cumulocity IoT response to such queries looks like:
{
	"operations": [{
		"c8y_Message": {
				"text": "Hello, world!"
		},
		"creationTime": "2014-02-25T08:32:45.435+01:00",
		"deviceId": "8789602",
		"status": "PENDING"
	}, {
		"c8y_Relay": {
			"status": "OPEN"
		}
	}]
}
The response contains a list of operations which can have different types. To work with such a structure, use the following response template:
11,2,$.operations,$.c8y_Message,$.c8y_Message.text
This means, value by value:
- 11: This is a response template.
- 2: It is the template number 2.
- $.operations: The response is a list and the list’s property is “operations”.
- $.c8y_Message: This template applies to responses with the property “c8y_Message”.
- $.c8y_Message.text: The text will be extracted from the message and will be returned.
The SmartREST client will thus get the following response:
HTTP/1.1 200 OK

2,0,"Hello, world!"
That is, the response was created using template 2, the template to translate display message operations. The response refer to the first request sent. The actual message to set is “Hello, world!”.