Casa Systems (NetComm) router
The Casa Systems (NetComm) router is a robust industrial IoT router designed for forwarding data packets between IoT devices within a network, ensuring reliable and secure connectivity.
The Casa Systems (NetComm) router is a robust industrial IoT router designed for forwarding data packets between IoT devices within a network, ensuring reliable and secure connectivity.
This tutorial describes how to set up and configure the Casa Systems (NetComm) routers of the NTC-220 series using the Cumulocity IoT NetComm Agent package.
Info: For NTC-140W, and NTC-6200, refer to the NetComm section in the Devices guide of the Cumulocity IoT 10.4.6 documentation.
Info: The developer documentation is available at https://github.com/SoftwareAG/cumulocity-agents-netcomm/blob/master/doc/devguide.md.
The following sections demonstrate how to use a Casa Systems (NetComm) router with the Cumulocity IoT platform.
| SECTION | CONTENT |
|---|---|
| Prerequisites | Description of the system requirements and supported routers. |
| Setting up and registering the device | How to install the agent, configure the router and connect the router to your Cumulocity IoT account. |
| Remote monitoring and control of industrial assets | How to use Cloud Fieldbus, Cloud Remote Access and the GPIO pins control feature to remotely monitor and control industrial assets. |
| Managing devices | Description of the supported device management functionalities. |
| Troubleshooting | List of known bugs and limitations. |
| Release notes | Release notes for the Cumulocity IoT NetComm Agent. |
The Cumulocity IoT NetComm Agent supports the following Industrial IoT functionality to remotely monitor and control industrial assets:
For details refer to Remote monitoring and control of industrial assets.
Moreover, the Cumulocity IoT NetComm Agent offers a large variety of device management features:
For details refer to Managing devices.
The agent was tested on an NTC-221 router with firmware version 2.0.84.0 and 2.0.89.0 and an NTC-222 router with firmware version 2.0.89.0.
For remote configuration of WAN parameters, you need a SIM card with SMS function. To configure the router remotely with SMS, a Connectivity management platform must be configured inside your tenant. Refer to Device Management > Connectivity in the User guide for details.
Download the agent software, which includes the CA root certificate bundle, Cloud Remote Access software, and our package public key. For the link see the table below.
Log in to the web user interface of the NTC-200 series.
Navigate to the System menu. Click System configuration > Firmware signature.
Turn Enable firmware signature check to OFF.
Info: If you don´t turn the signature check off, the software installation will fail. After you have installed the agent package, the signature check will automatically be turned on again. In case of firmware version 2.0.84.0 you can ignore this step as this version does not support the firmware signature.
Navigate to the System menu. Click System configuration > Upload > Choose a file and select the downloaded software. Click Upload to upload the software to the router.
Click the Install button for the uploaded software which you want to install.
The routers of the NTC-200 series will reboot automatically after the installation.
The agent will automatically start and the router can then be registered with Cumulocity IoT. Subsequent upgrades or downgrades can be performed remotely via the agent’s software management feature, or locally via the router’s web user interface.
| Version | Download | GA release version |
|---|---|---|
| 1.0.0 | download | 10.6.0 |
| 1.0.2 | download | 10.6.0 |
| 1.0.3 | download | 10.6.0 |
| 1.1.0 | download | 10.6.6 and higher |
| 1.1.1 | download | 10.6.6 and higher |
The support for Cumulocity IoT can be configured through the router’s web user interface. To do so, log in to the user interface as described in the router’s manual. Navigate to the System tab and click the Internet of Things menu item.
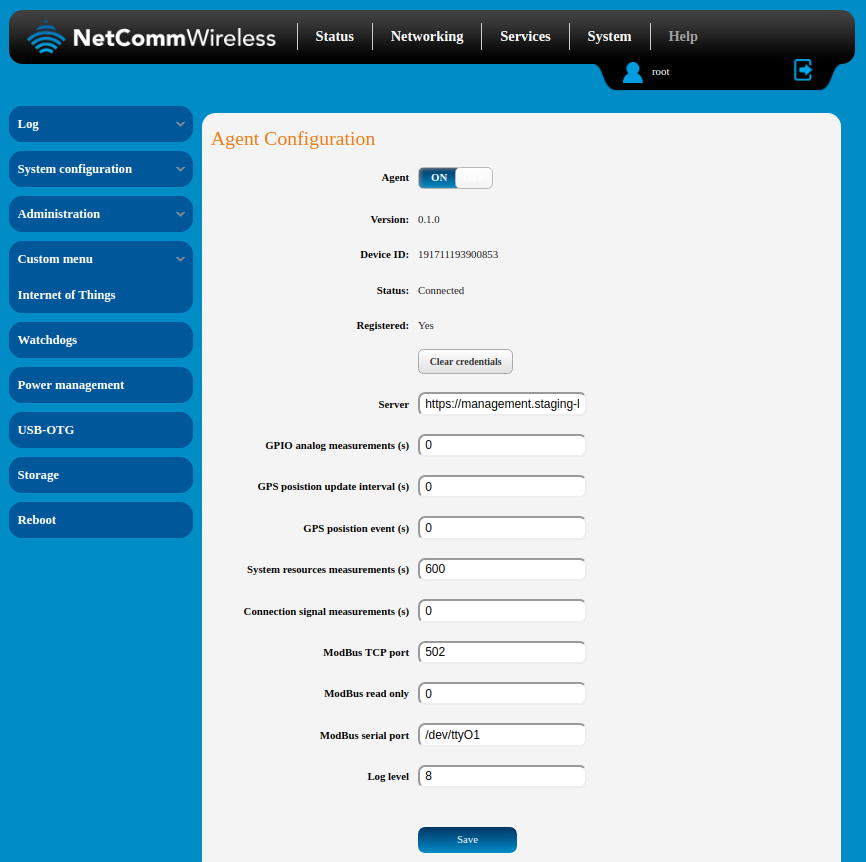
Verify that the Agent toggle is set to ON.
The URL in the Server field must point to the Cumulocity IoT instance that you want to connect to. The URL has to be of the format https://<my-tenant>.<instance-url>, where <instance-url> refers to the URL of the Cumulocity IoT instance, for example https://mqtt.cumulocity.com/.
Optionally, you can activate data collecting for the following functionalities:
All these options are disabled by default (the interval is set to 0).
The web interface also shows the status of the connection to Cumulocity IoT:
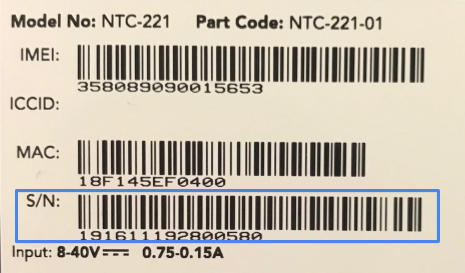
To register your NetComm router to Cumulocity IoT, you need the router’s serial number as device ID. The serial number is printed on the back side of the router as shown below. Alternatively, it is also available in the router’s web user interface. Navigate to System > Internet of Things and view the Device ID field.
You can find detailed information on the registration process in the User guide. Follow the description on how to connect a device manually in Device Management > Connecting devices.
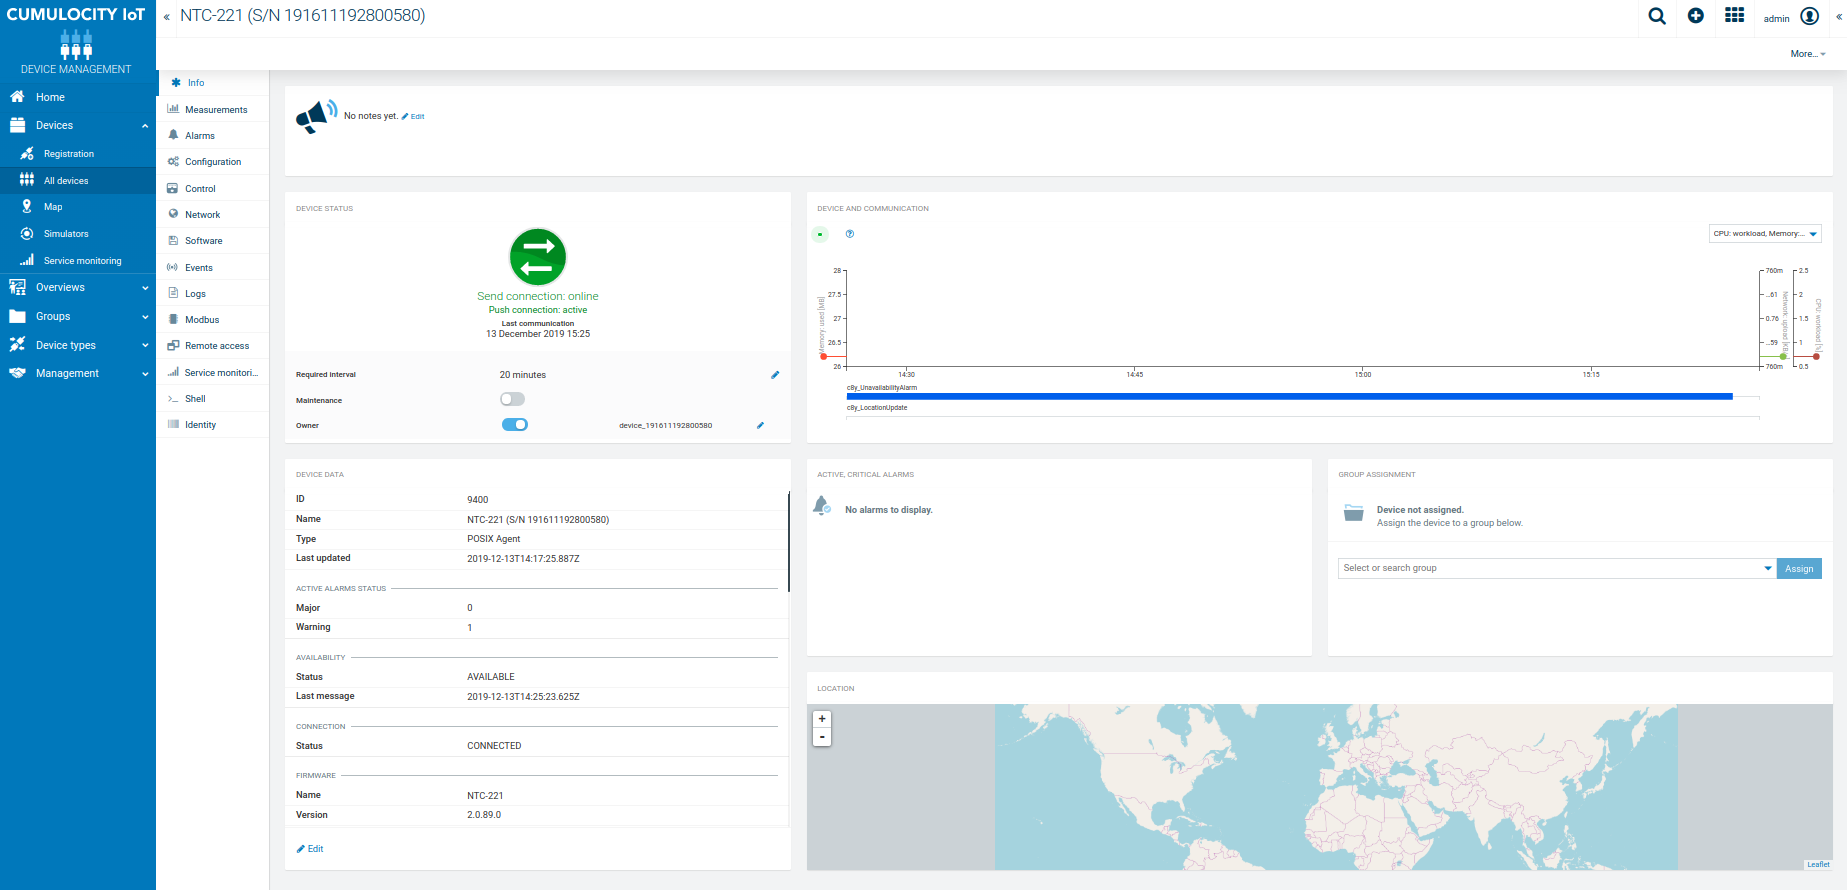
After clicking the Accept button on the Cumulocity IoT platform, navigate to All devices. The router should appear here after registration. The default name of a router is “<model> (S/N <serial number>)”, where <model> is the device model name. For example, the above router would appear as “NTC-221 (S/N 191611192800580)”.
Click on the router to view the detailed information and to access the functionality described in the remaining sections of this document. In order to distinguish a registered router from other devices in the listing, you can change the router’s name on the Info tab, which also displays basic information such as serial number of the router and SIM card data on the “Device data” widget. After clicking the edit icon at the bottom of the widget and changing the name, remember to click Save at the bottom of the “Device data” widget on the Info page.
The following GPIO functionalities are supported:
Consult the documentation of your router for more information about its specific IO settings. The available functionalities may vary between different router models. For example, the NTC-220 supports GPIO pins 1-3.
To regularly poll the input voltage of a GPIO pin and send it to the Cumulocity IoT platform, set GPIO analog measurements to a non-zero value. Alternatively, use the device shell.
set service.cumulocity.gpio.interval=<seconds>
Then, you need to specify the port and turn on the notification by using the device shell.
set service.cumulocity.gpio.<port>.notify=measurement
<port> is the numbering of the GPIO pin. For NTC-220,
You can raise alarms from digital inputs. These can be configured using the router user interface or through the device shell.
set service.cumulocity.gpio.<port>.notify=alarm
set service.cumulocity.gpio.<port>.debounce.interval=<seconds>
set service.cumulocity.gpio.<port>.alarm.text=<ALARM_TEXT>
set service.cumulocity.gpio.<port>.alarm.severity=<severity>
Possible values for the notify parameter are:
The debounce interval reduces electrical noise from the GPIO inputs: The shorter the interval, the noisier the value but the faster the reaction to signal changes. The default debounce interval is 10 mins.
You can override the default alarm text by setting the text property. By default, this value is empty and gpio<N> is active is used as text, where <N> is the numbering of a GPIO pin.
Valid alarm severities are:
The inputs are checked every second for changes.
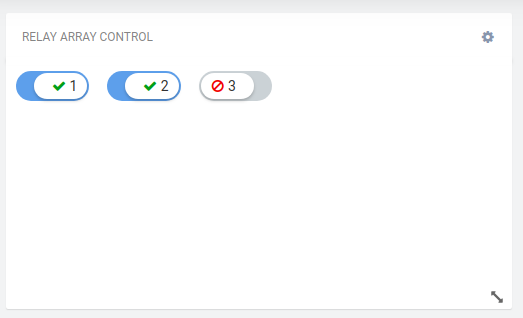
Digital outputs can be controlled using the “Relay array control” widget, see the screenshot below. The green icon means “closed (low value)” and the red icon means “opened (high value)”. The numbering of the GPIO pins are the same as listed on the router. For the NTC-220 model, three GPIO pins can be set.
You can connect Modbus-TCP and Modbus-RTU clients to the router via LAN and serial port, respectively, and manage them remotely in Cumulocity IoT. To do so, you need to follow these steps.
For Modbus-TCP setup:
For Modbus-RTU setup:
set serial.iomode.default=<mode>
where <mode> can be rs232, rs422 or rs485. You may need to reboot the router after changing the mode.
Info: The default serial port
/dev/ttyO1refers to the Model NTC-220 series. Other models might use different ports. For example, the Model NTC-6200 uses/dev/ttyAPP4instead. It should work with no further configuration. In case it’s empty or you need to configure a different port, it can be configured in the Cumulocity IoT menu in the web UI of the router, see Configuring the router.Some USB to serial adapters have echo mode enabled by default.This may result in stopping the Modbus communication completely. If you have one of these adapters, consult the adapter’s manufacturer about how to disable it.
Then:
If your device supports VNC, Telnet or SSH remote access, you can remotely manage it via Cumulocity IoT.
As shown in the screenshot, you can add your VNC, Telnet or SSH servers as an endpoint with appropriate IP and port in the Remote Access tab of a particular device in the Device Management application. If you click Connect, the display content of your remote server will be shown in a new browser window.
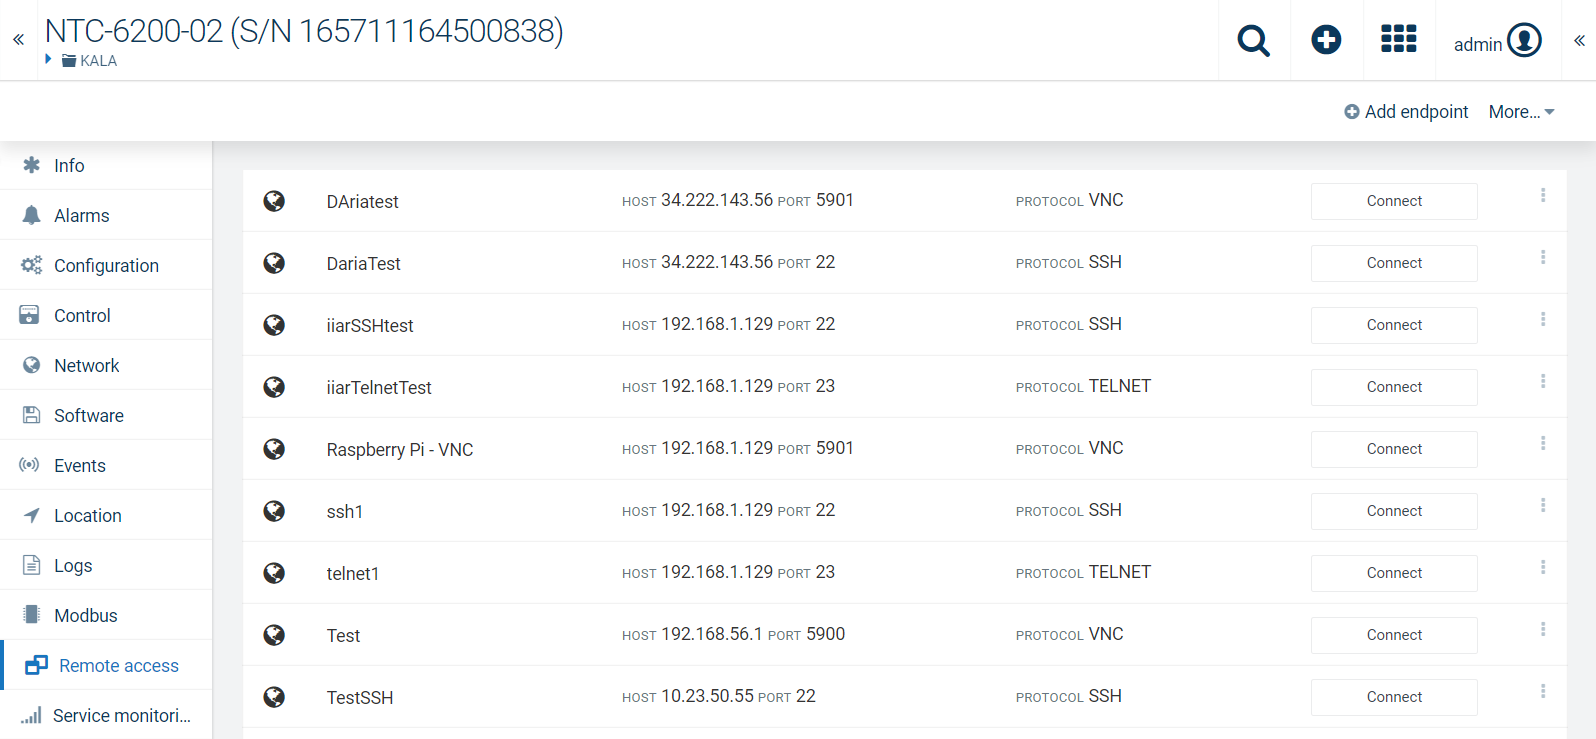
For details on the remote access functionality, refer to Cloud Remote Access.
You can view and configure the essential mobile network (WAN) and local area network (LAN) parameters in the Network tab as shown in the screenshot below.
The mobile network (WAN) parameters shown in the user interface corresponds to the first profile stored in the router. These parameters can be remotely configured directly or via SMS.
For SMS configuration, the router needs to be configured to accept SMS commands. Consult the router’s manual on the relevant parameters for SMS configuration, or use the router’s web user interface. Moreover, a Connectivity management platform must be configured inside your tenant. Refer to Device Management > Connectivity in the User guide for details.
For more information on the Network tab, see Device Management > Device details > Network in the User guide.
Info: If you configure the wrong APN settings, the device will lose mobile network connection and can only be managed by limited SMS functionality.
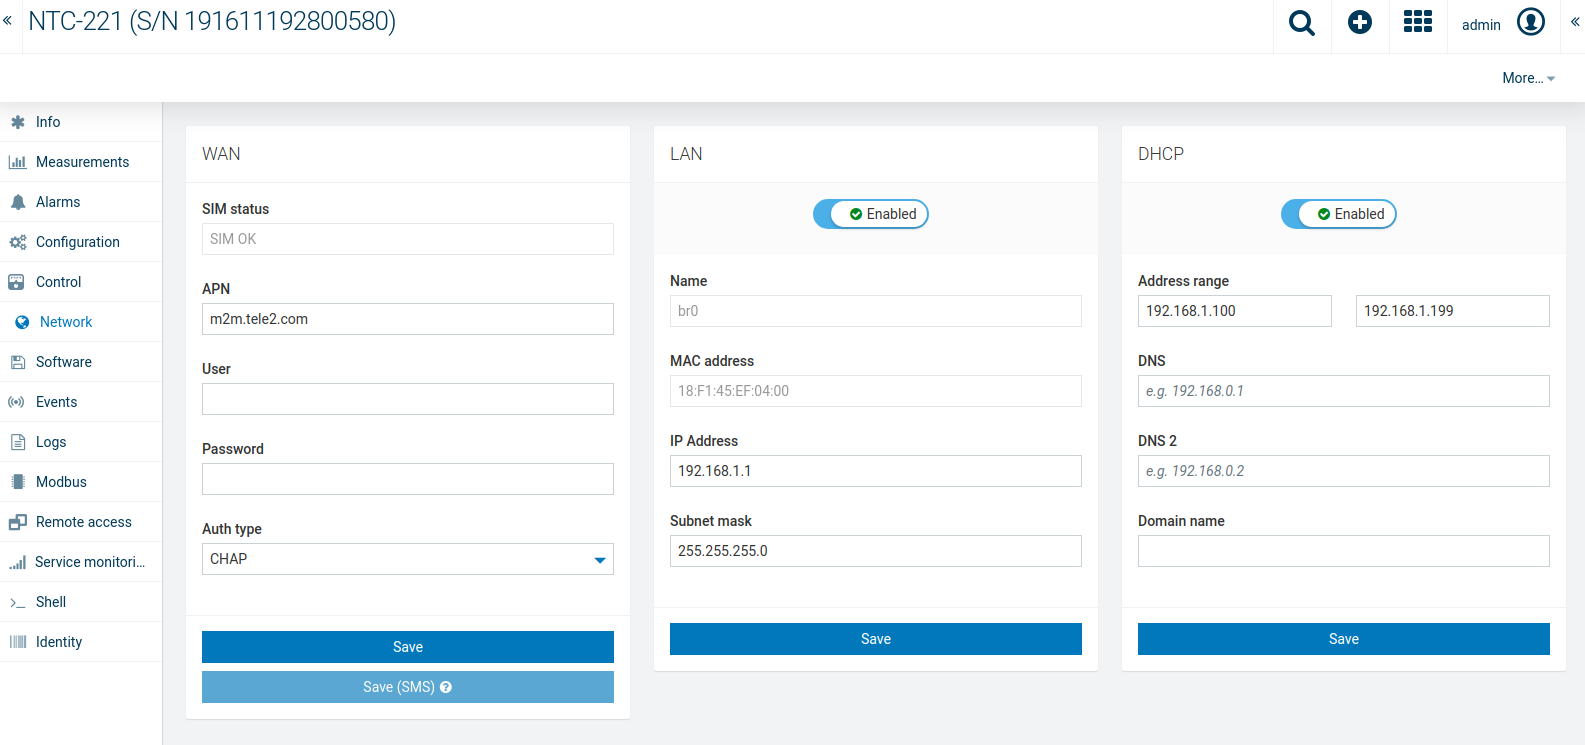
LAN and DHCP parameters can be directly configured from Cumulocity IoT as well.
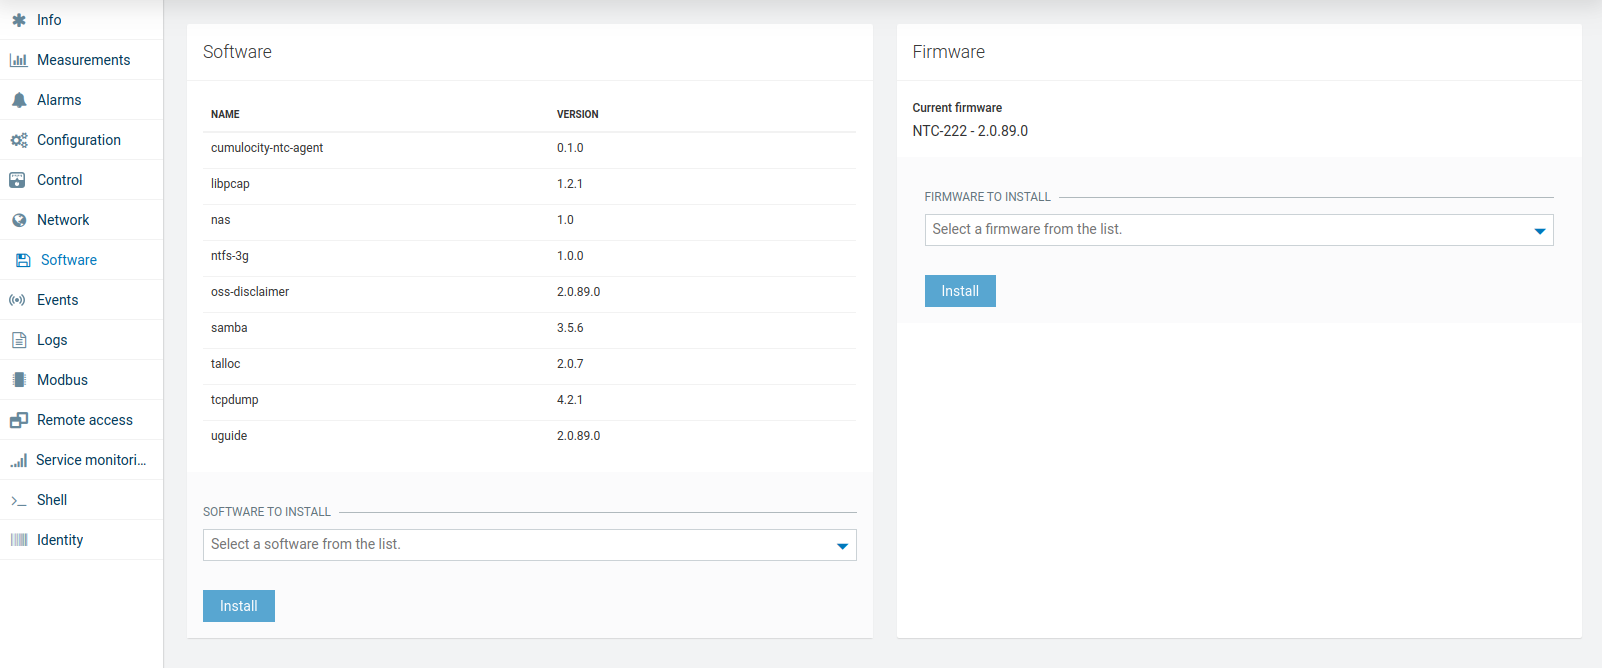
The installed software and firmware on the router can be remotely managed using the standard software and firmware management feature from Cumulocity IoT. For details, see Device Management > Managing device data in the User guide.
Software packages need to be in ipkg format and follow the naming convention <package>_<version>_<arch>.ipk. Version numbers including letters are not supported. All package management methods (install, upgrade, downgrade, removal) are supported through the router’s package manager. If software packages have dependencies, make sure to install these first.
Info: The package cumulocity-ntc-agent_<version>_arm.ipk represents the NetComm Agent. It is prohibited to remove this package from Cumulocity IoT.
Firmware can be uploaded and installed on the router as well. To successfully upgrade the firmware, make sure that the target firmware includes the agent package. Firmware files need to follow Netcomm’s naming convention (<name>_<version>.cdi).
Info: If the agent package is not included in the target firmware, the agent will not start after the installation.
You can record statistics of the router’s system resources usage for troubleshooting purposes. The following statistics are available:
By default, the collection of resource statistics is disabled. It can be enabled by setting a non-zero collecting interval in the System resources measurements entry of the web user interface of the router or using the device shell.
set service.cumulocity.system_resources.interval=<seconds>
Collected data can be accessed in the Measurements tab or in a dashboard.
You can also record statistics of the router’s cellular signal strength.
By default, the collection of signal strength statistics is disabled. They can be enabled by setting a non-zero collecting interval in the Connection signal measurements entry of the web user interface of the router or using the device shell.
set service.cumulocity.signal.interval=<seconds>
Collected data can be accessed in the Measurements tab or in a dashboard.
To locate or trace the router, connect a GPS antenna to the router and enable its GPS functionality. Then configure the frequency of data collection by setting the GPS position update interval and/or the GPS position event to a non-zero value. GPS position update interval defines how often the current location of the router is updated. GPS position event defines how often the current location is stored as location update event for tracing.
Similarly, you can set these parameters from the device shell.
set service.cumulocity.gps.update_interval=<seconds>
set service.cumulocity.gps.interval=<seconds>
After you applied the configuration changes, wait a moment for the first GPS data to arrive, then refresh the page. A Location and a Tracking tab should now appear. See Device Management > Device details in the User guide for details on the Location and Tracking tab.
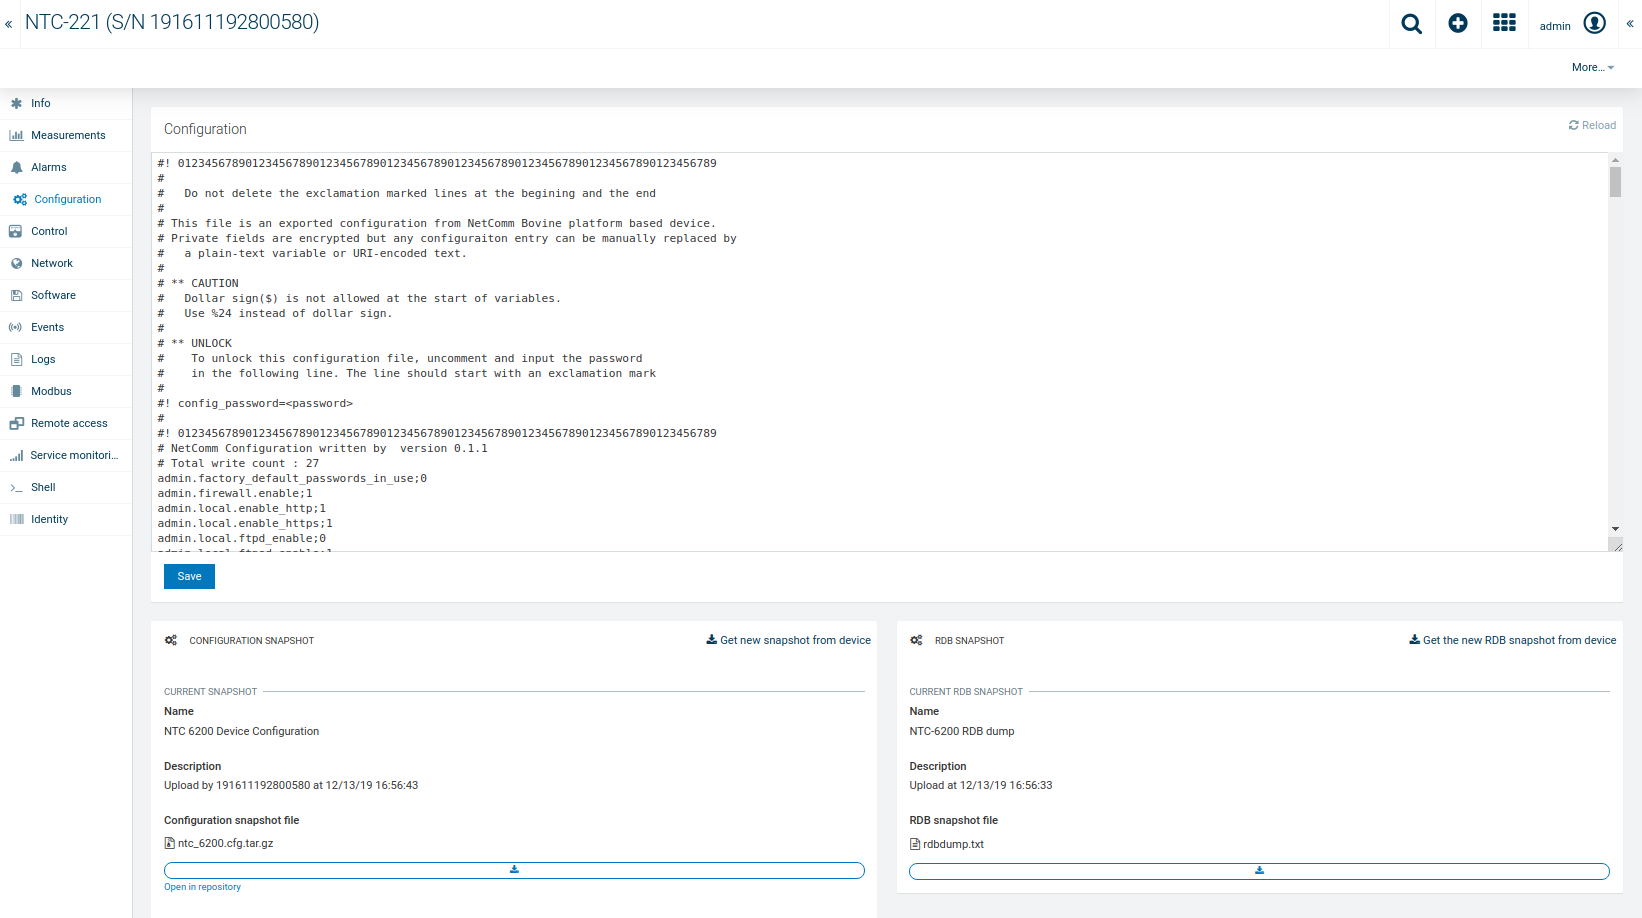
You can retrieve, modify and save user configuration data. To do this, navigate to the router in Device Management > All devices and switch to its Configuration tab. Click Reload in the Configuration section to request configuration data. It will take a few seconds to download. After the configuration data has arrived, you will see a list of parameters and their corresponding values. You can then make changes to the configuration and save them back to the device.
You can also request a configuration snapshot from the device and later apply the configuration snapshot to other devices.
There is also RDB snapshot support, which is a super-set of the configurations. This is mainly for troubleshooting purpose.
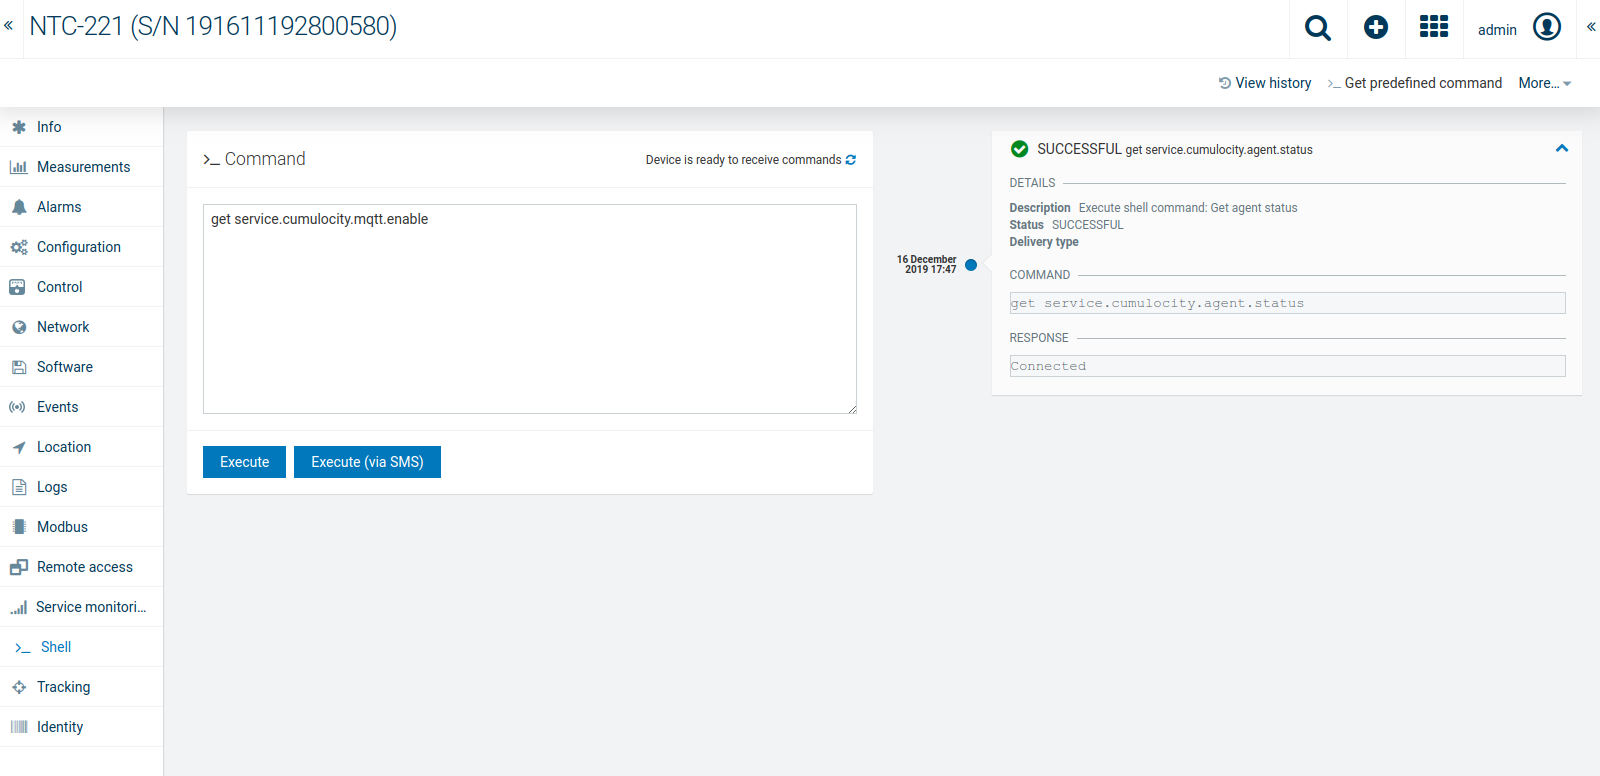
With the device shell, you can read and write individual configuration parameters from the device, as well as execute diagnostic commands. For more information, refer to Device Management > Device details > Device shell in the User guide. Consult the NetComm documentation for valid parameters and diagnostic commands. The general format is:
Multiple get, set and execute commands can be sent using a semicolon as a separator. Click the Get Predefined link to access frequently used parameters and commands.
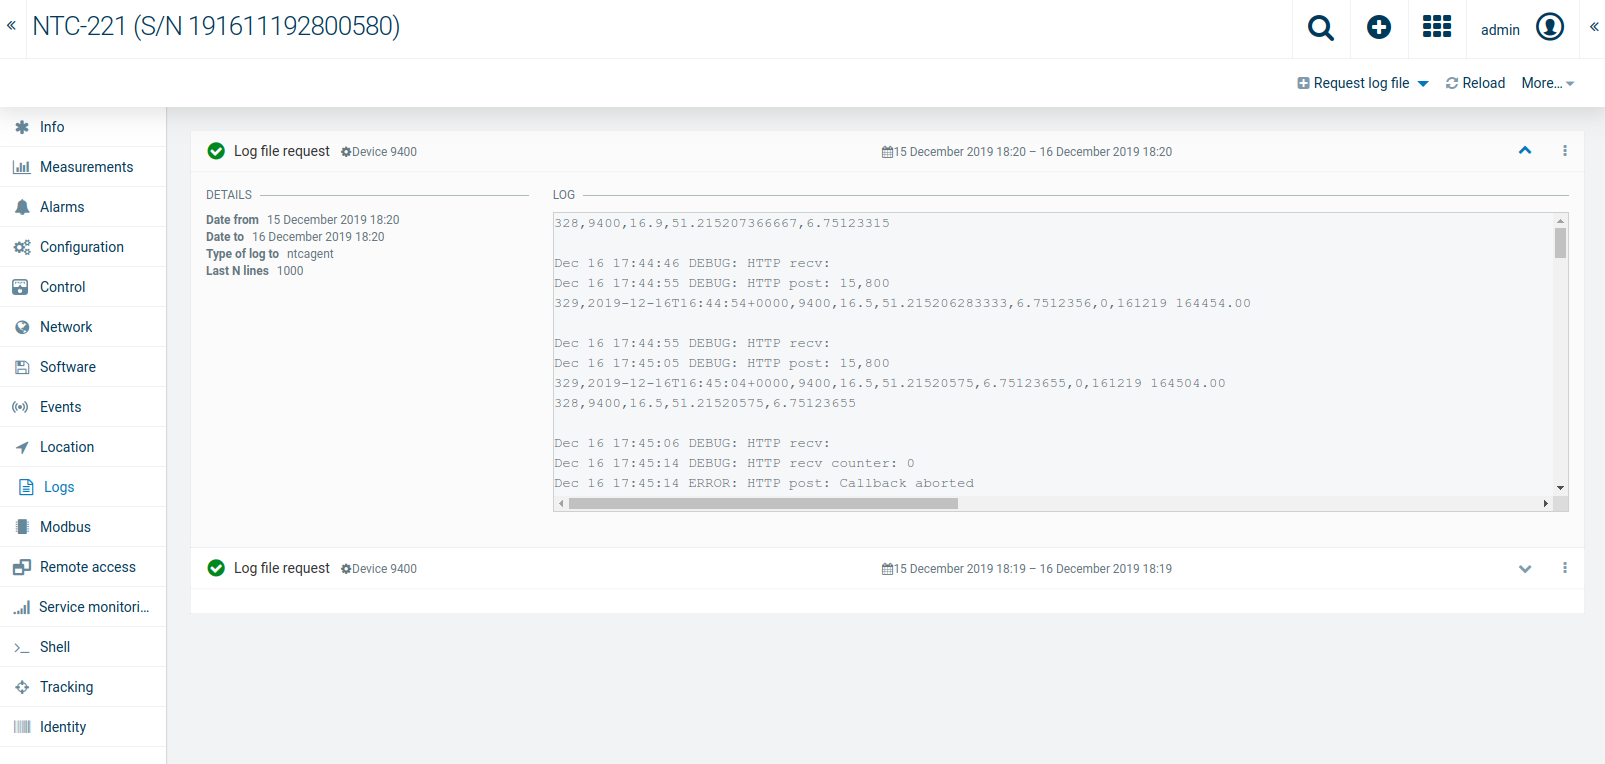
You can download and view the logs from the device. Log files can be quite big, but you can set filtering criteria to get only what is interesting for you.
For more information about logs, see Device Management > Device details > Logs in the User guide.
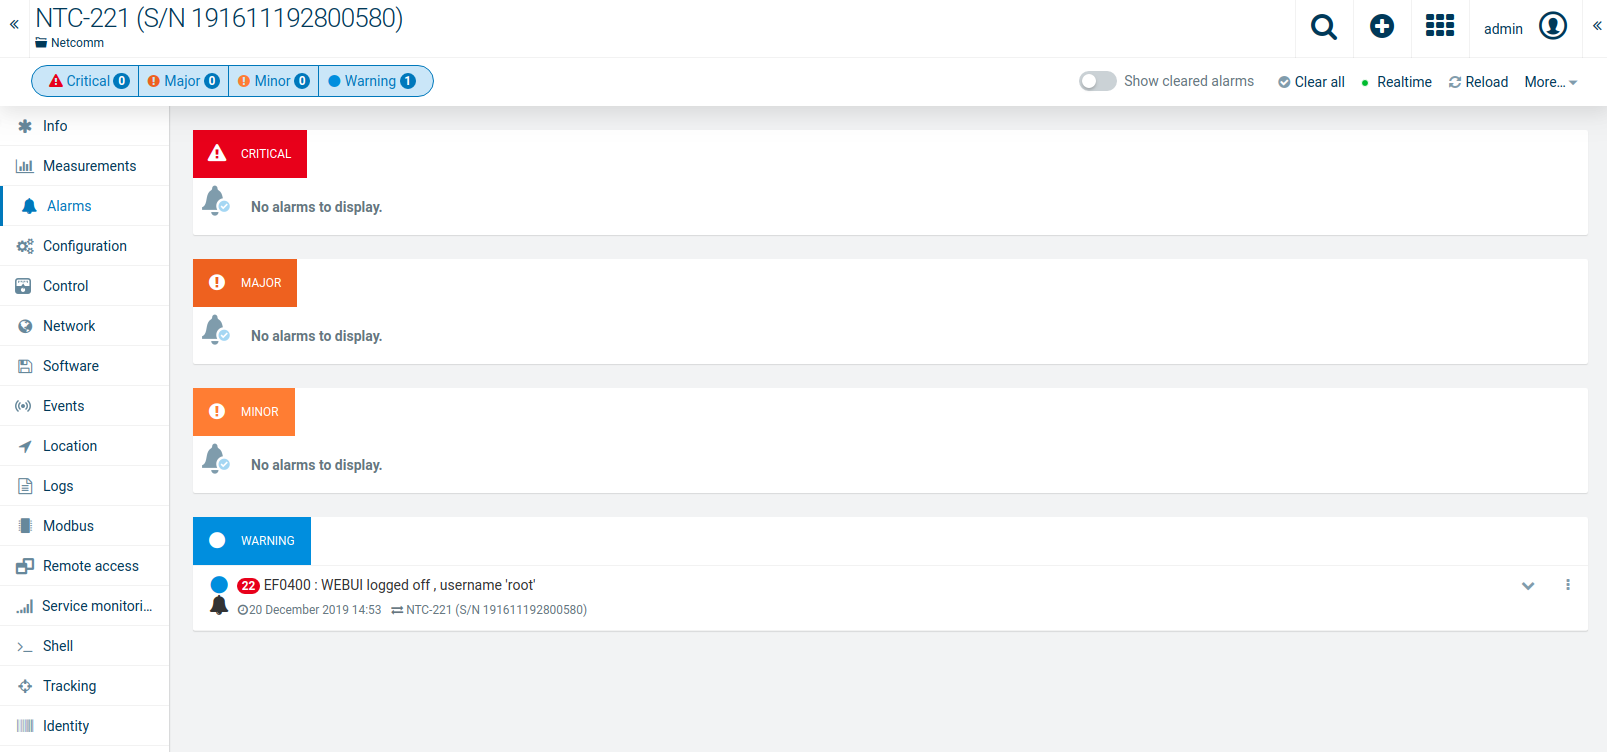
The router reports certain system events as notifications, which can be forwarded to the Cumulocity IoT platform as alarms. The system events help, for example, in troubleshooting mobile network issues. For more information on the different types of events and how to forward them, consult the NetComm documentation (for example, the Event notification section in the NTC-220 User guide). To forward an event as an alarm, set up a UDP destination sending to Port 1331 on localhost (see the Destination configuration section in the NTC-200 User guide).
The agent supports the MQTT protocol. MQTT is set as a default protocol. However, in case you need to manually configure MQTT enablement, run the following command via the device shell to either disable or enable MQTT communication.
set service.cumulocity.mqtt.enable = <0|1>
The configured server URL remains the same. For example, http://mqtt.cumulocity.com if you want to use plain MQTT, or https://mqtt.cumulocity.com if you want secure MQTT + TLS.
To configure the MQTT keepalive interval (default is 240 seconds), run the following command via the device shell to change the keepalive interval.
set service.cumulocity.mqtt.keepalive = <seconds>
Info: Changing the keepalive interval only has effect after the next reboot.
You may check the agent log file stored locally in your router when you face any issues. The log file is located in /opt/ntcagent/ntcagent.log by default.
Also, you may increase the Log level in the web user interface of the router. The log level is configured from 1 (min - error) to 8 (max - debug).
This document describes the Cumulocity IoT NetComm Agent package for the Casa System NTC-220 series router.
Info: If you are using either NetComm Wireless NTC-6200 or NetComm Wireless NTC-140W, you must use our prior Netcomm Agent version 4.2.3 or older. Contact product support or refer to the NetComm section in the Devices guide in the Cumulocity IoT 10.4.6 documentation 10.4.6 for information on how to get the packages.
Important: The Cumulocity IoT Netcomm Agent releases 1.0.x and 1.1.x are only supported on Casa Systems NTC-220 series routers. NetComm Wireless NTC-6200 and NetComm Wireless NTC-140W are only supported by another agent.
Changes from the previous agent for NTC-6200 and NTC-140W: