Managing exports
The export functionality lets you export specific data to either CSV or Excel files.
ROLES & PERMISSIONS:
- To view exports: READ permission for permission type “Inventory”
- To edit an export: ADMIN permission for permission type “Inventory”
- To add a new export: CREATE or ADMIN permission for permission type “Inventory”
- To schedule an export: ADMIN permission for permission type “Schedule export”
- To duplicate an export: ADMIN permission for permission type “Inventory”
- To delete an export: ADMIN permission for permission type “Inventory”
With this feature, you can request data for the whole tenant. Additionally, you can choose to filter for specific devices, time ranges or fields. The export data contains information about all specified filters and enabled fields.
To show all exports
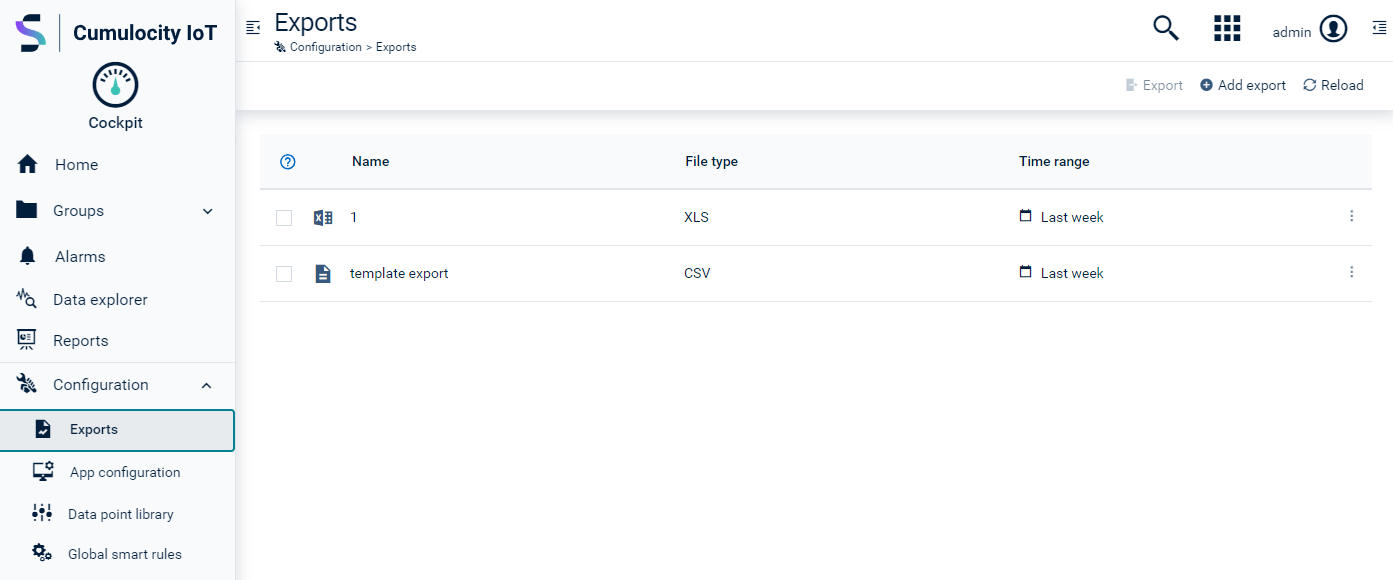
To show all exports, click Export in the Configuration menu in the navigator.
In the Export page you will find a list displaying all exports with their names, file type and time range.

To add an export
-
Click Add export in the top menu bar.
-
Enter a name for the export and select the file type (CSV or XLSX) for the report output.
Filters
In the Filter section, you can select filters to request object- or time-specific data.
To filter for a particular object, enter a name or property value into the search field and click the search icon . All matching devices or groups will be displayed below the Value field. Click an object to select it (highlighted in green).
The Time range filter can filter data for a specific time range. Select a time range from the dropdown field. All times assume platform system time (UTC).
- Last 24 hours:
- From: exactly 24 hours before the time of export
- To: the time of export
- Example: from 2020-12-31 12:34:56 to 2021-01-01 12:34:56 (when the export is done at 2021-01-01 12:34:56)
- Last 7 days:
- From: exactly 7 days before the time of export
- To: the time of export
- Example: from 2020-12-25 12:34:56 to 2021-01-01 12:34:56 (when the export is done at 2021-01-01 12:34:56)
- Last 30 days:
- From: exactly 30 days before the time of export
- To: the time of export
- Example: from 2020-12-02 12:34:56 to 2021-01-01 12:34:56 (when the export is done at 2021-01-01 12:34:56)
- Last week:
- From: same day as the time of export, but last week at midnight
- To: the time of export
- Example: from 2020-12-25 00:00:00 to 2021-01-01 12:34:56 (when the export is done at 2021-01-01 12:34:56)
- Last month:
- From: same day as the time of export, but last month at midnight
- To: the time of export
- Example: from 2020-12-01 00:00:00 to 2021-01-01 12:34:56 (when the export is done at 2021-01-01 12:34:56)
- Last year:
- From: same day as the time of export, but last year at midnight
- To: the time of export
- Example: from 2020-01-01 00:00:00 to 2021-01-01 12:34:56 (when the export is done at 2021-01-01 12:34:56)
- Custom:
- From: date and time specified by the user
- To: date and time specified by the user
Select the Object to export and Time range checkboxes to enable the respective filters.
Fields
Apart from object- and time-specific filtering you may filter data for specific fields:
- Alarms
- Events
- Managed objects
- Measurements
Use the toggle to enable/disable a field.
When a field is enabled, predefined or empty properties can be added.
To add a property
Click Add to add empty properties. To enter a label or path, click Column or Path and edit the field. For example, if you enable the Alarms field you could enter “Severity” in column and path to receive data for alarm severities.
Click Add predefined, to add predefined properties. Simply select the desired properties from the list and click Select. Use the search field at the top to search for a specific property.
If you have at least one field that is not originating from the “Add predefined” list but defined as a custom property, then you must set up at least one property for the custom values to appear in the export.
Example:
An export has 4 fields defined: time range, device name, type and c8y_SpeedMeasurement.speed.value. The first 3 are predefined properties, while the last one is a custom property. If any measurement for export does not have a custom property c8y_SpeedMeasurement.speed.value, then it will not appear in the export file.
If your field is a valid.key.with.dot then refer to it as [‘fragment.key.with.dot’] in the path, for example: [‘fragment.key.with.dot’].series.value
In case of measurements enabled, you can also select Add from data point. For details on how to add data points see To add a data point.
JsonPath expressions added from data points will be stored in bracket notation in order to increase the flexibility in fragment and series naming (for example whitespaces will be supported):

Predefined fields
Predefined fields are standard properties that always exist in a given type of document. The list of properties that you can select for export in the UI is wider and contains a lot of frequently used fragments with business meaning, but these fragments are treated as custom properties by the export engine logic. Here is the list of predefined fields for particular types of documents:
- Alarms: count, creationTime, firstOccurrenceTime, id, lastUpdated, severity, source, status, text, time, type
- Events: creationTime, id, lastUpdated, source, text, time, type
- Measurements: id, source, time, type
- Managed objects: additionParents, assetParents, childAdditions, childAssets, childDevices, creationTime, deviceParents, id, lastUpdated, name, owner, supportedMeasurements, type
To schedule an export
To schedule an export to a CSV or XLSX file to any point in time, open the respective export and click Add schedule at the bottom.
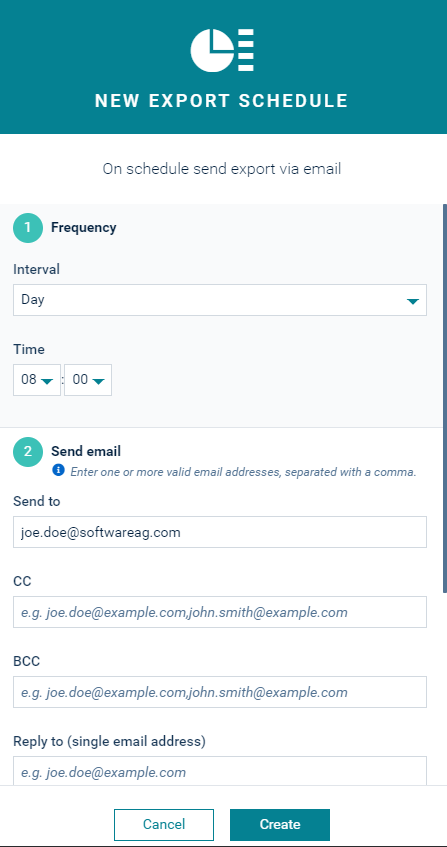
In the resulting dialog box provide the following information to receive the scheduled export via email.

1 - Frequency
Select the frequency for sending the export from the dropdown list, that is, every hour, day, week, month or year. Depending on the frequency selected, provide additional timing information. For example, if you have selected “every month”, provide the day of month, hour and minute.
2 - Send email:
Complete the email information.
In the Send to field, provide the email address of the recipient. This field is mandatory. Optionally, you can provide email addresses for recipients of copies (CC) or blind copies (BCC). Use comma as separator to enter multiple recipients.
Optionally, add the email address of the sender for reply.
Specify the subject of the email. This field is pre-filled, but may be modified.
Enter the actual email message. Available placeholders are {host}, {binaryId}. The default value is “File with exported data can be downloaded from {host}/inventory/binaries/{binaryId}”. Note that to create a clickable link in the email, you must add “https://” to the link. For example: “A file with exported data can be downloaded from https://{tenant-domain}/inventory/binaries/{binaryId}.”
Content-Type header.Click Create to create the new export schedule.
The export schedule will be added to the export details.
Migration of scheduled exports
With version 10.6.2, a new report agent has been implemented to allow scheduled exports. The export schedules functionality based on smart rules has been deprecated.
On opening a report, all scheduled exports based on smart rules are automatically migrated to the new report agent, while displaying a message informing the user about the process.
To export data
To export data to a CSV or XLSX file, select the checkbox in front of the respective row in the list and at the left of the top menu bar click Export.
You will receive an email containing links to each export file.
Standard time properties (like time or creationTime in alarms) are exported to the XLSX and CSV files following the date and time format representation defined in ISO-8601.
When the export documents limit is reached and the result is truncated due to its limitations, an additional line with an indicator is added at the end of document.
Sample CSV export with indicator:
Time,Device name,Creation time,Device name,ID,Source,Text,Time,Type 2021-11-25T10:37:06.485Z,Position #1,2021-11-25T10:37:06.485Z,Position #1,1266,1195,Location updated,2021-11-25T10:37:06.485Z,c8y_LocationUpdate 2021-11-25T10:37:01.484Z,Position #1,2021-11-25T10:37:01.484Z,Position #1,1265,1195,Location updated,2021-11-25T10:37:01.484Z,c8y_LocationUpdate […] limit exceeded!,result truncated!,limit exceeded!,result truncated!,limit exceeded!,result truncated!,limit exceeded!,result truncated!,limit exceeded!
To edit an export
Just click the respective row or click the menu icon at the end of the row and then click Edit.
For details on the fields see To add an export.
To duplicate an export
- Click the menu icon at the end of the row and then click Duplicate.
- Modify at least the name.
- Click Save & close to save the export and return to the export list.
To delete an export
Click the menu icon at the end of the row and then click Delete.
