Setting up Cumulocity IoT Edge
This document describes how to set up Cumulocity IoT Edge, the local version of Cumulocity IoT Core, in a Virtual Machine (VM).
This document describes how to set up Cumulocity IoT Edge, the local version of Cumulocity IoT Core, in a Virtual Machine (VM).
| Item | Details |
|---|---|
| Hypervisor | - VMWare ESXi 6.5 and 6.7 - VMware Workstation Player 16.x - Hyper-V on Microsoft Windows 10 Enterprise, version 1809. The supported VM configuration version is 9.0. |
| Edge VM image | To be downloaded from the Software AG Empower portal, based on the target hypervisor. For VMware (ESXi and Workstation Player), download all the 4 files of VMware (ovf, mf and two disks vmdk files). For Hyper-V, download the ZIP file. |
| Cumulocity IoT Edge license file | To request the license file for Cumulocity IoT Edge, please contact the logistics team for your region: - North and South America: LogisSrvus@softwareagusa.com - All Other Regions: LogisticsServiceCenterGER@softwareag.com In the email, you must include - your company name, under which the license has been bought - the domain name (for example, myedge.domain.com), where Cumulocity IoT Edge will be reachable For more information, see Domain name validation for Edge license key generation. |
| SSL key and SSL certificate | Use your internal or an external CA (Certification Authority) to generate these files. These files must not be password-protected. Info: Ensure that the .crt and .key files are in PEM format and the .key file is not encrypted. |
| DNS entry | The DNS (Domain Name System) is used to resolve human readable host names like www.cumulocity.com to machine readable IP addresses like 192.198.1.10. If you want to connect to Edge VM within your LAN, the DNS entry has to be added for the domain name (URL under which Cumulocity IoT Edge can be reached) with the IP address of the host. |
| Edge cloud remote access | To connect and manage one (or multiple) Edge devices to your Cumulocity IoT cloud tenant, you need an active Cumulocity IoT standard tenant with the Data Broker and Cloud Remote Access extensions. Info: The Edge cloud remote access is an optional feature in Cumulocity IoT Edge. |
To procure the Cumulocity IoT Edge license file, you must provide the right domain name to the Software AG’s logistics team for Edge license key generation.
When you provide the domain name, consider the following points:
The domain name does not need to be a Fully Qualified Domain Name (FQDN).
For example, to access the Edge platform with the domain name myown.iot.com, request the Edge license for myown.iot.com or iot.com (without the subdomain myown).
Important: When you are running the Edge post installation process, you must use the FQDN. For example, myown.iot.com.
If you exclude the subdomain from the domain name in the Edge license, you should possess a wildcard SSL certificate which can be used with multiple subdomains (myown or others) of the domain (iot.com).
For example, if you provide iot.com as the domain name, you should possess an SSL certificate for *.iot.com.
If you have an Internationalized Domain Name (IDN), then you should provide the translated ASCII equivalent domain name.
For example, if your domain name is myown.iöt.com (for example, containing ö), then you should use myown.xn–it-fka.com.
Also, provide the same translated ASCII equivalent domain name as the tenant domain name during the Edge post installation process.
Info: An Internationalized Domain Name (IDN) is an internet domain name that contains at least one label, in whole or in part, in a language-specific script or alphabet, such as Arabic, Chinese, Cyrillic, Devanagari, Hebrew or the Latin alphabet-based characters with diacritics or ligatures, such as French. The internationalization of domain names is a technical solution to translate names written in language-native scripts into an ASCII text representation that is compatible with the Domain Name System. See Wikipedia.
Ensure that you adhere to the following domain name validation rules:
The following network ports must be reachable from the local network:
If Cumulocity IoT Edge should communicate with the cloud, the following ports of www.cumulocity.com (or another instance) need to be available:
There is no internet connection required during installation. Internet connection during runtime is optional, and only used if this is configured in the Data Broker.
The following ports need to be enabled by default in order to accept traffic from users and devices on the internet (also refer to “Setting up port forwarding” in Setting up the environment):
| Source IP | Source Port | Destination IP | Destination Port | Service |
|---|---|---|---|---|
| any | any | Edge VM IP | TCP/80 | HTTP |
| any | any | Edge VM IP | TTCP/443 | HTTPS |
| any | any | Edge VM IP | TCP/1883 | MQTT |
| any | any | Edge VM IP | TCP/8883 | MQTT/TLS |
Depending on additional integrations more ports must be opened.
The core node must be able to connect to the internet. Ports required to outside are:
| Service | Port |
|---|---|
| HTTP | 80 |
| HTTPS | 443 |
Depending on the installed integrations (email, SMS, etc.) different ports might have to be opened in order to make these services available to the Cumulocity IoT platform. The descriptions of these ports are delivered with the corresponding integrations.
Depending on the DNS and NTP setup it might be the case that DNS (UDP/53) and NTP (UDP/123) connections to the internet must be possible from all hosts.
The virtual machine has the following minimum hardware requirements:
| Hardware | Configuration |
|---|---|
| Disk space | 115 GB |
| CPU | Intel x86 |
| Number of CPU cores | 2 - without microservice 4 - with microservice 4 - to update Docker CIDR |
| RAM | 6 GB - without microservice 8 GB - with microservice 8 GB - to update Docker CIDR |
| Network Interface Controller (NIC) | 1 |
These are the minimum system requirements to enable the microservice hosting feature. If the microservice requires additional system resources, you must configure the system requirements accordingly in addition to minimum system requirements. For example, if the microservice requires 2 CPU cores and 4 GB of RAM, then the VM must have 6 CPU cores (4 cores for VM + 2 cores for microservice) and 12 GB of RAM (8 GB for VM + 4 GB for microservice).
Info: This does not cover host operating system hardware requirements. The host operating system resource requirements should be sized independently and should be over and above the resource allocated to the virtual machines.
For your convenience, we provide the hypervisor examples for setting up Cumulocity IoT Edge:
For all hypervisors, the Edge VM is configured to use CET time zone. Software AG recommends that you use the same Internet Time Server on the host machine and the guest VM for better time synchronization.
SSH login into Cumulocity IoT Edge is allowed through the “admin” user. All operational activities described in this guide need to be carried out through the admin user.
Use the following login credentials for SSH login into the Edge instance:
In the Edge VM, the default keyboard layout is en_US. If your keyboard is other than en_US, the characters that you type might not match the keys on the keyboard. This might affect your Edge VM password when setting the password or logging in to Edge VM directly through the VM console.
Use the following command to log into Edge server via SSH:
ssh admin@<IP address>

$ Password: manage
The admin user can change the hostname of the Edge VM using the command:
[admin@server ~]$ sudo hostnamectl set-hostname <hostname>
The default hostname of the Edge VM is server.
Info: Root access is not supported in the Edge VM instance. Changes made as root user might cause failure of the described operational procedures. Moreover, the Edge VM is tested and validated with the configuration shipped (that is, operating system version/patch level, other components compatibility and so on). Root access would alter Cumulocity IoT Edge to an unknown and not tested configuration and handling support tickets would no longer work.
Copy the Edge license, SSL key, and SSL certificate into the Edge VM. Use WINSCP, SCP, FTP or any other file transfer tool to transfer the files from your host OS to Edge VM (Linux OS).
You can copy the files to the Edge VM folder /home/admin.
The files have the following extensions:
Important: Do not rename the license file received from Cumulocity IoT support. Renaming the license file causes failure of the post-installation process.
The post-installer configuration file is a key-value based configuration file which acts as input to the post-installation script while configuring the EDGE server.
A template of this configuration file is placed within the EDGE VM under /opt/c8y/utilities/post-installer/ as config.dat. In order to use this, you need to update the file with the correct values.
Important: This template file is overwritten if the post-installation script is invoked and inputs are entered manually through console. Therefore, it is advisable to copy this template file to a different location and edit the same.
The following keys are available in the configuration file:
tenant.admin.username : Provide a new username for the tenant admin. This username is later used to login to the system using the web browser.
tenant.admin.password : Provide a new password for the tenant admin username. This password is later used to login to the system using the web browser.
Info: The password should be base64-encoded only. For example, if you want the password to be edge@123 then the encoded value ZWRnZUAxMjM= should be used in the configuration file.
Important: The password must have a minimum of 8 and a maximum of 32 characters and it may contain letters, numbers or any of these symbols: `~!@#$%^&*()_|+-=?;:'",.<>{}[]/
tenant.domain.name : Provide a fully qualified domain name. For example, “myown.iot.com”. Here, you must have the Cumulocity IoT Edge license for the domain name iot.com or myown.iot.com.
The domain name must adhere to all the domain name validation rules as described in Domain name validation.
Important: Once configured, the domain name cannot be changed. Make sure to use the name finally desired.
ssl.certificate : Provide the absolute path of the SSL certificate file. The file extension should either be “.crt” or “.cert”. For example, /home/admin/myown-iot-com.crt. Make sure that the file path is valid and the file exists in the local machine.
Info: The SSL certificate that you provide here must be valid for the domain name that you have provided in the previous step.
ssl.certificate.key : Provide the absolute path of the SSL certificate key file. The file extension must be “.key.”. For example, /home/admin/myown-iot-com.key.
Make sure that the file path is valid and the file exists in the local machine.
Info: The SSL key that you provide here must be valid for the domain name that you have provided in the previous step.
c8y.license : Provide the absolute path of the license file. The file extension must be “.licence”. For example, /home/admin/myown.iot.com.licence.
Make sure that the file path is valid and the file exists in the local machine.
The following parameters are required only if you want to update the network parameters in the EDGE VM. You may skip these parameters if network is already configured or it is not applicable in your case.
network.ip : Provide the new IP address for the ethernet interface. For example, 192.168.56.120
netmask : Provide the netmask IP for your network. For example, 255.255.255.0
gateway.ip : Provide the gateway IP for your network. For example, 192.168.56.1
dns.server.ip : Provide the DNS Server IP for your network. For example, 192.168.56.1. For DNS, do not use the IP addresses 10.96.0.10 and 127.0.0.1.
Info: If the DNS Server IP is unknown, you can enter the previously entered gateway IP here. If any of the network parameters are not available, contact your network administrator.
Once Edge VM is started, you need to run the script post_installation.sh to configure the Edge server. The post-installation script is available in the folder /opt/c8y/utilities.
Post installation should only be run after the platform initialization is successful which can be checked by running below REST API:

Usually the platform comes up within 2 minutes.
Browse to the folder /opt/c8y/utilities.
[admin@server ~]$ cd /opt/c8y/utilities
Run the following command and provide the password when prompted.
[admin@server ~]$ su admin
[admin@server ~]$ Password: <Enter password for admin user>
Run the script post_installation.sh.
[admin@server ~]$ sudo ./post_installation.sh
Configure the network for your Edge server. See Configuring the network.
Perform the post-installation process. See Running the post installation process.
The Edge server configuration is complete.
The following sections explain the tasks that can be performed using the post-installer utility:
Important:
- Option 1 is the first step that you must perform while configuring the Edge server. Also, if you change the network configuration of a Hypervisor, you must configure the network using option 1.
- Option 3, 4 and 6 will only work after you have successfully completed the post-installation setup (Option 2).
- Option 1 and 4 must be run from the Edge VM console in the hypervisor. These options cannot be invoked from a remote connection like SSH.
Important: This task needs to be invoked from within the VM and cannot be invoked through a remote connection.
Run the post-installation script post_installation.sh.
Select the option 1. Configure network.
Select the type of input you want to use.
* Enter [F] to take input from file or [C] to take input from console:
You have the choice to enter the network parameters manually through the console or through a file.
Provide the new IP address for the ethernet interface. For example, 192.168.66.10
* Enter new IP address for ethernet interface:
Provide the netmask IP for your network. For example, 255.255.255.0
* Enter netmask:
Provide the gateway IP for your network. For example, 192.168.66.1
* Enter gateway IP:
Provide the DNS Server IP for your network. For example, 192.168.66.1
* Enter DNS Server IP:
For DNS, do not use the IP addresses 10.96.0.10 and 127.0.0.1.
Info: If the DNS Server IP is unknown, you can enter the previously entered gateway IP here. If any of the network parameters are not available, contact your network administrator.
Provide the default Docker bridge network CIDR. For example, 172.18.0.1/16
* Enter Default Docker Bridge Network CIDR (Current value: 172.17.0.1/16. Leave blank to retain the same):
Info: Update the default Docker bridge network CIDR only if the IP address of the Edge VM is in the same network range as the Docker network.
Confirm to continue with the network configuration process.
Restart your Edge VM.
Provide the absolute path of the configuration file. The network parameters will be loaded from the file. In case of any incorrect parameters, the utility will fall back to console mode and will prompt the user to enter the parameters as described above.
`* Enter existing file path containing network parameters:`
Confirm to continue with the network configuration process. Restart your Edge VM after the network configuration is successful.
The network configuration process consists of multiple steps which are executed sequentially. After a step has been executed, its status will be shown on the console. In case of any failure in any of the steps, the process halts and a failure message appears on the console.
Run the post-installation script post_installation.sh.
Select the option 2. Run post-installation.
Select the type of input you want to use.
* Enter [F] to take input from file or [C] to take input from console:
You have the choice to enter the post-installation parameters manually through the console or through a file.
Provide a new username for the tenant admin. This username is later used to login to the system using the web browser.
* Enter tenant admin username:
Provide a new password for the “tenant admin username”. This password is later used to login to the system using the web browser.
* Enter tenant admin password:
Info: The password must have a minimum of 8 and a maximum of 32 characters and it may contain letters, numbers or any of these symbols: `~!@#$%^&*()_|+-=?;:'",.<>{}[]/
Re-enter the previously entered password to confirm it.
* Re-enter tenant admin password:
Provide a fully qualified domain name. For example, “myown.iot.com”. Here, you must have the Cumulocity IoT Edge license for the domain name iot.com or myown.iot.com.
The domain name must adhere to all the domain name validation rules as described in Domain name validation.
* Enter tenant domain name:
Important: Once configured, the domain name cannot be changed. Make sure to use the name finally desired.
Provide the absolute path of the SSL certificate file. The file extension should either be “.crt” or “.cert”. For example, /home/admin/myown-iot-com.crt.
* Enter domain ({your-domain-name}) SSL certificate file path (*.crt|*.cert):
Info: The SSL certificate that you provide here must be valid for the domain name that you have provided in the previous step.
Provide the absolute path of the SSL certificate key file. The file extension must be “.key.”. For example, /home/admin/myown-iot-com.key.
* Enter domain ({your-domain-name}) SSL certificate key file path (*.key):
Info: The SSL key that you provide here must be valid for the domain name that you have provided in the previous step.
Provide the absolute path of the license file. The file extension must be “.licence”. For example, /home/admin/myown.iot.com.licence.
* Enter domain ({your-domain-name}) Cumulocity licence file path (*.licence):
Provide the URL for the Cumulocity IoT tenant (cloud or on-premise) to control your Edge VM remotely. For example, “https://<tenant-domain>.cumulocity.com”.
* Enter cloud URL (leave blank to disable remote management):
You can also configure the Edge agent with the Cumulocity IoT tenant URL by running the post-installation script and selecting Configuring Edge Agent.
Once the input parameters are entered correctly, the parameters will be saved under /opt/c8y/utilities/post-installer/config.dat for future reference. You can use this file for providing the input parameters to the post-installer.
Provide the absolute path of the configuration file. The installation parameters will be loaded from the file. In case of any incorrect parameters, the utility will fall back to console mode and will prompt the user to enter the parameters as described above.
`* Enter existing file path containing post-installation parameters:`
Confirm to continue with the post-installation process.
The post-installation process consists of multiple steps which are executed sequentially. After a step has been executed, its status will be shown on the console. In case of any failure in any of the steps, the process halts and a failure message appears on the console.
Run the post-installation script post_installation.sh.
Select the option 3. Update license and SSL certificates.
Select the type of input you want to use.
* Enter [F] to take input from file or [C] to take input from console:
You have the choice to enter the update parameters manually through the console or through a file.
Provide the absolute path of the SSL certificate file. The file extension should either be “.crt” or “.cert”. For example, /home/admin/myown-selfsigned.crt.
* Enter domain ({previously-entered-domain-name}) SSL certificate file path (*.crt|*.cert):
Provide the absolute path of the SSL certificate key file. The file extension must be “.key.”. For example, /home/admin/myown-selfsigned.key.
* Enter domain ({previously-entered-domain-name}) SSL certificate key file path (*.key):
Provide the absolute path of the license file. The file extension must be “.licence”. For example, /home/admin/myown.iot.com.licence.
* Enter domain ({previously-entered-domain-name}) Cumulocity licence file path (*.licence):
Once the input parameters are entered correctly, the parameters will be saved under /opt/c8y/utilities/post-installer/config.dat for future reference. You can use this file for providing the input parameters to the post-installer.
Provide the absolute path of the configuration file. The update parameters will be loaded from the file. In case of any incorrect parameters, the utility will fall back to console mode and will prompt the user to enter the parameters as described above.
`* Enter existing file path containing update parameters:`
Confirm to continue with the update process.
The update process consists of multiple steps which are executed sequentially. After a step has been executed, its status will be shown on the console. In case of any failure in any of the steps, the process halts and a failure message appears on the console.
Important: This task needs to be invoked from within the VM and cannot be invoked through a remote connection.
Info: During this process, the previously used password in the source will be validated as per Cumulocity IoT’s password policy. In case the password is not compliant with the policy, the user will be prompted to enter the tenant password without which the post-upgrade task cannot be completed.
Run the post-installation script post_installation.sh.
Select the option 4. Run post-upgrade.
Confirm to continue with the post-upgrade process.
Restart your Edge VM.
The post-upgrade process consists of multiple steps which are executed sequentially. After a step has been executed, its status will be shown on the console. In case of any failure in any of the steps, the process halts and a failure message appears on the console.
If you have configured the network in the ‘source’ version, the new configuration will be performed in the upgrade version when this task is executed.
You can expand the disk size of installation disk and data disk at the same time.
Shutdown the VM.
Edit the disk size in the hypervisor. See the hypervisor specific documentation for increasing the disk size.
Start the VM.
Run the post_installation.sh script.
Select the option 5. Expand disk size.
Confirm to continue with expanding the disk size.
The disk size expansion process consists of multiple steps which are executed sequentially. After a step has been executed, its status will be shown on the console. In case of any failure in any of the steps, the process halts and a failure message appears on the console.
The password updated using this option acts as the password for the administrators of both the tenants, that is, admin user of the ‘edge’ tenant and edgeadmin user of the management tenant. Using these credentials, the administrators can log in to the respective tenant through a web browser.
Run the post-installation script post_installation.sh.
Select the option 6. Update tenant password.
Enter the new tenant password.
* Enter new tenant admin password:
Info: The password must have a minimum of 8 and a maximum of 32 characters and it may contain letters, numbers or any of these symbols: `~!@#$%^&*()_|+-=?;:'",.<>{}[]/
Re-enter the previously provided password to confirm it.
* Re-enter tenant admin password:
Confirm to continue with updating the tenant password.
The update tenant password process consists of multiple steps which are executed sequentially. After a step has been executed, its status will be shown on the console. In case of any failure in any of the steps, the process halts and a failure message appears on the console.
Info: The Cumulocity IoT platform does not allow to use any of the last 10 previously used passwords.
Run the post-installation script post_installation.sh.
Select the option 7. Configure Edge Agent.
Provide the URL for the Cumulocity IoT tenant (cloud or on-premise). For example, “https://<tenant-domain>.cumulocity.com”.
* Enter cloud URL (leave blank to disable remote management):
After providing the tenant URL, you have to register your Edge VM with the Cumulocity IoT tenant. For more information, see Registering the Edge device with a Cumulocity IoT tenant.
Important: If you have configured the Cumulocity IoT tenant URL during the post installation and then use this option with a blank URL, you will disable the Cumulocity IoT tenant connectivity.
Info: Ensure that you have fulfilled the minimum system requirements: 4 logical CPU cores and 8 GB RAM.
If you want to use the microservice hosting feature, ensure that you do not use these IP ranges in your local network where the Edge virtual machines are configured. When you enable the microservice hosting feature, the Kubernetes system reserves these IP ranges on the Edge instances.
To enable the microservice hosting feature:
Run the post-installation script post_installation.sh.
Select the option 8. Enable microservice hosting feature.
The option 8 appears Disable microservice hosting feature if the microservice feature is enabled.
Confirm to enable the microservice feature.
When you enable or disable the microservice feature, the Device Simulator microservice also gets enabled or disabled.
After you enable the microservices, before using the microservices ensure that the microservices are active and healthy. For more information about microservices runtime, see Microservice runtime.
To disable the microservice feature, run the post installer and select the option 8. Before disabling the microservice feature, you should unsubscribe from all the microservices that have been uploaded. You can also delete the microservice if you are not planning to enable again and subscribe to the same microservice. For more information about developing and hosting a microservice, see Microservices SDK.
The following table lists the tenants and users available in Cumulocity IoT Edge:
Tenant |
User |
Credentials |
Description |
|---|---|---|---|
| edge | Tenant admin user | Username: The username provided during the post-installation process. Password: The password provided during the post-installation process. |
The edge tenant is the default tenant. The tenant admin user is created during the post-installation process. |
| management | sysadmin | Username: sysadmin Password: sysadmin-pass |
The management tenant is used to configure branding, user management and other platform settings. For information about managing the edge tenant, see Enterprise Tenant > Managing tenants in the User guide. The sysadmin user account in the management tenant is used for branding and unlocking the tenant admin user. |
| management | edgeadmin | If you have to log in as edgeadmin user, log in to the management tenant using the URL https://<Edge_VM_IP_Address>/apps/administration/index.html. - Tenant: management - Username: edgeadmin - Password: Will be the same as the Edge tenant admin password provided during the post-installation process |
The edgeadmin user account in the management tenant is used for configuring password policies, email server and template configurations. Info: You cannot access the Cockpit and Device Management application as edgeadmin user. |
Important: Creating tenants in Cumulocity IoT Edge is not supported.
The Cumulocity IoT platform is accessible with the domain name provided as part of the post installation script.
There are two ways to configure the accessibility with domain names:
Info: The first option is always preferable so that Cumulocity IoT Edge is reachable in LAN.
On Linux machines, add the following entry to /etc/hosts:
<IP address> <domain_name>
Use the IP address provided during network configuration. For example, the default value for Hyper-V is 192.168.66.10.
On Windows machines, add the same entry to C:\Windows\System32\drivers\etc\hosts.
Ping the <domain_name> to verify it.
[admin@server ~]$ ping <domain_name>
If the ping is successful the DNS resolution is working properly.
Using <domain_name>, Cumulocity IoT Edge can be connected from the host operating system (operating system which is hosting the Edge VM instance). If you want to connect Edge VM within your LAN, which is outside of the host operating system, you need to do following:
Enter the following:
https://<domain_name>
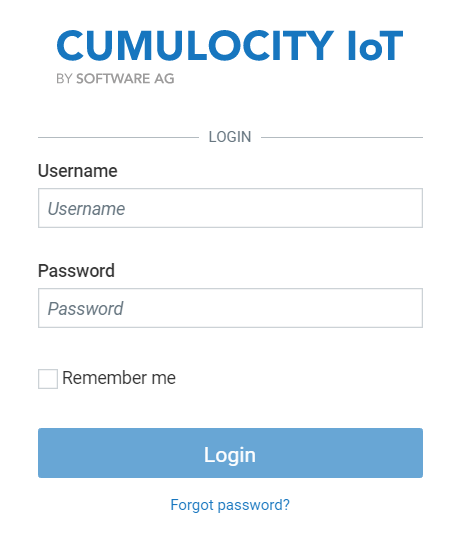
The Cumulocity IoT Login screen appears.
Next steps: Before you proceed further, you must first log in as sysadmin user and change the password. See Changing the sysadmin password.
Enter the following:
https://<IP_Address_Of_Edge>;
Next steps: Before you proceed further, you must first log in as sysadmin user and change the password. The sysadmin user account is used for unlocking the tenant admin user. See Changing the sysadmin password.
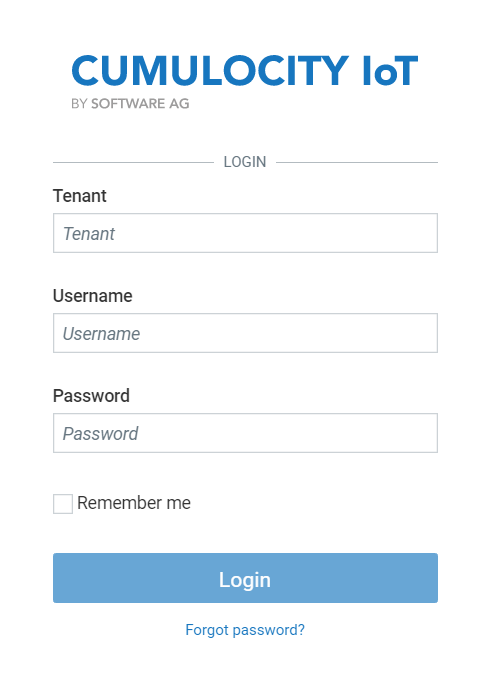
Log in using the following credentials:
Here, <tenant> refers to edge or management.
Change the password as described in User options and settings.
Log out.
Next steps: Log in with the tenant admin credentials provided during post-installation. In the Login screen, the tenant is always edge.
When you log into Cumulocity IoT Edge for the first time, you will be taken to the Cockpit application where the Home screen initially opens up.
To set up an ESXi virtual machine, follow these steps:
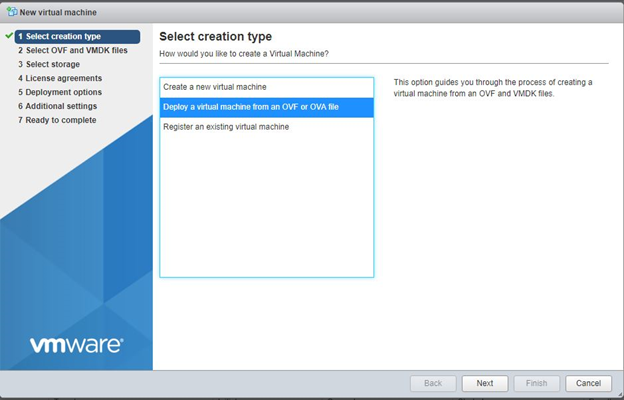
Click Create/Register VM to open a window to select the creation type.
Under Select creation type, select Deploy a virtual machine from OVA or OVF template and click Next.
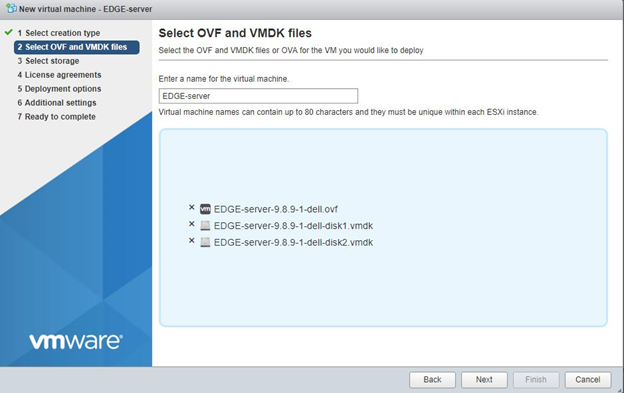
In the next window, provide a name for the VM, e.g. EDGE-server, and drag and drop the required files (ovf, vmdk1, vmdk2) and click Next.
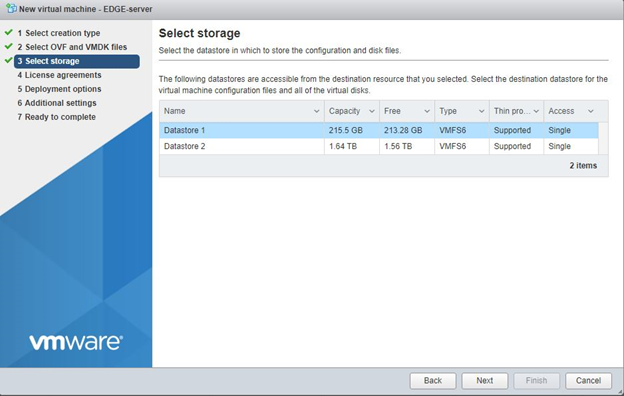
Under Select storage, select the datastore where the VM will reside and click Next.
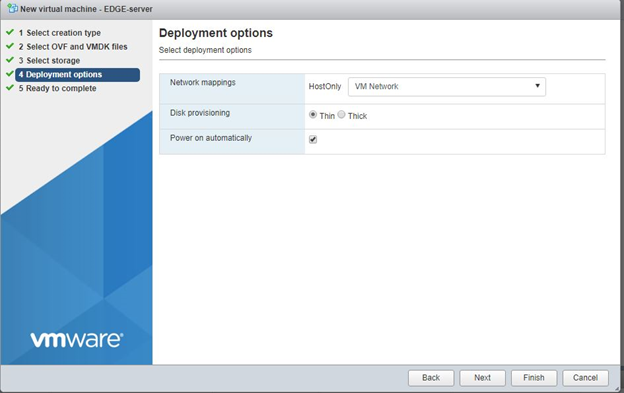
Under Deployment options, select options like thin/thick provisioning and click Next.
Review the machine settings and click Finish to complete the setup.

A VM with the provided name, e.g. “EDGE-server”, should now show up in the Virtual Machines section. Notifications will appear accordingly in the Recent tasks pane.
Perform the following steps to configure the network once the image is imported into ESXi.
Run /opt/c8y/utilities/post_installation.sh -> Option 1 -> “Configure network”.
Run /opt/c8y/utilities/post_installation.sh -> Option 2 -> “Run post-installation”.
To set up a VM in VMware Workstation Player, follow the steps below.
Info: The following steps show a reference example. Refer to the VMware documentation for the exact setup. The final configuration also depends on the end user setup.
In VMware, navigate to Player > File > Open to import the Edge VM.
Navigate to the folder where the Edge VM files are located, select the OVF file and click Open.
Change the VM name if required and click Import. You can also change the VM storage path here.
Start the Edge VM by clicking Play virtual machine.
Once the VM starts up successfully, you must configure the network so that it can be accessed from outside the VM.
To do so, the following information is required:
If this information is not available to you, contact your network administrator.
You may also use the vmnetcfg utility provided by VMware (see below) to obtain the netmask and gateway IP.
Configure the network by completing the “Configure network” task using the post-installer utility, see Configuration.
Finish the Cumulocity IoT Edge configuration by completing the “Run post-installation” task using the post-installer utility, see Configuration.
You can use the VMware vmnetcfg utility to get the necessary details like subnet mask and gateway IP required for completing the “Configure network” task using the post-installer.
The following example illustrates the network configuration on a Windows platform. For instructions on Linux platform, see VMware Knowledge Base.
Download the correct version of the vmnetcfg utility. It can also be extracted from the VMware Workstation Pro installer.
Save the vmnetcfg binary file (vmnetcfg.exe) in the VMware Workstation Player installation directory. In a Windows environment, this is usually C:\Program Files (x86)\VMware\VMware Player.
Open the file with the appropriate rights.
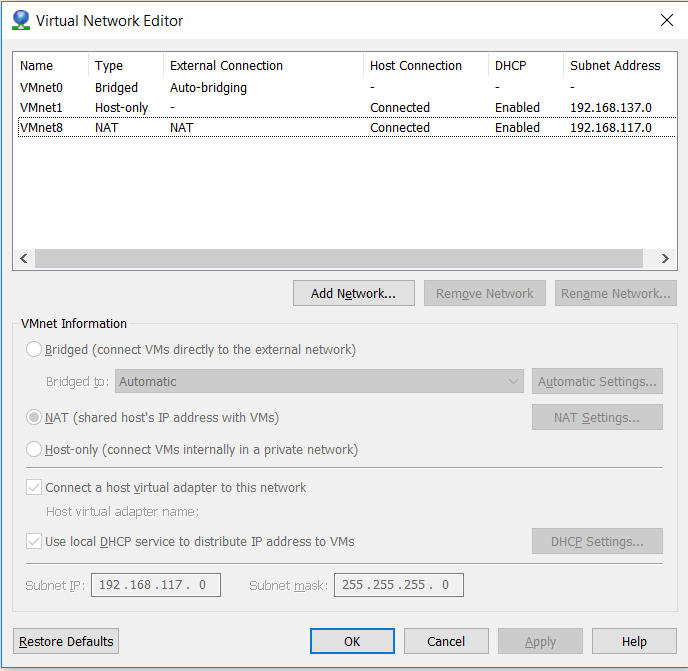
Select “NAT” as external connection.
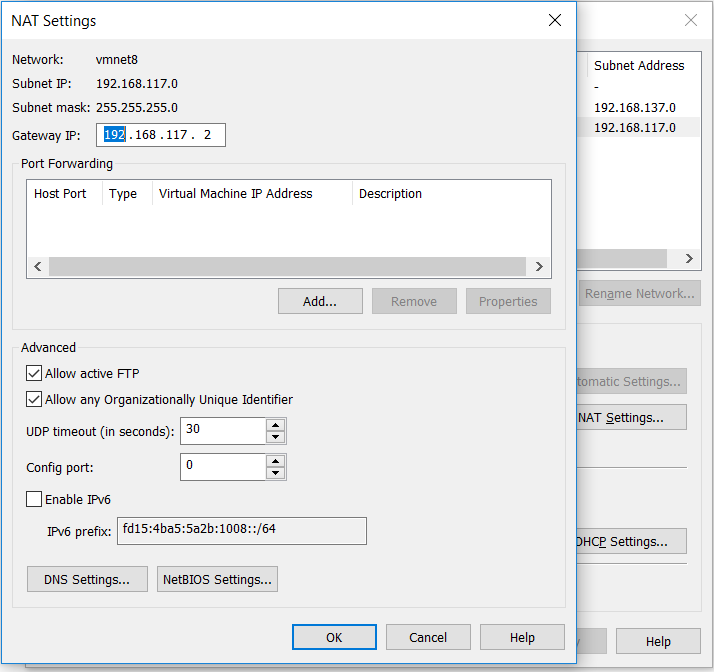
Click NAT settings to open the NAT Settings window.
Note down the gateway IP address and close the NAT settings window.
Click DHCP Settings to open the DHCP Settings window.
In the fields Starting IP address and Ending IP address, change the IP range from 3 to 254, i.e. if your gateway IP is 192.168.117.2, set the IP range from 192.168.117.3 to 192.168.117.254.
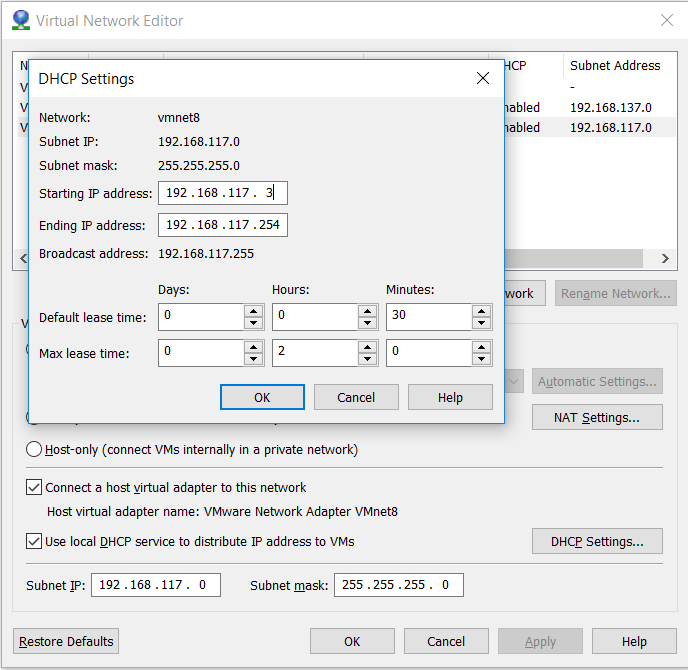
Click OK to save your settings.
To perform port forwarding on a VMware platform, follow the steps below.
Important: The IP addresses used in the screenshots are sample IP addresses, for the purpose of example only. The IP addresses may vary in your set up.
Run the vmnetcfg.exe utility as an administrator.

Select the NAT adapter and click NAT Settings.
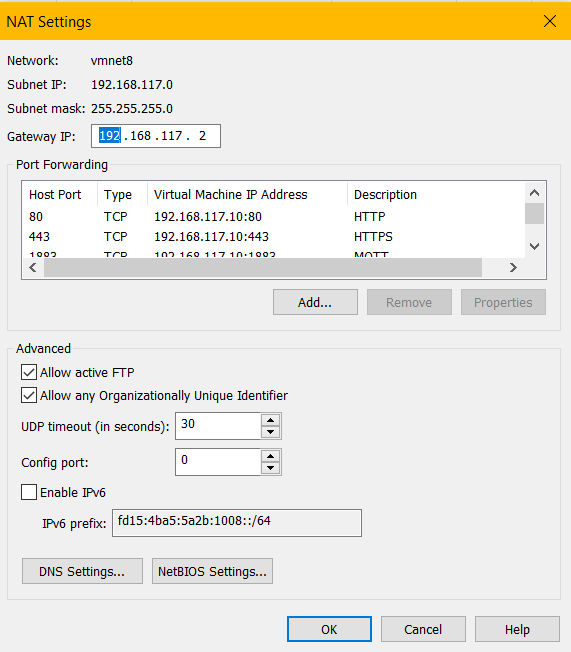
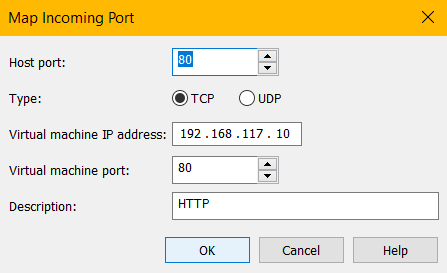
Click Add to add the port forwarding rules. Enter the port forwarding rules for HTTP, HTTPS, MQTT and MQTT over SSL protocols as described in the table below:
Info: Ensure that the Virtual machine IP address is the same as the IP address that you have configured for the Edge VM.
| Host Port | Type | VM IP Address | VM Port | Description |
|---|---|---|---|---|
| 80 | TCP | 192.168.117.10 | 80 | HTTP |
| 443 | TCP | 192.168.117.10 | 443 | HTTPS |
| 1883 | TCP | 192.168.117.10 | 1883 | MQTT |
| 8883 | TCP | 192.168.117.10 | 8883 | MQTT over SSL |
Click OK in the Map Incoming Port window after entering the port forwarding rules for each port.
Click OK in the NAT Settings window.
Click Apply > OK.
You can now access Cumulocity IoT Edge using the IP address of the host machine.
To set up Hyper-V, you must first enable Hyper-V on your system, and create Network Address Translation (NAT) adapter. For enabling Hyper-V, see the Microsoft documentation.
You can create a NAT adapter using two ways:
Info: Run all the commands in Windows PowerShell with administrative privileges.
Info: You must use the default adapter name
NATSwitchForEdgeand the default IP address192.168.66.1.
PS C:\WINDOWS\system32> New-VMSwitch -SwitchName "NATSwitchForEdge" -SwitchType Internal
PS C:\WINDOWS\system32> Get-NetAdapter
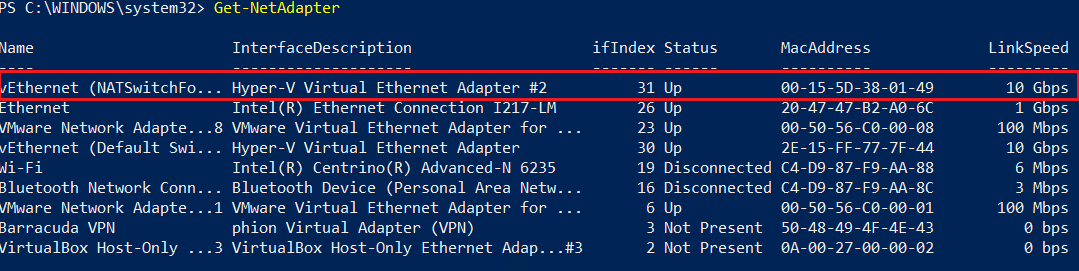 Note down the `ifIndex` of the adapter. The `ifIndex` in the above screenshot is 31. The `ifIndex` may vary in your system and the same `ifIndex` should be used in the next step.
PS C:\WINDOWS\system32> New-NetIPAddress -IPAddress 192.168.66.1 -PrefixLength 24 -InterfaceIndex 31
PS C:\WINDOWS\system32> New-NetNat -Name NATSwitchForEDGE -InternalIPInterfaceAddressPrefix 192.168.66.0/24
You can define the adapter name and configure the IP address for your Edge VM. In this example, the adapter name is EdgeAdapter1 and the IP address is 10.20.30.40.
Info: The following steps show a reference example. The final configuration also depends on the end user setup.
PS C:\WINDOWS\system32> New-VMSwitch -SwitchName "EdgeAdapter1" -SwitchType Internal
PS C:\WINDOWS\system32> Get-NetAdapter
Note down the ifIndex of the adapter. The ifIndex may vary in your system and the same ifIndex should be used in the next step.
PS C:\WINDOWS\system32> New-NetIPAddress -IPAddress 10.20.30.40 -PrefixLength 24 -InterfaceIndex 71
PS C:\WINDOWS\system32> New-NetNat -Name EdgeNATRule1 -InternalIPInterfaceAddressPrefix 10.20.30.0/24
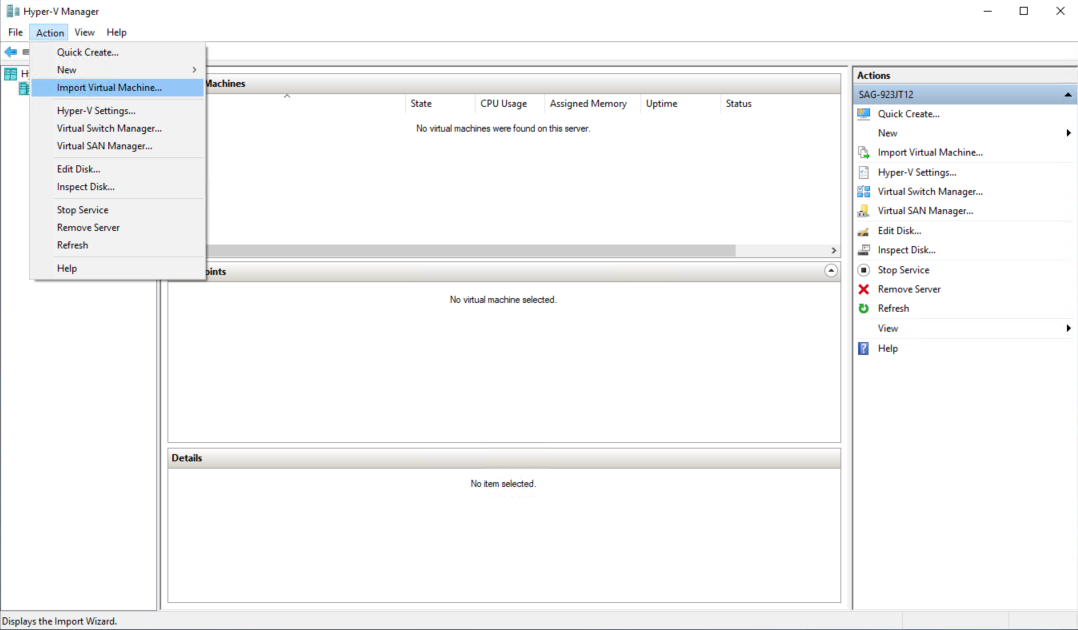
After creating a NAT adapter, you must import the Edge VM image into Hyper-V.
In Hyper-V Manager, go to Action > Import Virtual Machine.
In the Before You Begin wizard, click Next.
Provide the location of the Edge VM image and click Next.
Select the Edge VM and click Next.
In the Choose Import Type wizard, select Register the virtual machine in-place (use the existing unique ID) and click Next.
If you have used the default NAT adapter name, skip this step and proceed with step 7.
If you have used a different NAT adapter name, you will see the following screen:
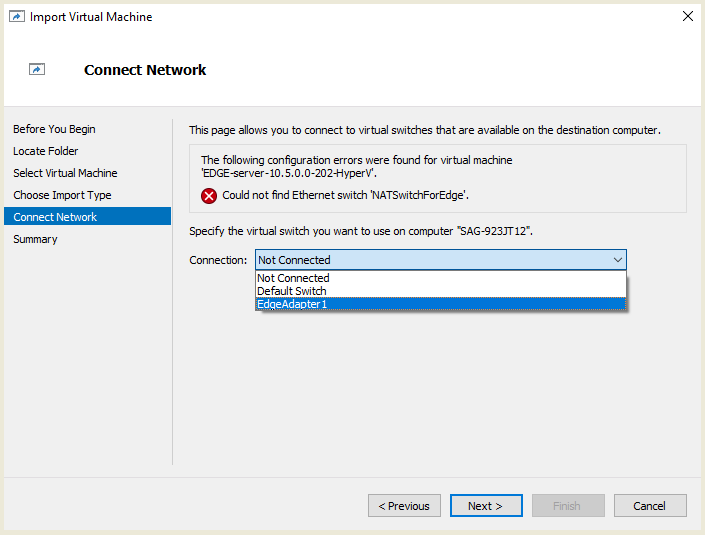 Select the adapter from the Connection drop down list and click Next.
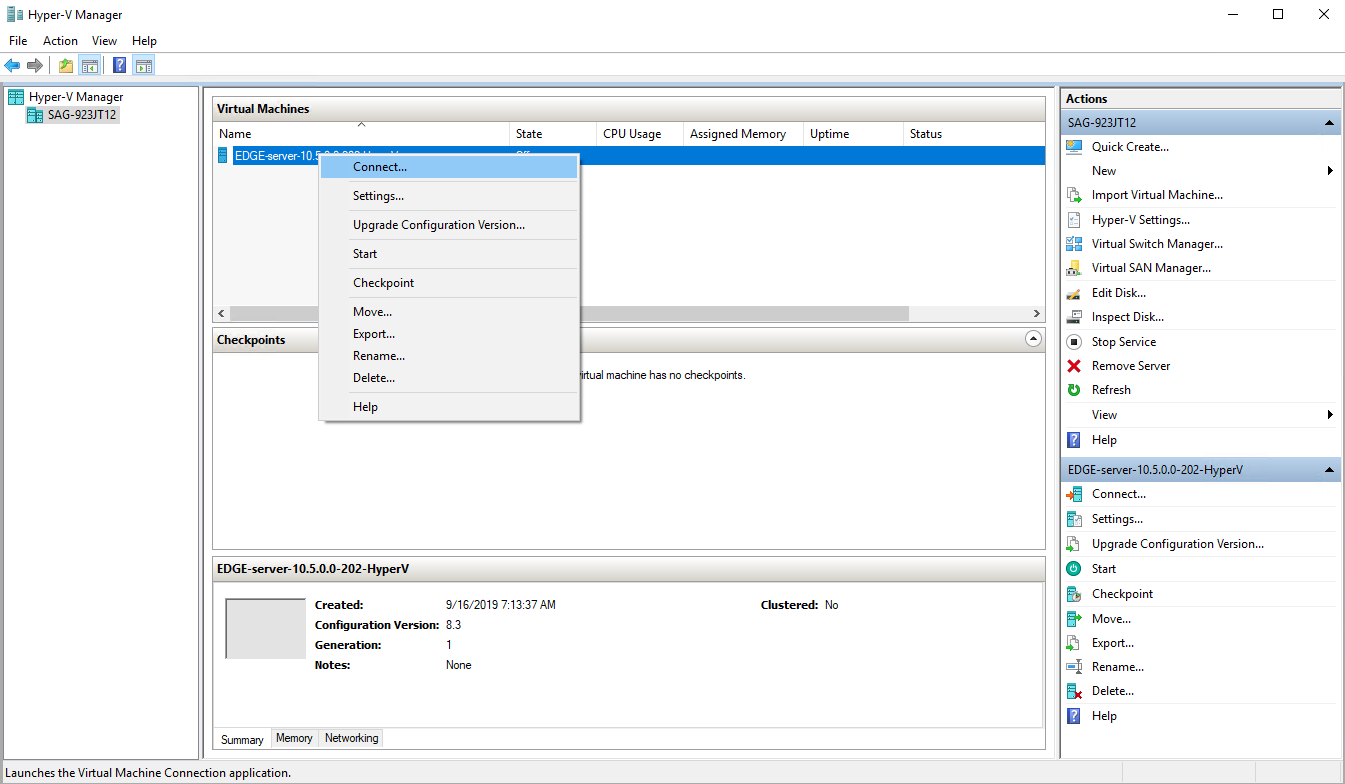
Click Finish. The Edge VM image appears in the Hyper-V Manager.
Right-click the Edge VM image and click Connect.
If you have defined the adapter name and IP address other than the default settings, you must first configure the network before running the post installation. See Configuring the Edge Server.
Info: By default, the NTP servers are configured to Europe NTP servers. You can configure the NTP server as per your requirements.
Cumulocity IoT Edge does not officially support VirtualBox. If you want to convert a VMWare image (OVF file) to VirtualBox image (OVA file), and run Cumulocity IoT Edge on VirtualBox for experimental or trial purposes, follow the example below.
Download and install the VMWare Open Virtualization Format Tool (OVF Tool) on the host machine from the VMWare website.
Go to the location of the OVF file.
Run the following command to convert the OVF file to OVA file:
"C:\Program Files (x86)\VMware\VMware Player\OVFTool\ovftool.exe" <source_ovf_file> <target_ova_file>
For example:
"C:\Program Files (x86)\VMware\VMware Player\OVFTool\ovftool.exe" EDGE-10.7.0-2059-VMware.ovf EDGE-10.7.0-2059-VBox.ova
A sample screenshot:

Import the converted VirtualBox image (OVA file) in VirtualBox Manager.
Create a host-only network adapter for the virtual machine. See Creating a host-only network interface.
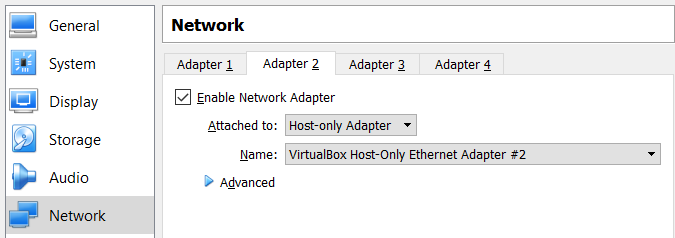
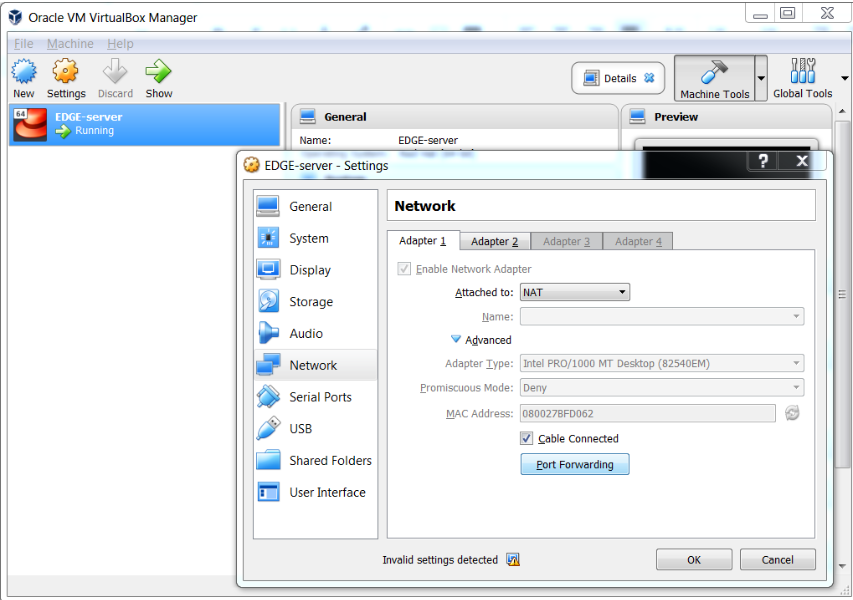
Select the network adapter for the VirtualBox image. Click Settings > Network > Adapter 2.
Select Enable Network Adapter.
Select Host-only Adapter from the Attached to: dropdown list.
Select the host-only network adapter that you created before, from the Name dropdown list.
Start the Edge VM and log in as root user. See Starting the virtual machine.
Configure and activate the network adapter.
Start the NetworkManager service.
[root@server ~]# systemctl start NetworkManager
Update the name of the newly added connection.
[root@server ~]# nmcli connection modify “Wired connection 2” connection.id “enp0s8"
Activate the connection.
[root@server ~]# nmcli connection up enp0s8
This command provides an error Error: Connection activation failed: IP configuration could not be reserved (no available address, timeout, etc.). Ignore this error.
Restart the Edge VM.
Log in as admin user.
Configure the Edge VM network using the post-installer. See Configuring the Edge network.
Run the post installation process. See Running the post installation process.
Info: Depending on the operating system and VirtualBox version you are using, the following steps and the screenshots might differ. The sample screenshots shared below were created using VirtualBox 5.2.8.
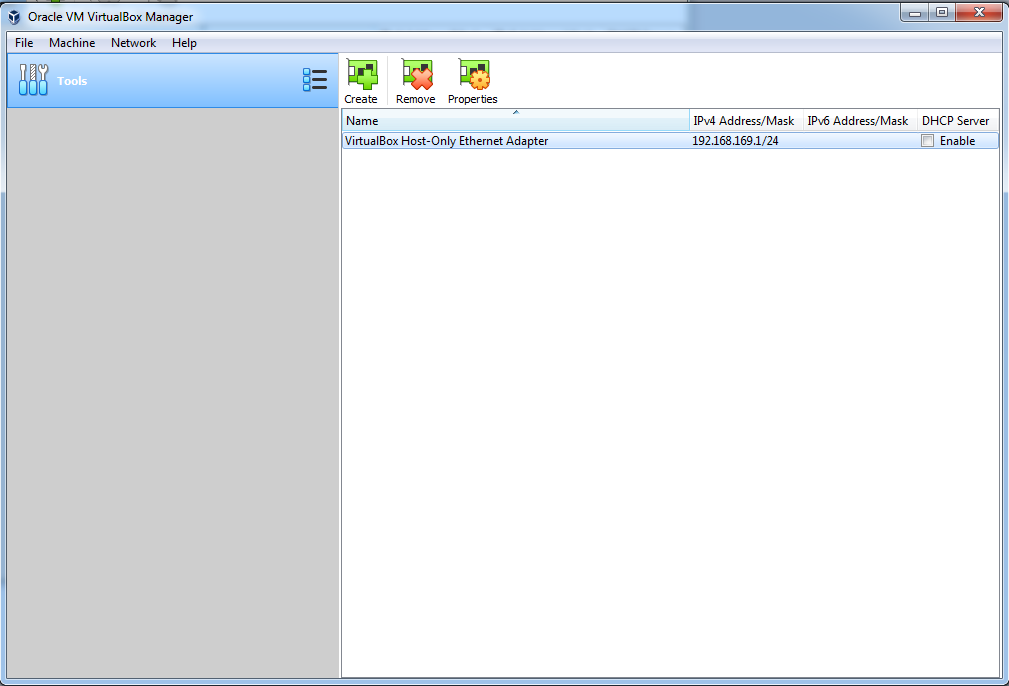
In the VirtualBox, click Tools > Network in the top left.
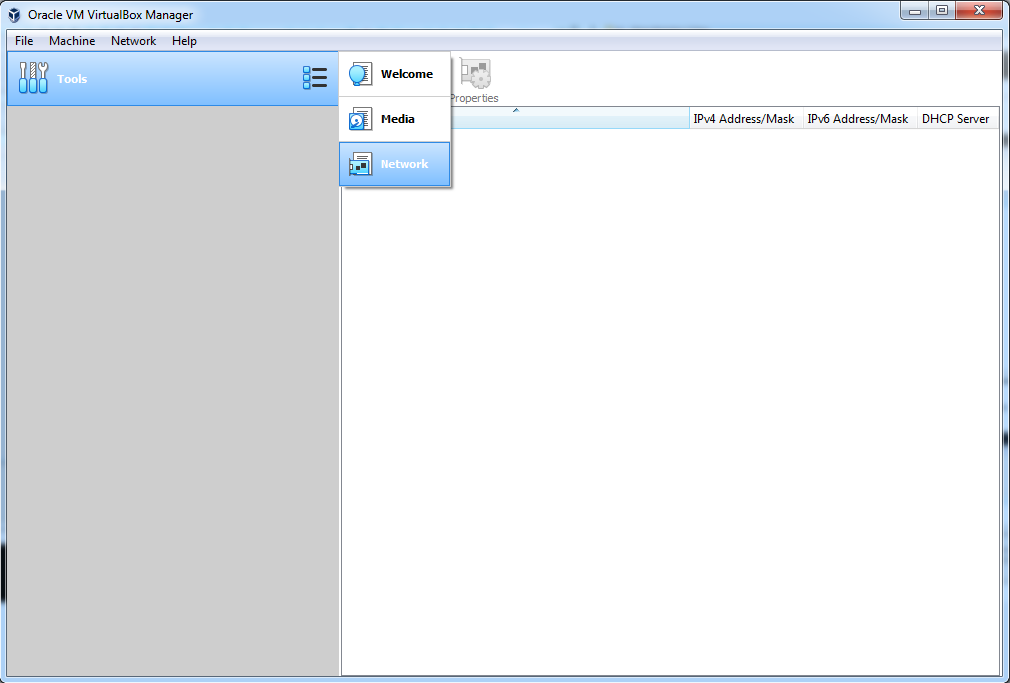
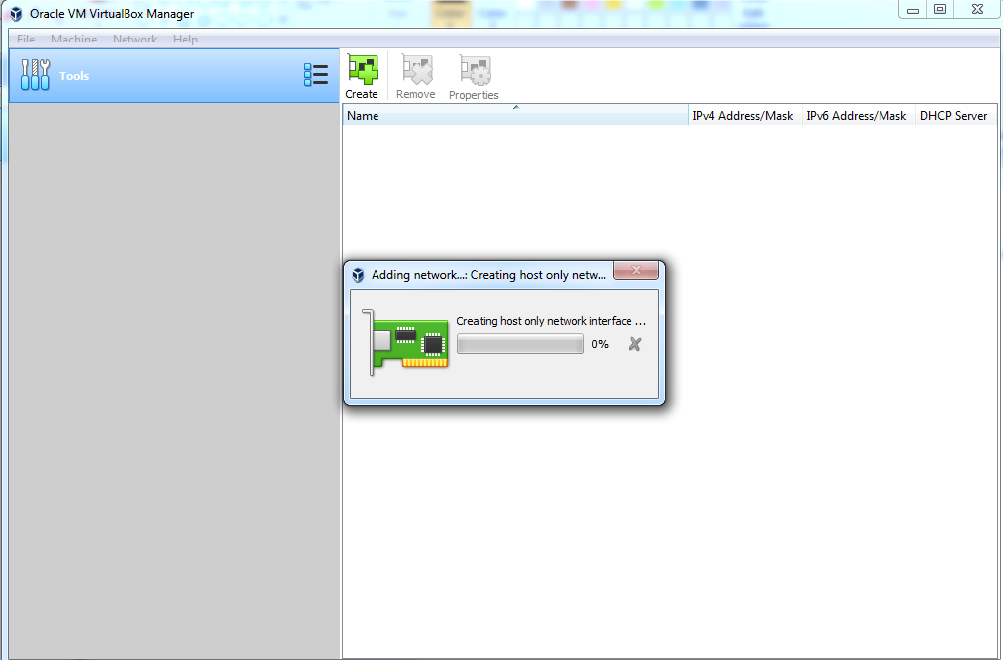
Click Create to set a host-only network interface for VM.
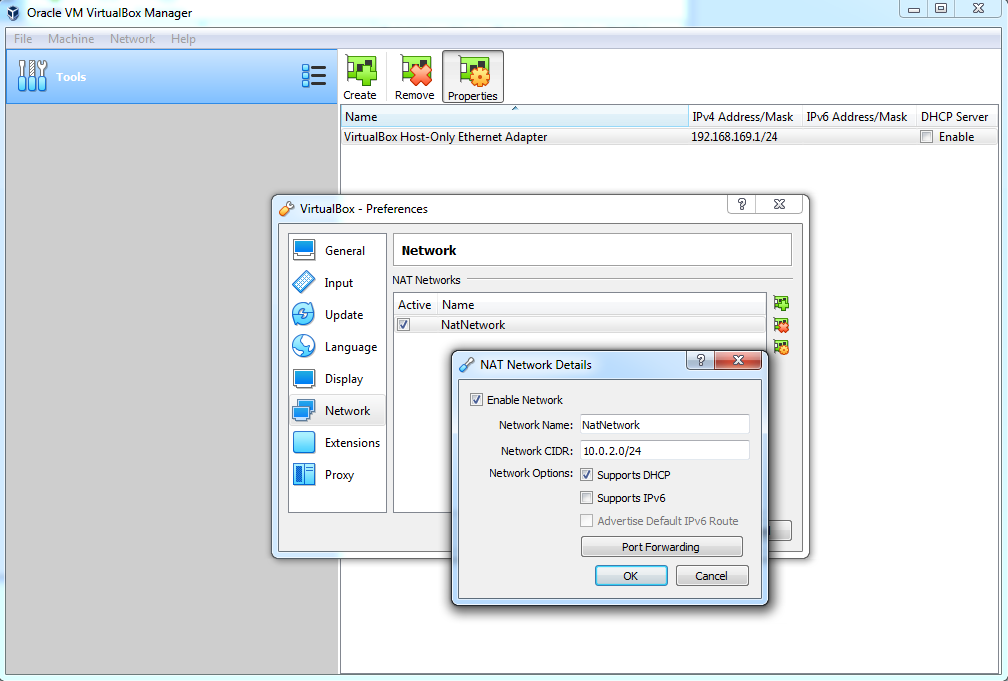
Navigate to File > Preferences > Network to check the network settings.
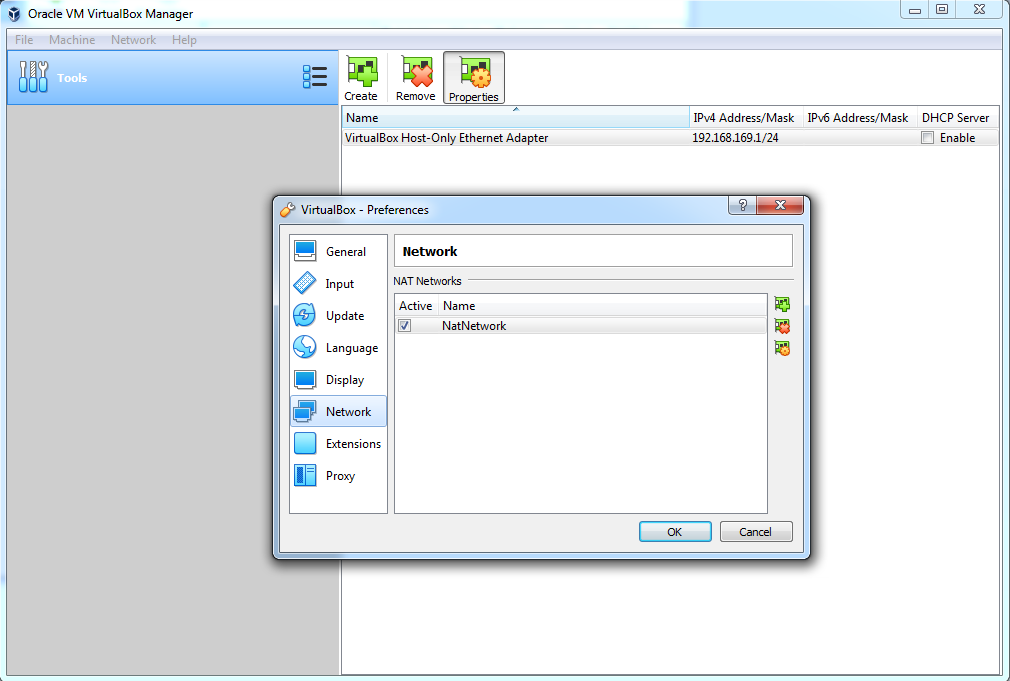
In the NAT Networks tab, click the plus icon to add a new network.
Click the settings icon on the right and make sure that Enable network is activated, which is the default. This network interface is used for outbound Internet/Intranet access.
Click Tools > Network in the top left. Select VirtualBox Host-Only Ethernet Adapter.
Click the properties icon on the right and make sure that IPv4 Address and IPv4 Mask are set to the following values: IPv4 Address = 192.168.56.1, IPv4 Mask = 255.255.255.0
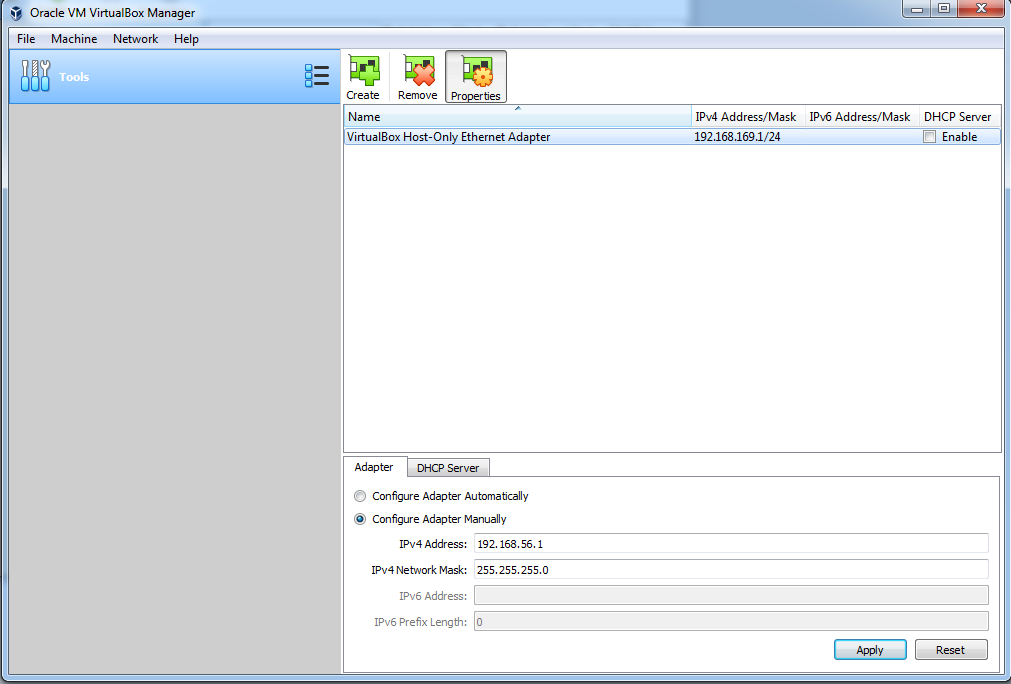
If, in your VirtualBox, there already is a Host-Only Ethernet Adapter configured with the same IPv4 address, then update its properties as described in the next steps.
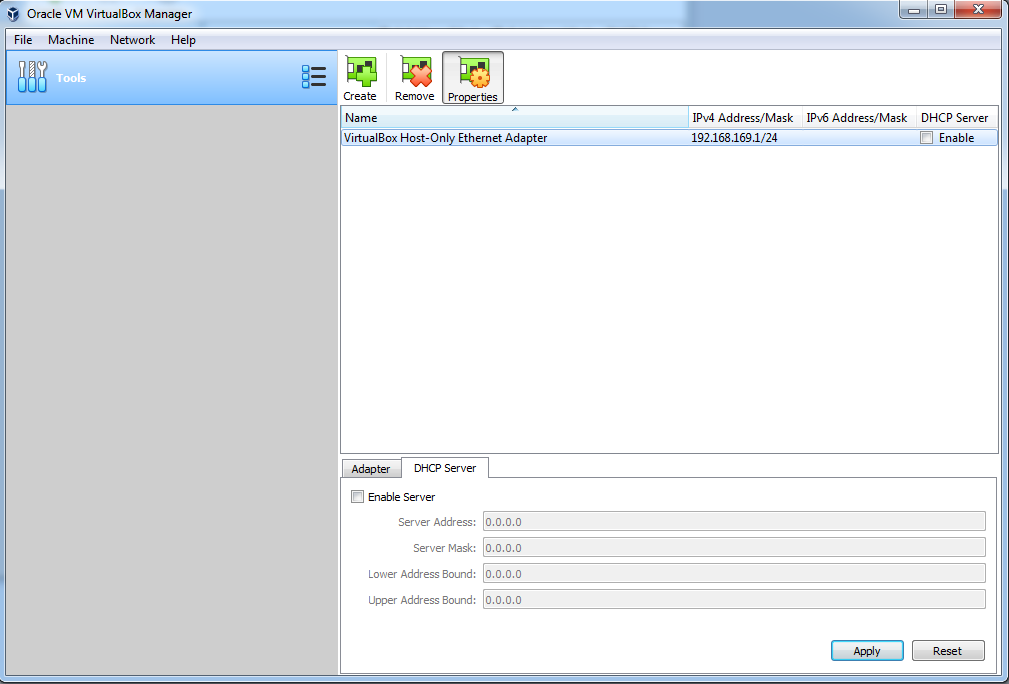
Click the DHCP Server tab and make sure that the DHCP server is not enabled.
The VirtualBox now is installed and the network is set.
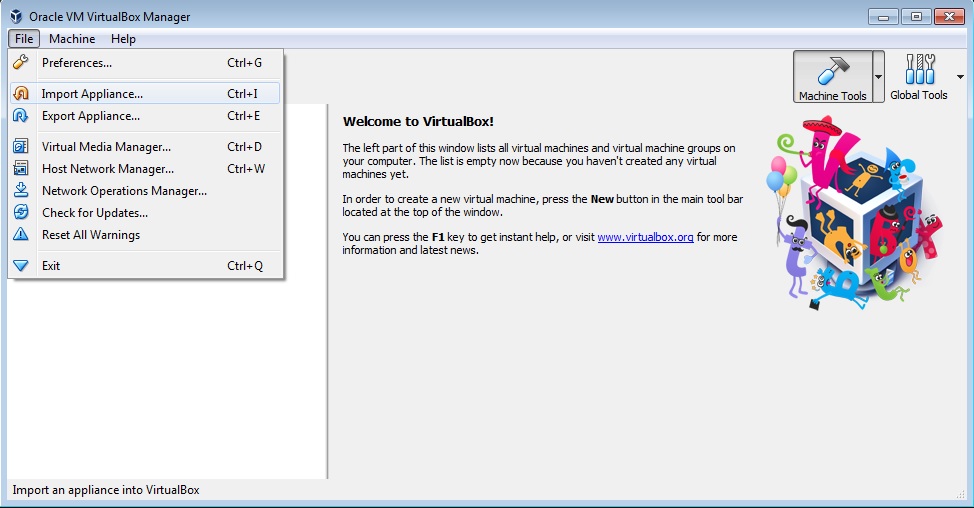
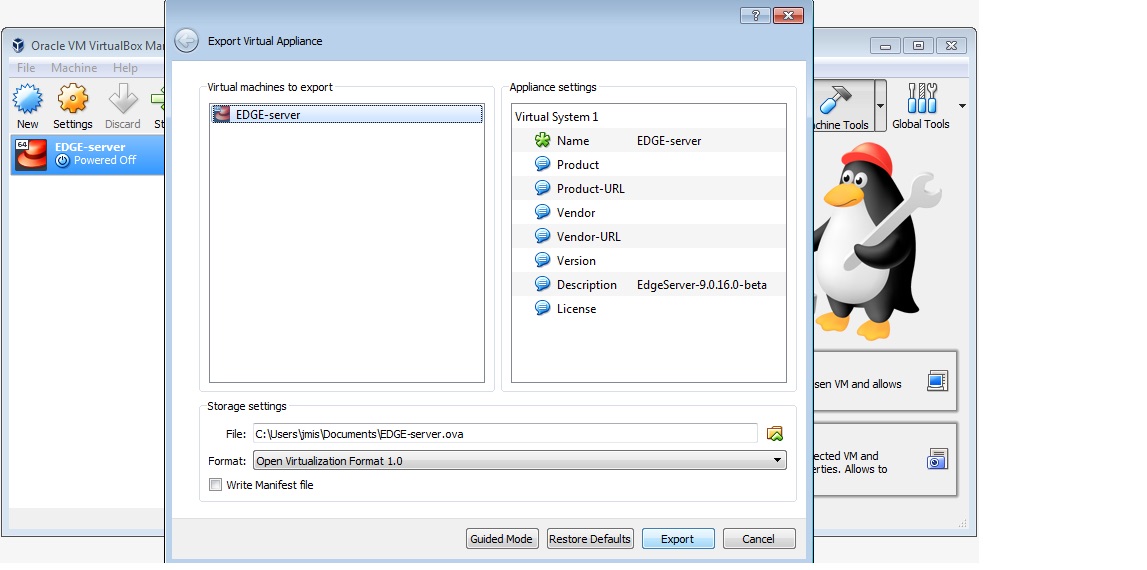
In the VirtualBox Manager, import the virtual machine. Click File > Import Appliance > Select the OVA file.
The machine will automatically be added to the VirtualBox Manager. The machine has predefined settings for disk, CPU and memory.
Click Start to start the virtual machine.
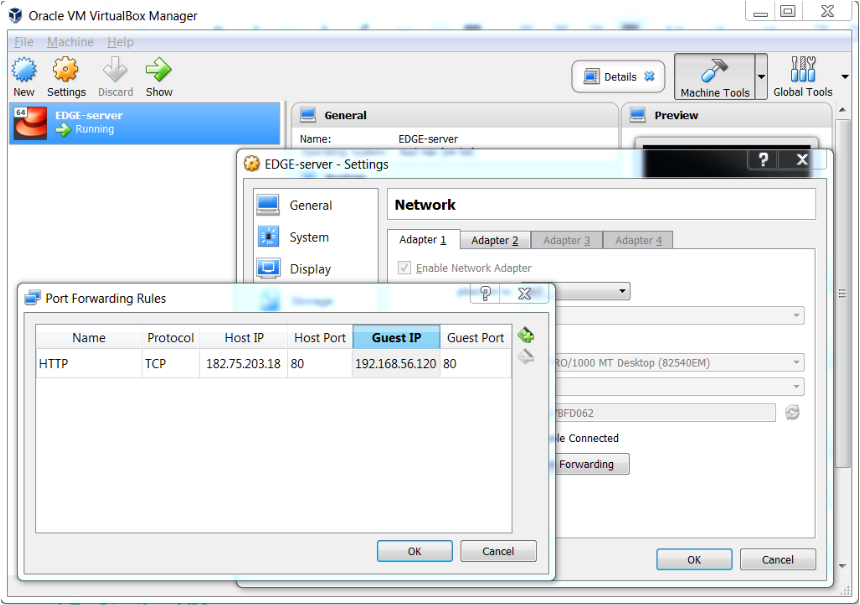
To setup port forwarding, follow the steps below:
In the VirtualBox Manager, click Machine Tools.
Click Settings > Network. Open the network you previously created and then click Port forwarding.

In the Port Forwarding Rules window, click the plus icon. Add the following details for HTTP:
Name: HTTP
Protocol: TCP
Host IP: The operating system IP address on which the Edge VM is running.
Host port: 80
Guest IP: The Edge VM IP address is always 192.168.56.120.
Guest port: 80
Follow the same steps and add details for other incoming and outgoing traffic, see Prerequisites > Network connectivity.
Once all port details have been added, it should look similar to the following screenshot:
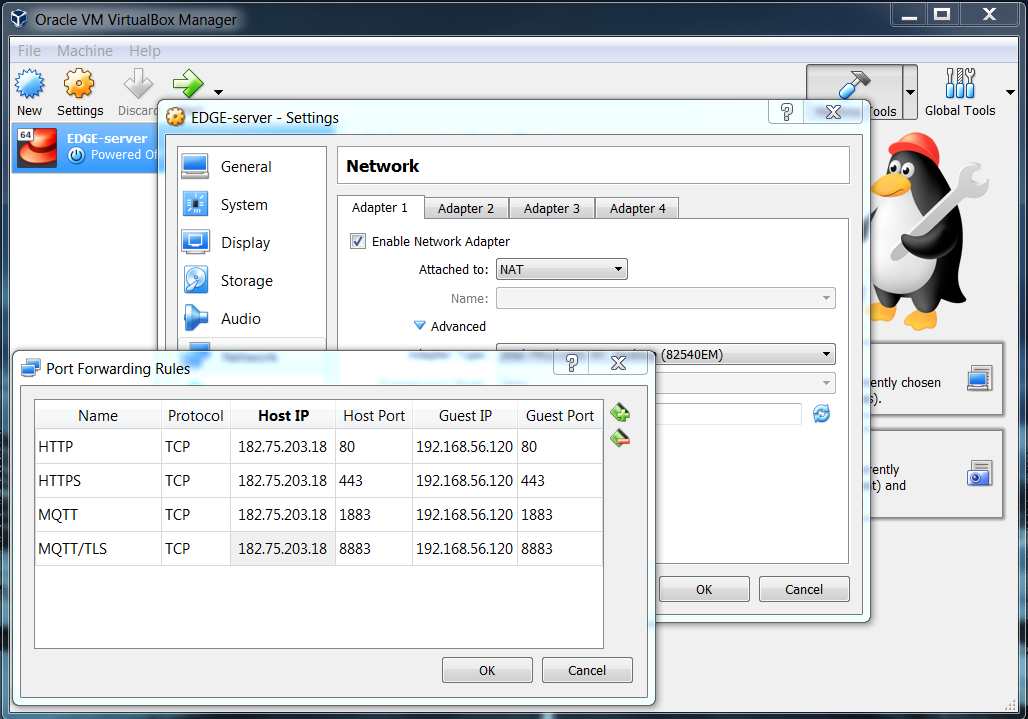
Click OK in the Port Forwarding Rules window.
Click OK in the Settings window to complete port forwarding on Edge VM.
Info: Upgrading OPC UA artifact from an older version to the newer version is not supported.
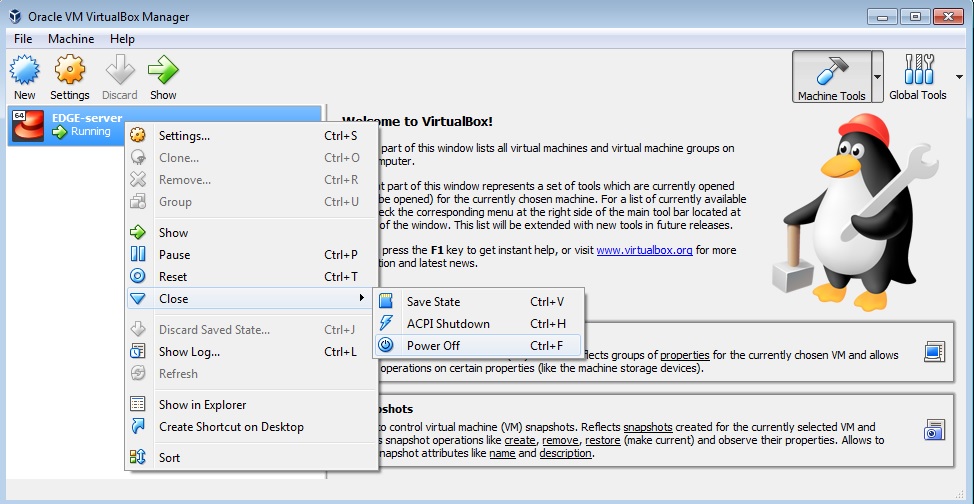
Power off the VM. Right-click the respective VM (e.g. EDGE-server) and click Close > Power off.
Navigate to the VM directory. For VirtualBox it is [USER-DIRECTORY]\VirtualBox VMs. Move the entire VM folder (e.g. EDGE-server) to a safe location.
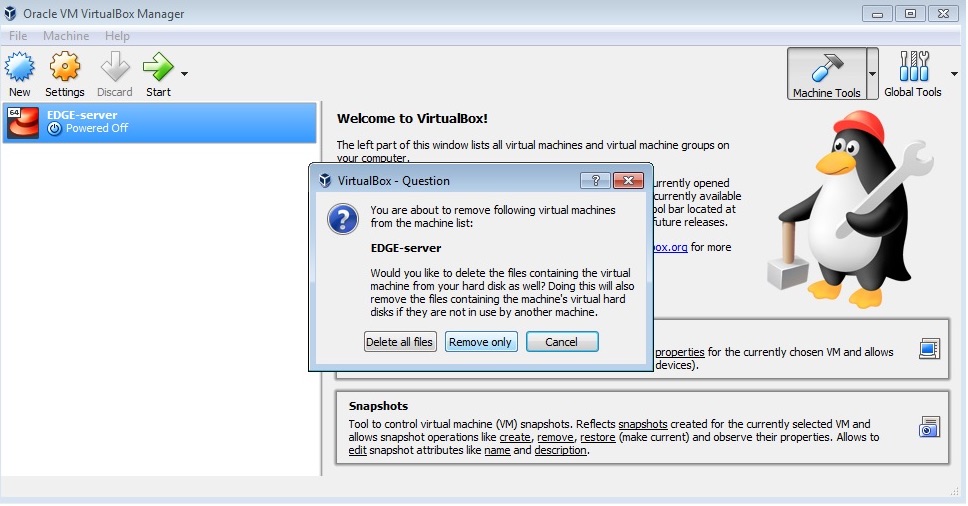
Right-click the VM and click Remove. Select Remove Only, so that the VM will not be deleted.
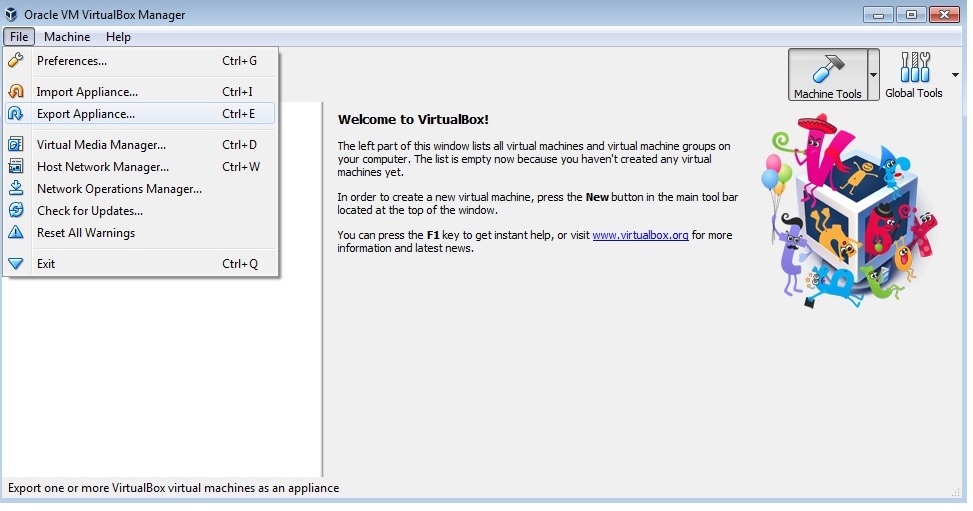
Import the new version of EDGE server. Click File > Import Appliance in the VirtualBox Manager. Select the new OVA file (upgraded one supplied by Cumulocity IoT) and click Open to import it.
Right-click the VM and select Settings> Storage. Two disks should be visible called disk001.vmdk and disk002.vmdk.
Right-click the second disk, that is disk002.vmdk, and select Remove attachment.
Right-click the second controller, that is SATA controller and select Add Hard Disk. Select Choose existing disk.
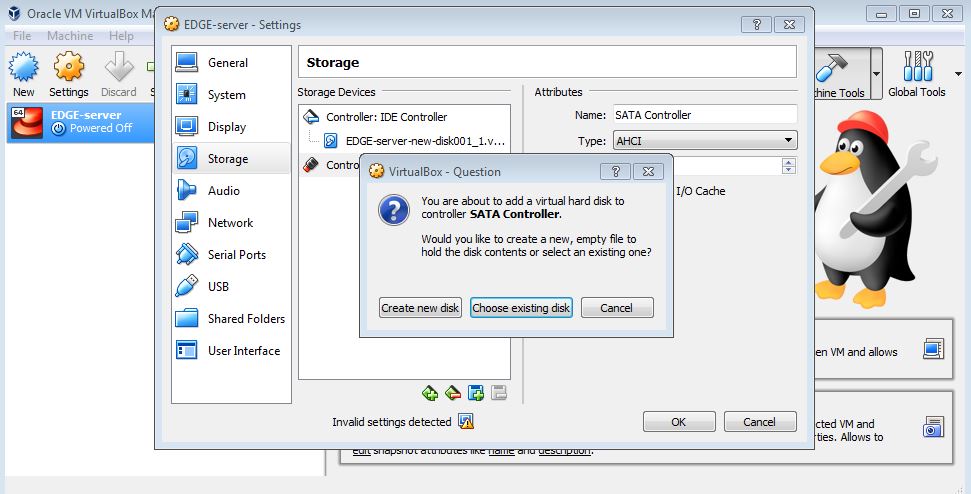
Navigate to the previously backed-up EDGE folder as per step 2. Select the secondary disk, that is disk002.vmdk, and click OK.
Click Start to start the Edge VM.
Run the post-upgrade task to complete the upgrade process. See Running post-upgrade.
To back up the data:
To restore the data: