In the following section you will get an overview on the Web SDK for Plugins which allows you to:
Extend applications with your own plugins.
Add your own applications to Cumulocity IoT’s web application.
Enhance the visualization of data with custom widgets.
Implement functionalities tailored to your use case.
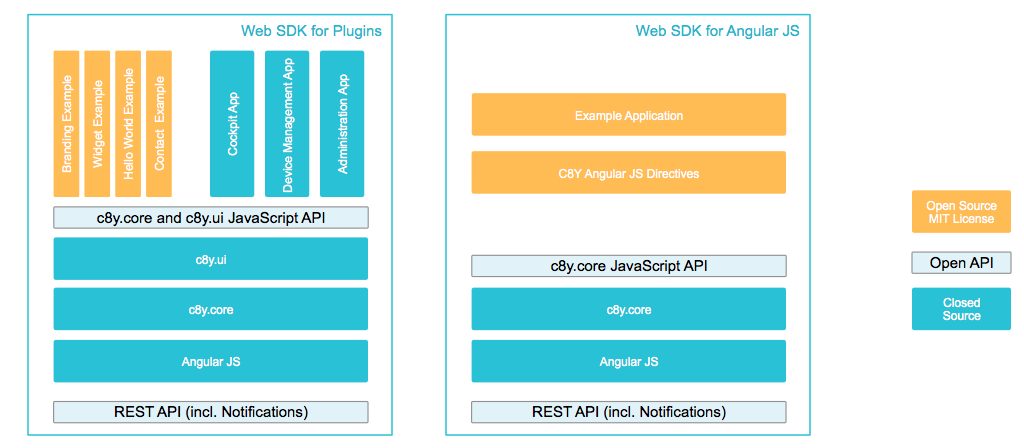
The illustration above shows the structure which lies behind the application and plugin development.
As the default applications, your applications will be built on AngularJS and the “c8y.core” and “c8y.ui” JavaScript API. Both modules offer you services to interact with the Cumulocity IoT web application. While the module “c8y.core” provides services to access different kinds of data, such as users and managed objects as well as basic functionalities, the module “c8y.ui” provides services to modify the user interface of your application or plugin, such as adding menu items or widgets. The modules in turn use the REST API provided by Cumulocity IoT. You can find examples on how to use the services in the plugin examples.
First, this section describes the concept behind applications and plugins and specifies the required folder structure and different configuration options for applications and plugins. Next, the setup necessary for developing applications and plugins is described.
Although an overview of the concepts of applications and plugins will be provided in the following, we recommend to take a look at the basic concept of Cumulocity IoT applications described in Developing applications.
Concepts
Before building an application or plugin, it is important to understand what is exactly meant by applications and plugins in Cumulocity IoT.
In this context, applications are based on the Cumulocity IoT UI framework and make up the Cumulocity IoT UI. By default, the Cumulocity IoT UI consists of three core applications, namely “Device Management”, “Administration” and “Cockpit”.
In turn, applications consist of plugins. A plugin represents any functionality you would like to add to an application. With a plugin, you can:
Modify the branding.
Add new navigation items to the menu.
Add new widgets to dashboards.
Add new menu items to the drop-down menus.
Add new views or tabs to groups and devices.
Add any other kind of functionality (e.g. for the search) you would like to integrate.
This is illustrated below:
As an example, let us take a look at some plugins being used by the Cockpit application.
Cockpit home: Adds the home menu to the navigator.
Dashboard: Adds a new view/tab to groups and devices, functioning as a container for widgets.
Data point table: Adds a widget to dashboards providing a visualization of measurements in tabular form.
Info: You can extend the default applications of Cumulocity IoT (Administration, Cockpit, Device Management) with new functionality. You must create a duplicate of the core application before you can extend it. To create a duplicate of an application, you can either copy it via the UI in the Administration application or create a new application which uses the exact same plugins as the desired application.
Project structure
Whenever you create a new application or plugin, you have to comply with the following folder structure. Otherwise the application or plugin will not work.
The default folder structure of an application is as follows:
Inside the root folder of your application, the application manifest is stored in the cumulocity.json file.
The folder plugins contains one folder per plugin contributed by the application. The plugin folder name together with the application name uniquely identifies the plugin. Inside each plugin folder, the plugin manifest is stored in another cumulocity.json file.
The format of the application manifest and the plugin manifest is described in Manifests.
Create an explicit root folder for your project. The Web SDK assumes that the parent folder of the root folder is readable by your operating system user.
Manifests
Application manifest
The application manifest describes where your application is stored and how it is exposed to Cumulocity IoT.
The following properties are available:
name: A descriptive name for the application. It will appear in the application switcher menu.
availability: “PRIVATE”, if the application is only available in your tenant, “MARKET”, if it is a public application.
contextPath: The path to be used for hosted applications. The URL of the application will be <<yourURL>>/apps/<<contextPath>>.
key: The application key which is used for associating requests of an application with the application and for subscribing to applications.
resourcesUrl: If the application is serving an upload ZIP file (which is the case for Smartapps) this value will be ‘/’. If it is a full URL all requests will be proxied to that address.
type: HOSTED, if the application is hosted through Cumulocity IoT, EXTERNAL, if the application is hosted elsewhere.
imports: A list of plugins used by the application. List of <<applicationName>>/<<pluginName>>.
noAppSwitcher: [optional] If set to true, the application will not appear in the app switcher menu. You might want to use this, for example, if the application only exposes plugins.
options:
hide_navigator: [optional] A boolean, which if set to true collapses the navigator menu on the left by default.
globalTitle: [optional] A title that will be used as the global title of the web application.
Info: The properties “contextPath” and “key” need to be unique. For “PRIVATE” applications, the properties “name” and “contextPath” need to be unique within your tenant only.
Plugin manifest
The plugin manifest describes how your plugin is shown in the Cumulocity IoT Administration application (name, description, category, gallery, list) and what files need to be built and loaded in order to run the plugin (ngModules, js, imports, css, less, copy).
name: [required] A descriptive name for the plugin.
description: [optional] A longer description of the plugin.
category: [optional] A category for the plugin to be used in the filtering in the user interface.
ngModules: A list of AngularJS modules that are provided by the plugin, at least one is required.
js: [optional] A list of JavaScript files to be loaded, such as index.js, controllers, services, etc. The path is relative to the plugin’s root folder.
CSS: [optional] A list of CSS files to be loaded, paths relative to the plugin’s root folder.
less: [optional] A list of LESS files to be loaded, paths relative to the plugin’s root folder.
copy: [optional] A list of files that should be copied into the built.
Most of the content of the manifest file corresponds to the application API properties, described in the REST reference. Examples of manifest files can be found in the bitbucket repository.
Setup
Prerequisites
Plugins are based on HTML5. You should be familiar with the following technologies:
Access to your Cumulocity IoT account, i.e. you need your tenant ID, username and password.
Cumulocity IoT CLI tool
Once all prerequisites are met, you are almost ready to build your own application and plugin.
For the process of developing a plugin (building, theming, translating and deploying your applications and plugins), the npm package “cumulocity-tools” must be installed globally on your machine. To install the npm package, execute the following command on your terminal.
$ npm i cumulocity-tools -g
Now you are ready to use the command line interface (CLI) tool. Try it out by executing the following command:
$ c8y --help
The “–help” option displays all available commands for the CLI tool.
Cumulocity IoT UI package
As already described above, applications are always a collection of plugins. We provide a set of plugins you can build on in addition to your own. Prior to this, you must add a package.json file to the folder you will use for your application. To generate the package.json file automatically, simply run:
$ npm init
This command prompts you to enter values for several properties which will be included in the package.json file. The package.json file should include at least a name and version. To skip a property, press enter.
Then proceed to install the Cumulocity IoT UI package containing the set of plugins by typing in the following command:
$ c8y install latest
This command will:
Check for the latest version of the Cumulocity IoT UI package.
Download the package.
Add it as a dependency inside the package.json file.
Instead of “latest”, you can also specify a certain version number, but this version has to be the same or less than the backend version number.
Info: When sharing your project, other developers only need to run npm install inside the root folder of the application project, as the version of the Cumulocity IoT UI package is already defined as a dependency in the package.json file. You can always install other versions by running the c8y install command again.
You can see the list of plugins which an application uses by utilizing the command c8y util:showimports \[appContextPath\].
Sample plugins
After setting up everything and getting an insight into the folder structure and manifests, you can finally start running your first “Hello world!” application and plugin.
Run “c8y install latest” to install the Cumulocity IoT UI package.
Run “c8y deploy:app myapplication”. “myapplication” is the name of the “Hello World!” application specified in the “cumulocity.json” file.
You will be asked for the name and base URL of your tenant, as well as your username and password. To prevent filling out these prompts over and over again, you can define the following environment variables on your computer: C8Y_TENANT, C8Y_USER, C8Y_PASS and C8Y_BASE_URL. For example, type “export C8Y_TENANT=demos” on a Unix system to by default create your application in the tenant “demos”.
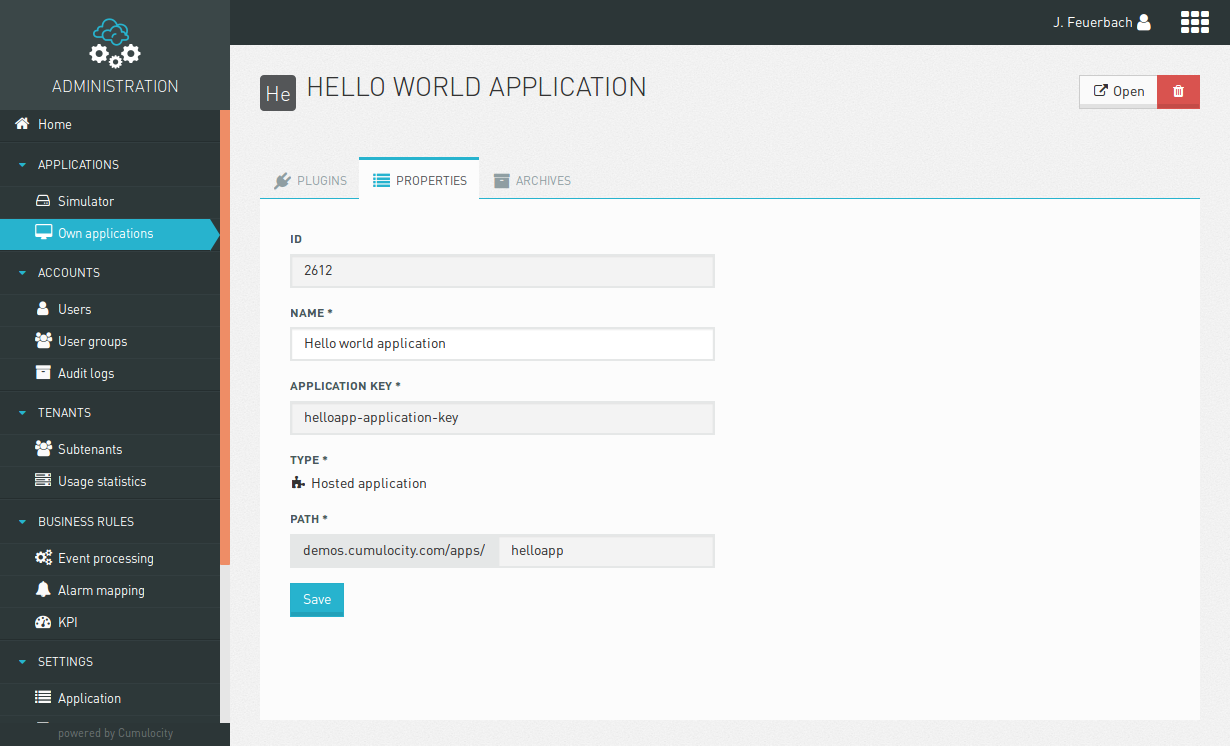
After deploying the application, it appears in the “Own applications” menu of the “Administration” application.
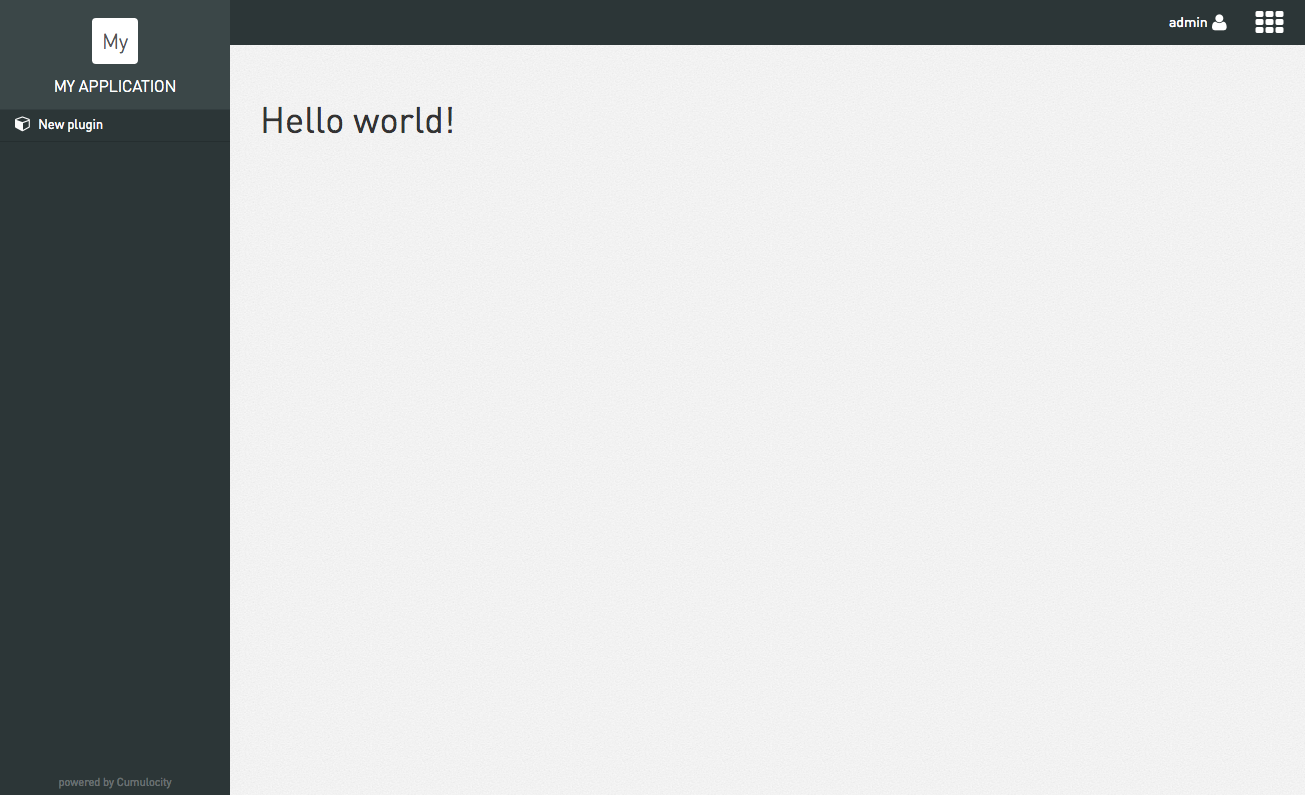
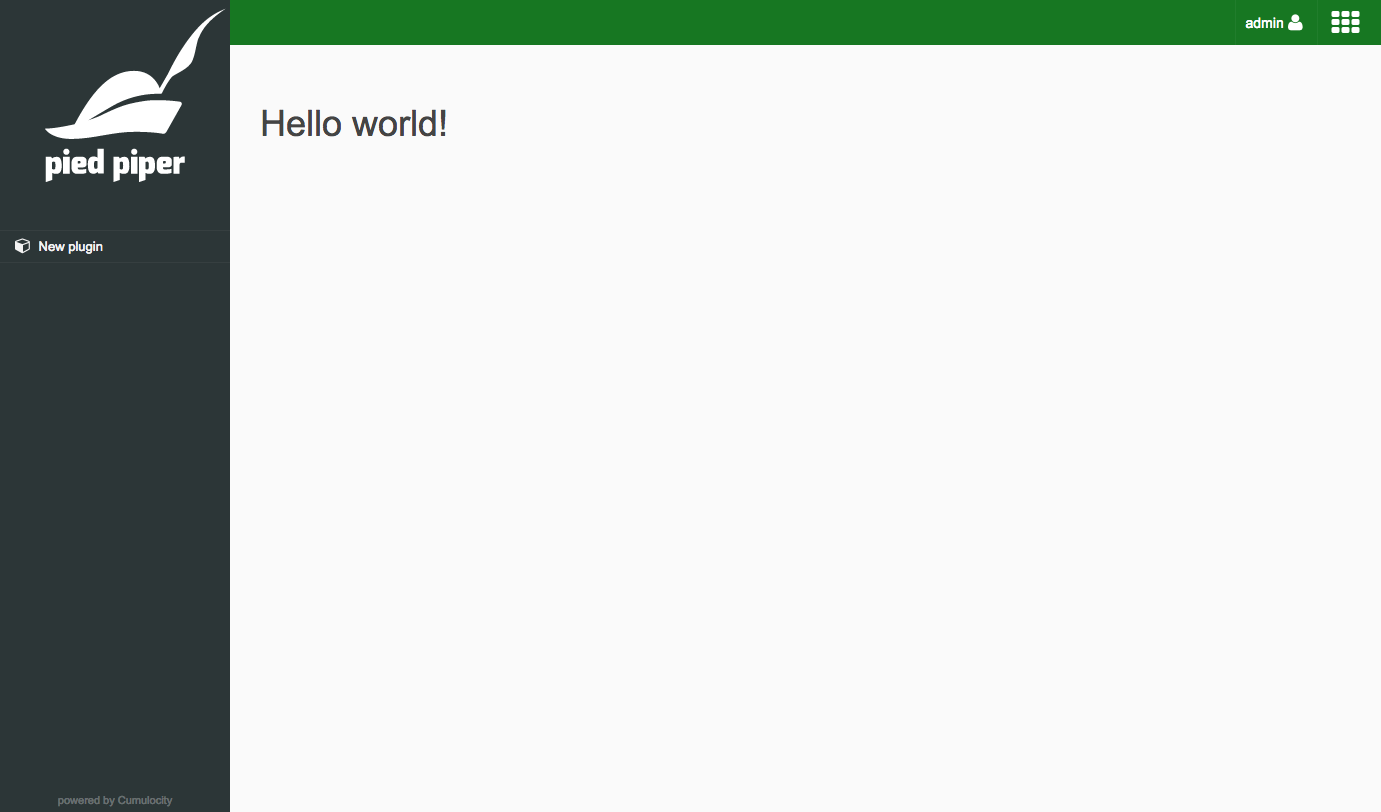
To see the “Hello world!” plugin, navigate to the example you just created an select the menu “New plugin”. You should be able to see the text “Hello world!”. You can also try out the other example plugins. For further information on the example plugins, visit the respective documents in the documentation.
Hello world
The purpose of this plugin is to add a new application to the app switcher menu. This application will consist of a single menu item which will display a simple “Hello world!” page when selected by the user. At the end, the application should look as follows:
In order to achieve this goal we need to do the following steps:
Set up an application project.
Configure the application manifest.
Create the application in your tenant.
Configure the plugin manifest.
Implement the plugin’s initialization function to add a menu item and associate it with a view template.
Implement the controller to provide data for the view template (a simple text in this case).
Add the view template to display the data.
Test the application.
Finally, build and publish the application and the plugin.
Set up an application project
First, we need to create the application project by
Creating a new folder with an arbitrary name.
Creating a “cumulocity.json” file inside this folder, representing our application manifest.
Running the command “npm init” to create a new “package.json” file.
Running the command “c8y install latest” to get the latest core plugins.
After these steps you should have the following folder structure:
Second, we have to fill out the application manifest (the “cumulocity.json” file inside our root folder) with information about our Cumulocity IoT application, such as its name, key, URL and dependencies. For this example, we have to specify the following properties:
With the project structure so far, we can already test our application. By adding the “c8yBranding” plugin from the Cumulocity IoT UI package to our imports, our application will not be completely empty when we try to access it. As the name already indicates, the plugin adds the Cumulocity IoT’s branding to our application. Before we can test an application locally, we have to create it on our tenant first.
For more details on other properties of the manifest, see “Manifests”.
Create the application in your tenant
After successfully logging in into a Cumulocity IoT UI application, the application key is fetched automatically. Thus, to develop an application we need to make sure that the application is created in our tenant. To create the application in our tenant we simply deploy it using c8y deploy:app <appContextPath>.
$ c8y deploy:app myapplication
? Tenant piedpiper
? User admin
? Password ***********
? Base URL https://piedpier.cumulocity.com
GET application/applicationsByOwner/piedpier?pageSize=10000200
POST application/applications/31337/binaries/ 201
PUT /application/applications/31337 200
You will be asked for the name and base URL of your tenant, as well as your username and password. To prevent filling out these prompts over and over again, you can define the following environment variables on your computer: C8Y_TENANT, C8Y_USER, C8Y_PASS and C8Y_BASE_URL.
After deploying your application, it appears in the “Own applications” menu of the “Administration” application.
Test your application
To run your application locally, just run c8y server.
Additionally, you can pass options:
-u https://tenant.cumulocity.com with the instance as parameter where you want your api calls to be proxied to,
-t examples or -t targets/examples/json to use specific target file, e.g. if you want to test your plugins inside one of the standard applications and you have defined your target file as in the example:
$ c8y server -u https://tenant.cumulocity.com -t targets/examples.json
Cumulocity UI development server running in port 9000.
Proxying api requests to https://tenant.cumulocity.com
140 modules loaded.
5 application manifest loaded.
http://localhost:9000/apps/myapplication/ cumulocity.json
http://localhost:9000/apps/fieldbus4/  Packaged App
http://localhost:9000/apps/administration/  Packaged App
http://localhost:9000/apps/cockpit/  Packaged App
http://localhost:9000/apps/devicemanagement/  Packaged App
Now, you can test your application by opening your browser at the URL “http://localhost:9000/apps/myapplication/”. If you access your application now, you should be able to see the following:
What is missing now is a plugin which adds a menu item to the navigator.
Configure the plugin manifest
Each plugin comes in a separate subfolder inside the plugins folder of your application. So to add a plugin to our application, we have to
Create a “plugins” folder in our project
Create a folder named “myplugin” inside the “plugins” folder.
Create a “cumulocity.json” file inside the “myplugin” folder, representing our application manifest.
Create a “views” folder inside the “myplugin” folder.
Create a “hello.html” file inside the “views” folder, representing the view of our plugin.
After these steps you should have the following folder structure:
The plugin manifest provides information about our plugin, such as the name, a short description, files to be loaded, and angular modules to be added to the main app. For our example, add the following lines to the “cumulocity.json” file:
{
	"name": "Hello world plugin testing",
	"description": "Simple hello world plugin."
}
For more details on other properties of the manifest, see “Manifests”.
Now that we have added a plugin to our application, we also have to add it to the imports of our application manifest. The name of the import consists of two parts separated by a slash. The first part has to be the context path of the application the plugin is located in and the second part has to be the name of the plugin folder. In our case, our plugin is located in our application with the context path “myapplication” as specified in the application manifest and our plugin folder is named “myplugin” which results in:
After we added the plugin folder to our application, we can start implementing the functionality.
Implement the plugin’s initialization function
Even though the scope of this example is very small, we recommend to use a modular approach. For this reason, create a file “hello.module.js” for the module, a file “hello.config.js” for the config and a file “hello.controller.js” for the controller inside the “myplugin” folder.
Inside the “hello.module.js” file, we initialize the module for our plugin:
In our “hello.config.js” file, we have to configure our plugin so that it adds a menu item to the navigator and redirects to our view when clicking on this menu item. For that purpose, we can use the services “c8yNavigatorProvider” and “c8yViewsProvider” provided by the Cumulocity JavaScript API. Simply inject the services into your config and call the following functions:
(function () {
'use strict';
angular
.module('myapp.hello')
.config(configure);
configure.$inject= [
'c8yNavigatorProvider',
'c8yViewsProvider'
];
functionconfigure(
c8yNavigatorProvider,
c8yViewsProvider
) {
c8yNavigatorProvider.addNavigation({ // adds a menu item to the navigator with ...
name:'hello', // ... the name *"hello"*
icon:'cube', // ... the cube icon (icons are provided by the great Font Awesome library and you can use any of their [icon names](http://fontawesome.io/icons/) without the *fa-* prefix here
priority:100000, // ... a priority of 100000, which means that all menu items with a priority lower than 100000 appear before this menu item and all with a priority higher than 100000 appear after this menu item
path:'hello'// ... */hello* as path
});
c8yViewsProvider.when('/hello', { // when the path "/hello" is accessed ...
templateUrl:':::PLUGIN_PATH:::/views/hello.html', // ... display our html file "hello.html" inside the "views" folder of our plugin (the plugin's folder is represented using the magic string ```:::PLUGIN_PATH:::```, which is replaced by the actual path during the build process)
controller:'HelloController', // ... use "HelloController" as controller
controllerAs:'vm'
});
}
}());
Implement the controller
Second, we have to implement the controller for our view. For this example, the controller just defines a variable “text” which contains the simple static text “hello, world”:
Now that we have added the module, config and controller to our plugin, we have to specify “myapp.hello” as our module and add each javascript file to our plugin manifest:
After we defined the variable “text”, we can access it in our view template. To render the text, add the following to your hello.html file:
<div>{{vm.text}}</div>
Test your application
To test your application, use the command c8y server with the complete URL of your tenant as parameter.
Build and deploy your application and plugins
If you run c8y --help you will list all available commands.
You can choose to build applications or plugins which results in a zip file that you can add by hand in any Cumulocity “Administration” application or you can deploy the app directly to your tenant.
build:app
Builds the application to the specified folder (./build by default).
Inside the outputFolder you will find a directory named [appContextPath] and a zip file [appContextPath].zip. This zip file can then be uploaded in the “Administration” application.
If you omit appContextPath the contextPath will be read from the “cumulocity.json” file at the path where the command was executed.
$ c8y build:app [appContextPath][outputFolder]
build:plugin
Builds the plugin to the specified folder (./build by default).
Inside the outputFolder you will find a directory named [pluginName] and a zip file [pluginName].zip. This zip file can be uploaded in the “Administration” interface and added to any application.
$ c8y build:plugin <pluginName> [outputFolder]
deploy:app
Builds all the plugins, assembles the application and uploads it to the defined tenant. If the app doesn’t yet exist on the remote instance it will be automatically created.
$ c8y deploy:app <appContextPath>
The build process for plugins includes the following steps:
Annotate angular functions with $inject. (Using ng-annotate).
Replace the :::PLUGIN_PATH::: by the proper strings.
Transform every html file to be included via $templateCache.
Concatenate and minify all the defined js files in the manifest (using UglifyJS 2).
Compile all the less files.
Concatenate and minify all the CSS and result of the less files.
Copy all the files defined in ‘copy’ in the manifest.
Copy all the localization files that may be available inside locales folder inside the plugin.
Copy the plugin manifest.
Create a zip file with the above contents.
The build process for an app includes the following steps:
Copy a built version of each plugin defined in the imports list.
Assemble all the localization files available in each plugin and assemble them in a single .json and .po file for each available language.
Generate an index.html.
Copy the application manifest.
Create a zip file with the above contents.
Deploy your plugin to the core applications
You can also add or replace plugins in the core applications by specifying a target .json file. This file is not restricted in its name or path.
The example above shows how to add your self-developed plugin to one of the core applications, in this case the “Administration” application. When specifying a plugin, ensure to include the contextPath of the application the plugin is in. In this case, the plugin “myplugin” is located in the plugins folder of the application with the contextPath “myapplication”.
If you are not deploying to a management tenant, you need to include the following fragment to your target .json file:
	"allApplications": {
		"availability": "PRIVATE"
	}
To deploy a target file, you have to execute c8y deploy:target [targetFile]. Assuming that we have the following folder structure:
Target files are JSON files that can be used to define a set of applications to build, configure options and or remove plugins for each application.
Example:
{
"name":"acme", // Unique name to identify the target
"options": { // runtime options to customize each option
"globalTitle":"Acme IoT", // Browser title
"hide_powered":true, // Toggle the 'Powered by' on the bottom of navigator
"supportUrl":false, // Customize the support URL. A falsy value will hide the link.
"rightDrawer":false, // Toggle the right drawer on the app
"login_extra_link": { // Creates an extra link on login screen
"url":"https://acme/eula",
"label":"EULA"
},
"company_name":"Acme, Inc", // Company name to be used when needed on the UI
"guideHrefTemplate":"${docsBaseUrl}", // The template used for help links ${docsBaseUrl}${partialUrl} is the default value
"docsBaseUrl":"https://acme/help/"// The value for docsBaseUrl variable that can be used in documentation link templates
},
/**
* The replaceImports is a map of plugins that will be replaced in all the applications.
* Keys represent the existing plugins and values are the plugins that should replace each of them.
* This technique is very commonly used for branding
*/"replaceImports": {
"core/c8yBranding":"core/acme-branding"
},
/**
* Describe the applications to be built or served locally.
* For each of the applications there are 3 properties that can be used to change the plugins that are included
* - replaceImports: A map of plugins to be replaced
* - addImports: A list of plugins to be added
* - removeImport: A list of plugins to be removed from the application
*/"applications": [
{
"contextPath":"administration""replaceImports": {},
"addImports": [],
"removeImports": []
},
{
"contextPath":"devicemanagement"
},
{
"contextPath":"cockpit"
}
]
}
Branding plugin
In this document you will get an overview on how to develop a plugin that changes the branding of an application.
Before you start working on the branding plugin, we recommend to take a look at the introduction which deals with the basic concepts of applications and plugins as well as an “Hello world!” style demo plugin.
You can find this and all the other plugins described in the documentation inside the repository cumulocity-ui-plugin-examples.
Our main CSS is based on the popular CSS framework Bootstrap 3. It is possible to build a branding plugin based on Cumulocity IoT’s own base branding simply by overriding less variables.
As the myBranding example is much more extensive than the other plugins, copy over the myBranding folder into your plugins folder.
Although there a few files there, the strategy is straight forward: defining less variables that are overriding the setting on the base theme c8yBranding.
You can inspect the less files to see what variables are available for configuration.
Because branding plugins are simply distinguished by their name, the name has to be unique. Besides that, it has to end in Branding (e.g. piedpiperBranding ). To use it in an application, add it to the imports statement of the application manifest, as is done in the cumulocity-ui-plugin-examples repository.
Make sure there is only a single branding plugin declared, otherwise both of them will be loaded. To replace the c8yBranding plugin in the core applications, you have to create a target .json file with at least the following content:
{
	"name": "Examples",
	"comment": "Release with new branding plugin",
  "replaceImports": {
    "core/c8yBranding": "myapplication/myBranding"
  }
}
Widget plugin
In this document you will get an overview on how to develop a plugin that adds a new widget to dashboards.
Before you start working on the widget plugins, we recommend you to take a look at the introduction which deals with the basic concepts of applications and plugins as well as an “Hello world!” style demo plugin.
You can find this and all the other plugins described in the documentation inside the repository cumulocity-ui-plugin-examples.
Iconmap plugin
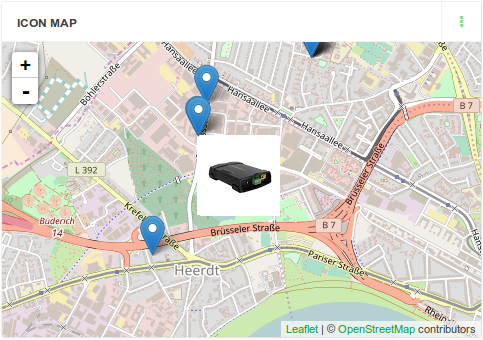
With the following plugin a new widget will be available for dashboards which displays devices as icons on a map. The new widget looks like this:
In order to achieve this goal you need to do the following steps:
We assume that you have already created an application that you can add the new plugin to. If not, you can use the application provided in the repository mentioned above. You can also find the example described here in the folder “plugins/iconmap”.
Create a plugin
Inside your application folder, run the command:
$ c8y create:plugin iconmap
Then edit the plugin manifest in /plugins/iconmap to add the following information:
{
  "name": "Icon Map",
  "description": "Shows devices on a map using an icon for the device type.",
}
Then create a file “iconmap.module.js” at the plugin’s root folder to have the following content:
Next, we have to create a config file which adds a menu item to the widget menu list. For that purpose, we can use the service “c8yComponentsProvider” provided by the Cumulocity IoT JavaScript API. Inject the service into your config and call the following function:
(function () {
'use strict';
angular
.module('myapp.iconmap')
.config(configure);
configure.$inject= [
'c8yComponentsProvider',
'gettext'
];
functionconfigure(
c8yComponentsProvider,
gettext
) {
c8yComponentsProvider.add({ // adds a menu item to the widget menu list with ...
name:'iconmap', // ... the identifier *"iconmap"* which has to be unique among the widgets in the application
nameDisplay:gettext('Icon Map'), // ... the displayed name *"Icon Map"*
description:gettext('Displays a map with icons for devices instead of markers'), // ... a description
templateUrl:':::PLUGIN_PATH:::/views/iconmap.main.html', // ... displaying *"iconmap.main.html"* when added to the dashboard
options: { noDeviceTarget:true }
});
}
}());
Get the images for the devices
To start with, we need to define an array “markers” which contains markers for every device to be displayed on the map. In this example, we will assign an image to a device based on its hardware model. To get the images, we need to get all binary objects in the inventory with the help of the “c8yBinary” service. Then we have to filter the binary objects for images which represent a certain hardware model. Afterwards, the devices will be placed on the map according to their “c8y_Position” fragment either with an image, if there is an image for the hardware model, or with the usual marker, if there is none.
Now that we have added the module, config and controller to our plugin, we have to specify “myapp.iconmap” as our module and add each javascript file to our plugin manifest:
{
	"name": "Icon Map",
	"description": "Shows devices on a map using an icon for the device type.",
  "ngModules": [
    "myapp.iconmap"
  ],
  "js": [
    "iconmap.module.js",
    "iconmap.config.js",
    "iconmap.controller.js"
  ]
}
Create a view for the widget
In our config, we already specified the .html file which contains our view for the widget. In this example, our widget should show a simple map. To add a map to the view, create a folder “views” inside your plugin folder, create a file “iconmap.main.html” and add the following content:
The “leaflet” tag adds an interactive map to our widget. To display the devices on the map, we just need to assign the array we defined in the controller to the “markers” attribute of the “leaflet” tag.
Test your plugin
After deploying the plugin to your tenant, you should be able to create a widget “Icon Map”. Note that in order to see an image for your device, you have to upload an image with the device type as file name to the file repository of your tenant.
Weather Plugin
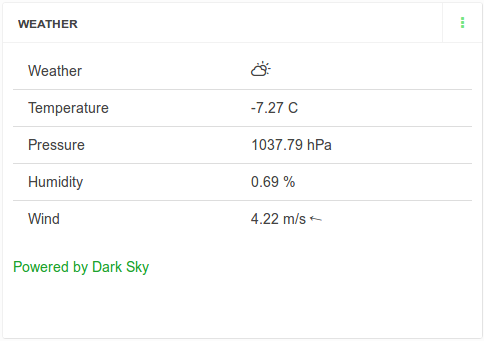
With the following plugin a new widget will be available for dashboards which shows the current weather at the location of a device. The new widget looks like this:
In order to achieve this goal you need to do the following steps:
We assume that you already have created an application that you can add the new plugin to. If not, you can use the application provided in the repository mentioned above. You can also find the example described here in the folders “plugins/weather”, “plugins/weatherAdmin” and “plugins/weatherService”.
Create a plugin for using the Dark Sky API
In this case, we recommend you to download the “weatherService” plugin from the repository and to save it in your application. This plugin provides the possibility to save and load the API key as well as retrieving weather information.
Do not forget to include the plugin in your application manifest:
Next, we have to create a config file, which adds an item to the navigator menu. For that purpose, we can use the service “c8yNavigatorProvider” and “c8yViewsProvider” provided by the Cumulocity IoT JavaScript API. Inject the service into your config and call the following function:
(function () {
'use strict';
angular
.module('myapp.weatherAdmin', [ 'myapp.weatherService' ])
.config(configure);
configure.$inject= [
'c8yNavigatorProvider',
'c8yViewsProvider',
'gettext'
];
functionconfigure(c8yNavigatorProvider, c8yViewsProvider, gettext) {
c8yNavigatorProvider.addNavigation({ // adds a menu item to the navigator with ...
parent:gettext('Settings'), // ... the category *"Settings"*
name:gettext('Weather'), // ... the name *"Weather"*
path:'weather', // ... */weather* as path
icon:'cloud'// ... the cloud icon (icons are provided by the great Font Awesome library and you can use any of their [icon names](http://fontawesome.io/icons/) without the *fa-* prefix here
});
c8yViewsProvider.when('/weather', { // when the path "/weather" is accessed ...
templateUrl:':::PLUGIN_PATH:::/views/weatherAdmin.html'// ... display our html file "weatherAdmin.html" inside the "views" folder of our plugin (the plugin's folder is represented using the magic string ```:::PLUGIN_PATH:::```, which is replaced by the actual path during the build process)
});
}
}());
In our controller, we just need to implement a function for loading the API key and for saving the API key the user entered. For loading the API key, we use the “load” method provided by the “weatherService” plugin.
Now that we have added the config and controller to our plugin, we have to specify “myapp.weatherAdmin” as our module and add each javascript file to our plugin manifest:
{
  "name": "Weather settings",
  "description": "Configure the API key for weather forecasts",
  "icon": "cloud",
  "category": "Administrator",
  "imports": [
    "myapplication/weatherService"
  ],
  "ngModules": [
    "myapp.weatherAdmin"
  ],
  "js": [
    "weatheradmin.config.js",
    "weatheradmin.controller.js"
  ]
}
Create a view where the user can save the API key
In our config, we already specified the .html file which contains our view for the navigation item. In this example, our view should show a simple text and input field as well as a button for saving. To add this view to the plugin, create a folder “views” inside your plugin folder, create a file “weatherAdmin.main.html” and add the following content:
<divng-controller="weatherAdminController">
<divclass="col-lg-6 panel panel-clean">
<ptranslate>Weather functionality is based on the <ahref="https://darksky.net"target="_blank">Dark Sky</a> service. Usage of Dark Sky requires an API key that can be obtained by registering at <ahref="https://darksky.net/dev/"target="_blank">https://darksky.net/dev/</a>. Paste the API key below.</p>
<formclass="form-horizontal"name="weatherAdminForm"novalidate>
<divclass="form-group">
<labelfor="key"class="control-label"translate>API Key</label>
<divng-class="{'has-error': invalid('license')}">
<inputtype="text"class="form-control"requiredname="key"id="key"ng-model="key"c8y-autocomplete="off">
</div>
</div>
<divclass="form-group ">
<buttontype="submit"class="btn btn-primary"ng-click="updateKey()"ng-disabled="weatherAdminForm.$invalid||weatherAdminForm.$pristine"translate>
Save
</button>
</div>
</form>
</div>
</div>
Create a plugin for the widget
Inside your application folder, run the command:
$ c8y create:plugin weather
Then edit the plugin manifest in /plugins/weather to add the following information:
{
  "name": "Weather",
  "description": "Shows the current weather at the location of a device.",
  "category": "Widgets",
  "icon": "cloud",
  "imports": [
    "myapplication/weatherService"
  ]
}
We will import the “weatherService” plugin, since it provides us the possibility to get weather information for a certain location.
Update the application manifest to add this new plugin to the import list.
{
"imports": [
(...)"myapplication/weather"
]
}
To be able to use the Weather plugin two things need to be added to the application manifest.
Firstly, we need to enable users to use dashboards in our application so that they can create the Weather widget instances. This is possible by importing two core plugins:
Secondly, we need to allow our application to send requests to Dark Sky API. In order to achieve that, let’s add a new property to the application manifest called contentSecurityPolicy with the following value:
Next, we have to create a config file, which adds a menu item to the widget menu list. For that purpose, we can use the service “c8yComponentsProvider” provided by the Cumulocity IoT JavaScript API. Inject the service into your config and call the following function:
(function () {
'use strict';
angular
.module('myapp.weather', [ 'myapp.weatherService' ])
.config(configure);
configure.$inject= [
'c8yComponentsProvider',
'gettext'
];
functionconfigure(c8yComponentsProvider, gettext) {
c8yComponentsProvider.add({ // adds a menu item to the widget menu list with ...
name:'weather', // ... the identifier *"weather"* which has to be unique among the widgets in the application
nameDisplay:gettext('Weather'), // ... the displayed name *"weather"*
description:gettext('Shows the current weather at the location of a device'), // ... a description
templateUrl:':::PLUGIN_PATH:::/views/weather.main.html'// ... displaying *"weather.main.html"* when added to the dashboard
});
}
}());
Get the weather for the device
In our controller, we get the weather information based on the position of the device which is selected in the widget dialog. If the device changes, the widget will be updated as well.
Now that we have added the config and controller to our plugin, we have to specify “myapp.weather” as our module and add each javascript file to our plugin manifest:
{
  "name": "Weather",
  "description": "Shows the current weather at the location of a device.",
  "category": "Widgets",
  "icon": "cloud",
  "imports": [
    "myapplication/weatherService"
  ],
  "ngModules": [
    "myapplication.weather"
  ],
  "js": [
    "weather.config.js",
    "weather.controller.js"
  ]
}
Create a view for the widget
In our config, we already specified the .html file which contains our view for the widget. In this example, our widget should show a simple table with information about the temperature, pressure, humidity and wind at the position of the device. To add the table to the view, create a folder “views” inside your plugin folder, create a file “weather.main.html” and add the following content:
After deploying the plugin to your tenant, you should be able to create a widget “Weather”. Note that you have to enter the API key first to see the weather information.
Tab plugin
In this document you will get an overview on how to develop a plugin that adds a new tab to devices.
Overview
Before you start working on the tab plugins, we recommend you to take a look at the introduction which deals with the basic concepts of applications and plugins as well as an “Hello world!” style demo plugin.
You can find this and all the other plugins described in the documentation inside the repository cumulocity-ui-plugin-examples.
Device Contact plugin
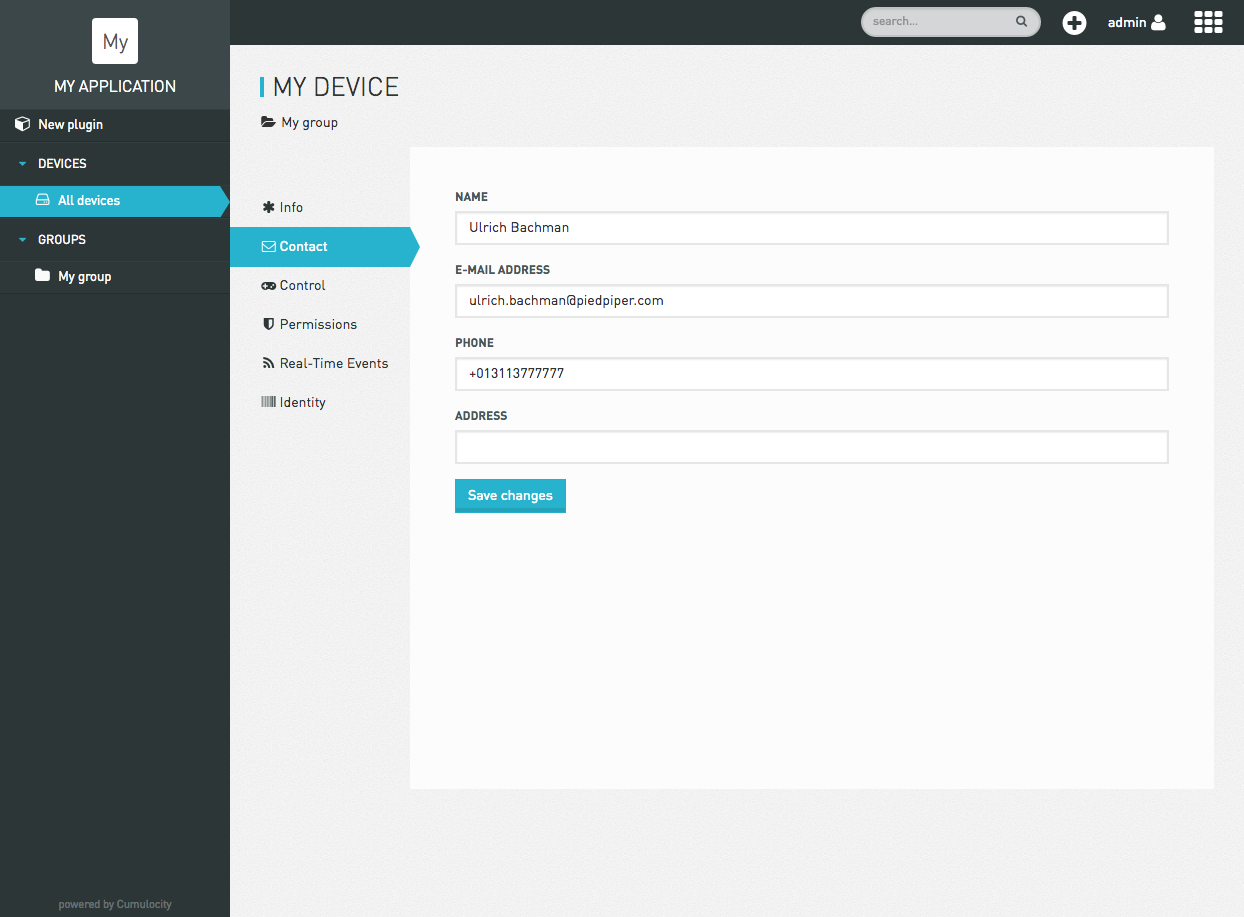
This section shows how to create a plugin that adds a new tab “Contact” to devices in your application. Clicking on “Contact” presents the user with a simple form for entering contact details. When the user saves the form, the contact details are stored as part of the device object in the inventory. The new tab looks like this:
In order to achieve this goal you need to do the following steps:
We assume that you already have created an application that you can add the new plugin to. If not, you can use the application provided in the repository mentioned above. You can also find the example described here in the folder “plugins/deviceContact”.
Adding dependencies
For this exercise, let us consider you want to extend the application “Device Management”. In practice, this means adding the set of plugins used in Device Management and adding your own to the list of imports in your application manifest. You can print the list of used plugins by any available application in your development environment by executing the command c8y util:showimports <appContextPath>.
In this case:
$ c8y util:showimports devicemanagement
Add the printed list of plugins to the imports definition of your application manifest.
Note that you have to exclude the c8yBranding plugin if you have already defined your own branding plugin.
However, if you prefer a more minimalistic approach you can also read the “cumulocity.json” file in cumulocity-ui-plugin-examples and only import the essential plugins for the Device Contact plugin to work.
TIP
Run c8y util:showimports cockpit or c8y util:showimports administration to see other plugins available to you. The manifests for the built-in applications are stored in _apps.json inside “node_modules/cumulocity-ui-build”.
Create a plugin
Inside your application folder, run the command:
$ c8y create:plugin deviceContact
Then edit the plugin manifest in “plugins/deviceControl” to add the following information:
{
	"name": "Device Details - Contact",
	"description": "Plugin adds a Contact tab to Device Details view"
}
Then create a file “deviceContact.module.js” at the plugin’s root folder to have the following content:
Now, we create an empty “Contact” tab in the device details view, which we will fill with contents in the following step.
Inside the plugin folder, create a file “deviceContact.config.js” with the content below. Just like in the “Hello world!” example, we will use the “c8yViewsProvider” service provided by the Cumulocity IoT JavaScript API to add a new view to our application.
(function() {
'use strict';
angular
.module('myapp.deviceContact')
.config(configure);
configure.$inject= [
'c8yViewsProvider'
];
functionconfigure(
c8yViewsProvider
) {
c8yViewsProvider.when('/device/:deviceId', { // when the path "/device/:deviceId" is accessed ...
name:'Contact', // ... show a tab with the name *"Contact"*
icon:'envelope-o', // ... use the envelope-o icon (icons are provided by the great Font Awesome library and you can use any of their [icon names](http://fontawesome.io/icons/) without the *fa-* prefix here
priority:1000, // ... set the priority to 1000, which means that all tabs with a priority lower than 1000 appear before this tab and all with a priority higher than 1000 appear after this tab
templateUrl:':::PLUGIN_PATH:::/views/deviceContact.html', // ... display our html file "deviceContact.html" inside the "views" folder of our plugin (the plugin's folder is represented using the magic string ```:::PLUGIN_PATH:::```, which is replaced by the actual path during the build process)
controller:'deviceContactCtrl'// ... use "deviceContactCtrl" as controller
});
}
}());
Note that when multiple views are attached to the route ("/device/:deviceId" in this case), tabs are created automatically for each of them. Since the device details view uses /device/:deviceId for device details already, “Contact” is rendered as a tab.
Next, we have to define our view and controller. For the controller, create a new file “deviceContact.controller.js” inside the plugin folder and add the following content:
Now that we have added the module, config and controller to our plugin, we have to specify “myapp.deviceContact” as our module and add each javascript file to our plugin manifest:
At this point, you can test your application by deploying it. When selecting a device, a new tab “Contact” should be displayed.
Display data in the “Contact” tab
Previously, we only set up a dummy view for the “Contact” tab. In this step, we will display the actual contact information stored with a device in the view. We will define that the contact data is stored in a fragment “c8y_Contact” of a device in the inventory like this:
Add a load function to “deviceContact.controller.js” and the necessary injection dependencies as shown below. The function gets the details of the currently displayed device ($routeParams.deviceId) and adds the device’s id and “c8y_Contact” fragment to the local scope.
After completing the following steps, you will be able to save the data entered in the new contact form.
Update the controller in “deviceContact.controller.js” to also save data by adding another injection dependency and the content below just after the closing brace of the load function. “c8yDevices.save” is a library function that stores a device using the Cumulocity IoT REST API. “c8yAlert.success” is a library function that displays a green confirmation box at the top of the user interface.
Add a “Save changes” button to the device contact view. Paste the div below just before the closing form tag in deviceContact.html. The button will trigger the save function that we just defined.