This section lists common how-to recipes for Web SDK for Angular. They require:
a basic understanding of Angular components, services and modules.
an understanding on how to scaffold an application and how to run it with the @c8y/cli.
a basic understanding of the extension points concepts of the @c8y/ngx-components.
Info: All recipes are written with a particular version of Web SDK for Angular. The version is mentioned at the top of the recipe. It is not recommended to use an older version for a recipe, as some of the mentioned features might not be available. If you use a newer version, you might face naming or import changes. We will update the recipes if there are conceptual revisions but not for small variations. Check out the tutorial application with c8ycli new my-app tutorial to have an up-to-date example of all concepts.
Extend an existing application and use hooks
Version: 10.4.11.0 | Packages: @c8y/cli, @c8y/apps and @c8y/ngx-components
It is a common use case to extend one of our existing apps like Cockpit or Device management.
This recipe explains step by step, how you can extend the Cockpit app with a custom route and hook this route into the navigator. Before starting with the step-by-step description we will provide some background on what we call a hybrid application and what the @c8y/apps npm package contains.
Brief background
The default applications consist of three application which are shipped with our platform by default. As these applications are a result of several years of development, the code is mainly based on angularjs. As we now use Angular for all of our build-in applications, we needed to find a solution to serve both frameworks. The @c8y/cli allows scaffolding a default app which allows exactly this. It uses the Angular upgrade functionality, to serve an Angular and angularjs app at the same time. This enables us to develop new features in Angular while every angularjs plugin should be easily integrable. This is what we call the hybrid mode.
The hybrid mode, however, comes with some limitations we will cover later in this recipe. Due to these limitations, we decided to provide a pure Angular empty starter application which comes without the possibility to integrate angularjs plugins. That pure version of the app comes in two flavors:
Angular CLI: When using the Angular CLI you benefit from the whole Angular ecosystem so that you can re-use many of the tools of the Angular CLI (e.g. testing).
@c8y/cli: Is our pre-caved way that integrates well with our tooling but most likely will not allow special cases.
So in total, there are three possibilities to start with the Web SDK: Extending an existing hybrid app, building a pure Angular app with Angular CLI or building it with @c8y/cli. Which one to choose heavily depends on the application you want to build. E.g. if you want an application that just follows the look&feel of the platform but want to use special dependencies for certain scenarios (e.g. Material-Framework), you are best with the pure Angular CLI solution.
Most likely you just want to extend a hybrid app, which we will cover in this recipe. But first, we must show the limitations of that approach to understanding better, why concepts are designed the way they are.
Hybrid mode limitations
As we need to make sure that Angular and angularjs run side by side when running a hybrid app, there are some limitations. The following list tries to explain them:
It is not possible to access the index.html: The whole bootstrapping process needs to be handled by Cumulocity IoT to make sure, that all required elements for Angular and angularjs are in place. There is no possibility to change the bootstrapping template, you can only add routes.
As the services need to be loaded first, you can also not inject any service in the root app module. You need to provide them on a route or as providedIn: root at the deceleration of the service.
Routes in the router must be defined before the UPGRADED_ROUTES. The reason for this is that the Angular router has a ** path match for all angularjs routes which is defined in the UPGRADED_ROUTES. If you define a route after it, the ** will match before your defined route.
Every extension needs to be done via a hook. This is because Angular and angularjs is needed in hybrid apps and the hooks can be used by both.
Styling is limited to global styles. That means you can only extend the styling by applying a custom branding or by using inline styles. The styleUrls are, as of this version, not supported.
Now that you know the limitations we can start to extend the first application and develop our first extension hook. To do so, we need to scaffold a hybrid app. Here the @c8y/apps package comes into play. It is a package containing the default apps and their minimum setup. The c8ycli uses that packages every time you initialize an app with the new command. The next section will explain that process and will then extend a hybrid app step by step.
1. Initialize the example app
As a starting point, you need an application. For this purpose, create a new Cockpit application using the c8ycli:
c8yclinewmy-cockpitcockpit-a@c8y/apps@1004.11.0
Next, you need to install all dependencies. Switch to the new folder and run npm install.
Tip: The c8ycli new command has a -a flag which defines which package to use for scaffolding. This way you can also define which version of the app you want to scaffold, e.g.:
c8ycli new my-cockpit cockpit -a @c8y/apps@1004.11.0 will scaffold an app with the version 10.4.11.0
c8ycli new my-cockpit cockpit -a @c8y/apps@latest will scaffold an app with the latest official release. Same as if used without the -a flag
c8ycli new my-cockpit cockpit -a @c8y/apps@next will scaffold an app with the latest beta release.
2. Bind a custom component to a route
Routes can be added the same way as in Angular. The only difference is that it needs to be defined before the UPGRADE_ROUTES (remember the hybrid limitations). Therefore we can create a simple hello.component.ts file in our project with the following content:
This is a very basic component. Only the template uses a special feature called “content projection” to show a title. Content projection is an Angular concept to display content in other places then they are defined. Which components support content projection is described in the @c8y/ngx-components documentation.
We can now bind this custom component to a route by changing the app.module.ts the following way:
The changes here are straight forward: First, we import the component (1.). Then we add it to the declarations (2.). Last we need to bind it to a path, in this case, hello (3.). When you now spin up the application with the c8ycli server command and navigate to the URL by adding the right hash to the URL (http://localhost:9000/apps/cockpit/#/hello) you should already see that custom component. In the next step, we will hook that component in the navigator on the left.
3. Hooking a navigator node
To allow the user to navigate to our created hello.component.ts we need to add some navigation to the left-side navigator. To do so, we will use a so-called hook.
The hooks are just providers that are bound to a certain injection token. To allow adding multiple providers we use the multi-provider concept of Angular. Explaining it in detail goes beyond the scope of this tutorial but there is a good official documentation describing it.
The injection tokens can be received from the @c8y/ngx-components package by simply importing it. They all start with HOOK_ following what they are used for. To add a navigator node we will therefore use the HOOK_NAVIGATOR_NODE:
We use a certain value. For complex cases we can also define a useClass and a get() function.
We define how the navigator node should look like.
Most hooks have interfaces which allow type-ahead information in typescript.
The multi-provider flag tells Angular that there could be more than just one hook.
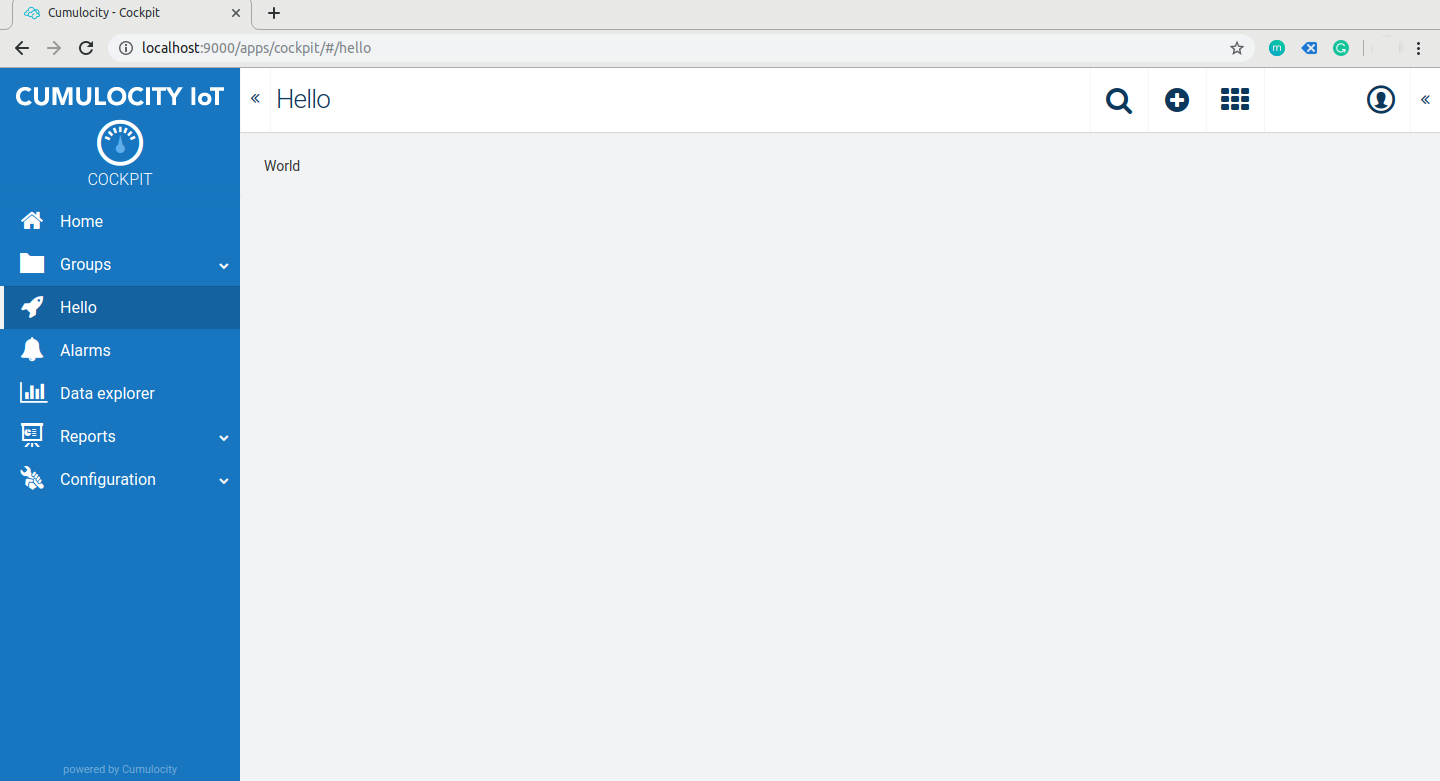
After we implement this extension hook we get a new entry in the navigator which looks like this (note that the property priority of the NavigatorNode interface defines in which order the nodes are shown):
As you can see the hello.component.ts is now like a blank canvas inside the Cockpit app. In that, you can implement any kind of feature you need, while the given functionality of the Cockpit isn’t touched.
Conclusion
As seen in this recipe, a hybrid app is limited due to its angularjs and Angular integration. However, the hook concept and a custom route allow adding nearly anything to the existing hybrid apps. They give you a powerful tool to extend the build-in apps. But sometimes more features are needed and a pure Angular app might fit better. It depends on the use case to decide if a simple extension is enough or a new application needs to be implemented.
Add a custom widget to a dashboard
Version: 10.4.11.0 | Packages: @c8y/cli and @c8y/ngx-components
If the widgets that are provided by the platform do not meet your requirements, you might want to create a custom widget and add it to a dashboard.
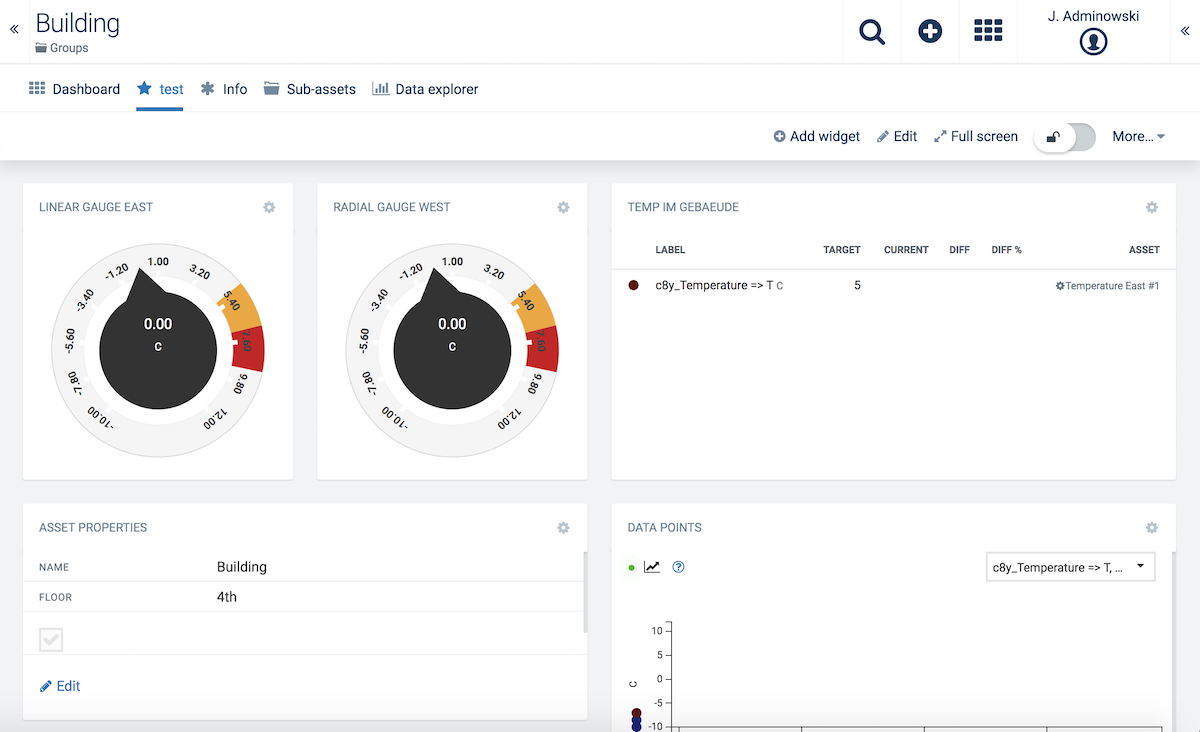
A typical dashboard looks like this, showing various widgets:
This recipe will show how to archive a custom widget to a dashboard with the COMPONENT_HOOK.
1. Initialize the example app
As a starting point, you need an application showing dashboards. For this purpose, create a new Cockpit application using the c8ycli:
c8yclinewmy-cockpitcockpit-a@c8y/apps@1004.11.0
Next, you need to install all dependencies. Switch to the new folder and run npm install.
Tip: The c8ycli new command has a -a flag which defines which package to use for scaffolding. This way you can also define which version of the app you want to scaffold, e.g.:
c8ycli new my-cockpit cockpit -a @c8y/apps@1004.11.0 will scaffold an app with the version 10.4.11.0
c8ycli new my-cockpit cockpit -a @c8y/apps@latest will scaffold an app with the latest official release. Same as if used without the -a flag
c8ycli new my-cockpit cockpit -a @c8y/apps@next will scaffold an app with the latest beta release.
2. Create the widget components
Widgets usually consist of two parts:
Configuration: The component that is shown when the user wants to add a widget to a dashboard.
Widget: The component that is shown when it is added to the dashboard.
There is nothing special to mention about this component. It will just show a configured text which is vertically mirrored via CSS. You can basically do everything in it what you can do in any other Angular component.
It just needs to have the config input to pass the configuration from the demo-widget-config.component.ts which is defined as:
Define the components as entry components and declare them to make them accessible by this module.
Add a multi-provider hook with the HOOK_COMPONENT. This hook is collected by the application and adds the widget based on the values you provide.
The ID needs to be unique as it identifies the data stored in the inventory. The label and description is shown as the title and in the widget dropdown.
These part tells the hook to associate the previously defined components to the widget.
If you now start your application with npm start you should be able to add your custom widget to a dashboard.
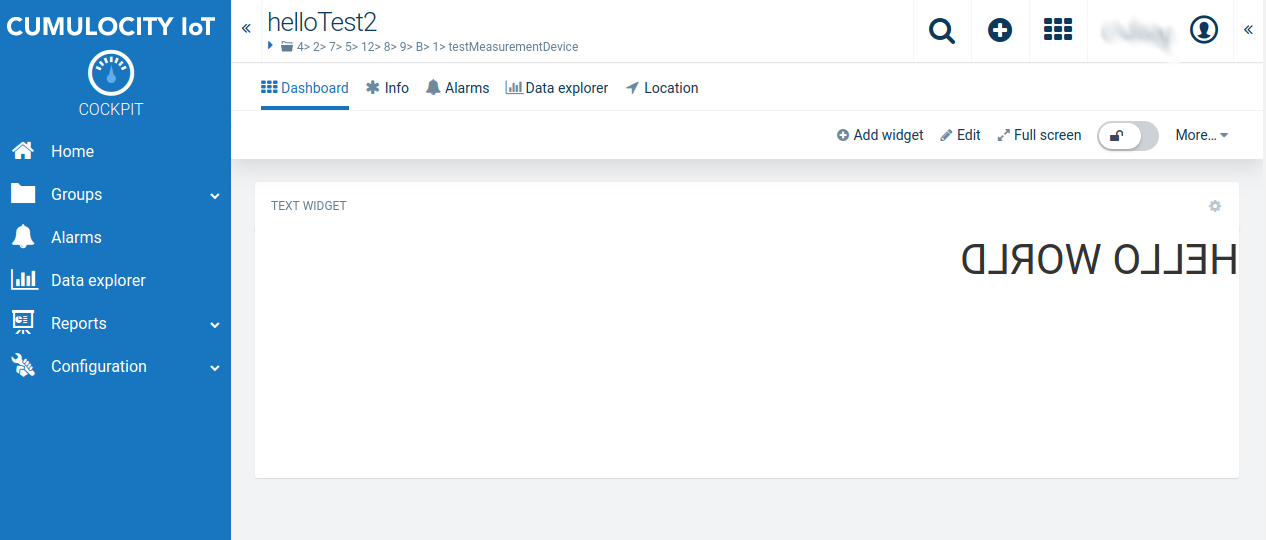
Once added to a dashboard, the widget looks similar to this:
Add a tab to a details views with context routes
Version: 10.4.11.0 | Packages: @c8y/cli and @c8y/ngx-components
It is a common use case that you want to show additional information to a user in a details view (e.g. for a device or a group).
This how-to recipe explains how to accomplish a new tab in the device details view:
In Web SDK for Angular, this kind of views are called ViewContext as they provide a view for a certain context. There are a couple of context views e.g. Device, Group, User, Application and Tenant. The user can access them by navigating to a certain Route with the hash navigation. For example, if you go to the route apps/cockpit/#/device/1234 the application tries to resolve the device with the ID 1234.
The details view usually shows a couple of Tabs, like the Info tab in the screenshot above which is referenced by another route called /info but reuses the context of the device to show information about it.
In the following, we will guide you through the process of creating a new tab to this view that is accessible through the route apps/cockpit/#/device/:id/hello.
1. Initialize the example app
As a starting point, you need an application supporting context routes. For this purpose, create a new Cockpit application using the c8ycli:
c8yclinewmy-cockpitcockpit-a@c8y/apps@1004.11.0
Next, you need to install all dependencies. Switch to the new folder and run npm install.
Tip: The c8ycli new command has a -a flag which defines which package to use for scaffolding. This way you can also define which version of the app you want to scaffold, e.g.:
c8ycli new my-cockpit cockpit -a @c8y/apps@1004.11.0 will scaffold an app with the version 10.4.11.0
c8ycli new my-cockpit cockpit -a @c8y/apps@latest will scaffold an app with the latest official release. Same as if used without the -a flag
c8ycli new my-cockpit cockpit -a @c8y/apps@next will scaffold an app with the latest beta release.
2. Add a new ROUTE_HOOK_ONCE
The hook concept allows you to hook into the existing code. In this example we want to add a so-called ChildRoute (by Angular) on the existing route device/:id.
To achieve this, add the following code to the app.module.ts:
Provides the multi-provider hook HOOK_ROUTE_ONCE. This tells the application to extend the current route configuration.
Specifies that we want to use a value to define the route hook. You can also use a class here, e.g. if you want to resolve the routes async.
Defines the context of the route. You should use the ViewContext enum to define it. In this case we want to extend the context of a device.
The path where it is going to be shown. Is added to the context path. In this case the complete path is: device/:id/hello.
Defines which component should be shown if the path is hit by a user.
The properties label and icon define how the tab should look like. The priority defines on which position it should be shown.
Info: The HOOK_ONCE_ROUTE inherits the Angular Route type, so all properties of it can be reused here.
After this alignments the route is registered but the application will fail to compile, as the HelloComponent does not exist yet. We will create it in the next section.
3. Add a component to display context data
The HelloComponent might want to display details about the device. Hence it needs the information in which context it has been opened. The context route resolves the device upfront, so there is no need to handle this. You can directly access it via the parent route.
So let’s create a new file called hello.component.ts:
There is nothing special to mention about this component other than that it injects the ActivatedRoute and accesses the parent data of it. This is the key point: as the parent context route already has resolved the data of the device, this component will always show the detailed data of the current device.
Adding this to the entryComponents in app.module.ts will allow to compile the application:
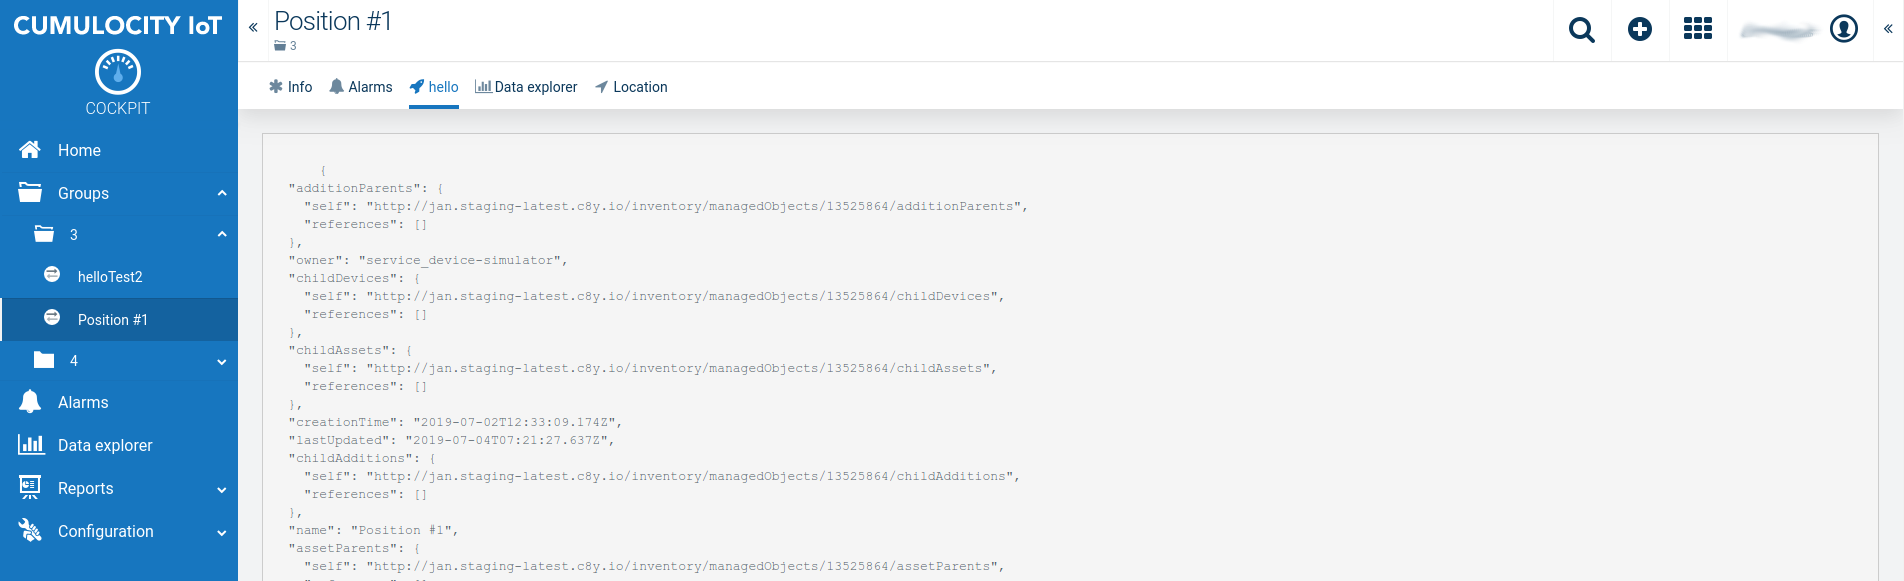
When you now start your application with npm start and navigate to a details view of a device it should look like this:
Congratulations, you added a tab to a device. You can do the same for tenants, users or applications details views.
Next you will learn how to show this tab only if a certain criteria is met.
(Bonus) 4. Show the tab only on certain criteria
In some cases, additional information is available only if a certain criteria is met. For example, it only makes sense to show a location if the device has a location fragment associated. To add such a criteria, the context routes inherit the guard concept of Angular.
To add a guard, you simply need to add the canActivate property to the route definition:
This is the only tricky part which is not aligned with the Angular router as in a context route the CanActivate will be called twice, once when the parent route is activated and once when the child route is activated. The first call checks if the tab should be shown at all, while the second call checks if the user is allowed to navigate to it. Hence the ActivatedRouteSnapshot is different in both calls and we need to resolve the contextData in the second case from the parent.
Checks if the acme_HelloWorld fragment is set on the context.
If you now post a device with the fragment "acme_HelloWorld": {} to the API, the Hello tab will just be shown for that device and not for others.
Conclusion
Context routes help you to extend existing routes with further information.
At the same time, the concept allows the application to be consistent since the context is just resolved once and context not found can be handled by the parent.
However, there is currently no default way of abstracting the context route concept and implementing your own context route. But since the concept is heavily based on Angular routing you can implement the concept quite easily.
Request data from a custom microservice
Version: 10.4.11.0 | Packages: @c8y/client and @c8y/ngx-components
In some situations, the UI needs data from a custom microservice. While you can always read that data with any HTTP client (e.g. the HttpModule from Angular) you might want to have authentication out of the box.
This recipe shows how to access custom endpoints with the @c8y/client and get authenticated automatically. But first, it will take a deeper look at the basics to explain how the client works in Angular applications.
Basic: How the client works
Let’s first clarify how the @c8y/client (short just client) works and what its benefits are.
The client handles HTTP requests from the browser (or if desire from node.js) to the platform. As most APIs of the platform are secured it allows to set the authentication to use.
Currently, there are two possible authentication methods:
BasicAuth: Adds a header to each request with the authentication details (less secure, as the password can be read by JavaScript).
CookieAuth: Reads a cookie set by the backend which allows accessing the platform. As on each HTTP request a cookie is sent, there is no particular authentication handling in this method except that these methods also set an XSRF-TOKEN header to prevent cross-side scripting attacks.
When you set the authentication method on a new client instance you can define which authentication to use. The client then returns an object with all common endpoints of the platform. For example, the following example requests data from the inventory via BasicAuth:
Each of the pre-configured endpoints returns an object containing the data, an optional paging object and the res object. Last is the response given by fetch, a next-generation XHR API which is implemented in all modern browsers (and can be polyfilled for IE11).
In conclusion, the @c8y/client is a helper library for JavaScript that abstracts fetch to allow easy authentication and direct access on the common platform APIs.
In the next section, we will show how you can easily use that concept in an Angular app with the help of the Dependency Injection (DI) model of Angular.
Basic: Interaction between @c8y/client and an Angular application
@c8y/ngx-components is an Angular component that allows to spin up an application. It is used in our basic apps like Cockpit, Administration and Device Management to display for example the login screen. When you spin up a new Angular-based application the @c8y/client and the @c8y/ngx-components are always included. Moreover the ngx-components have a sub-package which is called @c8y/ngx-components/api which exports a DataModule. That module already imports all common endpoint services, so that you can just use the standard dependency injection of Angular to access data.
The example above in a Angular application would look like this:
Use dependency injection to use the desired service. The DI concept of Angular will take care of all dependencies needed when the DataModule has been imported correctly in your main module.
You can now request data. Authentication is already handled. When used directly in a constructor or as an EntryComponent the request might fail unauthorized as the component is loaded previous to the login module. To change this, you can inject the AppStateService. It provides a currentUser observable that updates as soon as a user is logged in.
The basic gives an overview on how to use the common endpoints. The following recipe shows how to add a custom endpoint.
1. Initialize the example app
As a starting point, you need an application showing dashboards. For this purpose, create a new Cockpit application using the c8ycli:
c8yclinewmy-cockpitcockpit-a@c8y/apps@1004.11.0
Next, you need to install all dependencies. Switch to the new folder and run npm install.
Tip: The c8ycli new command has a -a flag which defines which package to use for scaffolding. This way you can also define which version of the app you want to scaffold, e.g.:
c8ycli new my-cockpit cockpit -a @c8y/apps@1004.11.0 will scaffold an app with the version 10.4.11.0
c8ycli new my-cockpit cockpit -a @c8y/apps@latest will scaffold an app with the latest official release. Same as if used without the -a flag
c8ycli new my-cockpit cockpit -a @c8y/apps@next will scaffold an app with the latest beta release.
2. Request data directly with fetch
Let’s say you want to access data from the endpoint service/acme via HTTP GET. The easiest way to archive this with authentification is to reuse the fetch implementation of the client. So we first add a file to the application and call it acme.component.ts:
We inject the FetchClient which is the fetch abstraction used by the client.
We request the data via fetchClient.fetch. The function is identical to the fetch API (as a second parameter it accepts for example the method or data) except that it adds the authentication to the platform.
We parse the data and set it onto our controller to display it in the template.
Next, we need to add a route to our application where we can show this component. The following code does this in the app.module.ts, without going into many details, as this is already explained in other recipes:
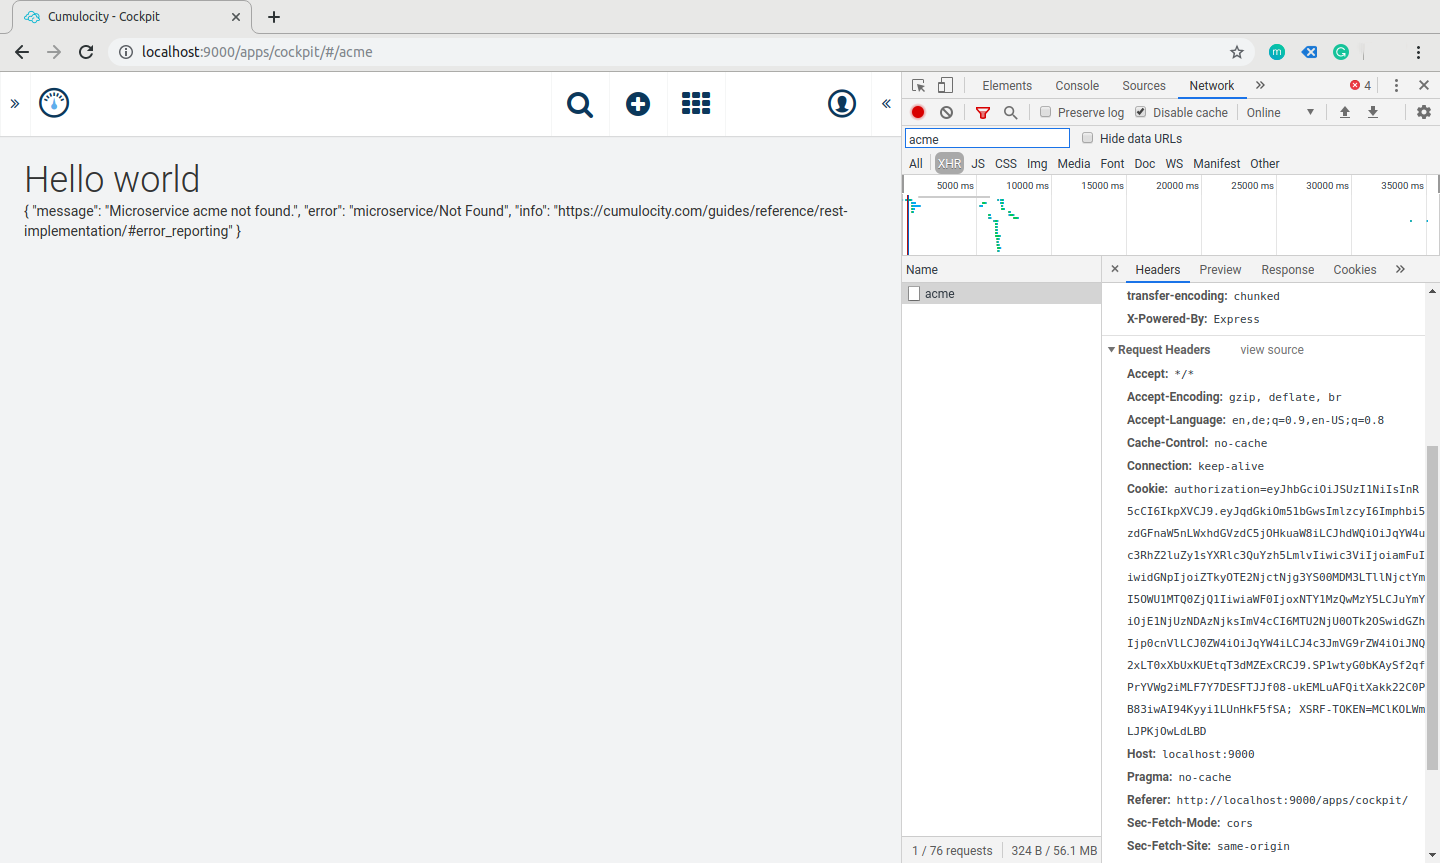
When you run the application with c8ycli server and point your browser to the path defined in the module http://localhost:9000/apps/cockpit/#/acme, you should see the following:
The request fails as we don’t have a microservice with this context path running. But as you can see (in the dev tools) the request has an authorization cookie attached. So if the microservice would exist, the request would pass and the data would be displayed.
4. Bonus: Write a Service.ts abstraction
In the above example, we have just used the underlying fetch abstraction to directly access a custom microservice. You might want to get the same simplicity as the common service of the client. It handles the URL and the JSON parsing for you internally. To achieve this you can extend the Service class returned by the @c8y/client and override the necessary methods or properties.
Let’s do this for the acme microservice example by creating a new file called acme.service.ts:
By extending the service we get the same capabilities as of all common services in @c8y/client. The generic type, in this case, is set to any, to keep the example as easy as possible. It is a common pattern to create an interface that reflects the data you are sending via this service and replace any by this interface.
The URLs are the main entry points for this service. The pattern always is <<url>>/<<baseUrl>>/<<listUrl>>/<id>. If your microservice follows a different structure, you can override the getUrl method of the Service class.
The constructor needs the current FetchClient imported via dependency injection. It also needs to get it passed to the extended Service class via super(). If you want your endpoint to support real time, you also need to inject the RealTime abstraction here and pass it.
You can now override the detail() or list() implementation. You can call the super method only, modify the result of the super call or write your own implementation. Which one to use here depends on the implementation details of your microservice.
Now you can reuse the AcmeService in the acme.component.ts:
We now simply inject the services (1.) and directly do a list request on the service (2.). As we know the service will throw an error we wrap the call in a try/catch and on error we show an alert by simply adding the exception to the addServerFailure method (3.).
Conclusion
The above examples show how to access custom microservices via the client. While it might be simpler to use a well-known client abstraction like the Angular HttpModule the reusing of the @c8y/client gives you authentication out of the box. On top, it is a solution that is more robust against changes as you can simply update the @c8y/client without worrying about some underlying changes.