Overview
This section contains step-by-step tutorials to successfully develop microservices which employ the Cumulocity IoT APIs and other third-party services. The source code of the examples can be found in our Bitbucket M2M repository.
On the Cumulocity IoT platform, microservice hosting is built on top of Docker containers. This makes it technology-agnostic and allows developers to create applications in any technology stack.
Python microservice
In this tutorial, you will learn how to create and run a microservice written in Python. This example contains:
- A sample Python application using the Flask framework to expose REST endpoints.
- An application manifest file with minimal content to run a microservice.
- The configuration of the Dockerfile which allows creating a ready to run Docker image with a bundled application (inside a light Alpine linux distribution).
- Instructions for building and packaging a ZIP file containing the full application (ready to upload into the platform).
- Instructions for uploading and subscribing to the packaged microservice.
Prerequisites
Create an account on cumulocity.com, for example by using a free trial. At this step you will be provided with a dedicated URL address.
Cumulocity IoT hosts linux/amd64 Docker containers and not Windows containers. The Docker version must be >= 1.12.6. Verify your Docker installation with the following command:
$ docker version
    Client:
     Version:         1.12.6
     API version:     1.24
     OS/Arch:         linux/amd64

    Server:
     Version:         1.12.6
     API version:     1.24
     OS/Arch:         linux/amd64
Developing the “Hello world” microservice
To develop a simple “Hello world” microservice in Python, you need to:
- Create a Python web application.
- Create the Dockerfile.
- Add the microservice manifest.
- Build and run the application.
Create a Python web application
This example uses Python 3 with a Flask microframework which enables simple exposing of endpoints and an embedded HTTP server.
Start by creating the application.py script with the following content:
#!flask/bin/python
from flask import Flask, jsonify
import os

app = Flask(__name__)

# Hello world endpoint
@app.route('/')
def hello():
    return 'Hello world!'

# Verify the status of the microservice
@app.route('/health')
def health():
    return '{ "status" : "UP" }'

# Get environment details
@app.route('/environment')
def environment():
    environment_data = {
        'platformUrl': os.getenv('C8Y_BASEURL'),
        'mqttPlatformUrl': os.getenv('C8Y_BASEURL_MQTT'),
        'tenant': os.getenv('C8Y_BOOTSTRAP_TENANT'),
        'user': os.getenv('C8Y_BOOTSTRAP_USER'),
        'password': os.getenv('C8Y_BOOTSTRAP_PASSWORD'),
        'microserviceIsolation': os.getenv('C8Y_MICROSERVICE_ISOLATION')
    }
    return jsonify(environment_data)

if __name__ == '__main__':
    app.run(host='0.0.0.0', port=80)
The application is configured to run on port 80 – which is required for microservices – and exposes three endpoints:
- / returns a hello world message.
- /health is the common endpoint to verify if a microservice is up and running.
- /environment reads some standard variables provided to the environment by the platform during the microservice installation and returns their values in JSON format.
Create the Dockerfile
You need to create a Dockerfile in order to build a Docker image with your application. For this example, it shall be in the same directory as the application.py script and with the following content:
FROM python:alpine3.6

COPY application.py /
RUN pip install flask==0.10.1

ENTRYPOINT ["python"]
CMD ["-u", "application.py"]
This build uses Alpine Linux with the Python SDK inside. It is a very thin distribution and the resulting Docker image is small (about 100 MB). The instruction RUN pip install flask installs the required Python library using the pip installer.
Add the application manifest
The microservice manifest file cumulocity.json is required for the application. Create that file with the following content:
{
    "apiVersion": "1",
    "version": "1.0.0",
    "provider": {
        "name": "Cumulocity GmbH"
    },
    "isolation": "MULTI_TENANT",
    "requiredRoles": [
    ],
    "roles": [
    ]
}
Build the application
Execute the following Docker commands to build the Docker image and save it as image.tar:
$ docker build -t hello-python-microservice .
$ docker save hello-python-microservice > "image.tar"
Then pack image.tar together with the manifest cumulocity.json into a ZIP file.
$ zip hello-microservice cumulocity.json image.tar
The resulting hello-microservice.zip file contains your microservice and it is ready to be uploaded to the Cumulocity IoT platform.
Run the example
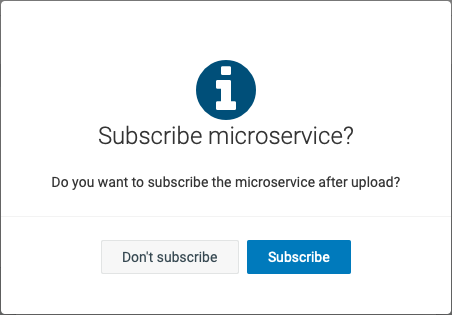
Uploading the hello-microservice.zip into the platform can be done via the UI. In the Administration application, navigate to Applications > Own applications > Add application > Upload microservice. Drop the ZIP file of the microservice and then click Subscribe.
For more details about uploading a microservice ZIP file, refer to Managing applications > Adding own applications under the Administration section in the User guide.
Using the microservice utility tool
You can also build, upload and subscribe the application using the microservice utility tool. In this case, the files must follow the directory structure required by the script.
For this particular microservice example, the structure shall be:
/docker/Dockerfile
/docker/application.py
/cumulocity.json
Execution
After the microservice has been successfully uploaded and subscribed by your tenant, it will run in a Docker container. A request similar to:
GET <URL>/service/hello-microservice/environment

HEADERS:
  "Authorization": "<AUTHORIZATION>"
with proper credentials (user from any subscribed tenant), returns a response as:
{
    "microserviceIsolation": "MULTI_TENANT",
    "mqttPlatformUrl": "tcp://cumulocity:1881",
    "password": "...",
    "platformUrl": "http://cumulocity:8111",
    "tenant": "mytenant",
    "user": "servicebootstrap_hello-microservice"
}
The authorization header is formed as “Basic <Base64(<tenantID>/<username>:<password>)>”. For instance, if your tenant ID, username and password are t0071234, testuser and secret123 respectively, you can get the Base64 string with the following command:
$ echo -n t0071234/testuser:secret123 | base64
dDAwNzEyMzQvdGVzdHVzZXI6c2VjcmV0MTIz
and your authorization header would look like "Authorization": "Basic dDAwNzEyMzQvdGVzdHVzZXI6c2VjcmV0MTIz".
Source code
The source code of this Hello world microservice can be found in our GitHub repository. Moreover, in our Bitbucket repository you can find a more comprehensive Python microservice application which uses the Cumulocity IoT REST API and exposes endpoints to verify if the microservice is up and running, create a device and random measurements for it, and to get the current application subscriptions for a particular tenant.
Java microservice
Important: Review the Hello world tutorial presented in Microservice SDK for Java and follow the setup steps there before continuing with this example as the basic configuration steps are not explained here.
Developing the IP-tracker microservice
This microservice application creates a warning alarm message (for demonstration purposes) and it exposes endpoints to:
- Verify if the microservice is up and running.
- Pass a parameter to the platform and return a formatted string.
- Get some of the environment variables and the microservice service settings.
- Track a user’s approximate location and store it in the platform.
- Get the tracked IPs and locations.
It also uses the Cumulocity IoT UI to display the tracked locations on a map.
Update the Project Object Model
Assuming that you have the base code of the “Hello world” example presented in Microservice SDK for Java, edit your pom.xml file changing the artifactId and name of your microservice to iptracker-microservice, and add a child element to the <properties> to specify the Java version you want to use. Your pom.xml file should contain a snippet similar to:
<name>iptracker-microservice</name>
<artifactId>iptracker-microservice</artifactId>
<properties>
    <java.version>13</java.version>
    <maven.compiler.source>${java.version}</maven.compiler.source>
    <maven.compiler.target>${java.version}</maven.compiler.target>
    <spring-boot-dependencies.version>2.1.4.RELEASE</spring-boot-dependencies.version>
    <c8y.version>1004.6.12</c8y.version>
    <microservice.name>iptracker-microservice</microservice.name>
</properties>
Info: This example was implemented using Java 13 and Spring Boot 2. You may install the JDK 13 or adjust this example to the version you already have, e.g. JDK 8. Note that since Java 10 some API methods were removed or deprecated, so you may get some warning messages during build time but they won’t affect the microservice application.
Finally, add the following dependency:
<dependency>
    <groupId>com.fasterxml.jackson.core</groupId>
    <artifactId>jackson-databind</artifactId>
    <scope>compile</scope>
</dependency>
Update the application manifest
In your cumulocity.json file:
- Add the required roles to be able to create events and alarms.
- Add the readiness and liveness probes.
- Add two keys for the microservice settings:
"ipstack.key"and"tracker.id". - Set the isolation level to PER_TENANT, which means that there will be a separate instance for each tenant. For more details see the Settings section in General aspects > Microservice manifest.
Your manifest file should look similar to this:
{
    "apiVersion": "1",
    "version": "@project.version@",
    "provider": {
        "name": "Cumulocity GmbH"
    },
    "isolation": "PER_TENANT",
    "settings": [
        {
            "key": "ipstack.key",
            "defaultValue": "<your-ipstack-key>"
        },
        {
            "key": "tracker.id",
            "defaultValue": "<your-tracker-id>"
        }
    ],
    "livenessProbe": {
        "httpGet": {
            "path": "/health"
        },
        "initialDelaySeconds": 60,
        "periodSeconds": 10
    },
    "readinessProbe": {
        "httpGet": {
            "path": "/health",
            "port": 80
        },
        "initialDelaySeconds": 20,
        "periodSeconds": 10
    },
    "requiredRoles": [
        "ROLE_EVENT_READ",
        "ROLE_EVENT_ADMIN",
        "ROLE_ALARM_READ",
        "ROLE_ALARM_ADMIN"
    ],
    "roles": []
}
Creating a managed object
An alarm must be associated to a source and it requires an ID. Hence, you need to create a managed object to be your source and use its ID in your microservice application. The same managed object will track the locations when the microservice gets accessed on a particular endpoint.
First, get your current location (latitude, longitude) using a free service, e.g. My Current Location.
Create a managed object as a device named “Microservice tracker” employing a POST request as follows:
POST <URL>/inventory/managedObjects

HEADERS:
  Content-Type: application/vnd.com.nsn.cumulocity.managedObject+json; charset=UTF-8; ver=0.9
  Accept: application/vnd.com.nsn.cumulocity.managedObject+json; charset=UTF-8; ver=0.9
  Authorization: <AUTHORIZATION>

BODY:
  {
    "c8y_IsDevice": {},
    "c8y_Position": {
      "lat": <LATITUDE>,
      "lng": <LONGITUDE>
    },
    "name": "Microservice tracker"
  }
You will get the ID of your managed object in the response. Assign this ID in your cumulocity.json file to the "tracker.id" key.
On the Cumulocity IoT platform, navigate to Devices > All devices in the Device Management application to verify that your device has been created and its location is displayed on the map.
![]()
Getting the client’s location
The microservice will get the approximate location based on the client’s IP. To achieve this, it uses the free service ipstack and you have to get a free API key. Once you have it, assign it in your cumulocity.json file to the "ipstack.key" key.
The GET request to the ipstack API using your key will return a location object. Therefore, you need to create a new file named Location.java in the same directory of your App.java with the following content:
package c8y.example;

import com.fasterxml.jackson.annotation.JsonIgnoreProperties;

@JsonIgnoreProperties(ignoreUnknown = true)
public class Location {

    private String city;
    private String country_code;
    private String latitude;
    private String longitude;

    public String getLongitude() {
        return longitude;
    }

    public void setLongitude(String longitude) {
        this.longitude = longitude;
    }

    public String getLatitude() {
        return latitude;
    }

    public void setLatitude(String latitude) {
        this.latitude = latitude;
    }

    public String getCountry_code() {
        return country_code;
    }

    public void setCountry_code(String country_code) {
        this.country_code = country_code;
    }

    public String getCity() {
        return city;
    }

    public void setCity(String city) {
        this.city = city;
    }
}
Updating the application
Modify your App.java file and:
- Run the microservice as a Spring application.
- Add a post-construct init method to get a subset of the environment variables and the microservice settings.
- Add an event listener to the microservice subscription. Each time a tenant subscribes to the microservice, an alarm will be created.
- Define a method to create LocationUpdate events based on the client’s IP.
- Add the application endpoints.
Your code should look similar to:
package c8y.example;

import java.util.ArrayList;
import java.util.HashMap;
import java.util.Map;

import javax.annotation.PostConstruct;
import javax.servlet.http.HttpServletRequest;

import org.joda.time.DateTime;
import org.springframework.beans.factory.annotation.Autowired;
import org.springframework.boot.SpringApplication;
import org.springframework.context.event.EventListener;
import org.springframework.web.bind.annotation.RequestMapping;
import org.springframework.web.bind.annotation.RequestParam;
import org.springframework.web.bind.annotation.RestController;
import org.springframework.web.client.RestTemplate;

import com.cumulocity.microservice.autoconfigure.MicroserviceApplication;
import com.cumulocity.microservice.context.ContextService;
import com.cumulocity.microservice.context.credentials.MicroserviceCredentials;
import com.cumulocity.microservice.settings.service.MicroserviceSettingsService;
import com.cumulocity.microservice.subscription.model.MicroserviceSubscriptionAddedEvent;
import com.cumulocity.model.idtype.GId;
import com.cumulocity.rest.representation.alarm.AlarmRepresentation;
import com.cumulocity.rest.representation.event.EventRepresentation;
import com.cumulocity.rest.representation.inventory.ManagedObjectRepresentation;
import com.cumulocity.sdk.client.Platform;
import com.cumulocity.sdk.client.event.EventFilter;

import net.minidev.json.JSONObject;

@MicroserviceApplication
@RestController
public class App {

    @Autowired
    private MicroserviceSettingsService settingsService;

    @Autowired
    private ContextService<MicroserviceCredentials> contextService;

    @Autowired
    private Platform platform;

    private Map<String, String> c8yEnv;

    public static void main (String[] args) {
        SpringApplication.run(App.class, args);
    }


    /**
    * Get some of the environment variables of the container and load the
    * microservice settings
    */
    @PostConstruct
    private void init () {
        // Environment variables
        var env = System.getenv();

        c8yEnv = new HashMap<>();
        c8yEnv.put("app.name", env.get("APPLICATION_NAME"));
        c8yEnv.put("url", env.get("C8Y_BASEURL"));
        c8yEnv.put("jdk", env.get("JAVA_VERSION"));
        c8yEnv.put("tenant", env.get("C8Y_TENANT"));
        c8yEnv.put("user", env.get("C8Y_USER"));
        c8yEnv.put("password", env.get("C8Y_PASSWORD"));
        c8yEnv.put("isolation", env.get("C8Y_MICROSERVICE_ISOLATION"));
        c8yEnv.put("memory.limit", env.get("MEMORY_LIMIT"));

        // Required ID and key
        c8yEnv.put("tracker.id", settingsService.get("tracker.id"));
        c8yEnv.put("ipstack.key", settingsService.get("ipstack.key"));
    }


    /**
    * Create a warning alarm on microservice subscription
    */
    @EventListener(MicroserviceSubscriptionAddedEvent.class)
    public void createAlarm (MicroserviceSubscriptionAddedEvent event) {
        contextService.callWithinContext(event.getCredentials(), () -> {
            var source = new ManagedObjectRepresentation();
            source.setId(GId.asGId(c8yEnv.get("tracker.id")));

            var alarm = new AlarmRepresentation();
            alarm.setSource(source);
            alarm.setSeverity("WARNING");
            alarm.setStatus("ACTIVE");
            alarm.setDateTime(DateTime.now());
            alarm.setType("c8y_Application__Microservice_subscribed");
            alarm.setText("The microservice " + c8yEnv.get("app.name") + " has been subscribed to tenant "
            + c8yEnv.get("tenant"));

            platform.getAlarmApi().create(alarm);

            return true;
        });
    }


    /**
    * Create a LocationUpdate event based on the client's IP
    *
    * @param String The public IP of the client
    * @return The created event
    */
    public EventRepresentation createLocationUpdateEvent (String ip) {
        // Get location details from ipstack
        var rest = new RestTemplate();
        var apiURL = "http://api.ipstack.com/" + ip + "?access_key=" + c8yEnv.get("ipstack.key");
        var location = rest.getForObject(apiURL, Location.class);

        // Prepare a LocationUpdate event using Cumulocity IoT's API
        var c8y_Position = new JSONObject();
        c8y_Position.put("lat", location.getLatitude());
        c8y_Position.put("lng", location.getLongitude());

        var source = new ManagedObjectRepresentation();
        source.setId(GId.asGId(c8yEnv.get("tracker.id")));

        var event = new EventRepresentation();
        event.setSource(source);
        event.setType("c8y_LocationUpdate");
        event.setDateTime(DateTime.now());
        event.setText("Accessed from " + ip + " (" + (location.getCity() != null ? location.getCity() + ", " : "")
        + location.getCountry_code() + ")");
        event.setProperty("c8y_Position", c8y_Position);
        event.setProperty("ip", ip);

        // Create the event in the platform
        platform.getEventApi().create(event);

        return event;
    }


    /* * * * * * * * * * Application endpoints * * * * * * * * * */

    // Check the microservice status/health (implemented by default)
    // GET /health

    // Greeting endpoints
    @RequestMapping("hello")
    public String greeting (@RequestParam(value = "name", defaultValue = "World") String you) {
        return "Hello " + you + "!";
    }

    @RequestMapping("/")
    public String root () {
        return greeting("World");
    }

    // Return the environment values
    @RequestMapping("environment")
    public Map<String, String> environment () {
        return c8yEnv;
    }

    // Track client's approximate location
    @RequestMapping("location/track")
    public String trackLocation (HttpServletRequest request) {
        // Get the public IP address and create the event
        return createLocationUpdateEvent(request.getHeader("x-real-ip")).toJSON();
    }

    // Get the tracked IPs and locations
    @RequestMapping("location/locations")
    public ArrayList<Object> getLocations (@RequestParam(value = "max", defaultValue = "5") int max) {
        var filter = new EventFilter().byType("c8y_LocationUpdate");
        var locations = new ArrayList<Object>();
        var eventCollection = platform.getEventApi().getEventsByFilter(filter).get(max);

        eventCollection.getEvents().forEach((event) -> {
            var map = new HashMap<String, Object>();

            map.put("ip", event.getProperty("ip"));
            map.put("coordinates", event.getProperty("c8y_Position"));
            map.put("when", event.getCreationDateTime().toString("yyyy-MM-dd hh:mm:ss"));

            locations.add(map);
        });

        return locations;
    }
}
Building and deploying the application
Use the command mvn clean install and follow the same steps of the Hello world tutorial to deploy your microservice. You may also employ the cURL command to deploy the microservice.
$ curl -F "data=@target/iptracker-microservice-1.0.0-SNAPSHOT.zip" \
     -H "Authorization: <AUTHORIZATION>" \
     "<URL>/application/applications/<APPLICATION_ID>/binaries"
Testing the application
You can test any endpoint of your application using the command line or a web browser. For example, a GET request on location/track will obtain the client’s IP from the request header and use the createLocationUpdateEvent method to get the approximate location. A response will be similar to:
{
  time: "2019-06-03T08:44:21.730Z",
    source: {
      id: "..."
    },
    text: "Accessed from ... (Sofia, BG)",
    type: "c8y_LocationUpdate",
    c8y_Position: {
      lng: "23.3175",
      lat: "42.683"
    },
    ip: "..."
}
Using the endpoint location/locations will return by default five stored events. You can use the max parameter to specify a higher number.
In the Device Management application, navigate to Devices > All devices and locate your microservice tracker. Under Tracking you will see a map with the tracked locations. It is also possible to develop your own web application and customize a map widget. Refer to the Web SDK for Angular for more details.
![]()
Run the Docker container
The Docker image was built and added to the local Docker repository during the Maven build. In a similar way as the Hello world tutorial, you can run the Docker container locally. Note that in this case the isolation was changed to PER_TENANT. You can also use your Docker image name and tag to run it as follows:
$ docker run -p 8082:80 -e C8Y_BOOTSTRAP_TENANT=<BOOTSTRAP_TENANT> -e C8Y_BOOTSTRAP_USER=<BOOTSTRAP_USERNAME> -e C8Y_BOOTSTRAP_PASSWORD=<BOOTSTRAP_USER_PASSWORD> -e C8Y_MICROSERVICE_ISOLATION=PER_TENANT -i -t -e C8Y_BASEURL=<URL> iptracker-microservice:latest
If your Docker image has run successfully, you can test the microservice on any web browser. For instance, using http://localhost:8082/location/locations will return all the tracked locations.
Source code
The code of this iptracker-microservice can be found in our Bitbucket M2M repositories.
Node.js microservice
Cumulocity IoT provides SDKs for developing microservices using C# or Java. Nevertheless, you are free to choose the tech-stack of your preference to develop a microservice as long as it fulfills the general requirements.
In this example you will learn how to create and deploy a Node.js-based microservice. The application exposes endpoints to verify if the microservice is up and running and get some of the environment variables.
It uses the Cumulocity IoT @c8y/client JavaScript library to subscribe to alarms. When a new alarm is created, a Slack channel gets notified.
Prerequisites
- Cumulocity IoT credentials (tenant, user and password).
- Slack channel to post messages to, Slack app and OAuth token.
- Docker local installation.
- A .env file in the root directory with the following content:
PORT=80
SLACK_OAUTH_TOKEN=<YOUR-TOKEN-GOES-HERE>
SLACK_CHANNEL_ID=<YOUR-CHANNEL_ID-GOES-HERE>
Developing the microservice
Configure a Node.js application
Start by creating a folder node-microservice to contain your files. Inside your folder, use the following command to initialize your project:
$ npm init
It will walk you through creating a package.json file which allows to identify the project as well as handling its dependencies. When prompted, enter your project’s information and use app.js as entry point. Once the file has been created, install the dependencies using:
$ npm install --save @c8y/client @slack/web-api dotenv express
Eventually, your package.json file should look similar to:
{
  "name": "node-microservice",
  "version": "1.0.0",
  "description": "Cumulocity IoT microservice application",
  "main": "app.js",
  "dependencies": {
    "@c8y/client": "^1004.0.7",
    "@slack/web-api": "^5.0.1",
    "dotenv": "^8.0.0",
    "express": "4.17.0"
  },
  "scripts": {
    "start": "node app.js",
    "test": "echo \"Error: no test specified\" && exit 1"
  },
  "author": "<your-name>",
  "license": "MIT"
}
Add the source code
Now create a file app.js which is the main entry point of your application. It uses the Express framework to start a server listening on port 80, defines its endpoints and requires controllers to use the Cumulocity IoT and Slack APIs.
"use strict";

require("dotenv").config();
const express = require("express");
const app = express();

// Application endpoints
const routes = require("./routes");
routes(app);

// Server listening on port 80
app.use(express.json());
app.listen(process.env.PORT);
console.log(`${process.env.APPLICATION_NAME} started on port ${process.env.PORT}`);

// Cumulocity IoT and Slack controllers
require("./controllers");
As you may have already noticed, routes and controllers are required. Create a routes.js file with the following content:
"use strict";

module.exports = function(app) {
    // Hello world
    app.route("/").get(function(req, res) {
        res.json({ "message" : "Hello world!" });
    });

    // Health check
    app.route("/health").get(function(req, res) {
        res.json({ "status" : "UP" });
    });

    // Environment variables
    app.route("/environment").get(function(req, res) {
        res.json({
            "appName" : process.env.APPLICATION_NAME,
            "platformUrl" : process.env.C8Y_BASEURL,
            "microserviceIsolation" : process.env.C8Y_MICROSERVICE_ISOLATION,
            "tenant" : process.env.C8Y_BOOTSTRAP_TENANT,
            "bootstrapUser" : process.env.C8Y_BOOTSTRAP_USER,
            "bootstrapPassword" : process.env.C8Y_BOOTSTRAP_PASSWORD
        });
    });
};
At this point, your microservice would be accessible via web on its endpoints to return a “Hello world” message, verify that the microservice is up and running and get some environment variables.
In order to implement the controllers, you first need to create a Slack app and get a token to use the Web API. Go to Slack API: Applications to create a new app. Choose your workspace and give your app a name, e.g. C8Y Slack bot. Then get an OAuth access token.
Once you have your Slack app and token ready, create the controllers.js file with the following content:
"use strict";

/********************* Slack *********************/

// Create a new instance of the WebClient class with the OAuth access token
const { WebClient } = require("@slack/web-api");
const web = new WebClient(process.env.SLACK_OAUTH_TOKEN);

// Slack channel ID to know where to send messages to
const channelId = process.env.SLACK_CHANNEL_ID;

// Format a message and post it to the channel
async function postSlackMessage (adata) {
    // Alarm severity
    let color = {
        "WARNING" : "#1c8ce3",
        "MINOR"   : "#ff801f",
        "MAJOR"   : "#e66400",
        "CRITICAL": "#e0000e"
    };

    // Send a message from this app to the specified channel
    let src = adata.source;
    await web.chat.postMessage({
        channel: channelId,
        attachments : [{
            "text": adata.text,
            "fields": [
                {
                    "title": "Source",
                    "value": `<${src.self}|${src.name ? src.name : src.id}>`,
                    "short": true
                },
                {
                    "title": "Alarm type",
                    "value": adata.type,
                    "short": true
                }
            ],
            "color": color[adata.severity]
        }]
    });
}


/********************* Cumulocity IoT *********************/

const { Client, FetchClient, BasicAuth } = require("@c8y/client");

const baseUrl = process.env.C8Y_BASEURL;
let cachedUsers = [];

// Get the subscribed users
async function getUsers () {
    const {
        C8Y_BOOTSTRAP_TENANT: tenant,
        C8Y_BOOTSTRAP_USER: user,
        C8Y_BOOTSTRAP_PASSWORD: password
    } = process.env;

    const client = new FetchClient(new BasicAuth({ tenant, user, password }), baseUrl);
    const res = await client.fetch("/application/currentApplication/subscriptions");

    return res.json();
 }


// where the magic happens...
(async () => {

    cachedUsers = (await getUsers()).users;

    if (Array.isArray(cachedUsers) && cachedUsers.length) {
        // List filter for unresolved alarms only
        const filter = {
            pageSize: 100,
            withTotalPages: true,
            resolved: false
        };

        try {
            cachedUsers.forEach(async (user) => {
                // Service user credentials
                let auth = new BasicAuth({
                    user:     user.name,
                    password: user.password,
                    tenant:   user.tenant
                });

                // Platform authentication
                let client = await new Client(auth, baseUrl);

                // Get filtered alarms and post a message to Slack
                let { data } = await client.alarm.list(filter);
                data.forEach((alarm) => {
                    postSlackMessage(alarm);
                });

                // Real time subscription for active alarms
                client.realtime.subscribe("/alarms/*", (alarm) => {
                    if (alarm.data.data.status === "ACTIVE") {
                        postSlackMessage(alarm.data.data);
                    }
                });
            });
            console.log("listening to alarms...");
        }
        catch (err) {
            console.error(err);
        }
    }
    else {
        console.log("[ERROR]: Not subscribed/authorized users found.");
    }

})();
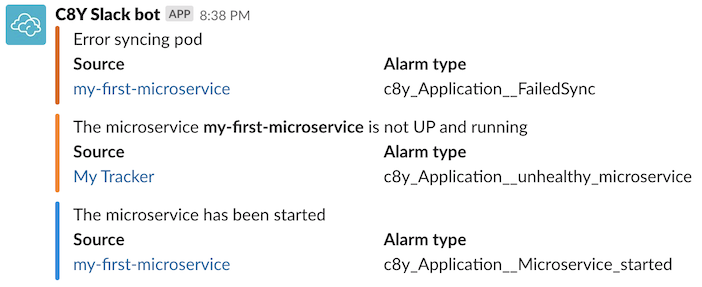
The code has two parts. The first one needs your Slack OAuth token and channel ID (chat group where the messages will be posted). A message is formatted using the colors of the different alarm severities that you may see in the Cockpit application. This message gets posted to the Slack channel.
The second part uses basic authentication to the Cumulocity IoT platform, it gets all active alarms and posts alarm messages to the Slack channel. After that, it subscribes to alarms and notifies the Slack channel each time a new alarm is created in the subscribed tenants.
Dockerfile and application manifest
Create a microservice manifest cumulocity.json with the following content:
{
    "apiVersion": "1",
    "version": "1.0.0-SNAPSHOT",
    "provider": {
        "name": "Cumulocity GmbH"
    },
    "isolation": "MULTI_TENANT",
    "requiredRoles": [
        "ROLE_ALARM_READ",
        "ROLE_ALARM_ADMIN"
    ],
    "roles": [
    ]
}
Finally, Docker needs to know how to build your microservice. Create a Dockerfile as follows:
FROM node:alpine

WORKDIR /usr/app

COPY ./package.json ./
RUN npm install
COPY ./ ./

CMD ["npm", "start"]
Deploying the microservice
Once you have all the required files, building and deploying the microservice application is fairly simple. Execute the following Docker commands to build the Docker image and save it as image.tar:
$ docker build -t node-microservice .
$ docker save node-microservice > "image.tar"
Then pack image.tar together with the manifest cumulocity.json into a ZIP file.
$ zip node-microservice cumulocity.json image.tar
The resulting node-microservice.zip file contains your microservice and it is ready to be uploaded to the Cumulocity platform. Uploading the node-microservice.zip into the platform can be done via the UI. In the Administration application, navigate to Applications > Own applications > Add application > Upload microservice. Drop the ZIP file of the microservice and then click Subscribe.
For more details about uploading a microservice ZIP file, refer to Managing applications > Adding own applications under the Administration section in the User guide.
Testing the microservice
After the microservice has been successfully uploaded and subscribed to your tenant, it will run in a Docker container. A request similar to:
GET <URL>/service/node-microservice/environment

HEADERS:
  "Authorization": "<AUTHORIZATION>"
with proper credentials (user and password from any subscribed tenant), returns a response as:
{
  "appName": "node-microservice",
  "platformUrl": "http://cumulocity:8111",
  "microserviceIsolation": "MULTI_TENANT",
  "tenant": "t...",
  "bootstrapUser": "...",
  "bootstrapPassword": "..."
}
The authorization header is formed as “Basic <Base64(<tenantID>/<username>:<password>)>”. For instance, if your tenant ID, username and password are t0071234, testuser and secret123 respectively, you can get the Base64 string with the following command:
$ echo -n t0071234/testuser:secret123 | base64
dDAwNzEyMzQvdGVzdHVzZXI6c2VjcmV0MTIz
and your authorization header would look like "Authorization": "Basic dDAwNzEyMzQvdGVzdHVzZXI6c2VjcmV0MTIz".
If there are active alarms on your tenant, your Slack channel will get notified. You can also create a new alarm using the Cumulocity REST API and validate that your microservice is listening to new alarms. Your Slack channel will also get notified.
Source code
The code of this node-microservice can be found in our Bitbucket M2M repositories.