Overview
Simple Network Management protocol (SNMP) is an application layer protocol, used widely in network management for monitoring network devices.
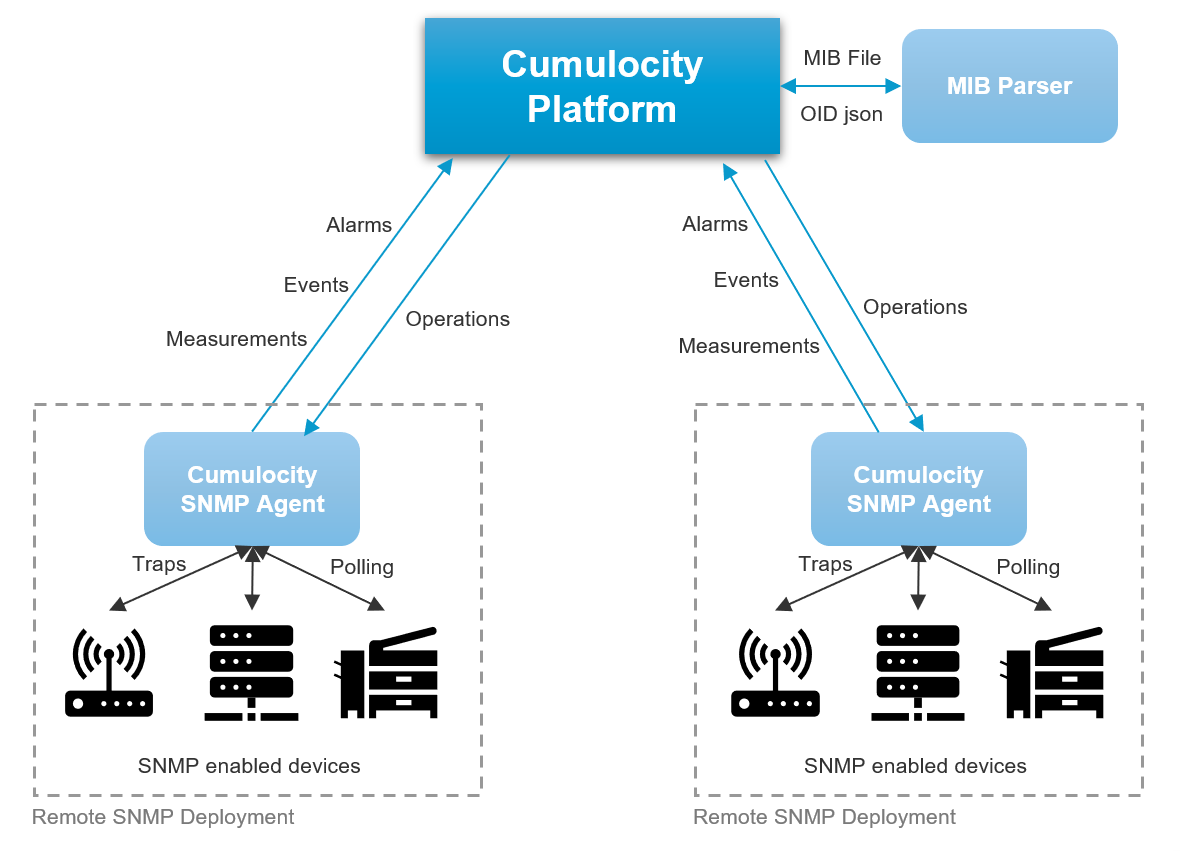
There are two components that help SNMP-enabled devices to connect to the Cumulocity IoT platform:
- The Mibparser microservice helps in converting a Managed Information Base (MIB) file to a JSON representation which is then used to create a device protocol.
- The SNMP agent is a device-side agent that helps SNMP-enabled devices to connect to the Cumulocity IoT platform and translates messages from a SNMP-specific format to a Cumulocity IoT model before forwarding them to the Cumulocity IoT platform.
The following image provides a general overview of the SNMP-enabled device integration with Cumulocity IoT:
SNMP agent
Introduction
The SNMP agent is a stand-alone Java program that communicates with SNMP-enabled device(s) and the Cumulocity IoT platform. It receives SNMP data from the devices, converts the data to Cumulocity IoT-based objects based on the device protocol mapping, persists the data locally, and forwards the data to Cumulocity IoT. The agent must be registered in Cumulocity IoT before serving the device request.
If you are using one of the Software AG public cloud instances, you must ensure that your tenant is subscribed to the Mibparser microservice.
To add the Mibparser microservice to the Cumulocity IoT platform,
- download the file snmp-mib-parser-<ga-version>.zip (for example snmp-mib-parser-1005.7.0.zip) from http://resources.cumulocity.com/examples/snmp/.
- Upload this ZIP file as a microservice into the platform. Refer to Managing and monitoring microservices in the User guide for details on how to upload microservices into Cumulocity IoT.
Installation
Prerequisites
| Java version | Java Runtime Environment 8 or newer version. |
| Heap memory | The agent Java application can run on as little as 200MB of heap space. However, based on the number of devices and the load, this needs to be adjusted. |
| Disk space | The Cumulocity IoT representation of the SNMP message will be persisted before forwarding to the platform. Based on the load, sufficient disk space should be available to store the objects. |
| Hardware and OS | Linux environment, can run on laptops or industrial PCs. |
To install the agent
-
Download the latest SNMP agent RPM:
wget -nv http://resources.cumulocity.com/examples/snmp/snmp-agent-gateway-<ga-version>-1.noarch.rpmThe
<ga-version>needs to be provided in the format1005.7.0,1006.0.0, and so on. A sample command would look like this:wget -nv http://resources.cumulocity.com/examples/snmp/snmp-agent-gateway-1006.0.0-1.noarch.rpm -
Verify the signature of the RPM package:
rpm --checksig snmp-agent-gateway-<ga-version>.rpm -
Install the SNMP agent RPM package:
sudo rpm -ivh snmp-agent-gateway-<ga-version>.rpm -
Check the installed RPM package:
rpm -q snmp-agent-gateway -
Configure the agent:
-
Create a .snmp folder in the user home directory:
mkdir -p $HOME/.snmp -
Copy the snmp properties file into the .snmp folder:
cp /etc/snmp-agent-gateway/snmp-agent-gateway.properties $HOME/.snmp -
Change the properties according to the Cumulocity IoT environment (for example gateway.identifier, Cumulocity IoT bootstrap details, SNMP Community target).
-
-
Start the service:
systemctl start snmp-agent-gateway -
Check if the service started properly by checking the status:
systemctl status snmp-agent-gateway -
Make sure that the agent process is running without any issues. To do so, check the agent log file:
$HOME/.snmp/log/snmp-agent-gateway-server.log
$HOME/.snmp/{gateway.identifier}/chronicle
Upgrading a GA version
-
Make sure that the load to the SNMP agent is zero. This can be done by gracefully disconnecting all SNMP devices from the SNMP agent or redirect the traffic to a different endpoint.
-
If there are pending messages in the SNMP agent to be sent to the platform, wait for the processing to complete.
-
Once the message processing is complete, stop the agent process:
systemctl stop snmp-agent-gateway -
Upgrade the SNMP agent RPM package:
rpm -Uvh snmp-agent-gateway-<new-ga-version>.rpm -
Start the service:
systemctl start snmp-agent-gateway -
Check if the service started properly by checking the status:
systemctl status snmp-agent-gateway -
Make sure that the agent process is running without any issues. To do so, check the agent log file:
$HOME/.snmp/log/snmp-agent-gateway-server.log
Migration
Between version 10.4.x and 10.5.x, the SNMP agent has undergone a major revamp regarding persistence storage mechanism, robustness, performance improvements and more. If the current running version of SNMP is 10.4.x or earlier then follow the steps below to migrate to a GA version.
-
Make sure that load to the SNMP agent is zero. This can be done by gracefully disconnecting all SNMP devices from the SNMP agent or redirect the traffic to a different endpoint.
-
If there are pending messages in the SNMP agent to be sent to the platform, wait for the processing to complete.
-
Once the message processing is complete, stop the agent process.
-
Take a backup of the $HOME/.snmp folder, the configuration file in /etc/snmp (if present) and the agent JAR file (if a JAR file is used for starting the agent).
-
If the SNMP agent was installed as RPM package, uninstall it:
rpm -e <snmp-package-name> -
Delete the contents inside $HOME/.snmp/ and /etc/snmp folder (if present).
-
Delete the snmp-agent device in Cumulocity IoT which was registered as part of the installation and all its child SNMP devices. This can be done from the user interface or by using REST endpoints.
-
Follow the installation procedure described above, to install/move to GA version.
Registering the agent
Before any SNMP device can connect to the Cumulocity IoT platform, first the SNMP agent needs to be registered in the platform.
To register the agent from the UI
- In the Device management application, click Registration in the Devices menu in the navigator.
- Click Register device and then select General device registration.
- In the resulting dialog box, enter the device ID. The device ID corresponds to the gateway.identifier value mentioned in the snmp-agent-gateway.properties file.
- Click Next to proceed with the device registration and then click Complete.The device will be shown in the Device registration page with the status WAITING FOR CONNECTION.
- If the agent process is started and the device ID is correct you will see an Accept button. If the agent is not started, start the agent application. Click Accept to complete the registration process.
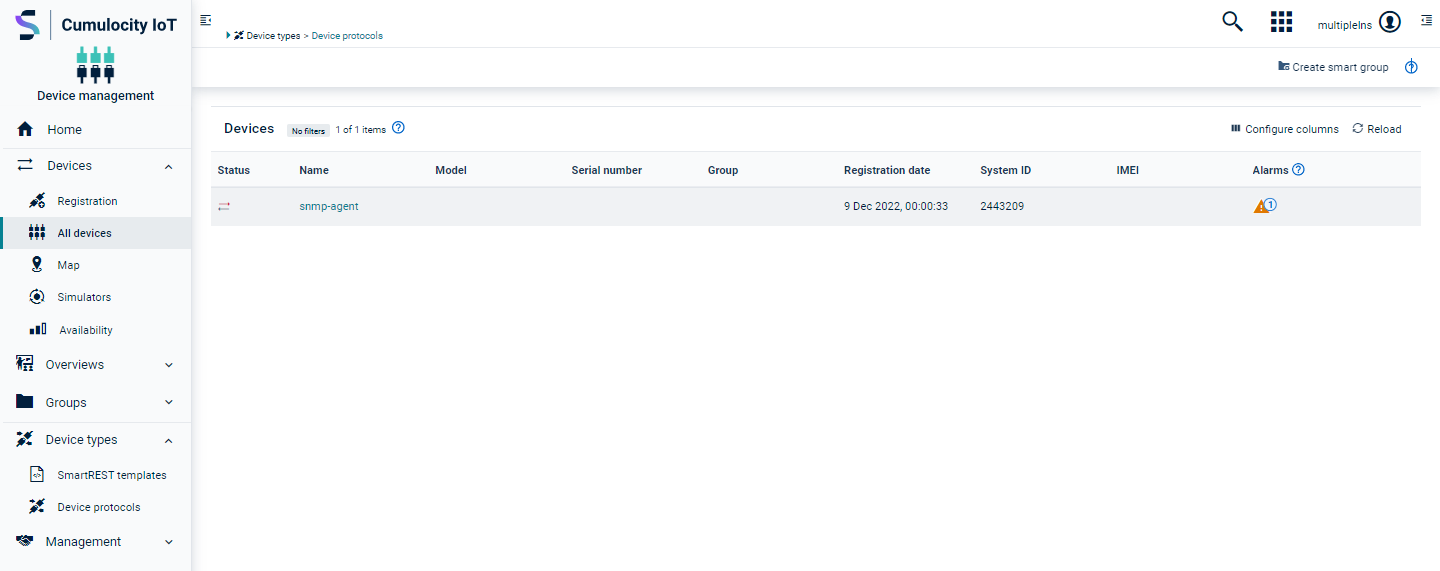
After successful registration, the agent device will be added to the device list in the All devices page, with device ID as name.
To register the agent via REST API
Step-1: Create a new device request:
POST /devicecontrol/newDeviceRequests
Authorization: Basic ...
Content-Type: application/vnd.com.nsn.cumulocity.newdevicerequest+json
{
    "id": "snmp-agent" // should be the same as "gateway.identifier" value from the snmp-agent-gateway.properties file.
}
Step-2: Accept the new device request:
PUT /devicecontrol/newDeviceRequests/snmp-test
Authorization: Basic ...
Content-Type: application/vnd.com.nsn.cumulocity.newdevicerequest+json
{
    "status": "ACCEPTED"
}
Creating a device protocol
SNMP device protocols can either be created manually or by importing a MIB file shared by the device manufacturer. This device protocol will later be used when adding the SNMP device to the platform.
To create a device protocol from the UI
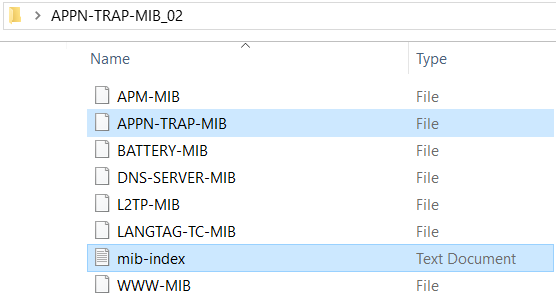
- Create a ZIP file which contains the top-level MIB file along with dependent MIB files and an index file named mib-index which contains the name of the top level MIB file.
- In the Device management application, click Device protocols in the Device types menu in the navigator.
- In the top menu bar of the Device protocols page, click Import.
- Select the MIB ZIP file from the dropdown list or upload the file from your file system.
- In the Name field, enter a name for the device protocol.
- Click Import.
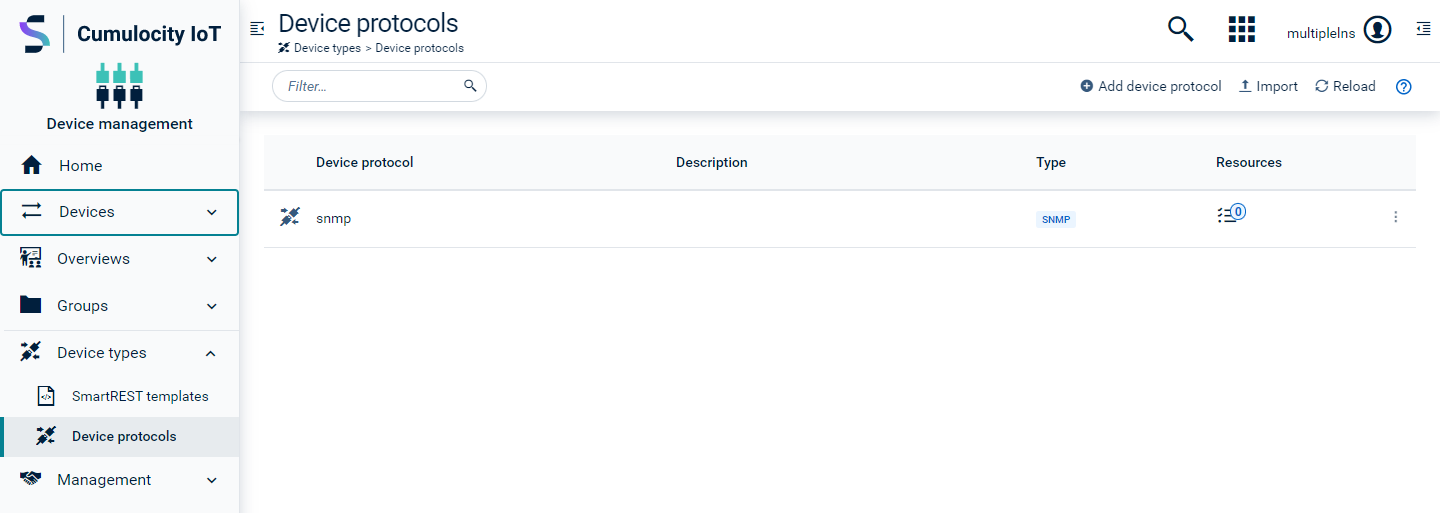
On successful import, the newly added device protocol will be listed in the device protocols list.
To create a device protocol via REST API
Step-1: Upload the MIB file and note down the JSON response:
POST /service/mibparser/mib/uploadzip
Authorization: Basic ...
Content-Type: multipart/form-data; boundary=----WebKitFormBoundary8WCDTr2uRkbroQ11

------WebKitFormBoundary8WCDTr2uRkbroQ11
Content-Disposition: form-data; name="file"; filename="APPN-TRAP-MIB_02.zip"
Content-Type: application/zip
------WebKitFormBoundary8WCDTr2uRkbroQ11--
Step-2: Use the JSON response and create a device protocol managed object:
POST /inventory/managedObjects
Authorization: Basic ...
Content-Type: application/vnd.com.nsn.cumulocity.managedobject+json;
{
	"name": "snmp-device-protocol",
	"fieldbusType": "snmp",
	"type": "c8y_ModbusDeviceType",
	"fieldbusVersion": 4,
	"c8y_IsDeviceType": {},
	"c8y_Global": {},
	"c8y_Registers": [
	    <<This is the response of the above POST call>>
	]
}
To create a device protocol manually
Device protocols can also be created manually. To do so, you must know the OIDs supported by the device. This method is suitable for small number of OIDs supported by the device or for testing purposes.
- In the Device management application, click Device protocols in the Device types menu in the navigator.
- In the top menu bar of the Device protocols page, click Add device protocol.
- Select SNMP as device protocol.
- Enter the name and a description for the device protocol.
- Click Create. On successful creation, the new device protocol will be added to the device protocols list.
- Open the newly created device protocol.
- Click Add component.
- Provide OID details and device protocol mapping for the OID.
- Click Save to save your settings.
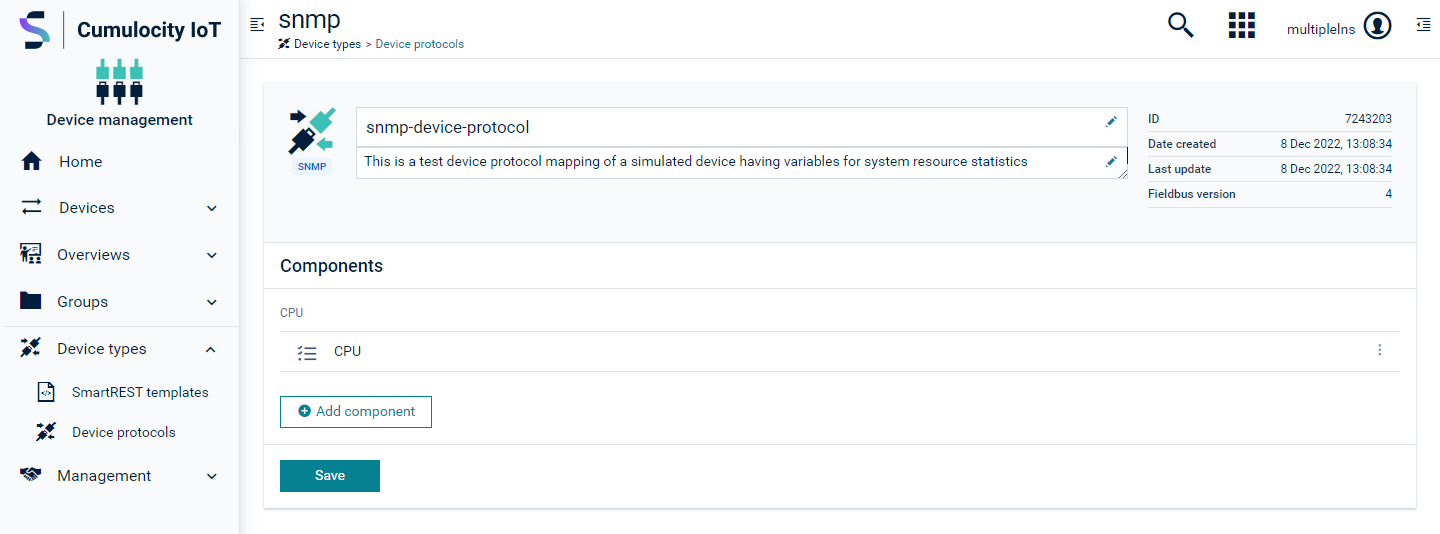
Creating device protocol mapping
The device protocol mapping helps the agent to know how to deal with incoming data from the SNMP-enabled devices. It basically allows users to configure an OID with a corresponding Cumulocity IoT object such as an alarm, event or measurement. This information is later used by the agent to convert incoming data (say TRAP) to corresponding Cumulocity IoT object/s that are defined in the mapping.
To create mapping from the UI
-
In the Device management application, click Device protocols in the Device types menu in the navigator.
-
Open the desired device protocol (for example snmp-device-protocol). It shows a list of components representing the OIDs.
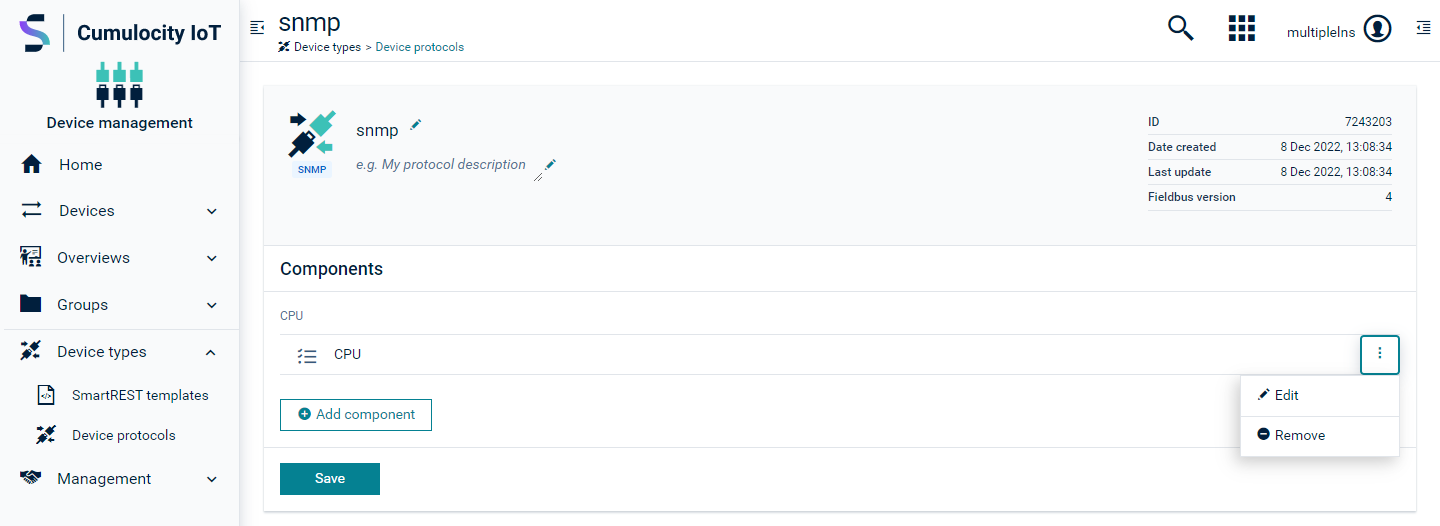
-
Click the menu icon at the right of the component and click Edit to configure the mapping for the component.
-
Under Functionalities, switch the toggle button to turn on the mapping for the required Cumulocity IoT model (Send measurement, Raise alarm and/or Send event). Fill in the values for the respective fields and click Save.
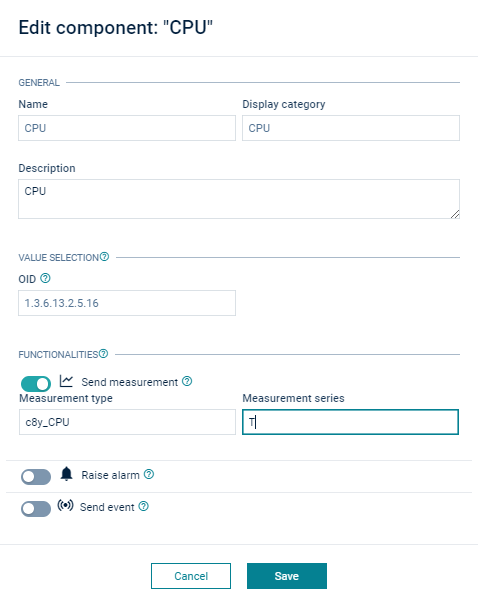
-
Click Save in the Device protocol page to finally save the changes.
To create mapping via REST API
PUT /inventory/managedObjects/{{device.protocol.id}}
Authorization: Basic ...
Content-Type: application/vnd.com.nsn.cumulocity.managedobject+json
{
   "id":"18849",
   "name":"snmp-device-protocol",
   "owner":"snmp-test",
   "description":"snmp-device-protocol",
   "fieldbusType":"snmp",
   "type":"c8y_ModbusDeviceType",
   "fieldbusVersion":4,
   "c8y_Coils": [],
   "c8y_Global": {},
   "c8y_IsDeviceType": {},
   "c8y_Registers": [
	{
		"id": "22555518094562443"
		"name": "CPU",
		"number": null,
		"multiplier": 1,
		"divisor": 1,
		"offset": 0,
		"decimalPlaces": 0,
		"startBit": 0,
		"noBits": 16,
		"unit": "",
		"signed": false,
		"input": false,
		"category": "cpu",
		"description": "CPU",
		"oid": "1.3.6.1.2.1.34.4.0.2",
		"measurementMapping": {
			"type": "c8y_CPU",
			"series": "T",
			"sendMeasurementTemplate": 301
		}
	}
   ]
}
Adding SNMP devices
SNMP-enabled devices can be added manually or through the autodiscovery method.
Autodiscovery
The autodiscovery functionality allows to scan SNMP-enabled devices in the network for a given IP range. Identified devices will automatically be added as a child to the agent device in the platform. This functionality is helpful when you must add a large number of devices to the agent. Instead of adding all devices manually, you can use the autodiscovery functionality. The IP range field accepts multiple IP ranges separated by comma, for example “10.23.52.51-10.23.52.54,192.168.0.1-192.168.0.5”. It also supports the IPv6 IP address format.
There are two supported ways of discovering devices.
- Autodiscovery once - If the number of SNMP-enabled devices is fix and doesn’t change often, autodiscovery can be done once. This avoids network congestion due to repeated autodiscovery of same devices.
- Scheduled autodiscovery - If the number of devices keeps varying (addition and removal of devices happens often), autodiscovery can be scheduled to run for every interval.
Both ways of device discovery can be controlled from the user interface.
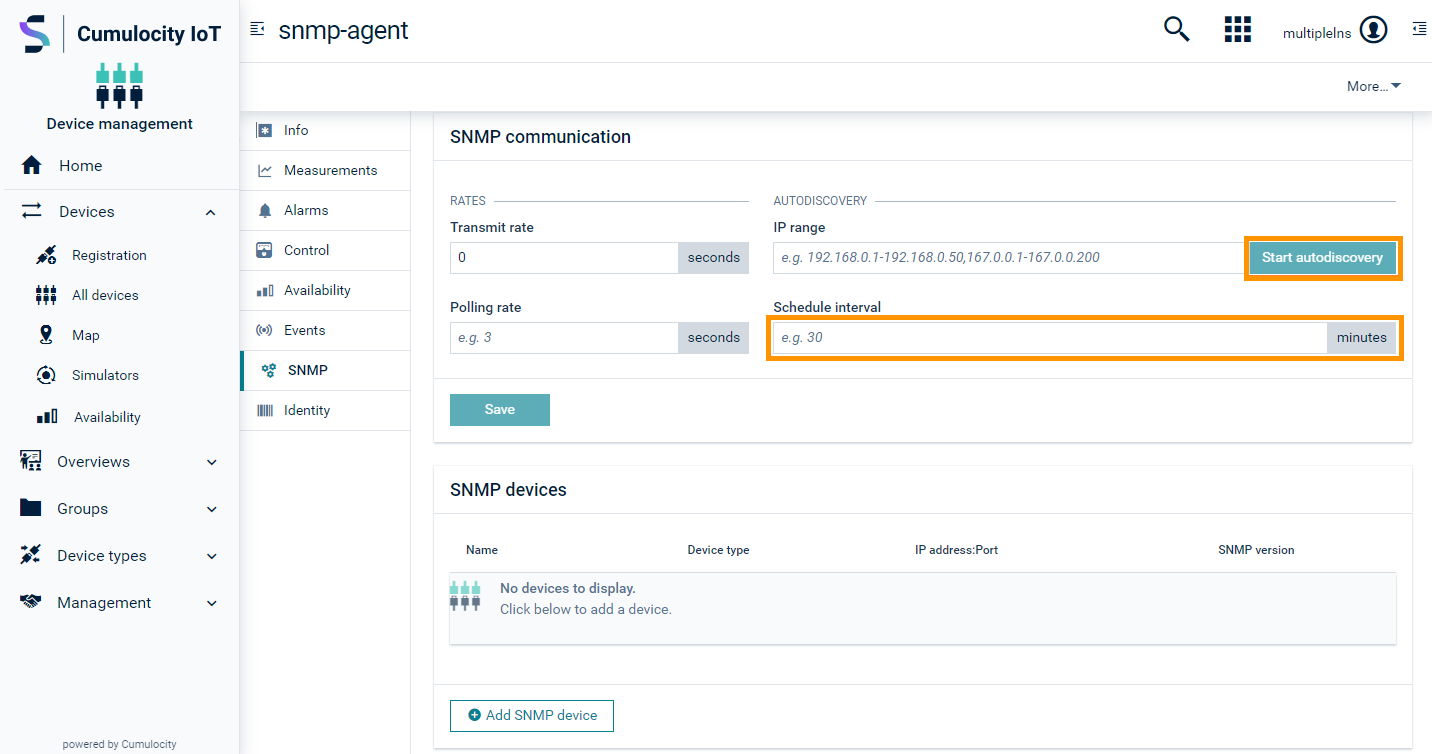
To start autodiscovery from the UI
- In the Device management application, click All devices in the Devices menu in the navigator.
- In the devices list, click on the SNMP agent device and open the SNMP tab of the device.
- Enter the IP range and click Save.
- Once the changes are saved, the Start autodiscovery button gets enabled.
- Click Start autodiscovery. The operation being started can be monitored in the Control tab.
If a new SNMP-enabled device is identified, it will be added to the devices list. Alternatively, added SNMP devices can be seen in the Child devices tab.
If you want to run autodiscovery after every interval, enter the interval in the Scheduled interval field and click Save. When the agent refreshes the configuration data, the scheduled autodiscovery will automatically be started. You don´t need to click Start autodiscovery in case of scheduled autodiscovery.
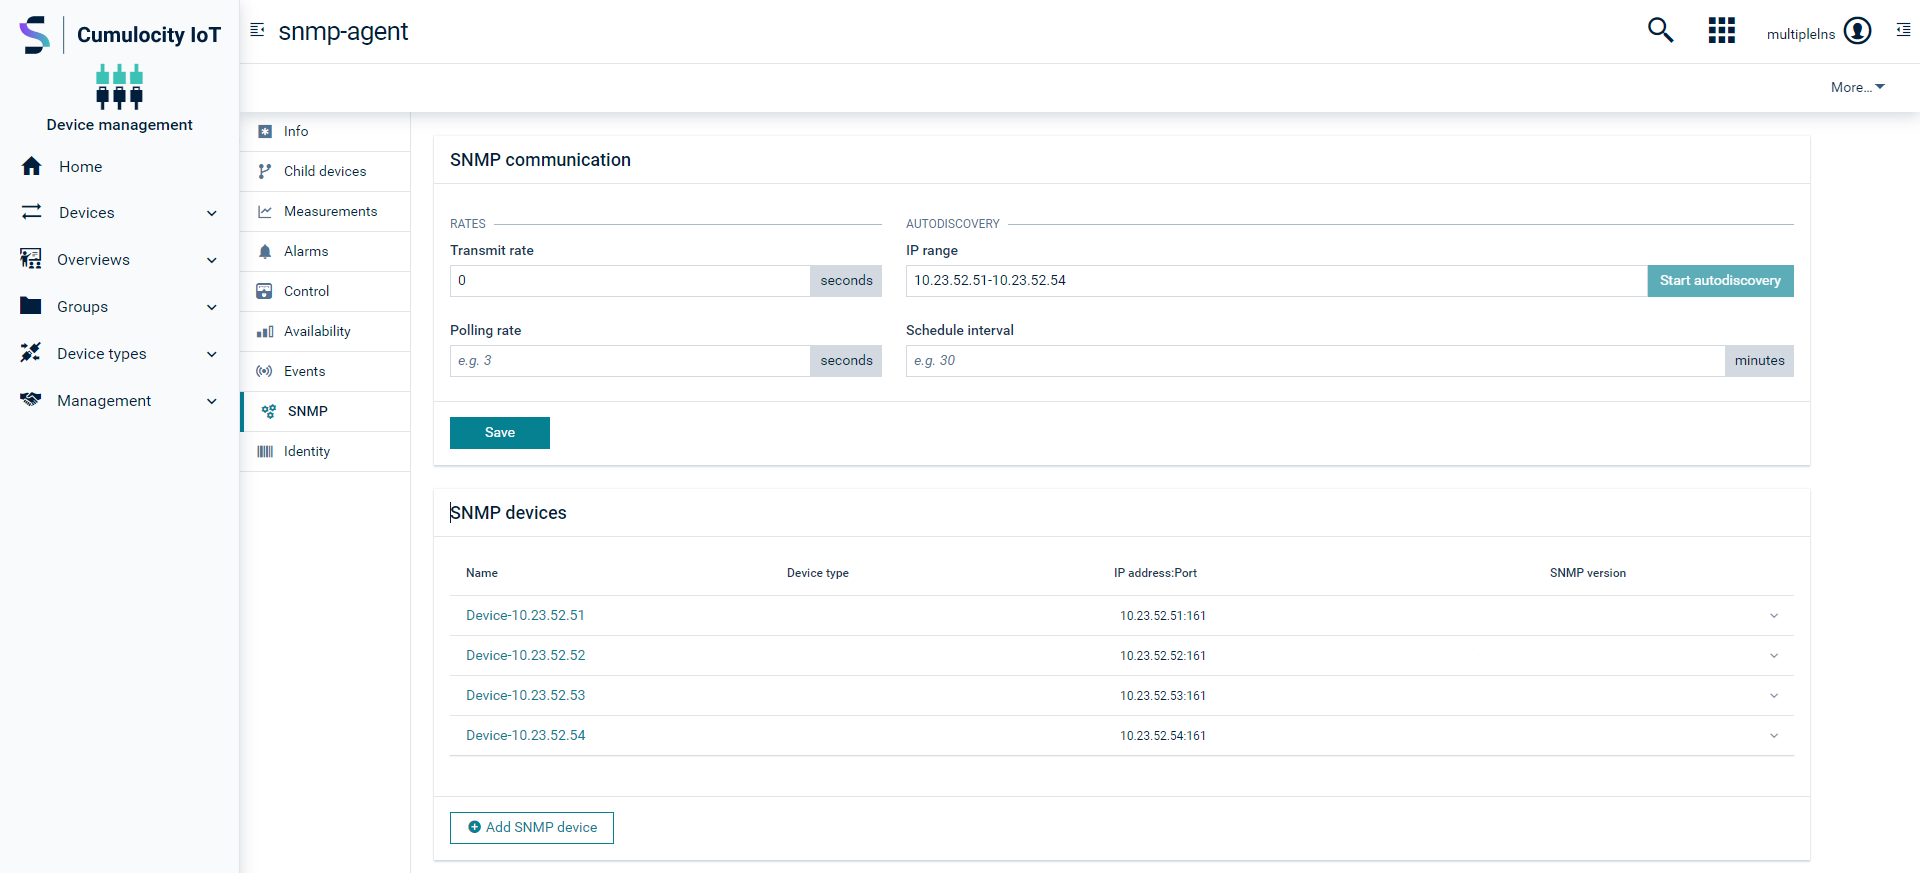
For the newly found SNMP device, the default device name will be mentioned as Device-<device-ip-address>, the IP address will be <device-ip-address> and the default port number is 161. All other details will be empty and must be entered manually.
An alarm will be generated
- if an existing device in the platform is not reachable during the autodiscovery scan.
- if a device is discovered but it is not SNMP-enabled.
To start autodiscovery via REST API
The following REST call will trigger autodiscovery once:
POST /devicecontrol/operations
Authorization: Basic ...
Content-Type: application/json
{
    "deviceId": "{{agent.device.id}}",
    "description": "Autodiscovery request",
    "c8y_SnmpAutoDiscovery": {
        "ipRange": "10.23.52.51-10.23.52.54"
    }
}
The following REST call schedules autodiscovery for the given interval:
PUT /inventory/managedObjects/{{agent.device.id}}
Authorization: Basic ...
Content-Type: application/vnd.com.nsn.cumulocity.managedobject+json
{
    "id": "{{agent.device.id}}",
    "c8y_SNMPGateway": {
        "ipRange": "10.23.52.51-10.23.52.54",
        "autoDiscoveryInterval": 10,     // Scheduling interval in minutes
        "maxFieldbusVersion": 4,
		"transmitRate": 0,
		"pollingRate": 0
    }
}
Adding SNMP devices manually
To add a SNMP device manually from the UI
- In the Device management application, click All devices in the Devices menu in the navigator.
- In the devices list, click on the SNMP agent device and open the SNMP tab of the device.
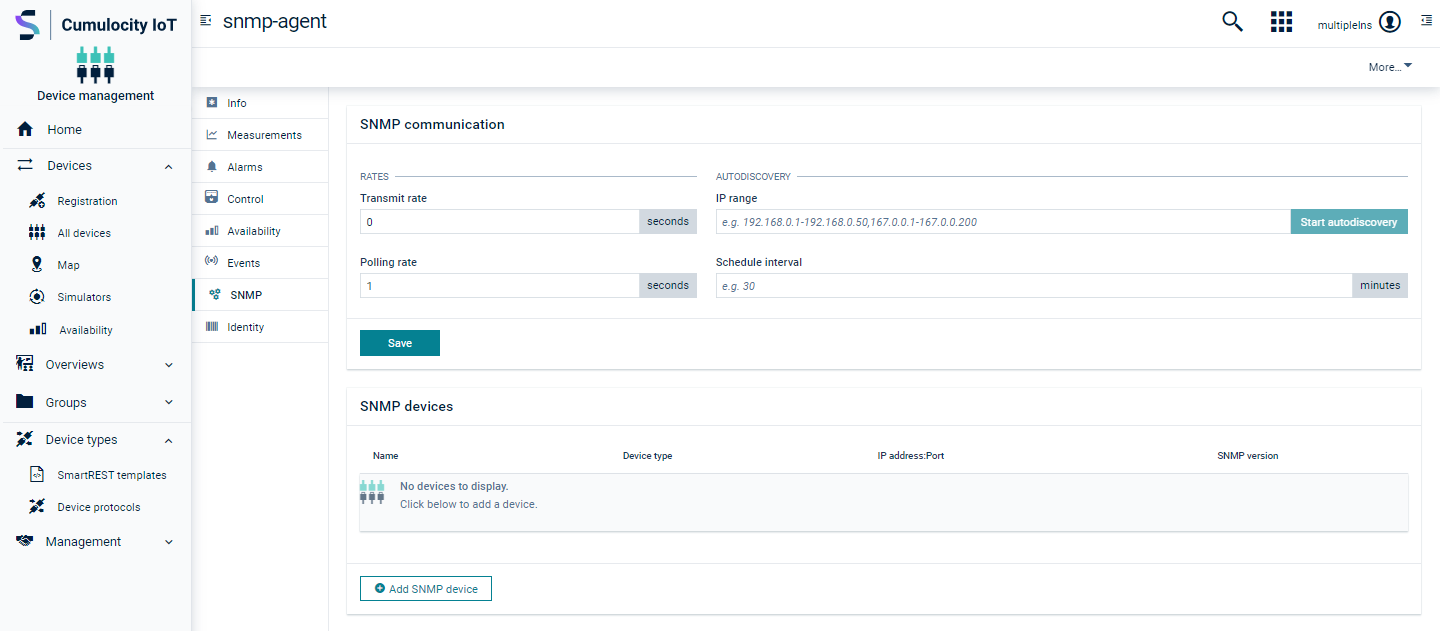
- In the SNMP devices section, click Add SNMP device.
- Provide the SNMP device details:
Field Description Name Provide a meaningful name to identify the device. Device type Select the device protocol relevant for the device being added. The device protocol contains the OID and the mapping of the OID to the Cumulocity IoT's model such as alarm/event/measurement. IP address IP address of the device. Port Port to be used during device polling. SNMP version Select one of the 3 SNMP versions (v1, v2c and v3) supported by the SNMP agent:
For v1 and v2c, the community target is configurable at the agent side (snmp-agent-gateway.properties).
For v3, various additional parameters must be provided under Device authentication details:
- Username: Provide a valid username for the device which will be used to authenticate the TRAPs coming from the device.
- Engine ID: The engine ID must be unique for each device and cannot be edited once saved. The length of the engine ID must have of a minimum of 5 and a maximum of 32 characters.
- Security Level: There are three types of security levels supported by SNMP v3 (NOAUTH_NOPRIV, AUTH_NOPRIV, AUTH_PRIV). Depending on the security level selected, you must provide authentication and/or privacy details. - Click Add to add the device.
The SNMP device will be listed in the devices list and in the Child devices tab.
To add a SNMP device via REST API
Step-1: Create a device in the platform:
For a SNMP device with SNMP v1 or v2c
POST /inventory/managedObjects
Authorization: Basic ...
Content-Type: application/vnd.com.nsn.cumulocity.managedobject+json
{
   "name":"snmp-device-0",
   "type":"snmp-device-protocol",
   "owner":"{{tenant.user}}"
   "c8y_SNMPDevice":{
	  "ipAddress":"192.168.0.1",
	  "port":"161",
	  "version":0,              // 0 for v1, 1 for v2c and 3 for v3
	  "auth":{},
	  "type":"/inventory/managedObjects/{{device.protocol.id}}"
   }
}
After posting the above request you will get a response similar to the one below. Note down the SNMP device ID (snmp.device.id).
{
   "id": "18955",
   "owner": "{{tenant.user}}",
   "name": "snmp-device-0",
   "type": "snmp-device-protocol",
   "c8y_SNMPDevice": {
		"port": "161",
		"auth": {},
		"ipAddress": "127.0.0.1",
		"type": "/inventory/managedObjects/{{device.protocol.id}}",
		"version": 0
	}
   ...
}
For SNMP v3, additional authentication and privacy details must be provided:
POST /inventory/managedObjects
Authorization: Basic ...
Content-Type: application/vnd.com.nsn.cumulocity.managedobject+json
{
	"name": "snmp-device-3",
	"type": "snmp-device-protocol",
	"owner": "{{tenant.user}}",
	"c8y_SNMPDevice": {
		"ipAddress": "192.168.0.1",
		"port": "161",
		"version": 3,
		"auth": {
			"username": "my-user",
			"engineId": "12:23:4B:3F",
			"securityLevel": 3,
			"authProtocol": 2,
			"authPassword": "***",
			"privProtocol": 1,
			"privPassword": "****",
		},
		"type": "/inventory/managedObjects/{{device.protocol.id}}"
	}
}
Security level and protocols can have the following values:
securityLevel
"securityLevel": 1 //NOAUTH_NOPRIV
"securityLevel": 2 //AUTH_NOPRIV
"securityLevel": 3 //AUTH_PRIV
authProtocol
"authProtocol": 1 // MD5
"authProtocol": 2 // SHA
privProtocol
"privProtocol": 1 // DES
"privProtocol": 2 // AES128
"privProtocol": 3 // AES192
"privProtocol": 4 // AES256
Step-2: Add the SNMP device as a child device under the agent:
POST /inventory/managedObjects/{{agent.device.id}}/childDevices
Authorization: Basic ...
Content-Type: application/vnd.com.nsn.cumulocity.managedobjectreference+json
{
	"managedObject": {
		"id": "{{snmp.device.id}}"
	}
}
To update the SNMP device details, use the following REST API:
PUT /inventory/managedObjects/{{snmp.device.id}}
Authorization: Basic ...
Content-Type: application/vnd.com.nsn.cumulocity.managedobject+json
{
    "name": "snmp-device-1",
    "type": "snmp-device-protocol",
	"owner": "{{tenant.user}}",
    "c8y_SNMPDevice": {
        "ipAddress": "192.168.0.1",
        "port": "161",
        "version": 2,
        "auth": {},
        "type": "/inventory/managedObjects/{{device.protocol.id}}"
    }
}
To delete the SNMP device, use the following REST API:
DELETE /inventory/managedObjects/{{snmp.device.id}}
Authorization: Basic ...
TRAP processing
A TRAP is an urgent message sent from the SNMP device to the agent. The SNMP device must send the TRAPs to the agent at the port number defined in snmp.trapListener.port in the agent configuration file (default port number is 6671). For this, the SNMP device needs to be configured with the agent connectivity details.
For SNMP v1 and v2c, the community target must be the same in the agent and in the SNMP device. At the agent side, this is configured in snmp-agent-gateway.properties and this should match with the SNMP device. In case of SNMP v3, the authentication and privacy details must be configured before the SNMP device can send the TRAP to agent.
A TRAP contains a PDU object which is configured with an OID and a value. If this OID is configured with a mapping in the device protocol assigned to the SNMP device in the platform, corresponding Cumulocity IoT object/s such as alarm/event/measurement will be created in the platform based on the configured mapping.
Device polling
The SNMP agent provides the capability to poll for SNMP device data by the OID. In the device protocol that is configured for the SNMP device, if any of the OIDs have measurement mapping enabled, these OIDs will be polled for the data. If an OID does not contain measurement mapping it will be skipped from polling.
To enable polling from the UI
- In the Device management application, click All devices in the Devices menu in the navigator.
- In the devices list, click on the SNMP agent device and open the SNMP tab of the device.
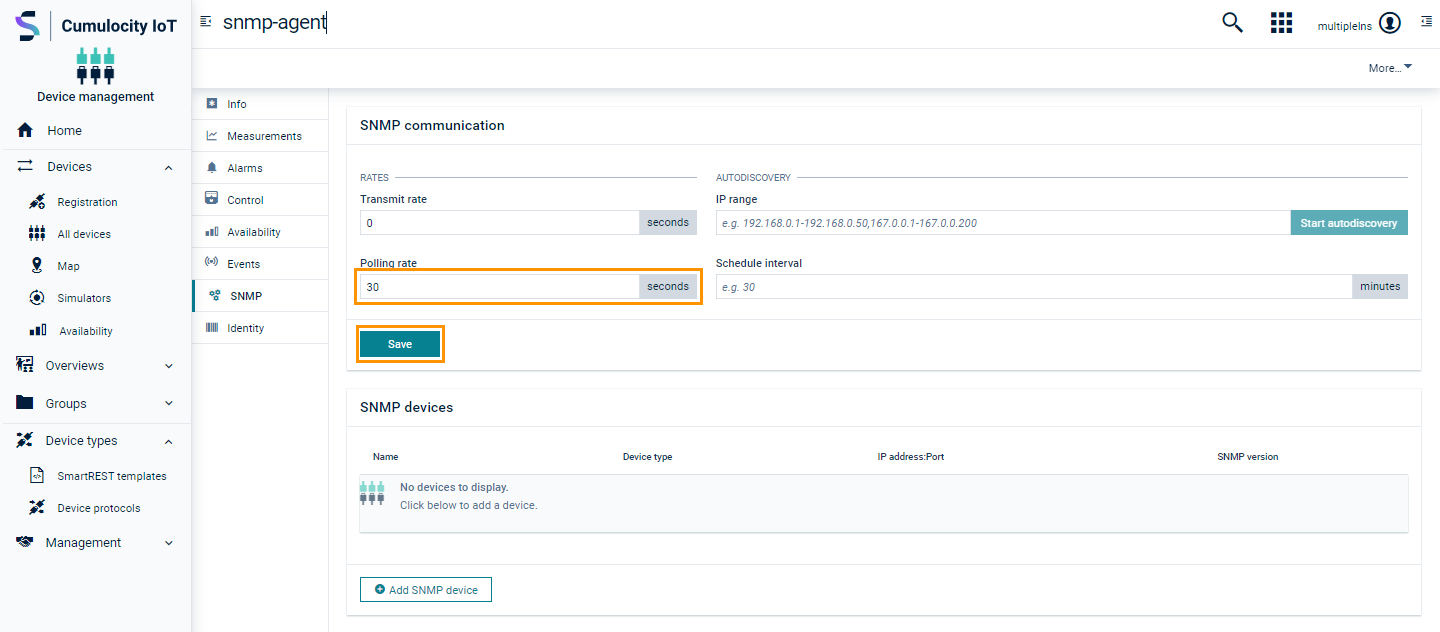
- In the SNMP communication section, provide the polling interval in the field Polling rate. For example: If the value is set to “5”, the agent polls the SNMP devices OID(s) data every 5 seconds. To stop the polling, set the polling interval to 0 or an empty value.
- Click Save.
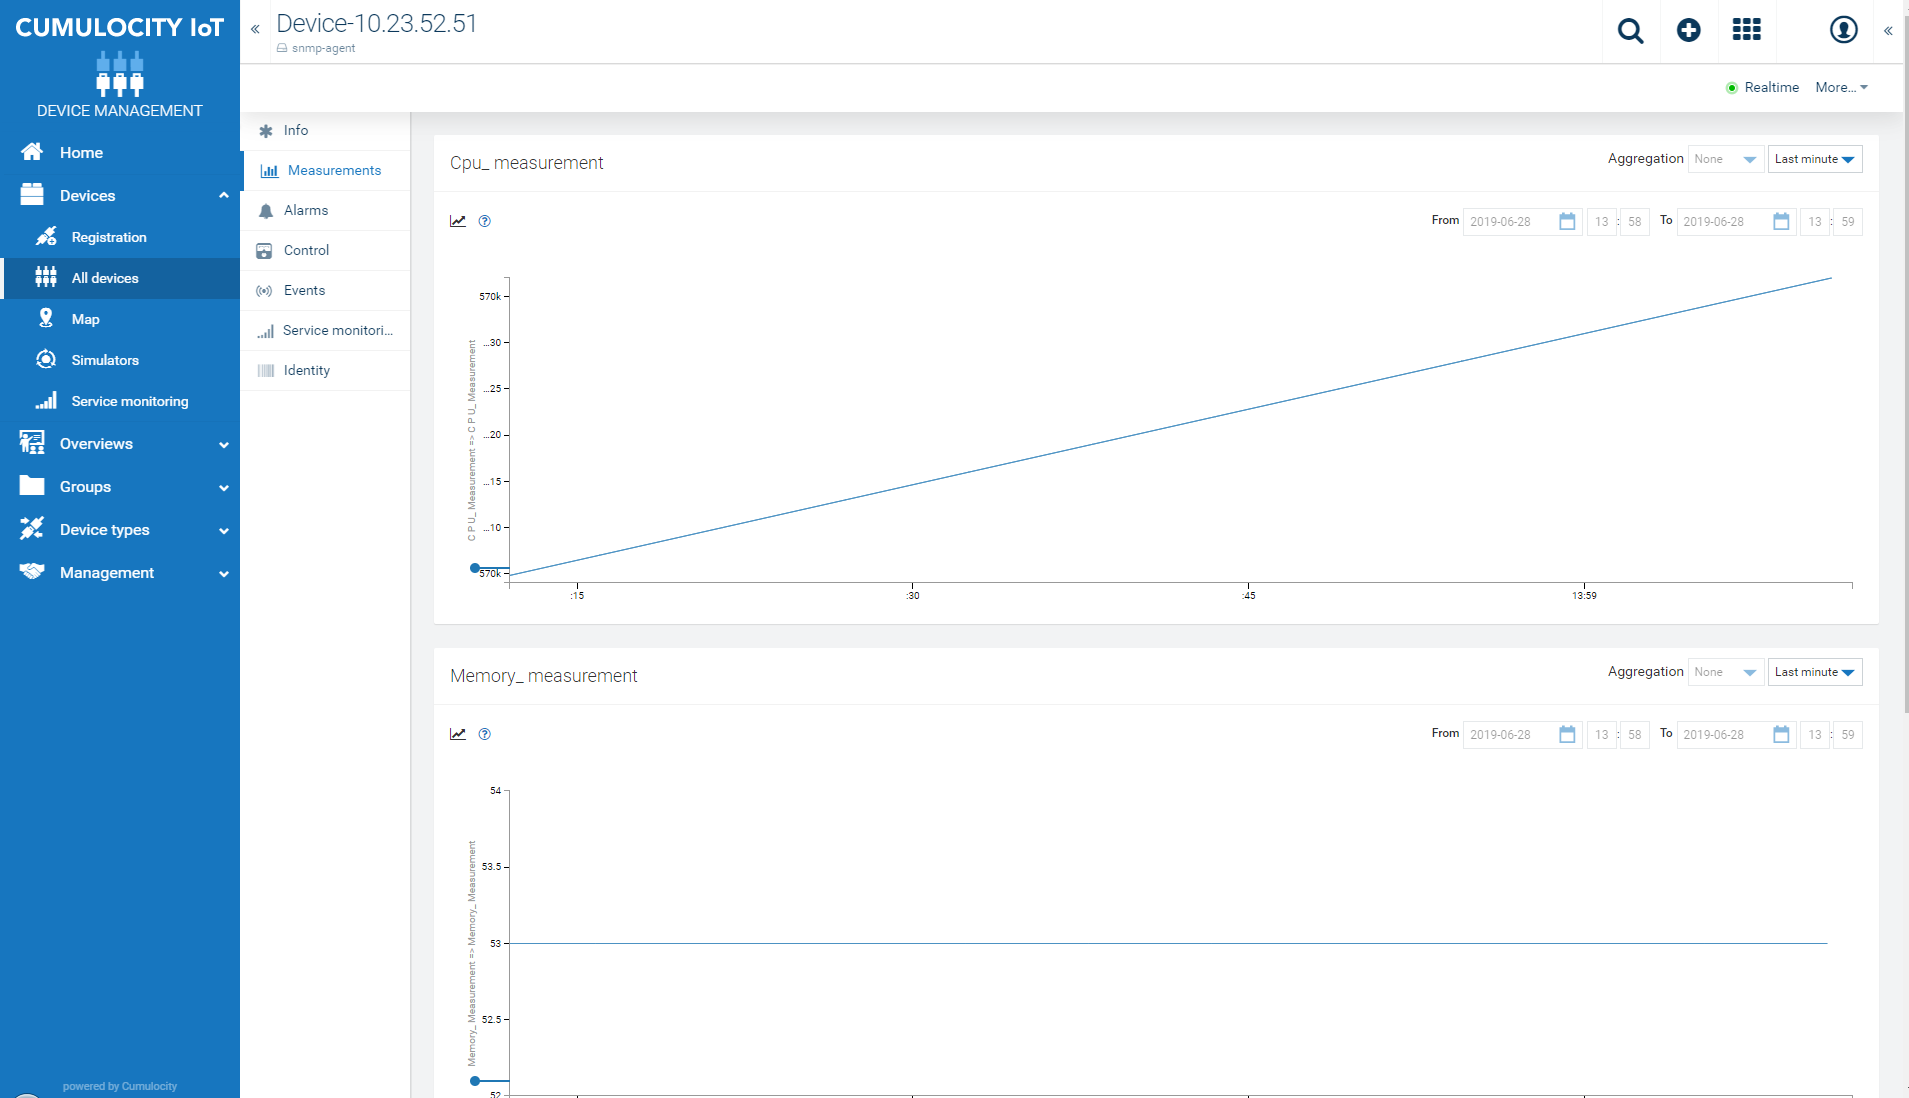
The data received via polling is mapped to the Cumulocity IoT model based on the mapping defined. As the OIDs contain measurement mapping, the measurements can be viewed in the Measurements tab of the SNMP device.
To enable polling via REST API
The following REST call schedules the polling with a given time period:
PUT /inventory/managedObjects/{{agent.device.id}}
Authorization: Basic ...
Content-Type: application/vnd.com.nsn.cumulocity.managedobject+json
{
    "id": "{{agent.device.id}}",
    "c8y_SNMPGateway": {
        "maxFieldbusVersion": 4,
        "ipRange": "",
        "autoDiscoveryInterval": null,
		"pollingRate": 5,    // Polling rate in seconds
        "transmitRate": 10,
    }
}
Transmit rate is the interval at which the data from the agent is sent to the platform. For example: If the transmit rate is 5 seconds, the data will be queued up at the agent side and sent to the platform after every 5 seconds. In case of measurements, if the number of measurements is more than 1, the measurements will be grouped and sent to the platform in batches. In case of a large number of measurements in the queue, the maximum batch size will limit to 200 measurements in a single request (default is 200, but configurable in snmp-agent-gateway.properties). If the transmit rate is set to zero, the data will be sent to the platform as and when they are created.
Uninstallation
To uninstall the agent completely, follow these steps:
-
Make sure that the load to the SNMP agent is zero. This can be done by gracefully disconnecting all SNMP devices from the SNMP agent or redirect the traffic to a different endpoint.
-
If there are any messages to be processed, wait for it to complete. If you do not care about the pending messages to be processed, continue.
-
Stop the agent process:
systemctl stop snmp-agent-gateway -
Take a backup of the following folders (if required):
$HOME/.snmp /etc/snmp-agent-gateway -
Uninstall the SNMP agent RPM package:
rpm -e snmp-agent-gateway -
Delete the following folders:
 $HOME/.snmp
 /etc/snmp-agent-gateway
 /usr/lib/snmp-agent-gateway
 /var/log/snmp-agent-gateway
Troubleshooting
If there are any issues while starting the service
Check the status of the service:
systemctl status snmp-agent.service
If there are any issues during the execution
The agent has extensive logging to inform the user about the situation and in many cases it will also provide the action that the user can take in case of an error situation. All information is logged into a file and the log file is located at: $HOME/.snmp/log/snmp-agent-gateway-server.log.
How can I find the old logs?
The latest log can be found in $HOME/.snmp/log/snmp-agent-gateway-server.log. However, the agent uses logback and log files are rotated based on a rolling policy. The default rolling policy is FileAndTime based and the max file size is set to 50MB. The old log files are also present in the same directory as the current running log: $HOME/.snmp/log/snmp-agent-gateway-server-%d.%i.log.
How can I change the log configuration of the agent process?
Edit the following startup file and change the “arguments” attribute and add the new log configuration file path. Restart the service for the changes to take effect.
vi /usr/lib/snmp-agent-gateway/start
--logging.config=/etc/snmp-agent-gateway/snmp-agent-gateway-logging.xml
How can I change the memory configuration of the agent Java process?
Edit the following startup file and change the heap memory settings (-Xms128m -Xmx384m) to the desired value. Restart the service for the changes to take effect.
/usr/lib/snmp-agent-gateway/start
How can I change the default agent configurations?
In the installation procedure, many of the agent configurations are defaulted to some value. These default values are set based on testing, common usage assumptions and ease of installation. However, you can change the default value to a value suitable for your environment and usage. To do so, uncomment the property and change the value of the property in $HOME/.snmp/snmp-agent-gateway.properties.
On saving the changes, restart the agent service for the changes to take effect.
Which Cumulocity IoT services does the agent use?
The agent makes use of c8y core APIs (most notably inventory, identity, device control, alarm/measurement/event) of the platform.
What are the ports used by the agent?
Exposed Network Interfaces (listening ports) The table below lists the default values for all inbound listening ports. All ports are configurable in the agent settings configuration file.
| Default Port | Protocol | Remarks | Note |
|---|---|---|---|
| 6671 | UDP/TCP | SNMP TRAP listener port | This is the default port number on which SNMP devices connect and sends TRAP. The value can be changed in the property file. |