Developing applications
Cumulocity IoT is designed to accommodate arbitrary vertical IoT applications in addition to its generic functionality.
This section introduces the basic concepts around applications in Cumulocity IoT.
Cumulocity IoT is designed to accommodate arbitrary vertical IoT applications in addition to its generic functionality.
This section introduces the basic concepts around applications in Cumulocity IoT.
Cumulocity IoT applications can have two forms:
Web applications are HTML5 single page applications, that appear in the Cumulocity IoT application switcher and that are hosted in the Cumulocity IoT platform.
Microservices are Docker containers, hosted by Cumulocity IoT and exposing a REST API.
Applications regardless of their form are identified by a so-called application key. The application key enables Cumulocity IoT to associate a REST request from an application with the particular application. The application key is the unique identifier of the application and should remain unchanged in all versions of that application. See the section on Application management in the Cumulocity IoT OpenAPI Specification.
Super tenants (Management tenants or Enterprise tenants) can subscribe subtenants to Cumulocity IoT applications deployed by them. This provides a basic application marketplace.
A Cumulocity IoT web application can be a
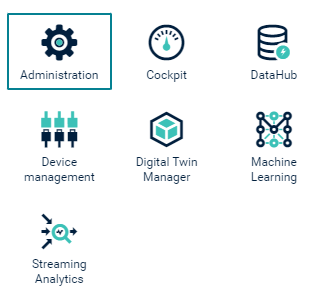
All subscribed web applications of a tenant appear in the application switcher on the top right of theCumulocity IoT UI, so that users can navigate between the applications. They are hosted by Cumulocity IoT and the application will be made available through a URL <tenant>.cumulocity.com/apps/<application>.
The Cumulocity IoT UI itself is built around a framework based on Angular, AngularJS and Bootstrap, the modern HTML5 web application frameworks. It is designed in a modular fashion around a set of plugins so that developers can create their own configurations of the Cumulocity IoT user interfaces. For more information on developing plugins, refer to Web SDK for plugins.
For an application to be available it must be deployed on the Cumulocity IoT platform.
For details on how to deploy an application to Cumulocity IoT, refer to Administration > Managing applications in the User guide.
You can host your own HTML5 and JavaScript web applications through Cumulocity IoT by using the application manager under Ecosystem > Applications > All applications in the Cumulocity IoT Administration application.
For details refer to Administration > Managing applications in the User guide.
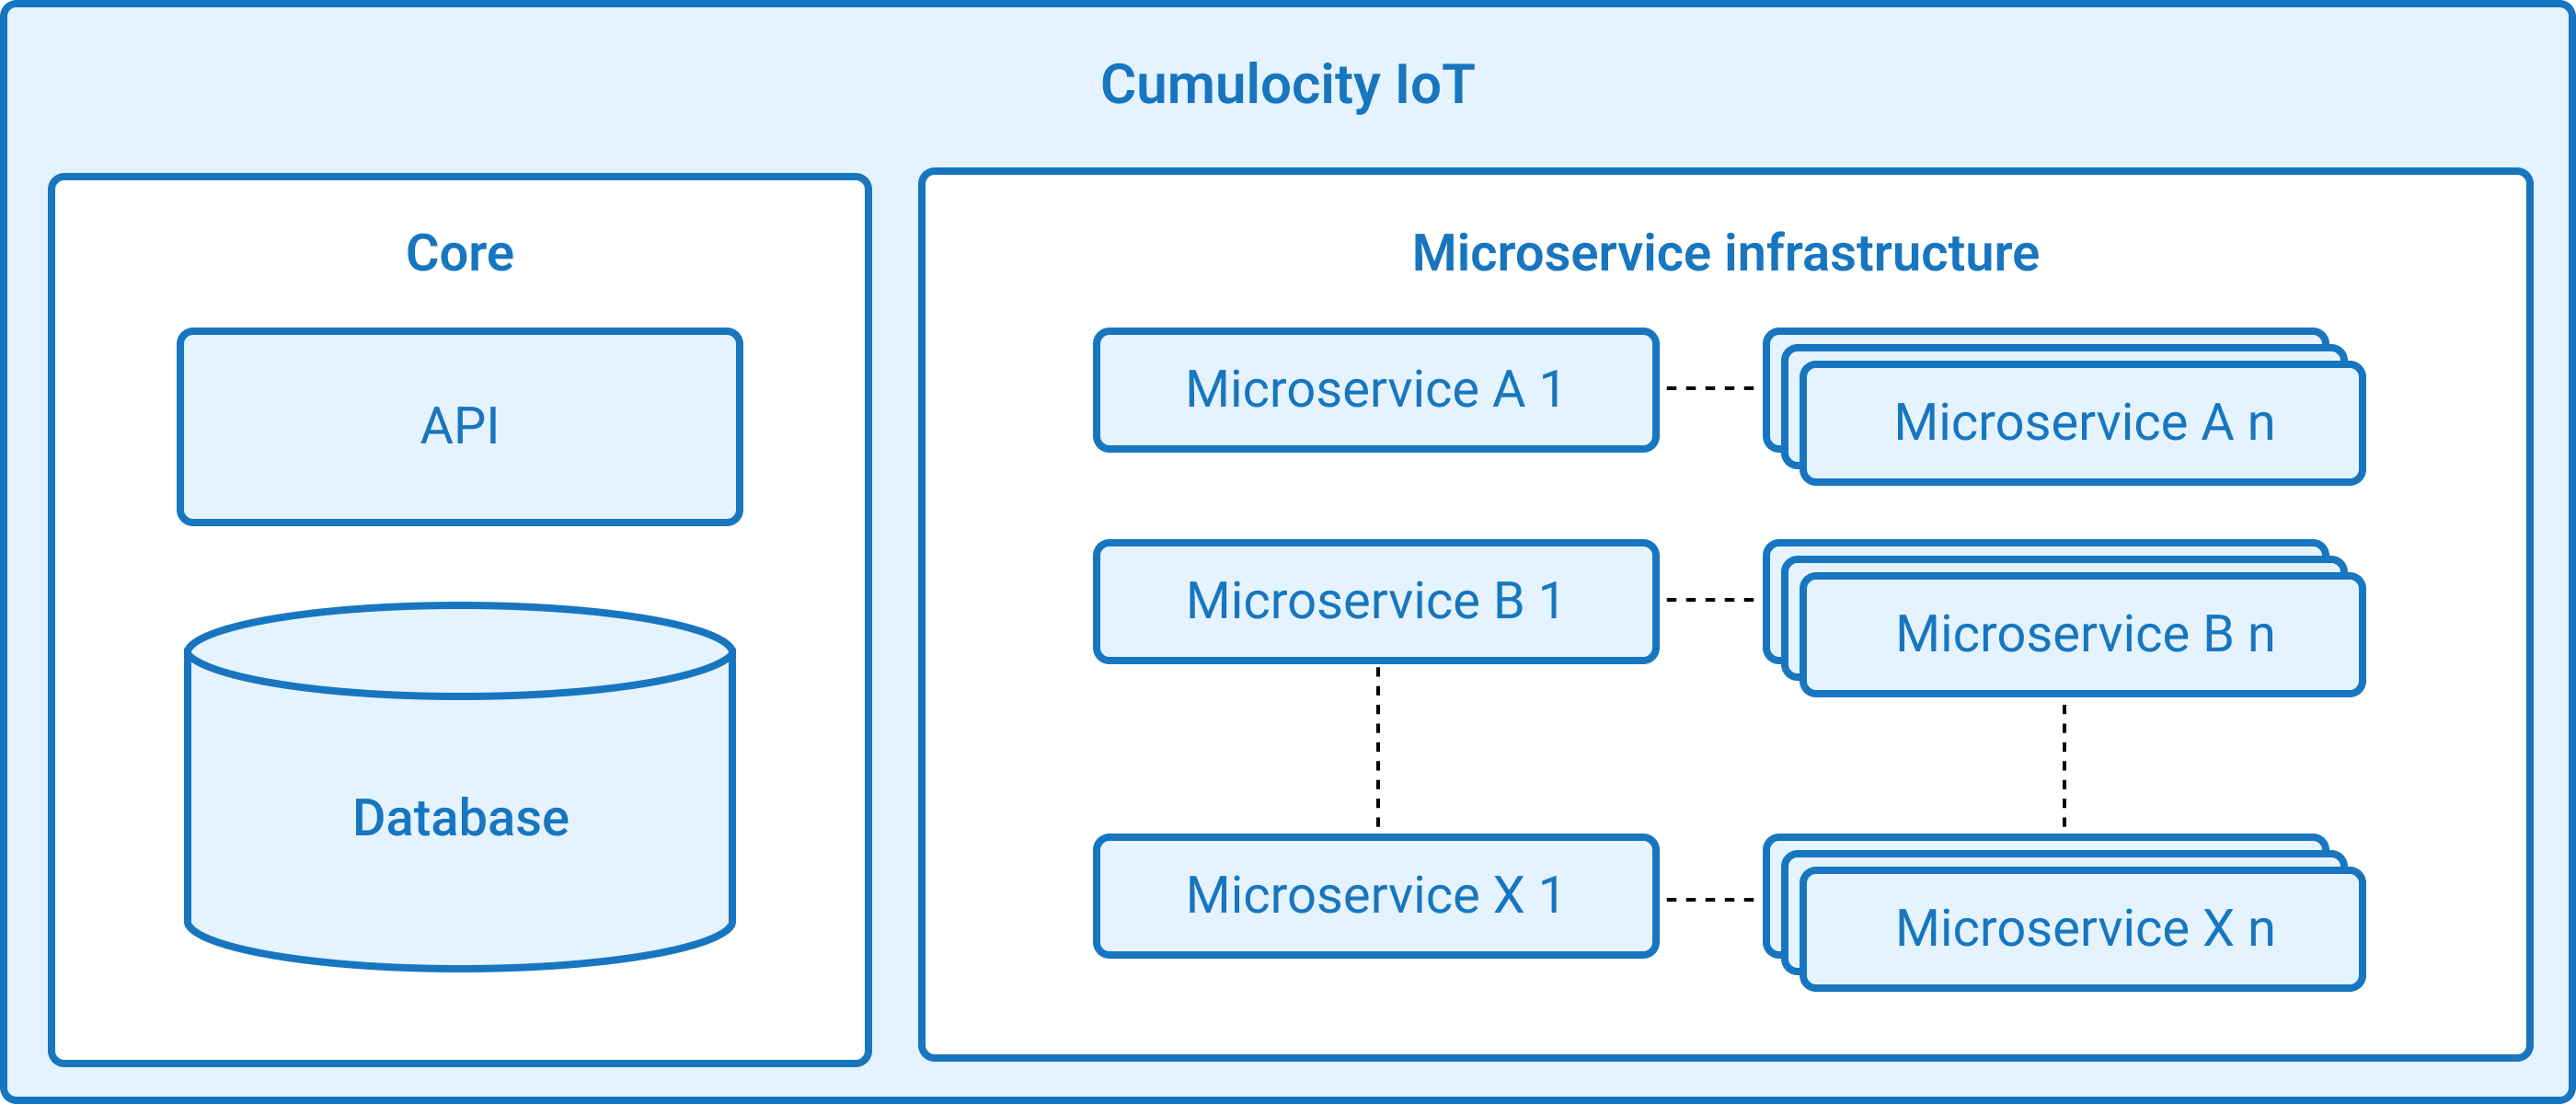
Microservices are server-side applications. Microservices can be used to develop for example the following functionality on top of Cumulocity IoT:
Microservices are deployed as Docker images to Cumulocity IoT, and follow specific conventions. They typically provide one REST API, which is available under /service/<microservice-name>. They typically access Cumulocity IoT using the documented REST API.
When developing a Cumulocity IoT microservice, a developer is not restricted to any programming language. However, a microservice must serve as a HTTP server working on port 80 and must be encapsulated in a Docker image.
The hosting of the microservice is provided by Cumulocity IoT. This way developers can focus on business logic and leave scaling, security, high availability and monitoring to Cumulocity IoT. Microservices can be built on top of the API exposed by the Cumulocity IoT. This way, Cumulocity IoT microservices are a comfortable means to provide new functionality and extend existing ones.
For detailed information on developing and deploying microservices on top of Cumulocity IoT refer to the Microservice SDK guide which provides information on the general concept of microservices in Cumulocity IoT as well as specific guidance and examples for various programming languages. For microservice developers Cumulocity provides a Microservice SDK in the Java programming language.
The application concept of Cumulocity IoT includes a basic application marketplace.
Tenants can be subscribed to applications which have been deployed by their superior tenant (Management tenant or Enterprise tenant).
Granting access to subtenants and subscribing to applications is done in the Administration application, see Enterprise tenant > Managing tenants > Applications in the User guide.
Tenants can also have their own applications which can also be subscribed to subtenants. See Administration > Managing application > Custom applications in the User guide for details on adding custom applications.
A tenant can have multiple available applications but to use an application’s functionality a subscription to the application must be established for the tenant. As an example, when a custom decoder microservice is available in the tenant’s marketplace, it is not enabled to be used until the tenant subscribes for the microservice application.
To see the list of subscribed applications for the tenant, the Cumulocity IoT REST API can be used to get specific tenant information. Those applications will be listed under the applications fragment.
To address the growing number of IoT protocols and certain restrictions in the general single or bulk device registration, an extensible device registration is available with release 10.15.
The general concept is based on extending the device registration using a metadata-based approach. Microservices and agents that implement current device registrations can add custom forms to the device registration wizard by providing simple descriptions of the required registration attributes. The metadata is then used by the UI to render a corresponding device registration wizard.
There are two possible ways to extend the UI:
The extended device registration provides the following advantages:
Extensibility of the device registration wizard: You can easily add own forms to the device registration wizard in the Device management application UI. The values to be entered in the user-specified forms can be freely customized by the device integration developers.
Support for bulk registration using custom CSV: You can customize the bulk registration and hence implement support for CSV files of a different format.
No UI code changes required: You do not need to write UI Angular code. This keeps the amount of integration work as little as possible. The device integration developer only needs to subscribe a microservice that provides an own wizard, and the wizard shows up automatically.
As a first step to extend the device registration flow you must define extensions in the application representation.
extensions fragment can be placed either as root level or inside the manifest fragment of the application representation.There are two types of extensions:
extensibleDeviceRegistration, for example:"extensions": [
{
"name": "<extension name>",
"description": "<description>",
"type": "extensibleDeviceRegistration"
},
...
]
extensibleBulkDeviceRegistration, for example:"extensions": [
{
"name": "<extension name>",
"description": "<description>",
"type": "extensibleBulkDeviceRegistration"
},
...
]
After enabling the extensibleDeviceRegistration extension type, the Devices > Register device menu in the Device management application is extended with an entry corresponding to the extension name property.
From now on, everything will be rendered based on data provided via the custom microservice. The added menu entry opens a window which fetches the form definition using the following endpoint:
GET /service/<contextPath>/deviceRegistration/metadata&lang=<user-language>
Make use of the lang query parameter in your microservice to respond with the already translated JSON Schema metadata. See also Limitations.
The UI automatically takes the contextPath for the GET request from the application definition of the microservice:
{
  "contextPath": "<relative path>",
  "availability": "MARKET",
  "type": "MICROSERVICE",
  "name": "<agent name>",
  ...
}
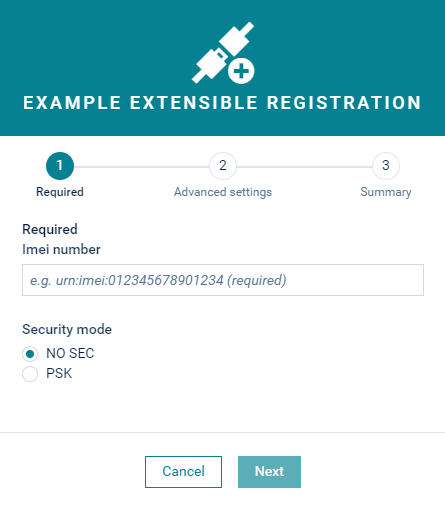
Example metadata definition:
{
    "c8y_DeviceRegistration": {
      "title": "Example extensible registration",
      "description": "The required and optional properties to register and setup devices",
        "pages": [
            {
                "$schema": "https://json-schema.org/draft/2020-12/schema",
                "type": "object",
                "title": "Mandatory settings",
                "properties": {
                    "security": {
                      "default": "NO_SEC",
                      "type": "string",
                      "title": "Security mode",
                      "enum": [
                        "NO_SEC",
                        "SEC"
                      ]
                    },
                    "imei": {
                        "examples": [
                            "012345678901234"
                        ],
                        "type": "string",
                        "title": "Imei number"
                    }
                },
                "required": [
                    "imei",
                    "security"
                ]
            },
            {...}
        ]
    }
}
The important part is the pages array which contains steps of the wizard that the modal is going to render accordingly to the JSON Schema definition: https://json-schema.org/.
As a result the following wizard will be displayed:
In the final step all data collected via the wizard will be sent back to the microservice using the following REST endpoint:
POST /service/<contextPath>/deviceRegistration
{
  "imei": "012345678901234",
  "security": "NO_SEC",
  ...
}
The form is able to send anything defined via JSON Schema to the microservice. The Microservice provides the form definition and is responsible for the proper handling of the submitted data.
The device integration microservices must implement the following REST endpoints:
GET /service/<contextPath>/deviceRegistration/metadata?lang=<user-language>
Accept: application/json
Returns the metadata in the vocabulary of the JSON Schema.
POST /service/<contextPath>/deviceRegistration
Content-type: application/json
Creates a single device based on the collected data. Sends application/json with key-value pairs.
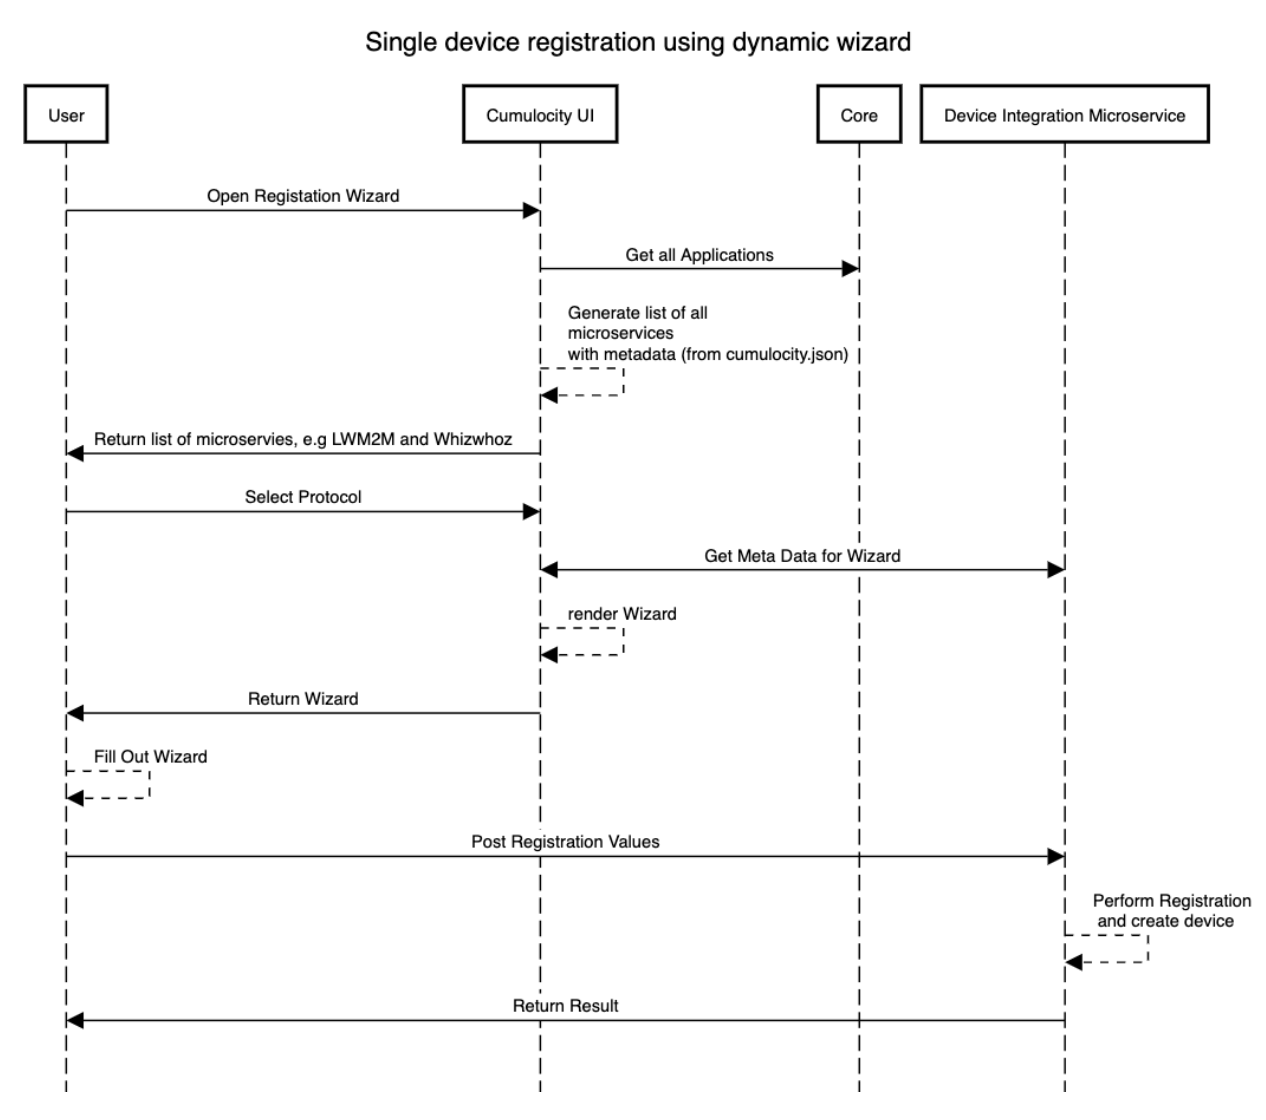
The following diagram visualizes the single device registration flow:
Many device integrations require the registration of many devices at the same time. Currently, all protocols have to rely on the bulk registration mechanism of the platform, which often either requires too many fields or requires custom fields to be added. The latter ones can however so far not be validated, as the core directly creates devices – and microservices and agents have no control over the properties being written to the managed objects.
After enabling the extensibleBulkDeviceRegistration extension type, the Device management > Devices > Register device Bulk device registration modal is displayed with an extended wizard entry corresponding to the extension name property.
Additionally, the microservice provides the title of the wizard step and example bulk file(s):
{
  "c8y_DeviceRegistration": {
    "title": "<title>",
    "description": "<description>",
    "bulk": {
      "title": "<bulk form title>",
      "exampleFileUrls": [{
        "title": "<example title>",
        "description": "<example description>",
        "url": "<publicly-reachable-URL>"
      }]
    }
  }
}
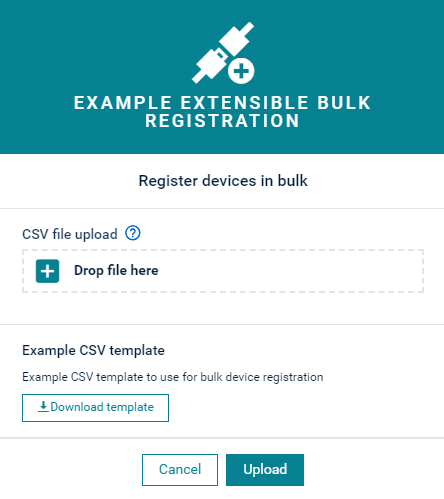
As a result the following wizard will be displayed:
The device integration microservices must implement the following REST endpoints:
GET /service/<contextPath>/deviceRegistration/metadata?lang=<user-language>
Accept: application/json
Returns the metadata in the vocabulary of the JSON Schema.
POST /service/<contextPath>/deviceRegistration/bulk`
Content-Type: multipart/form-data; boundary=boundary

--boundary
Content-Disposition: form-data; name="file"; filename="<input csv file>"
Content-Type: text/csv

--boundary--
Sends multipart form-data of the csv file type.
The following diagram visualizes the bulk device registration flow:
