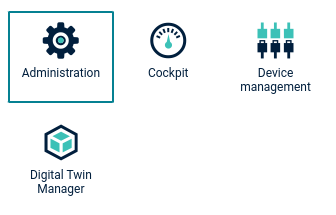
 ### To view applications {#to-view-applications}
Click **Applications** in the **Ecosystem** menu in the navigator to display a list or grid of all applications in your account.
### To view applications {#to-view-applications}
Click **Applications** in the **Ecosystem** menu in the navigator to display a list or grid of all applications in your account.
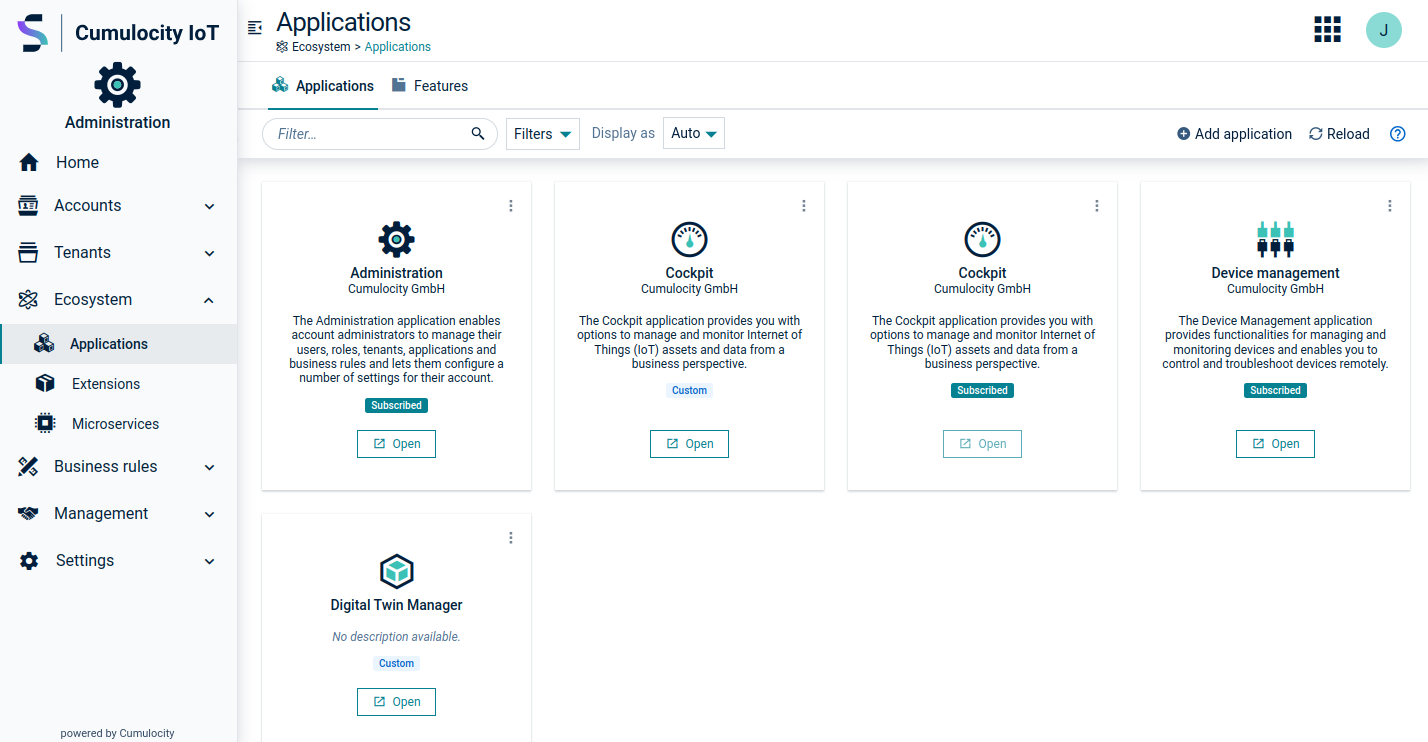 In the **Applications** tab, you can see all applications available in your tenant.
Applications can be filtered by name or by availability.
### To edit an application {#to-edit-an-application}
Click the application or click the menu icon at the right of an entry and then click **Edit**.
In the **Properties** tab, several fields can be modified, depending on the application type (see [Application properties](https://cumulocity.com/docs/standard-tenant/ecosystem/#application-properties)).
> **Important:**
> Never change the system application names (such as "Device Management", "Cockpit"). Otherwise, tenant initialization will fail.
### To delete an application {#to-delete-an-application}
Click the menu icon at the right of an entry and then click **Delete**. You can also delete an application directly from the **Properties** tab in the application details.
If you delete an application that overwrites a subscribed application, the currently subscribed application becomes available to all users. Additionally, the users will then also benefit from future upgrades of the subscribed application.
It is not possible to delete subscribed applications. This can only be done by the owner of the subscribed application.
### Features {#features}
Features are applications which are built-in and not represented by an explicit artifact (like microservices or web applications).
In the **Features** tab, you will find a list of all features subscribed in your tenant. In an Enterprise tenant, the following features are available by default:
In the **Applications** tab, you can see all applications available in your tenant.
Applications can be filtered by name or by availability.
### To edit an application {#to-edit-an-application}
Click the application or click the menu icon at the right of an entry and then click **Edit**.
In the **Properties** tab, several fields can be modified, depending on the application type (see [Application properties](https://cumulocity.com/docs/standard-tenant/ecosystem/#application-properties)).
> **Important:**
> Never change the system application names (such as "Device Management", "Cockpit"). Otherwise, tenant initialization will fail.
### To delete an application {#to-delete-an-application}
Click the menu icon at the right of an entry and then click **Delete**. You can also delete an application directly from the **Properties** tab in the application details.
If you delete an application that overwrites a subscribed application, the currently subscribed application becomes available to all users. Additionally, the users will then also benefit from future upgrades of the subscribed application.
It is not possible to delete subscribed applications. This can only be done by the owner of the subscribed application.
### Features {#features}
Features are applications which are built-in and not represented by an explicit artifact (like microservices or web applications).
In the **Features** tab, you will find a list of all features subscribed in your tenant. In an Enterprise tenant, the following features are available by default:
| Name in the UI | Functionality | Identification in the API | Availability |
|---|---|---|---|
| Feature-branding | Customize the look of your tenants to your own preferences | feature-branding | Enterprise tenant |
| Feature-broker | Share data selectively with other tenants | feature-broker | Enterprise tenant |
| Feature-user-hierarchy | Reflect independent organizational entities in Cumulocity that share the same database | feature-user-hierarchy | Enterprise tenant |
| Name in the UI | Functionality | Identification in the API | Technical type | Availability |
|---|---|---|---|---|
| Administration | Lets account administrators manage users, roles, tenants and applications | administration | Web application | Standard tenant, Enterprise tenant |
| Cockpit | Manage and monitor IoT assets and data from a business perspective | cockpit | Web application | Standard tenant, Enterprise tenant |
| Device Management | Manage and monitor devices, and control and troubleshoot devices remotely | devicemanagement | Web application | Standard tenant, Enterprise tenant |
| Streaming Analytics | Manage and edit Analytics Builder models and EPL apps (if enabled) | Streaming Analytics | Web application | Standard tenant (limited version for Analytics Builder), Enterprise tenant (full version) |
| Digital Twin Manager | Create and manage basic building blocks for Digital twins: Assets, Asset models and Asset properties | digital-twin-manager | Web application | Standard tenant, Enterprise tenant |
| Time Series Migration | The application facilitates the migration of tenant data from legacy measurements to the new time series storage | timeseries-migration | Microservice | Standard tenant, Enterprise tenant |
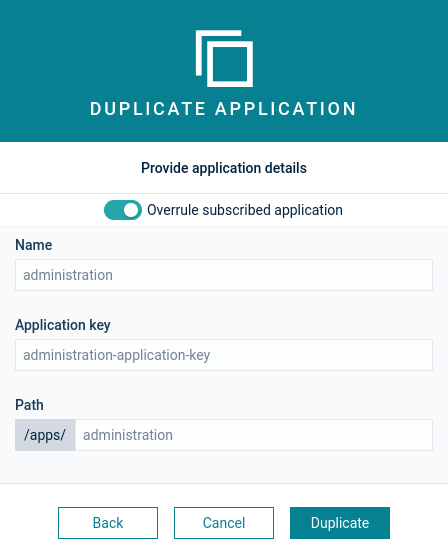 For details on the fields, see also [Application properties](https://cumulocity.com/docs/standard-tenant/ecosystem/#application-properties) below.
## Application properties
To display further details on an application, click it to open its **Properties** tab.
For details on the fields, see also [Application properties](https://cumulocity.com/docs/standard-tenant/ecosystem/#application-properties) below.
## Application properties
To display further details on an application, click it to open its **Properties** tab.
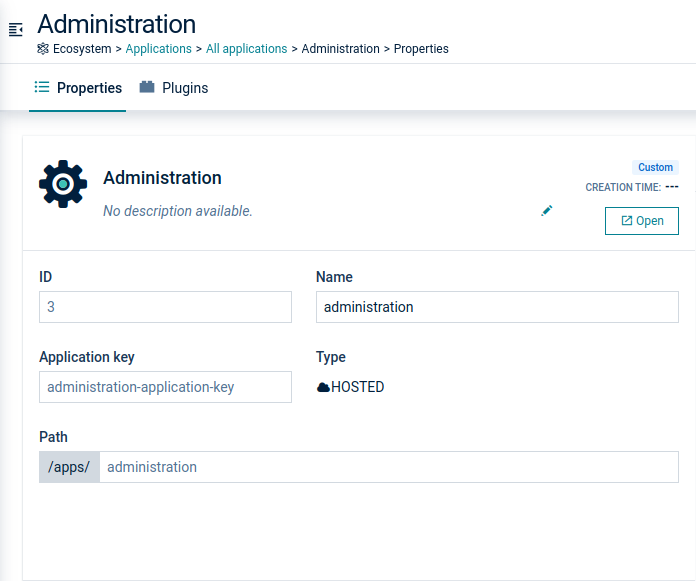 In the **Properties** tab, each application will show the following information, depending on the application type (hosted or external):
| Field | Description | Hosted (web application) | External |
|---|---|---|---|
| ID | Unique ID to identify the application | Automatically provided | Automatically provided |
| Name | Application name; will be shown as title of the application in the top bar and in the application switcher | Automatically created | Specified by the user |
| Application key | Used to identify the application and to make it available for subscription | Automatically created | Specified by the user |
| Type | Application type | Hosted | External |
| Path | Part of the URL invoking the application | Automatically created | Specified by the user; for example, if you use "hello" as application path, the URL of the application will be "/apps/hello" |
| Select icon | Provides a variety of icons from which an icon for the application can be selected. | Automatically created | Specified by the user |
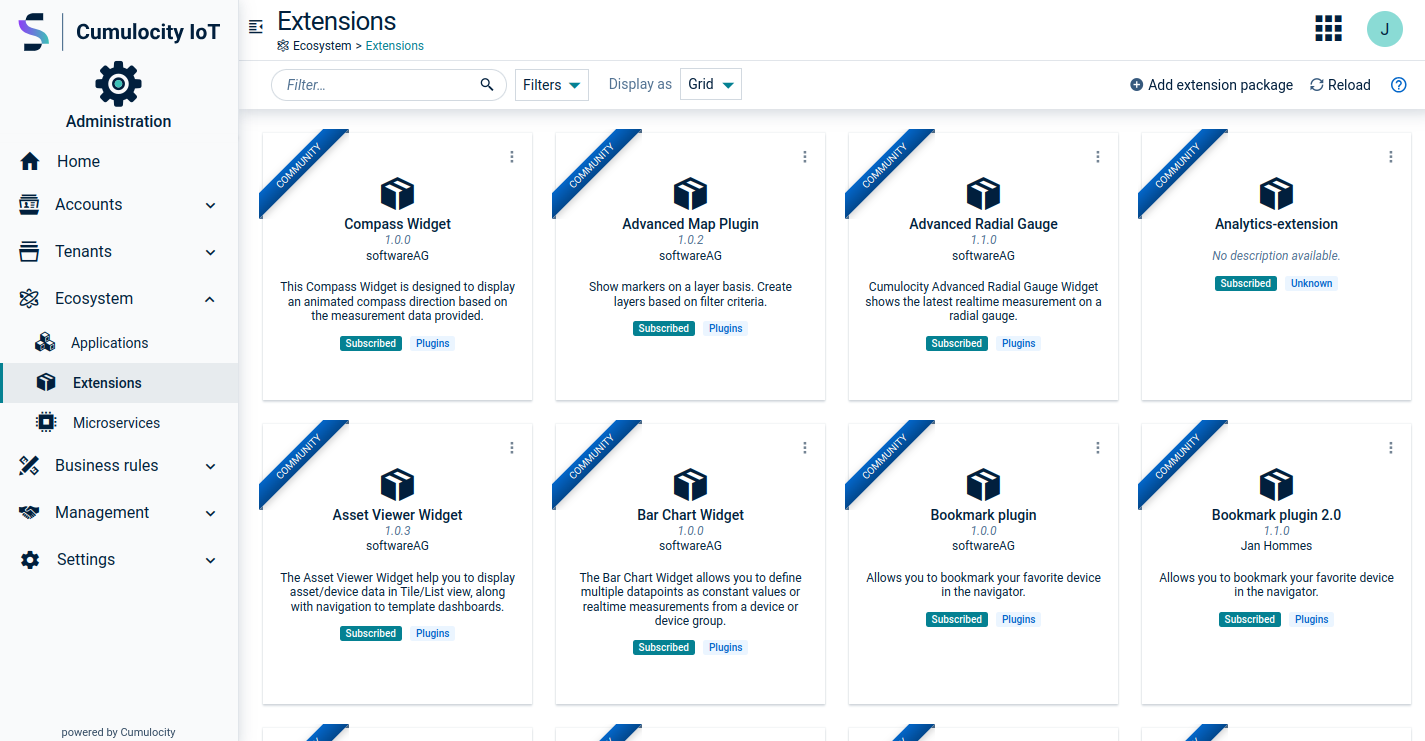 Packages can be filtered by name, creator type, availability and type of content.
To add a new extension package, click **Add extension package** at the top right. Like for applications, the availability of extension packages can either be `subscribed` or `custom`. While `subscribed` extensions are mostly shared from the management tenant, `custom` ones are private to the current tenant. On upload, the availability of the extension can be selected:
- PRIVATE: This extension package is only available on the current tenant.
- MARKET: Allows to create a subscription model for the extension. Only the current tenant and tenants to which the extension is subscribed can use the extension.
- SHARED: Every subtenant and the current tenant can install the extension.
In general, you provide an extension as SHARED to make it available across the tenant hierarchy. However, it is important to "scope" such applications, that is, prefix the application name, context path, and key with a company shortcode. For example, Cumulocity packages are always prefixed with `c8y-` as Cumulocity might automatically deploy an extension, which will fail if you upload your own package to the management tenant.
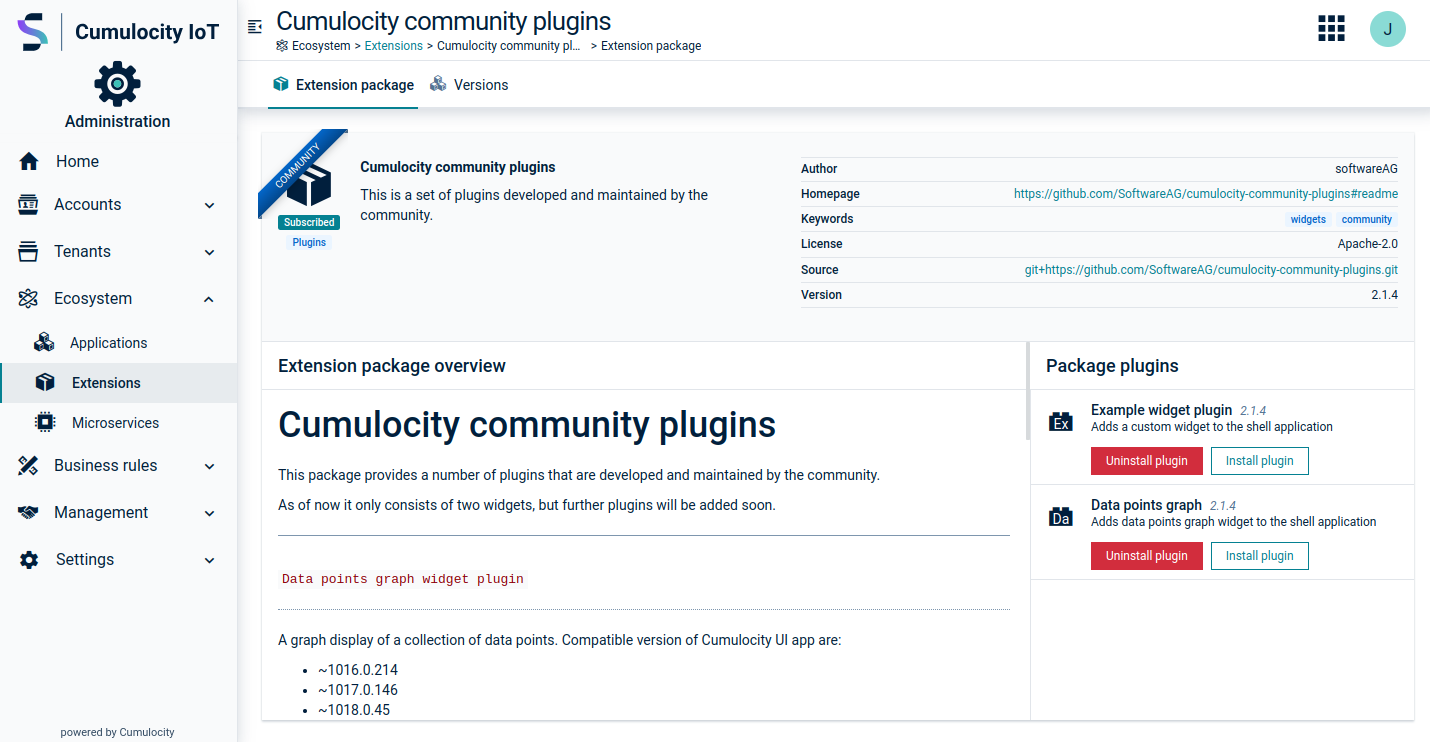
By clicking on a package, you can see the package details such as **Extension package overview** which includes a description and images as well as some meta information which is taken from the *package.json*.
Additionally, it is possible to view all available plugins within the selected package at the right. To install a plugin click **Install plugin** and select the desired application.
Packages can be filtered by name, creator type, availability and type of content.
To add a new extension package, click **Add extension package** at the top right. Like for applications, the availability of extension packages can either be `subscribed` or `custom`. While `subscribed` extensions are mostly shared from the management tenant, `custom` ones are private to the current tenant. On upload, the availability of the extension can be selected:
- PRIVATE: This extension package is only available on the current tenant.
- MARKET: Allows to create a subscription model for the extension. Only the current tenant and tenants to which the extension is subscribed can use the extension.
- SHARED: Every subtenant and the current tenant can install the extension.
In general, you provide an extension as SHARED to make it available across the tenant hierarchy. However, it is important to "scope" such applications, that is, prefix the application name, context path, and key with a company shortcode. For example, Cumulocity packages are always prefixed with `c8y-` as Cumulocity might automatically deploy an extension, which will fail if you upload your own package to the management tenant.
By clicking on a package, you can see the package details such as **Extension package overview** which includes a description and images as well as some meta information which is taken from the *package.json*.
Additionally, it is possible to view all available plugins within the selected package at the right. To install a plugin click **Install plugin** and select the desired application.
 In the **Versions** tab, you see all previously uploaded binaries related to the current package. The binaries displayed on this tab can be downloaded via the context menu next to each package version entry.
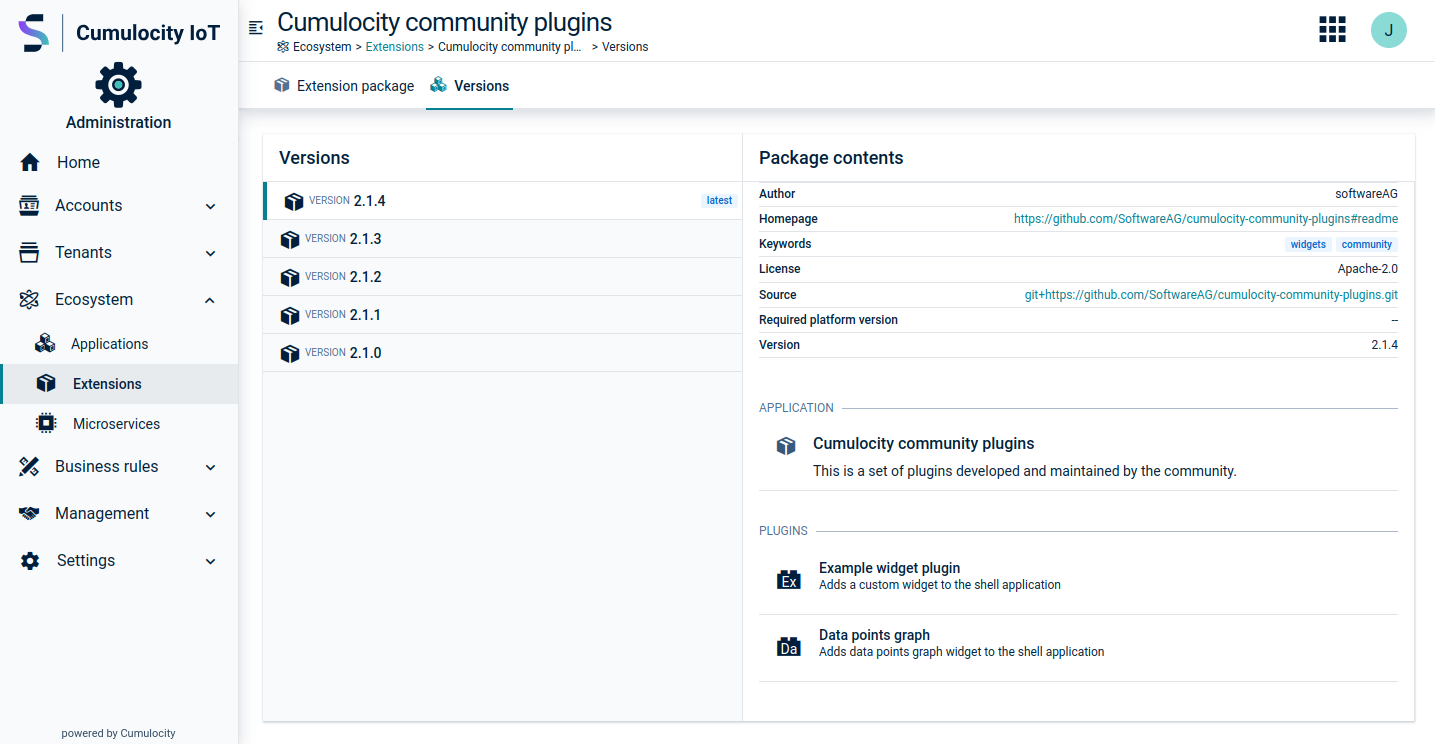 You can select or upload different versions. Versions indicate the state of the package. They can be used to verify whether a certain package is outdated and must be updated. By clicking on a version additional information is provided such as package contents, applications or plugins. Tags can be used to give versions meaningful names. The "latest" tag is used to indicate the default version which will be selected in case no tag is provided. The "latest" tag is set by default to the latest version whenever a version is uploaded without a given tag.
To switch to a different version open the context menu for the desired version and click **Set as latest**. To delete a version click **Delete**.
### Plugins {#plugins}
Switch to the **Plugins** tab of an application to view all plugins installed on an application.
You can select or upload different versions. Versions indicate the state of the package. They can be used to verify whether a certain package is outdated and must be updated. By clicking on a version additional information is provided such as package contents, applications or plugins. Tags can be used to give versions meaningful names. The "latest" tag is used to indicate the default version which will be selected in case no tag is provided. The "latest" tag is set by default to the latest version whenever a version is uploaded without a given tag.
To switch to a different version open the context menu for the desired version and click **Set as latest**. To delete a version click **Delete**.
### Plugins {#plugins}
Switch to the **Plugins** tab of an application to view all plugins installed on an application.
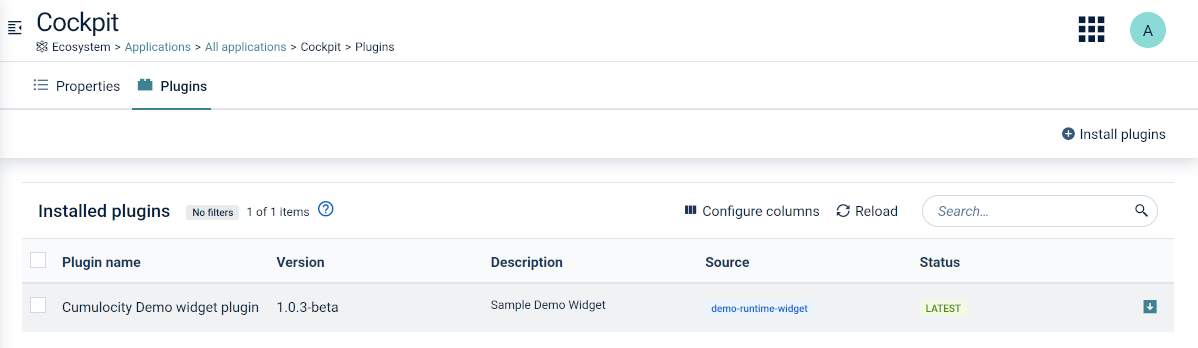 In the **Plugins** tab you can add and remove plugins. Additionally, you can install plugins to an application.
## Uploading archives
For custom applications, multiple file versions can be stored in Cumulocity when they were created by uploading either a ZIP file or a MON file. Each version is called an archive. You can upload different versions at the same time and switch between these versions.
### To upload an archive {#to-upload-an-archive}
1. Open the application properties for the respective application by clicking on it.
2. Click the plus button at the bottom of the **Activity log** section and browse for the archive in your file system or simply drop the archive file.
3. Click **Upload** to upload the archive to your Cumulocity account.
In the **Plugins** tab you can add and remove plugins. Additionally, you can install plugins to an application.
## Uploading archives
For custom applications, multiple file versions can be stored in Cumulocity when they were created by uploading either a ZIP file or a MON file. Each version is called an archive. You can upload different versions at the same time and switch between these versions.
### To upload an archive {#to-upload-an-archive}
1. Open the application properties for the respective application by clicking on it.
2. Click the plus button at the bottom of the **Activity log** section and browse for the archive in your file system or simply drop the archive file.
3. Click **Upload** to upload the archive to your Cumulocity account.
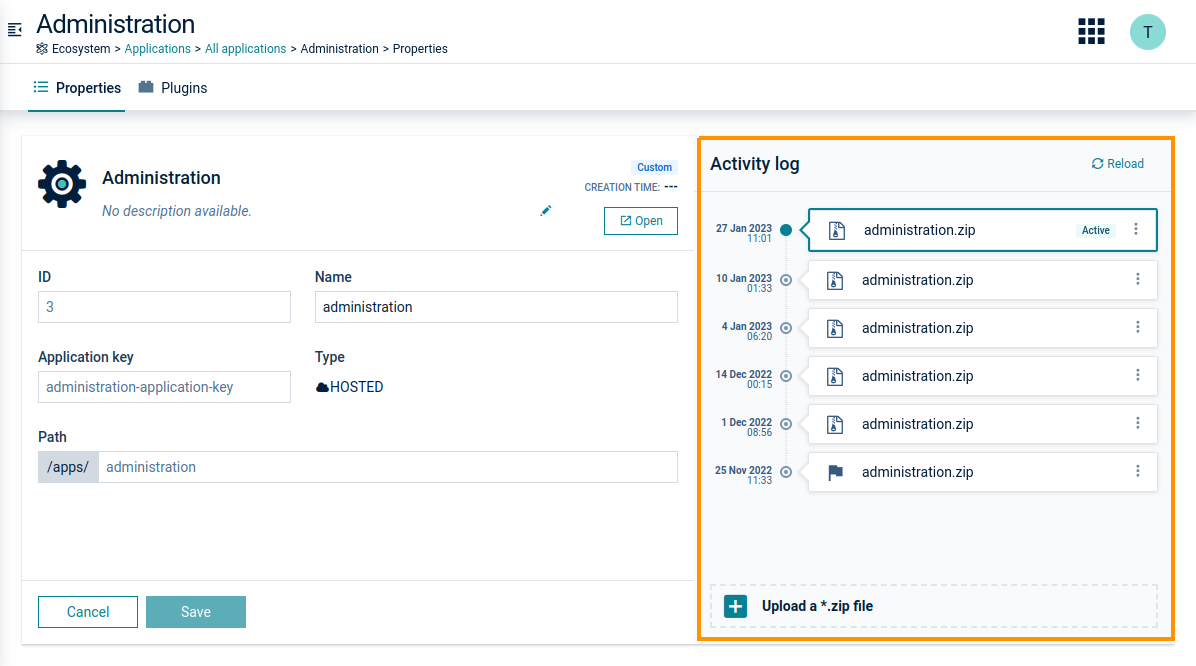 Once uploaded, the recently uploaded version is automatically the active version, that is the version of the application that is currently being served to the users of your account. This version cannot be deleted.
> **Info:**
> The archive functionality is not available for subscribed applications, as only the owner of the application can perform these actions.
### To restore an older application version {#to-restore-an-older-application-version}
Users can restore previous versions of an application from an archive.
1. Open the application properties for the respective application by clicking on it.
2. In the **Activity log** section, open the context menu for the desired version by clicking the menu icon and select **Set as active** to make it the active version.
### To reactivate a single application {#to-reactivate-a-single-application}
If a hosted application is not deployed correctly, users may reactivate it.
1. Open the application properties for the respective application by clicking on it.
3. In the **Activity log** section, open the context menu for the desired version by clicking the menu icon and select **Reactivate archive**.
The selected application will be reactivated by removing the respective files from the application directory and unpacking the web application package again.
## Managing microservices
Click **Microservices** in the **Ecosystem** menu in the navigator to display a list or grid of all microservices subscribed to your account.
Once uploaded, the recently uploaded version is automatically the active version, that is the version of the application that is currently being served to the users of your account. This version cannot be deleted.
> **Info:**
> The archive functionality is not available for subscribed applications, as only the owner of the application can perform these actions.
### To restore an older application version {#to-restore-an-older-application-version}
Users can restore previous versions of an application from an archive.
1. Open the application properties for the respective application by clicking on it.
2. In the **Activity log** section, open the context menu for the desired version by clicking the menu icon and select **Set as active** to make it the active version.
### To reactivate a single application {#to-reactivate-a-single-application}
If a hosted application is not deployed correctly, users may reactivate it.
1. Open the application properties for the respective application by clicking on it.
3. In the **Activity log** section, open the context menu for the desired version by clicking the menu icon and select **Reactivate archive**.
The selected application will be reactivated by removing the respective files from the application directory and unpacking the web application package again.
## Managing microservices
Click **Microservices** in the **Ecosystem** menu in the navigator to display a list or grid of all microservices subscribed to your account.
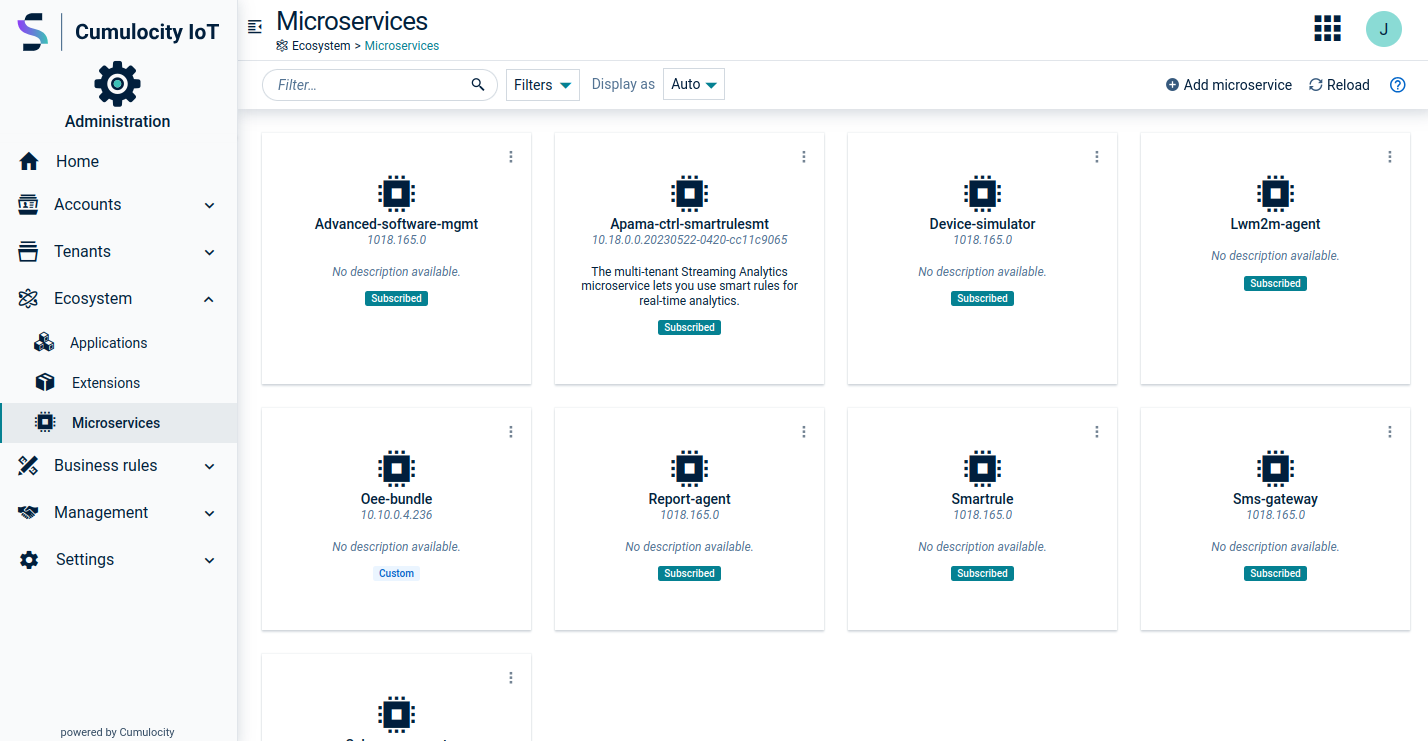 Microservices can be filtered by name and availability.
A microservice is a specific type of application, that is a server-side application used to develop further functionality on top of Cumulocity. As web applications, microservices can either be subscribed to your tenant by the platform or by a service provider, or they can be owned by you as custom applications, see [Custom microservices](https://cumulocity.com/docs/standard-tenant/ecosystem/#custom-microservices).
### Subscribed microservices {#subscribed-microservices}
Cumulocity provides a variety of microservice applications for different purposes. Depending on your installation and/or optional services your tenant will show a selection of the potentially available applications.
Below you find a list of all microservices which are by default subscribed in a Standard tenant and/or Enterprise tenant. In addition, numerous optional microservices might be subscribed to your tenant.
#### Microservices subscribed by default {#microservices-subscribed-by-default}
Microservices can be filtered by name and availability.
A microservice is a specific type of application, that is a server-side application used to develop further functionality on top of Cumulocity. As web applications, microservices can either be subscribed to your tenant by the platform or by a service provider, or they can be owned by you as custom applications, see [Custom microservices](https://cumulocity.com/docs/standard-tenant/ecosystem/#custom-microservices).
### Subscribed microservices {#subscribed-microservices}
Cumulocity provides a variety of microservice applications for different purposes. Depending on your installation and/or optional services your tenant will show a selection of the potentially available applications.
Below you find a list of all microservices which are by default subscribed in a Standard tenant and/or Enterprise tenant. In addition, numerous optional microservices might be subscribed to your tenant.
#### Microservices subscribed by default {#microservices-subscribed-by-default}
| Name in the UI | Functionality | Identification in the API | Availability |
|---|---|---|---|
| Apama-ctrl-* | Streaming Analytics microservices, including runtime for Analytics Builder, EPL apps and smart rules. Capabilities and resources vary depending on the microservice variant used | apama-ctrl-* | Standard tenant, Enterprise tenant |
| Device-simulator | Simulate all aspects of IoT devices | device-simulator | Standard tenant, Enterprise tenant |
| Report agent | Schedule data exports from within the Cockpit application | report agent | Standard tenant, Enterprise tenant |
| Smartrule | Use the smart rules engine and create smart rules to perform actions based on realtime data. Requires a variant of the Apama-ctrl microservice | smartrule | Standard tenant, Enterprise tenant |
| Sslmanagement | Activate your own custom domain name by using an SSL certificate | sslmanagement | Enterprise tenant |
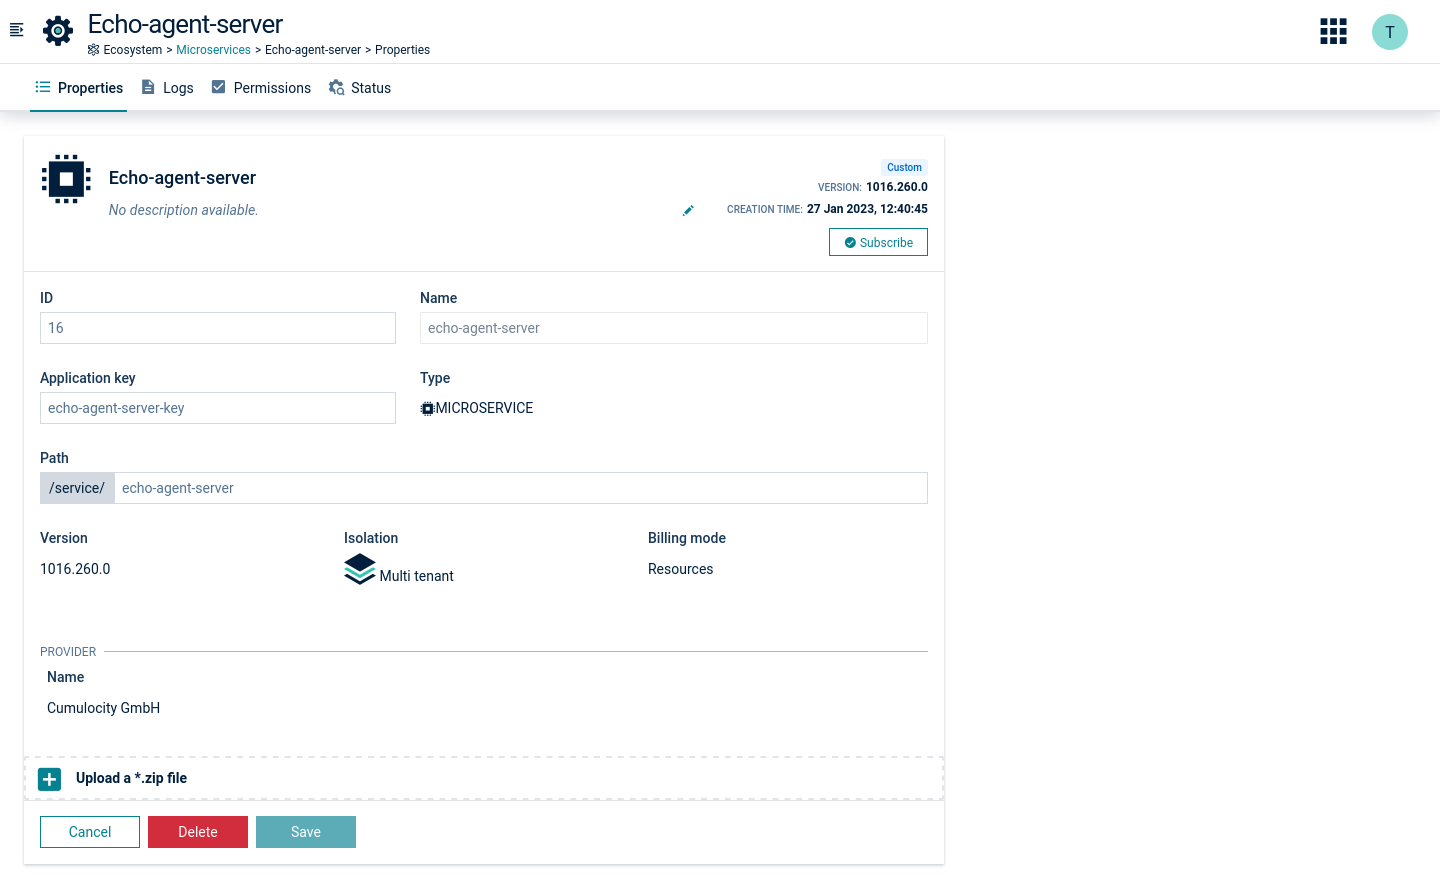 In the **Properties** tab, each microservice will show the following information:
| Field | Description | Comment |
|---|---|---|
| ID | Unique ID to identify the microservice | Automatically provided |
| Name | Application name; will be shown as title of the microservice application in the top bar | Automatically inferred from the ZIP file name (recognized version number is dropped), unless provided in the microservice's manifest file |
| Application key | Used to identify the microservice application and to make it available for subscription | Automatically created, based on the ZIP file name |
| Type | Application type | Microservice |
| Path | Part of the URL invoking the application | Automatically created as /service/<microservice-name> |
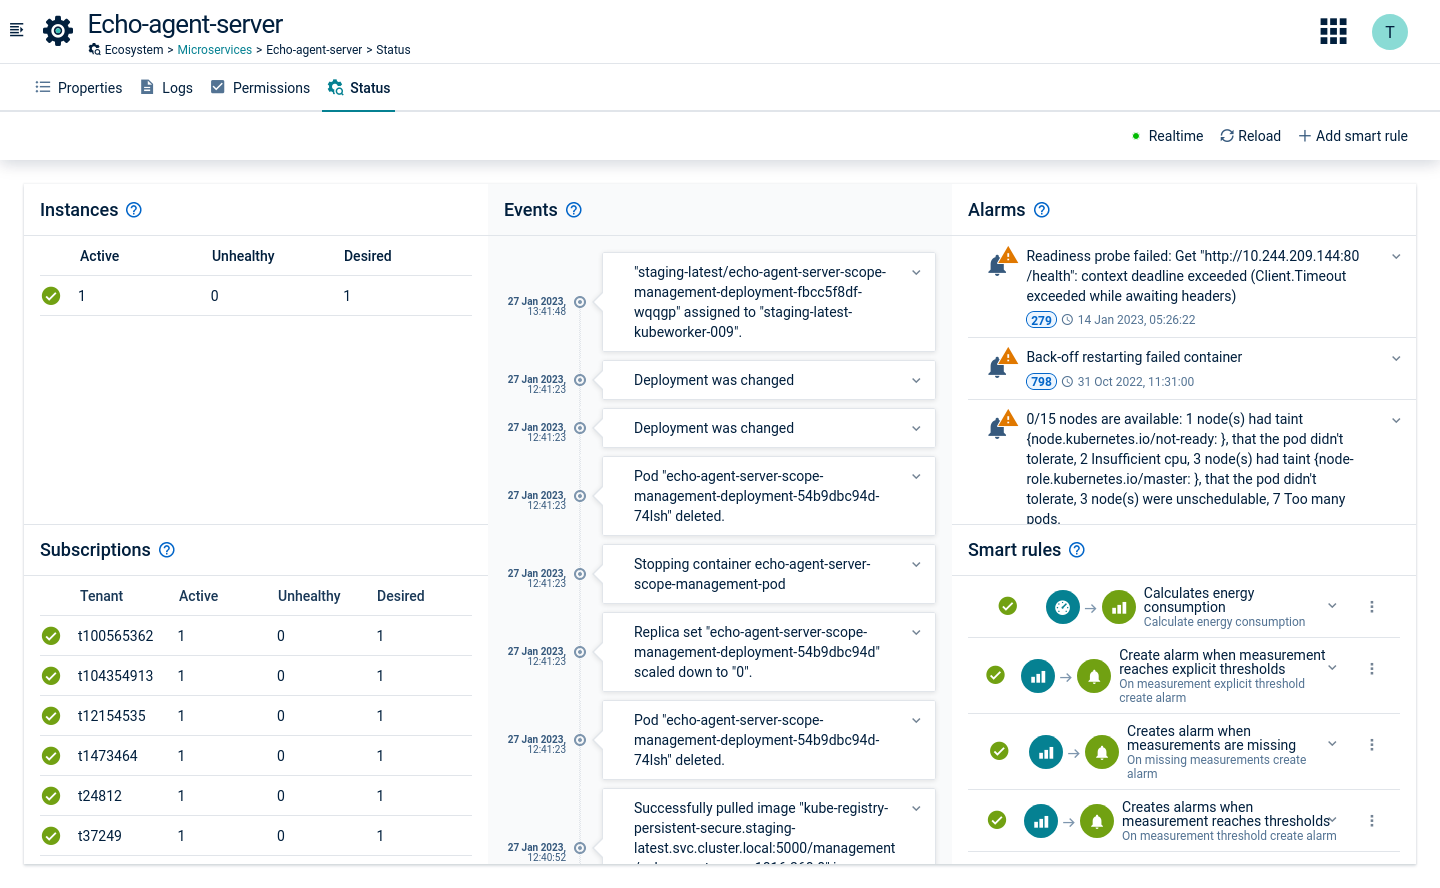 To view the status you need the following permissions: READ permission for "Application management" and "Inventory".
The following information is provided on the **Status** tab:
* Instances - number of active, unhealthy and desired microservice instances for the current tenant.
* Subscriptions - number of active, unhealthy and desired microservice instances for all subtenants subscribed to the microservice.
* Alarms - alarms for given application, provided in realtime.
* Events - events for given application, provided in realtime.
* Smart rules - list of applicable smart rules.
#### Alarms and events {#alarms-and-events}
Most of the alarms and events visible in the **Status** tab are strictly technical descriptions of what's going on with the microservice.
There are two user-friendly alarm types:
* `c8y_Application_Down` - critical alarm which is created when no microservice instance is available.
* `c8y_Application_Unhealthy` - major alarm which is created when there is at least one microservice instance working properly, but not all of them are fully operating.
User-friendly alarms are created for the microservice owner tenant only. They are also automatically cleared when the situation gets back to normal, that is all the microservice instances are working properly.
User-friendly alarms can be used to create smart rules. For details on creating smart rules of various types, see [Smart rules](https://cumulocity.com/docs/cockpit/smart-rules/).
For example, to send an email, if a microservice is down, create an "On alarm send email" smart rule.
In the **On alarm matching** section, use `c8y_Application_Down` as an alarm type. As a target asset select the microservice which you would like to monitor, for example "echo-agent-server".
### Log files {#log-files}
Cumulocity offers viewing logs which provide more details on the status of microservices owned by the tenant.
To view logs, open the **Logs** tab of the respective microservice.
At the top of the page, you can select the instance of the microservice, for which you want to view the logs.
> **Info:**
> If your microservice was re-scaled into two instances you should be able to switch between them, but it is not possible to see the logs from both instances at once.
Next to the instance dropdown you can select the time range for the log entries to be shown by selecting a date from the calendar and entering a time.
> **Info:**
> The time entered here may differ from the server time due to different time zones.
At the top right, additional functionality is provided:
* **Download** - to download the log data for a specified time range.
* **Dark theme** - to turn dark theme on or off.
* **Auto refresh** - to activate the auto refresh functionality. If activated, the displayed log data will automatically be refreshed every 10 seconds.
Initially, the **Logs** tab shows the latest logs of the microservice instance.
At the bottom right you find navigation buttons:
* **First** - directly navigates to the oldest available log entries for the microservice after its restart (maximum capacity 35 MB of logs).
* **Previous** - increases the time range in 10 minutes steps.
* **Next** - reduces the time range in 10 minutes steps.
* **Last** - directly navigates to the latest available log entries.
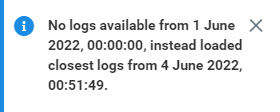
If no logs are available in the selected time range, a message is shown accordingly:
To view the status you need the following permissions: READ permission for "Application management" and "Inventory".
The following information is provided on the **Status** tab:
* Instances - number of active, unhealthy and desired microservice instances for the current tenant.
* Subscriptions - number of active, unhealthy and desired microservice instances for all subtenants subscribed to the microservice.
* Alarms - alarms for given application, provided in realtime.
* Events - events for given application, provided in realtime.
* Smart rules - list of applicable smart rules.
#### Alarms and events {#alarms-and-events}
Most of the alarms and events visible in the **Status** tab are strictly technical descriptions of what's going on with the microservice.
There are two user-friendly alarm types:
* `c8y_Application_Down` - critical alarm which is created when no microservice instance is available.
* `c8y_Application_Unhealthy` - major alarm which is created when there is at least one microservice instance working properly, but not all of them are fully operating.
User-friendly alarms are created for the microservice owner tenant only. They are also automatically cleared when the situation gets back to normal, that is all the microservice instances are working properly.
User-friendly alarms can be used to create smart rules. For details on creating smart rules of various types, see [Smart rules](https://cumulocity.com/docs/cockpit/smart-rules/).
For example, to send an email, if a microservice is down, create an "On alarm send email" smart rule.
In the **On alarm matching** section, use `c8y_Application_Down` as an alarm type. As a target asset select the microservice which you would like to monitor, for example "echo-agent-server".
### Log files {#log-files}
Cumulocity offers viewing logs which provide more details on the status of microservices owned by the tenant.
To view logs, open the **Logs** tab of the respective microservice.
At the top of the page, you can select the instance of the microservice, for which you want to view the logs.
> **Info:**
> If your microservice was re-scaled into two instances you should be able to switch between them, but it is not possible to see the logs from both instances at once.
Next to the instance dropdown you can select the time range for the log entries to be shown by selecting a date from the calendar and entering a time.
> **Info:**
> The time entered here may differ from the server time due to different time zones.
At the top right, additional functionality is provided:
* **Download** - to download the log data for a specified time range.
* **Dark theme** - to turn dark theme on or off.
* **Auto refresh** - to activate the auto refresh functionality. If activated, the displayed log data will automatically be refreshed every 10 seconds.
Initially, the **Logs** tab shows the latest logs of the microservice instance.
At the bottom right you find navigation buttons:
* **First** - directly navigates to the oldest available log entries for the microservice after its restart (maximum capacity 35 MB of logs).
* **Previous** - increases the time range in 10 minutes steps.
* **Next** - reduces the time range in 10 minutes steps.
* **Last** - directly navigates to the latest available log entries.
If no logs are available in the selected time range, a message is shown accordingly:
 > **Info:**
> There is no possibility to see the logs from the previously running instances or from previously rotated logs exceeding 35 MB. However, inside the instance there is a Docker container running, and if only this one was restarted (not the whole instance) you should see the logs from the currently running and also lately terminated Docker container.
>
> Logs are always loaded from the Docker container using both `stdout` and `stderr` sources, and there is no possibility to distinguish/filter by the source.
> **Info:**
> There is no possibility to see the logs from the previously running instances or from previously rotated logs exceeding 35 MB. However, inside the instance there is a Docker container running, and if only this one was restarted (not the whole instance) you should see the logs from the currently running and also lately terminated Docker container.
>
> Logs are always loaded from the Docker container using both `stdout` and `stderr` sources, and there is no possibility to distinguish/filter by the source.