# Examples
Source: https://cumulocity.com/docs/microservice-sdk/http/
Sector: Application enablement & solutions
Release: Latest
This section contains step-by-step tutorials to successfully develop microservices which employ the Cumulocity APIs and other third-party services. The source code of the examples can be found in our [GitHub repository](https://github.com/Cumulocity-IoT//cumulocity-examples/tree/develop/microservices).
On the Cumulocity platform, microservice hosting is built on top of Docker containers. This makes it technology-agnostic and allows developers to create applications in any technology stack.
## Python microservice
In this tutorial, you will learn how to create and run a microservice written in Python:
1. Install the required prerequisites.
2. Create a sample application exposing REST endpoints using Python and the Flask framework.
3. Create a Dockerfile to build and save your application as a Docker image.
4. Create a Cumulocity application manifest.
5. Build and package the Docker image and the application manifest into a microservice ZIP file that is ready to upload to Cumulocity.
6. Upload your new microservice ZIP file and subscribe to run it.
### Prerequisites {#prerequisites}
Create an account on [cumulocity.com](https://cumulocity.com), for example by using a free trial. At this step you will be provided with a dedicated URL that you can also use to test your microservice below.
Make sure that you have a recent version of Docker installed. You can, for example, install [Docker Desktop](https://www.docker.com/products/docker-desktop/) for your operating system.
Cumulocity hosts linux/amd64 Docker containers. If you run, for example, a recent Mac with Apple silicon, you need to configure Docker to build linux/amd64 containers:
```shell
$ export DOCKER_DEFAULT_PLATFORM=linux/amd64
```
### Create a sample Python web application {#create-a-python-web-application}
This example uses Python 3 with the [Flask](https://flask.palletsprojects.com/) web framework and the [Waitress](https://docs.pylonsproject.org/projects/waitress/en/latest/) HTTP server. Start by creating the _application.py_ script with the following content:
```python
#!flask/bin/python
from flask import Flask, jsonify
import os
app = Flask(__name__)
# Hello world endpoint
@app.route('/')
def hello():
return 'Hello world!'
# Verify the status of the microservice
@app.route('/health')
def health():
return '{ "status" : "UP" }'
# Get environment details
@app.route('/environment')
def environment():
environment_data = {
'platformUrl': os.getenv('C8Y_BASEURL'),
'mqttPlatformUrl': os.getenv('C8Y_BASEURL_MQTT'),
'pulsarPlatformUrl': os.getenv('C8Y_BASEURL_PULSAR'),
'tenant': os.getenv('C8Y_BOOTSTRAP_TENANT'),
'user': os.getenv('C8Y_BOOTSTRAP_USER'),
'password': os.getenv('C8Y_BOOTSTRAP_PASSWORD'),
'microserviceIsolation': os.getenv('C8Y_MICROSERVICE_ISOLATION')
}
return jsonify(environment_data)
if __name__ == '__main__':
import logging
logging.basicConfig(level=logging.INFO)
from waitress import serve
serve(app, host="0.0.0.0", port=80)
```
The application exposes three endpoints:
- / returns a hello world message.
- /health is the common endpoint to verify if a microservice is up and running. It should be included into all production microservices to enable high availability.
- /environment reads some standard variables provided to the environment by the platform during the microservice installation and returns their values in JSON format.
It runs the HTTP server on port 80. This is required for all microservices.
Logging is set to "INFO" level to show some logging information in the Administration application. You can remove the log level setting to get only warnings logged.
### Create a Dockerfile {#create-the-dockerfile}
To build a runnable Docker image containing your application, create a so-called _Dockerfile_ in the same directory as your _application.py_ script and add the following content:
```
FROM python:alpine
COPY application.py /
RUN pip install flask waitress
ENTRYPOINT ["python"]
CMD ["-u", "application.py"]
```
The Dockerfile:
* Uses a very small Docker distribution based on Alpine Linux and Python.
* Copies your _application.py_ file into the image.
* Installs the web framework and web server (Flask and Waitress) in the image.
* And tells Docker to run Python with your _application.py_ as argument.
### Create the application manifest {#add-the-application-manifest}
Besides the Docker image, Cumulocity requires some additional information to correctly run the Docker image. This is provided in the application manifest. Create a file _cumulocity.json_ in the same folder as your other files and add the following content:
```json
{
"apiVersion": "2",
"version": "1.0.0",
"provider": {
"name": "Cumulocity"
},
"isolation": "MULTI_TENANT",
"replicas": 2,
"livenessProbe": {
"httpGet": {
"path": "/health"
},
"initialDelaySeconds": 10
},
"readinessProbe": {
"httpGet": {
"path": "/health"
},
"initialDelaySeconds": 10
},
"requiredRoles": [ ],
"roles": [ ]
}
```
Your microservice:
* Is a multi-tenant microservice, which means that it runs only once even if many customers are subscribed to it.
* Has two replicas as required for highly available production microservices. Note: For development purposes where high availability is not required, you can set this to one replica only.
* Has so-called liveness and readiness probes that Cumulocity uses to check if your microservice is healthy and can run.
* Requires no roles and provides no roles -- it just prints some information.
### Build the application {#build-the-application}
Execute the following Docker commands to build the Docker image and save it as _image.tar_:
```shell
$ docker build -t hello-python-microservice .
$ docker save hello-python-microservice > "image.tar"
```
Then pack _image.tar_ together with the manifest _cumulocity.json_ into a ZIP file.
```shell
$ zip hello-microservice cumulocity.json image.tar
```
The resulting _hello-microservice.zip_ file contains your microservice and it is ready to be uploaded to the Cumulocity platform.
#### Run the example {#run-the-example}
Uploading the _hello-microservice.zip_ into the platform can be done via the UI. In the Administration application, navigate to **Ecosystem** > **Microservices** and click **Add microservice**. Drop the ZIP file of the microservice and then click **Subscribe**. For more details about uploading a microservice ZIP file, refer to [Custom microservices](https://cumulocity.com/docs/standard-tenant/ecosystem/#custom-microservices).
After the microservice has been successfully uploaded and subscribed by your tenant, it runs in a Docker container. Verify this by checking the **Status** and **Logs** tabs of your microservice in the Administration application.
To try out your microservice, use a command-line tool such as [curl](https://curl.se/). Your _tenantID_ can be found under **Platform info** in the right drawer which shows up if you click on the user icon at the top right.
```shell
$ curl -u '/:' https:///service/hello/environment
{
"microserviceIsolation": "MULTI_TENANT",
"mqttPlatformUrl": "tcp://cumulocity:1881",
"password": "...",
"platformUrl": "https://cumulocity:8111",
"pulsarPlatformUrl": "pulsar://pulsar-proxy",
"tenant": "mytenant",
"user": "servicebootstrap_hello-microservice"
}
```
Note that all requests to your microservice are automatically authenticated. Try running the curl command without the authentication.
```
$ curl -v https:///service/hello/environment
…
< HTTP/1.1 401 Unauthorized
…
{"error":"general/internalError","message":"No auth information found","info":"https://cumulocity.com/guides/reference/rest-implementation"}
```
### Using the microservice utility tool {#using-the-microservice-utility-tool}
You can also build, upload and subscribe the application using the [microservice utility tool](https://cumulocity.com/docs/microservice-sdk/general-aspects/#microservice-utility-tool). The tool requires a _docker_ folder with the _Dockerfile_ and your application files in it:
```
docker/Dockerfile
docker/application.py
cumulocity.json
```
### Source code {#source-code}
The source code of this Hello world microservice can be found in our [GitHub repository](https://github.com/Cumulocity-IoT//c8y_microservice-python). Moreover, in our GitHub repository you can find a more comprehensive [Python microservice application](https://github.com/Cumulocity-IoT//cumulocity-examples/tree/develop/microservices/sample-python-microservice) which uses the Cumulocity REST API and exposes endpoints to verify if the microservice is up and running, create a device and random measurements for it, and to get the current application subscriptions for a particular tenant.
## Node.js microservice
Cumulocity provides an SDK for developing microservices using Java. Nevertheless, you are free to choose the tech-stack of your preference to develop a microservice as long as it fulfills the [general requirements](https://cumulocity.com/docs/microservice-sdk/general-aspects/#requirements-interactions).
In this example you will learn how to create and deploy a Node.js-based microservice. The application exposes endpoints to verify if the microservice is up and running and get some of the environment variables.
It uses the Cumulocity [@c8y/client JavaScript library](https://www.npmjs.com/package/@c8y/client) to subscribe to alarms. When a new alarm is created, a Slack channel gets notified.
### Prerequisites {#prerequisites}
- Cumulocity credentials (tenant, user and password).
- Slack channel to post messages to, [Slack app and OAuth token](https://slack.dev/node-slack-sdk/getting-started).
- Docker local installation.
- A *.env* file in the root directory with the following content:
```properties
SLACK_OAUTH_TOKEN=
SLACK_CHANNEL_ID=
```
### Developing the microservice {#developing-the-microservice}
#### Configure a Node.js application {#configure-a-nodejs-application}
Start by creating a folder *node-microservice* to contain your files. Inside your folder, use the following command to initialize your project:
```shell
$ npm init
```
It will walk you through creating a *package.json* file which allows to identify the project as well as handling its dependencies. When prompted, enter your project's information and use *app.js* as entry point. Once the file has been created, install the dependencies using:
```shell
$ npm install --save @c8y/client @slack/web-api dotenv express
```
Eventually, your *package.json* file should look similar to:
```json
{
"name": "node-microservice",
"version": "1.0.0",
"main": "index.js",
"scripts": {
"test": "echo \"Error: no test specified\" && exit 1"
},
"author": "",
"license": "ISC",
"description": "",
"dependencies": {
"@c8y/client": "^1023.22.5",
"@slack/web-api": "^7.13.0",
"dotenv": "^17.2.3",
"express": "^5.2.1"
}
}
```
You must adjust the `scripts` object in the *package.json* file manually to include a start and build script:
```json
{
"name": "node-microservice",
"version": "1.0.0",
"main": "index.js",
"scripts": {
"start": "node index.js",
"build": "docker build -t node-microservice . && docker save node-microservice > image.tar && zip node-microservice cumulocity.json image.tar",
"test": "echo \"Error: no test specified\" && exit 1"
},
"author": "",
"license": "ISC",
"description": "",
"dependencies": {
"@c8y/client": "^1023.22.5",
"@slack/web-api": "^7.13.0",
"dotenv": "^17.2.3",
"express": "^5.2.1"
}
}
```
#### Add the source code {#add-the-source-code}
Now create a file *index.js* which is the main entry point of your application. It uses the Express framework to start a server listening on port 80, defines its endpoints and requires controllers to use the Cumulocity and Slack APIs.
```javascript
"use strict";
require("dotenv").config();
const express = require("express");
const app = express();
// Application endpoints
const routes = require("./routes");
routes(app);
// Server listening on port from environment variables
const port = process.env.SERVER_PORT || 8080;
app.use(express.json());
app.listen(port);
console.log(`${process.env.APPLICATION_NAME} started on port ${port}`);
// Cumulocity and Slack controllers
require("./controllers");
```
As you may have already noticed, `routes` and `controllers` are required. Create a *routes.js* file with the following content:
```javascript
"use strict";
module.exports = function(app) {
// Hello world
app.route("/").get(function(req, res) {
res.json({ "message" : "Hello world!" });
});
// Health check
app.route("/health").get(function(req, res) {
res.json({ "status" : "UP" });
});
// Environment variables (not meant for production use)
app.route("/environment").get(function(req, res) {
res.json({
"appName" : process.env.APPLICATION_NAME,
"platformUrl" : process.env.C8Y_BASEURL,
"microserviceIsolation" : process.env.C8Y_MICROSERVICE_ISOLATION,
"tenant" : process.env.C8Y_BOOTSTRAP_TENANT,
"bootstrapUser" : process.env.C8Y_BOOTSTRAP_USER,
"bootstrapPassword" : process.env.C8Y_BOOTSTRAP_PASSWORD
});
});
};
```
At this point, your microservice would be accessible via web on its endpoints to return a "Hello world" message, verify that the microservice is up and running and get some environment variables.
In order to implement the controllers, you must first create a Slack app and get a token to use the Web API. Go to [Slack API: Applications](https://api.slack.com/apps?new_app=1) to create a new app. Select your workspace and give your app a name, for example, C8Y Slack bot. Then [get an OAuth access token](https://docs.slack.dev/tools/node-slack-sdk/getting-started/#get-a-token-to-use-the-web-api).
Once you have your Slack app and token ready, create the *controllers.js* file with the following content:
```javascript
"use strict";
/********************* Slack *********************/
// Create a new instance of the WebClient class with the OAuth access token
const { WebClient } = require("@slack/web-api");
const web = new WebClient(process.env.SLACK_OAUTH_TOKEN);
// Slack channel ID to know where to send messages to
const channelId = process.env.SLACK_CHANNEL_ID;
// Format a message and post it to the channel
async function postSlackMessage(adata) {
// Alarm severity
let color = {
"WARNING": "#1c8ce3",
"MINOR": "#ff801f",
"MAJOR": "#e66400",
"CRITICAL": "#e0000e"
};
// Send a message from this app to the specified channel
let src = adata.source;
await web.chat.postMessage({
channel: channelId,
attachments: [{
"text": adata.text,
"fields": [
{
"title": "Source",
"value": `<${src.self}|${src.name ? src.name : src.id}>`,
"short": true
},
{
"title": "Alarm type",
"value": adata.type,
"short": true
}
],
"color": color[adata.severity]
}]
});
}
/********************* Cumulocity *********************/
const { Client, BasicAuth } = require("@c8y/client");
const baseUrl = process.env.C8Y_BASEURL;
let cachedSubscriptions = [];
// Get the microservice subscriptions
async function getSubscriptions() {
const {
C8Y_BOOTSTRAP_TENANT: tenant,
C8Y_BOOTSTRAP_USER: user,
C8Y_BOOTSTRAP_PASSWORD: password
} = process.env;
const subscriptions = await Client.getMicroserviceSubscriptions({ tenant, user, password }, baseUrl);
return subscriptions;
}
// where the magic happens...
(async () => {
cachedSubscriptions = (await getSubscriptions());
if (Array.isArray(cachedSubscriptions) && cachedSubscriptions.length) {
// List filter for unresolved alarms only
const filter = {
pageSize: 100,
withTotalPages: true,
resolved: false
};
try {
for (const subscription of cachedSubscriptions) {
// Service user credentials
let auth = new BasicAuth({
user: subscription.user,
password: subscription.password,
tenant: subscription.tenant
});
// Platform authentication
let client = await new Client(auth, baseUrl);
// Get filtered alarms and post a message to Slack
let { data } = await client.alarm.list(filter);
const postAlarmOnSlack = async (alarm) => {
try {
console.log(`Posting alarm ${alarm.id} to Slack...`);
await postSlackMessage(alarm);
} catch (err) {
console.error(`Failed to post alarm ${alarm.id} to Slack`, err);
}
};
for (const alarm of data) {
await postAlarmOnSlack(alarm);
}
// Real time subscription for active alarms
client.realtime.subscribe("/alarms/*", async (alarm) => {
if (alarm.data.data.status !== "ACTIVE") {
return;
}
await postAlarmOnSlack(alarm.data.data);
});
}
console.log("listening to alarms...");
}
catch (err) {
console.error(err);
}
} else {
console.log("[ERROR]: Not subscribed/authorized users found.");
}
})();
```
The code has two parts. The first one needs your Slack OAuth token and channel ID (chat group where the messages will be posted).
A message is formatted using the colors of the different alarm severities that you may see in the Cockpit application. This message gets posted to the Slack channel.
The second part uses basic authentication to the Cumulocity platform, it gets all active alarms and posts alarm messages to the Slack channel. After that, it subscribes to alarms and notifies the Slack channel each time a new alarm is created in the subscribed tenants.
#### Dockerfile and application manifest {#dockerfile-and-application-manifest}
Create a microservice manifest *cumulocity.json* with the following content:
```json
{
"apiVersion": "2",
"version": "1.0.0-SNAPSHOT",
"provider": {
"name": "Cumulocity"
},
"isolation": "MULTI_TENANT",
"requiredRoles": [
"ROLE_ALARM_READ",
"ROLE_ALARM_ADMIN"
],
"roles": [ ]
}
```
Finally, Docker needs to know how to build your microservice. Create a *Dockerfile* as follows:
```
FROM node:alpine
WORKDIR /usr/app
COPY ./package.json ./
COPY ./package-lock.json ./
RUN npm ci
COPY ./*.js ./
COPY ./.env ./
CMD ["npm", "start"]
```
### Deploying the microservice {#deploying-the-microservice}
Once you have all the required files, building and deploying the microservice application is fairly simple.
Execute the following Docker commands to build the Docker image and save it as _image.tar_:
```shell
$ docker build -t node-microservice .
$ docker save node-microservice > "image.tar"
```
Then pack _image.tar_ together with the manifest _cumulocity.json_ into a ZIP file.
```shell
$ zip node-microservice cumulocity.json image.tar
```
These steps can also be executed via the `build` script. To run it, just execute:
```shell
npm run build
```
The resulting _node-microservice.zip_ file contains your microservice and it is ready to be uploaded to the Cumulocity platform.
Uploading the _node-microservice.zip_ into the platform can be done via the UI. In the Administration application, navigate to **Ecosystem** > **Microservices** and click **Add microservice**. Drop the ZIP file of the microservice and then click **Subscribe**.
For more details about uploading a microservice ZIP file, refer to [Custom microservices](https://cumulocity.com/docs/standard-tenant/ecosystem/#custom-microservices).
### Testing the microservice {#testing-the-microservice}
After the microservice has been successfully uploaded and subscribed to your tenant, it will run in a Docker container. A request similar to:
```http
GET /service/node-microservice/environment
HEADERS:
"Authorization": ""
```
with proper credentials (user and password from any subscribed tenant), returns a response as:
```json
{
"appName": "node-microservice",
"platformUrl": "http://cumulocity:8111",
"microserviceIsolation": "MULTI_TENANT",
"tenant": "t...",
"bootstrapUser": "...",
"bootstrapPassword": "..."
}
```
The authorization header is formed as "Basic <Base64(<tenantID>/<username>:<password>)>". For instance, if your tenant ID, username and password are **t0071234**, **testuser** and **secret123** respectively, you can get the Base64 string with the following command:
```shell
$ echo -n t0071234/testuser:secret123 | base64
dDAwNzEyMzQvdGVzdHVzZXI6c2VjcmV0MTIz
```
and your authorization header would look like `"Authorization": "Basic dDAwNzEyMzQvdGVzdHVzZXI6c2VjcmV0MTIz"`.
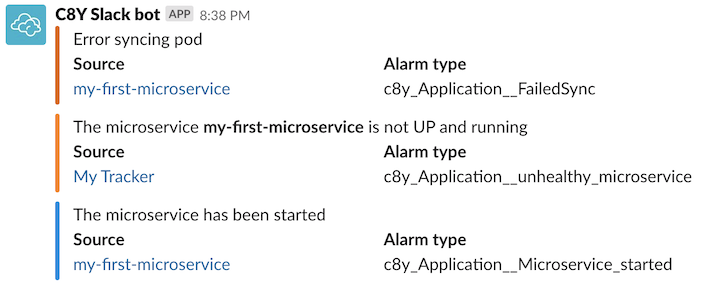
If there are active alarms on your tenant, your Slack channel will get notified. You can also [create a new alarm](https://cumulocity.com/api/core/#operation/postAlarmCollectionResource) using the Cumulocity REST API and validate that your microservice is listening to new alarms. Your Slack channel will also get notified.
### Source code {#source-code}
The code of this [node-microservice](https://github.com/Cumulocity-IoT//cumulocity-examples/tree/develop/microservices/node-microservice) can be found in our public GitHub repositories.