# Asset hierarchy
Source: https://cumulocity.com/docs/dtm/asset-hierarchy/
Sector: Application enablement & solutions
Release: Latest
Description: Build asset hierarchies from a root asset and its subassets, work with assets, and link data points to them.
## Overview
An asset hierarchy is a structure that organizes multiple assets and devices into a hierarchy, allowing for the visualization and management of complex systems.
An asset hierarchy consists of a root asset and all its subsequent subassets.
For details, on viewing, creating and modifying assets in an assets hierarchy, see [Working with assets](https://cumulocity.com/docs/dtm/asset-hierarchy/#assets).
In addition to its hierarchical structure, an asset can have associated or linked [data points](https://cumulocity.com/docs/dtm/asset-hierarchy/#datapoints). This means that each asset not only represents a physical entity but also serves as a dynamic interface to its operational data.
## Working with assets
To work with assets in the DTM application, navigate to the **Assets** page using the navigator.
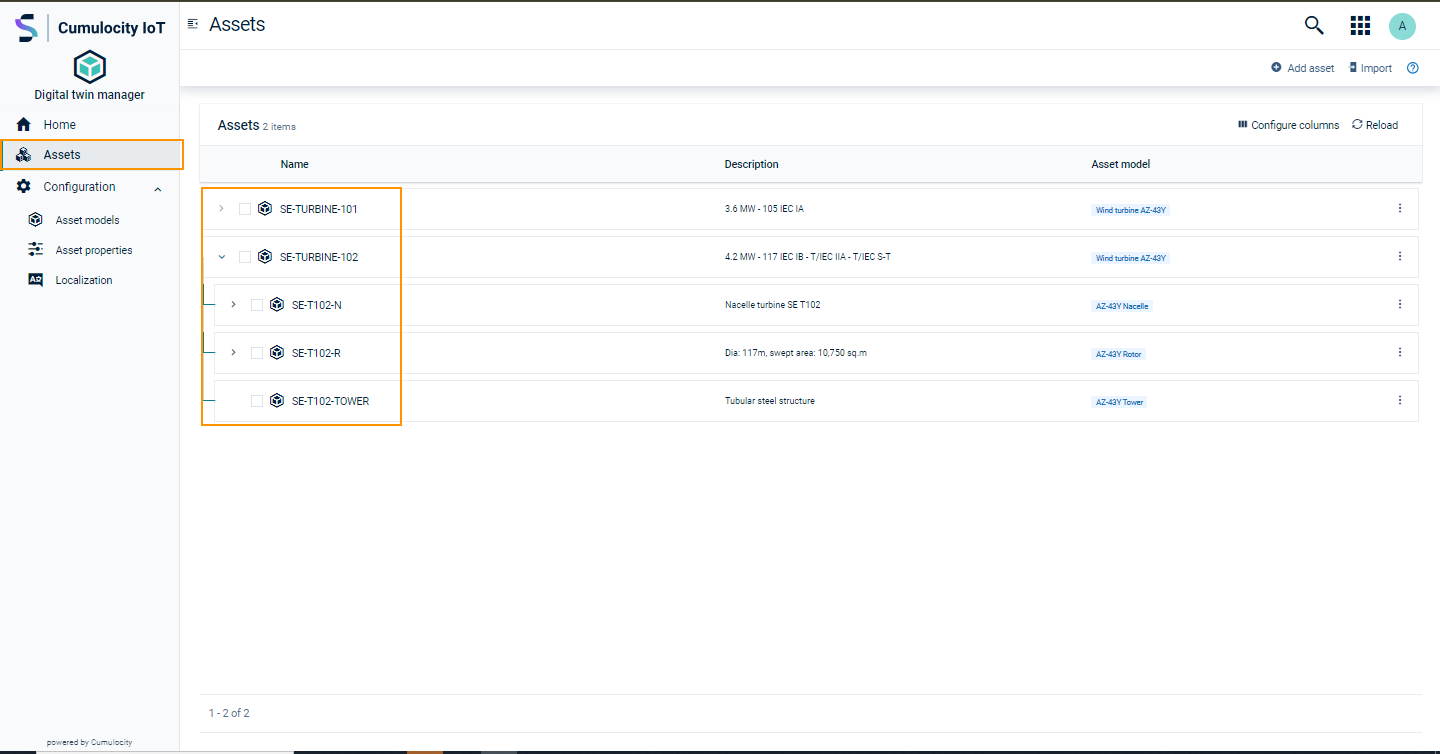
By default, the **Assets** page is empty. Once an [asset hierarchy](https://cumulocity.com/docs/dtm/asset-hierarchy/#asset-hierarchy) has been created by adding assets, the assets are shown in the **Assets** page.
> **Info:**
> The count of assets shown at the bottom of the **Assets** page represents the number of root assets in the assets hierarchy, not the total number of assets.
> **Requirements:**
> ROLES & PERMISSIONS
>
> - To view all assets: READ permission for permission type "Inventory"
> - To add/update/delete assets: CREATE/ADMIN permission for permission type "Inventory"
> - To view specific assets: READ permissions for "Inventory" in the inventory roles
> - To manage or delete specific assets: READ and CHANGE permissions for "Inventory" in the inventory roles
>
> Note that global inventory permissions override inventory role permissions. By default, the user has full access to assets created by them regardless of permissions granted to them. See [Managing permissions and roles](https://cumulocity.com/docs/standard-tenant/managing-permissions/) for further information.
### To view an asset {#to-view-an-asset}
In the **Assets** page, select an asset to view its details, such as subassets, child devices, and asset properties.
#### Subassets {#subassets}
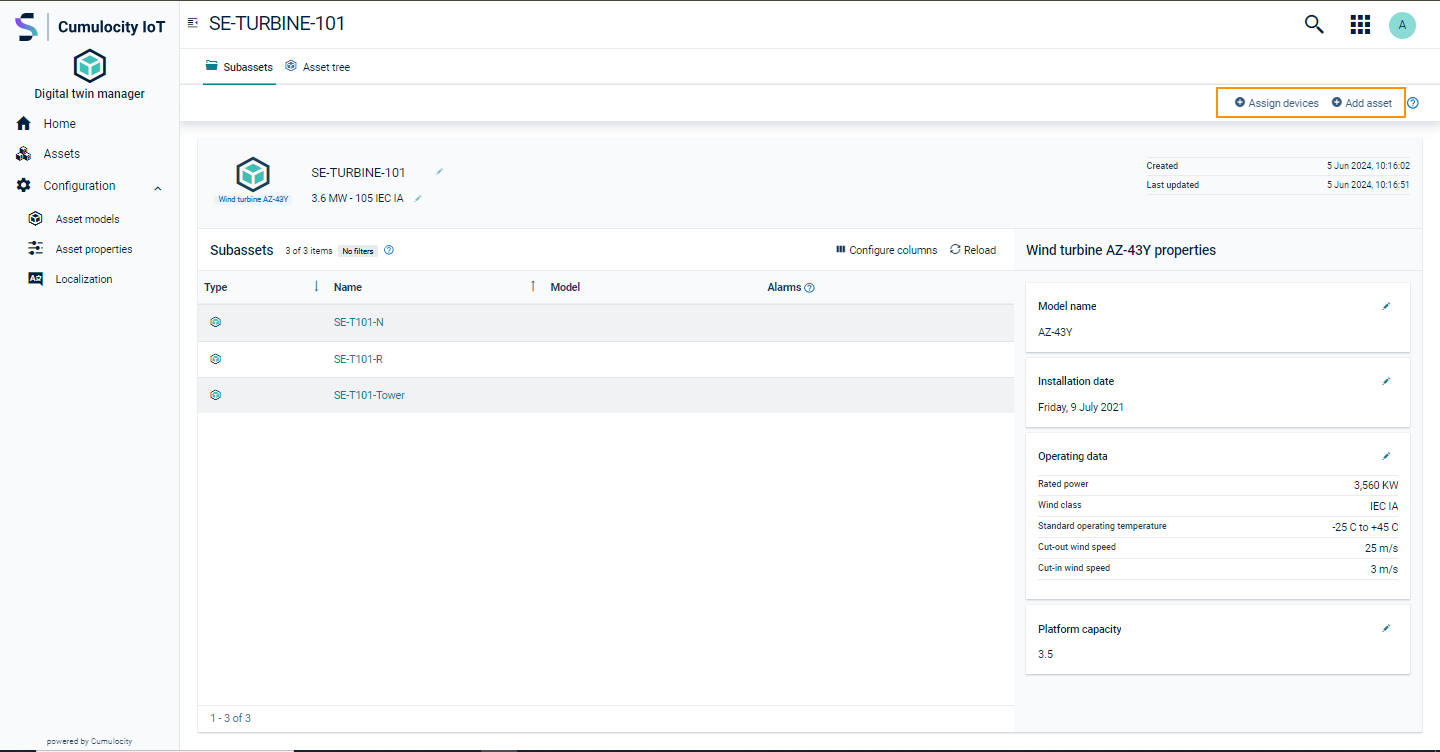
The **Subassets** tab shows all asset details:
- At the top left of the asset header, the icon, the asset definition, the asset name, and the description are presented.
- Next to it, the **Created** and **Last updated** time as well as, if configured, the **External ID** of the asset are shown.
- In the **Subassets** section at the left, all subassets and devices are listed.
- At the right, the asset properties are displayed.
Optionally, [add subassets](https://cumulocity.com/docs/dtm/asset-hierarchy/#to-add-subassets) or [assign devices](https://cumulocity.com/docs/dtm/asset-hierarchy/#to-assign-devices-to-an-asset) from the top bar.
For assets with the **Allow any property** option enabled, you can add additional properties beyond those defined in the asset definition. Click **Add property** to select from the available property definitions.
If the asset has a **Location** property or the asset definition of the asset specifies Location as a selected [property definition](https://cumulocity.com/docs/dtm/asset-types/#asset-properties), a map is shown at the bottom right of the page. In DTM, the Location property definition represents the formal model of a `c8y_Position` fragment used in Cumulocity to [track the geographical location of assets and devices](https://cumulocity.com/docs/device-integration/fragment-library/#tracking). Click the full screen icon at the top right of the map to view it in full screen. You cannot modify the marker when viewing the asset. Edit the property to change the position of the marker.
> **Info:**
> - The **Add asset** button is not displayed for the last hierarchical level, except for generic assets with the **Allow any asset** option enabled in their asset definition.
> - For complex properties, the keys will be ordered as specified in the property definition.
> - The external source label of the asset from `c8y_ExternalSource` is only shown for for read-only assets to indicate synchronization from an external system.
#### Asset tree {#asset-tree}
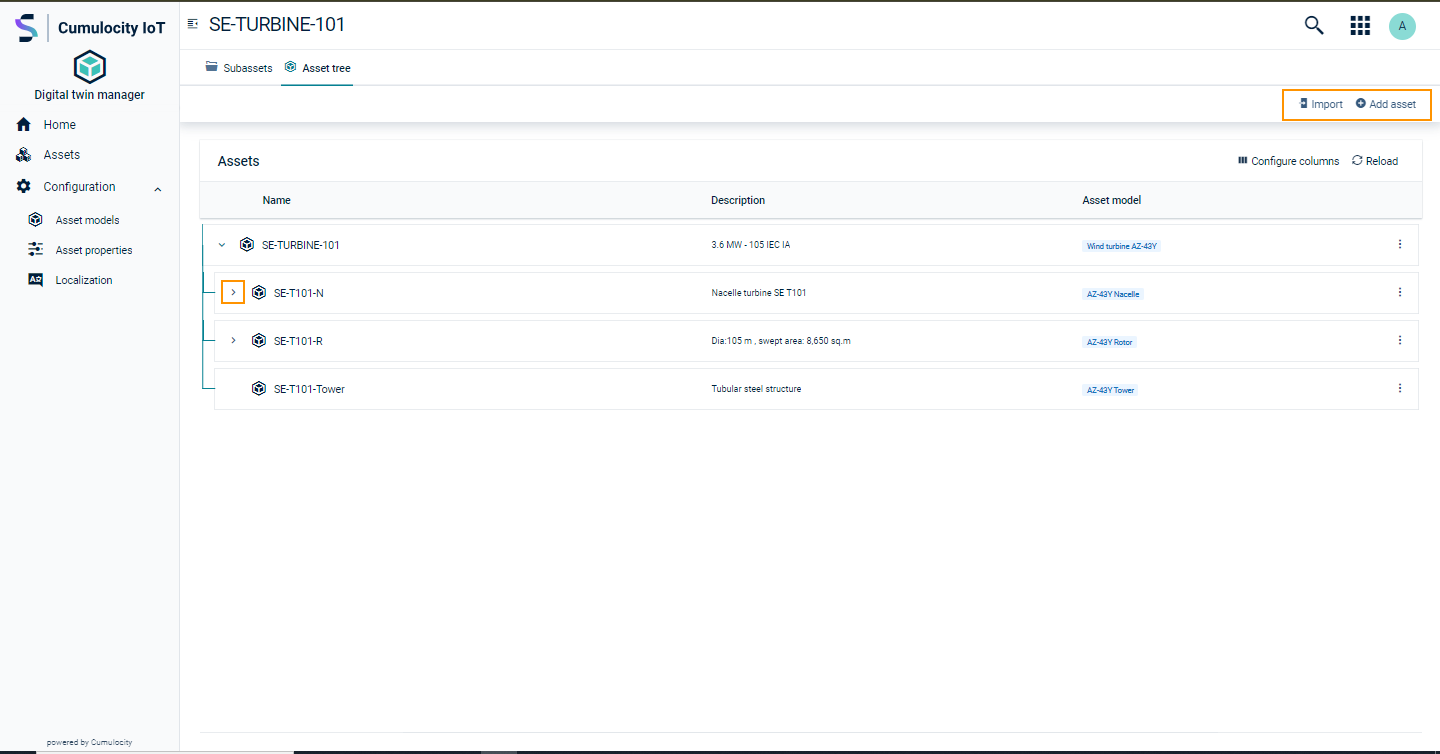
You can view the hierarchy of the asset in the **Asset tree** tab. Initially the asset hierarchy is collapsed. Click the expand icon to view the next level of subassets.
Click **Add asset** to add more subassets.
### To create an asset {#to-create-an-asset}
There are two options for creating assets in the DTM application, that is, via the UI and via REST API.
The following section describes how to create an asset via the UI. See the [DTM API documentation](https://cumulocity.com/api/dtm/) for using the DTM REST API.
To add an asset via the UI:
1. Click **Add asset** in the top bar of the **Assets** page.
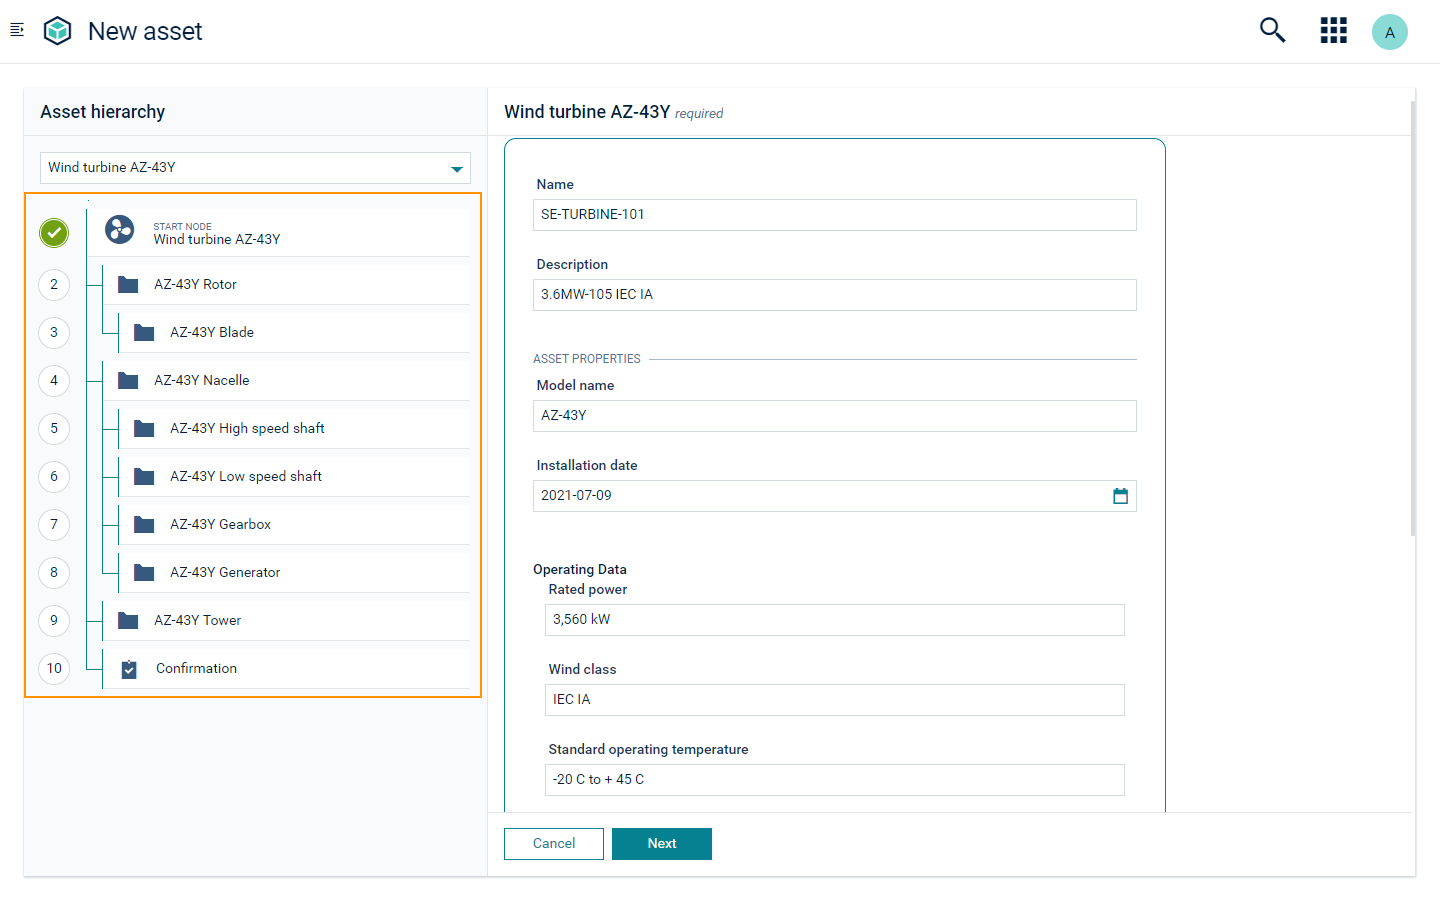
2. In the **New asset** page, select the desired asset definition from the **Choose asset definition** dropdown menu.
> **Info:**
> The asset definitions provided here are root asset definitions. Root asset definitions are asset definitions which are at the top of a hierarchy and don't have any parent. They are labeled "PARENT NODE" in the hierarchy.
3. At the left, the asset hierarchy is shown. At the right, provide a name for the new asset and optionally add a description.
4. If the selected asset definition has **Allow any asset** enabled, a **Subassets** section is displayed. Click **Add/Create asset** to add a row and select an asset definition to add as a subasset. Click the remove icon next to a row to remove it.
5. Under the **Property definitions**, provide the values for all asset properties. The corresponding property definitions are defined when [creating the asset definition](https://cumulocity.com/docs/dtm/asset-types/#to-create-an-asset-definition).
- If the selected asset definition has **Allow any property** enabled, the **Add property** button is displayed in the **Property definitions** section. Click **Add property**, select the desired properties in the resulting dialog, and click **Select**. The selected properties appear in the **Property definitions** section. Click the remove icon next to a property to remove it.
> **Info:**
> For complex properties, the keys are ordered as specified in the property definition.
- For an asset with a **Location** property, click **Choose on map** to set the values for latitude and longitude. Click the full screen icon at the top right of the map to view it in full screen. The marker is positioned at the default value set in the **Location** property. Click or drag the marker to the preferred position to set the value for both latitude and longitude. If you do not enter a latitude or longitude value, you will not see a marker on the map.
> **Info:**
> The values of latitude and longitude are automatically updated whenever a new location is selected on the map and vice-versa. The altitude value is not represented on the map.
6. Optionally, [assign devices](https://cumulocity.com/docs/dtm/asset-hierarchy/#to-assign-devices-to-an-asset) to your root asset.
5. To add more than one asset on this level, click **Add**.
7. After defining a hierarchy level, you see a green check mark on the asset hierarchy at the left.
8. Click **Next** to navigate to the next hierarchy level and fill in the required fields. For generic assets, the asset hierarchy on the left updates automatically as you add subassets.
9. Repeat this steps for all asset hierarchy levels. You can track your progress via the green check marks in the asset hierarchy on the left.
Modify the assets by navigating to the respective asset pages using the **Previous** and **Next** buttons.
When all assets in the asset hierarchy show green check marks, the **Confirmation** step shows a preview of the asset hierarchy. Click **Create** to create the asset hierarchy.
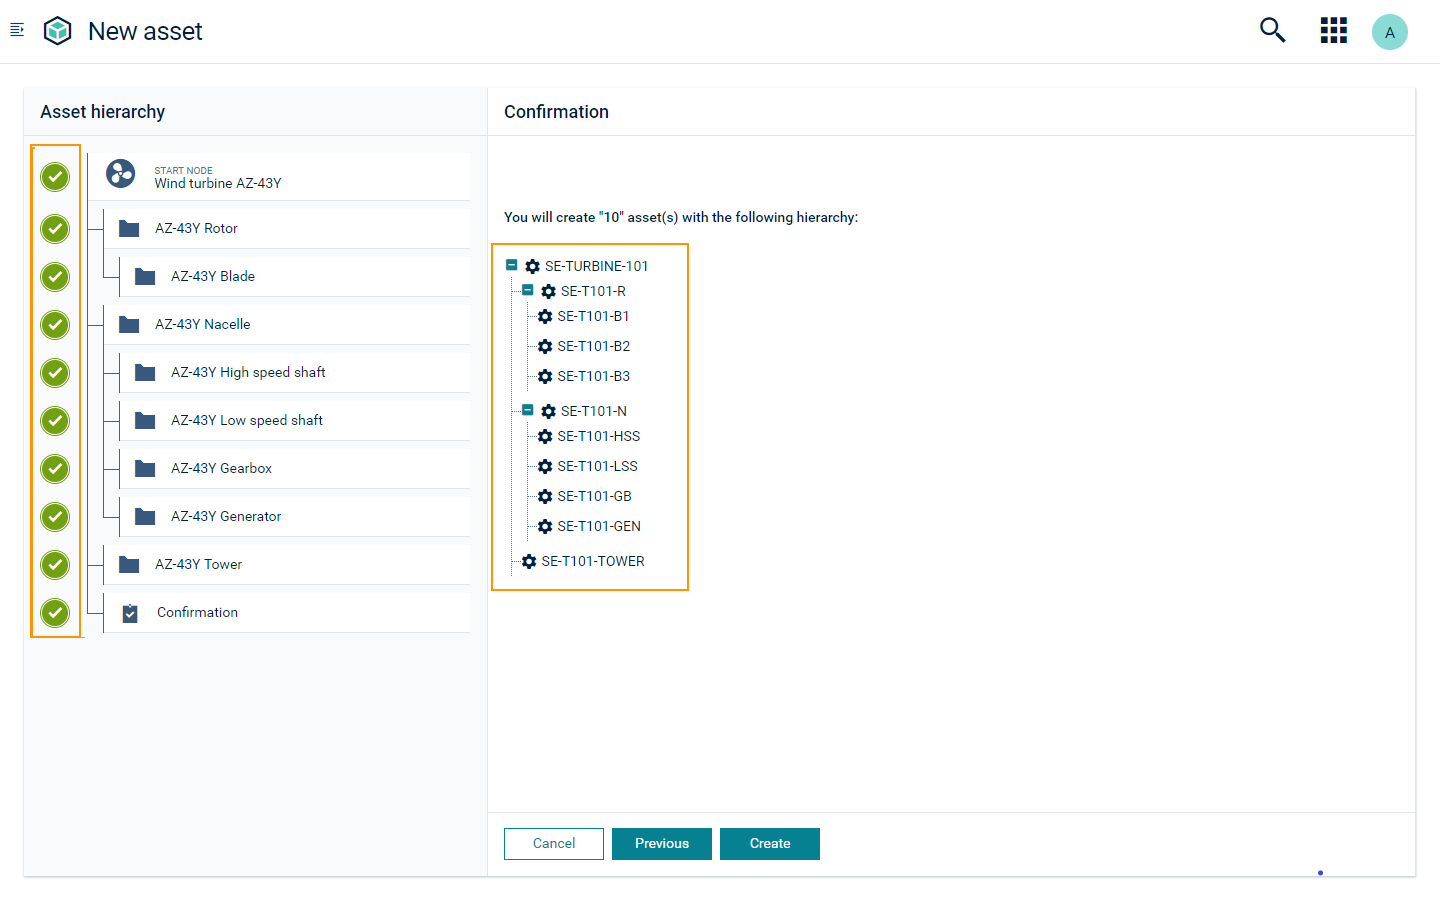
If the asset hierarchy has been successfully created, you see a popup notification at the top right.
The new asset hierarchy in displayed the **Assets** page.
> **Info:**
> - In case of validation errors, they are indicated in red. Correct the required information to continue.
> - If you leave the page abruptly, a confirmation dialog is shown.
> - In case of a bulk operation failure, the entire operation is rolled back. The user is navigated to the main assets page in order to clean up the entities created and to repeat the operation.
#### Example
If you want to create an asset hierarchy for the asset definition "Wind turbine AZ-43Y":
1. Select "Wind turbine AZ-43Y" from the **Choose asset definition** dropdown. Starting with the root asset level, you see the dialog window "Wind turbine AZ-43Y" on the right.
2. Enter the **Name** of the wind turbine, for example, "SE-TURBINE-101".
Optionally, enter a brief description, for example, "Wind turbine with rated power of 3.6MW".
3. To add more assets to this hierarchy level, click **Add** at the bottom.
4. Click **Next** to see the next asset level, for example, "Rotor".
5. Fill out all required fields. Again, you have the option to add more assets on this level.
6. Click **Next** to continue until all assets are created.
### To add subassets {#to-add-subassets}
You can add subassets to an asset from the **Subassets** or **Asset tree** tab.
1. Click **Add asset** to load the **Asset hierarchy** for the selected asset.
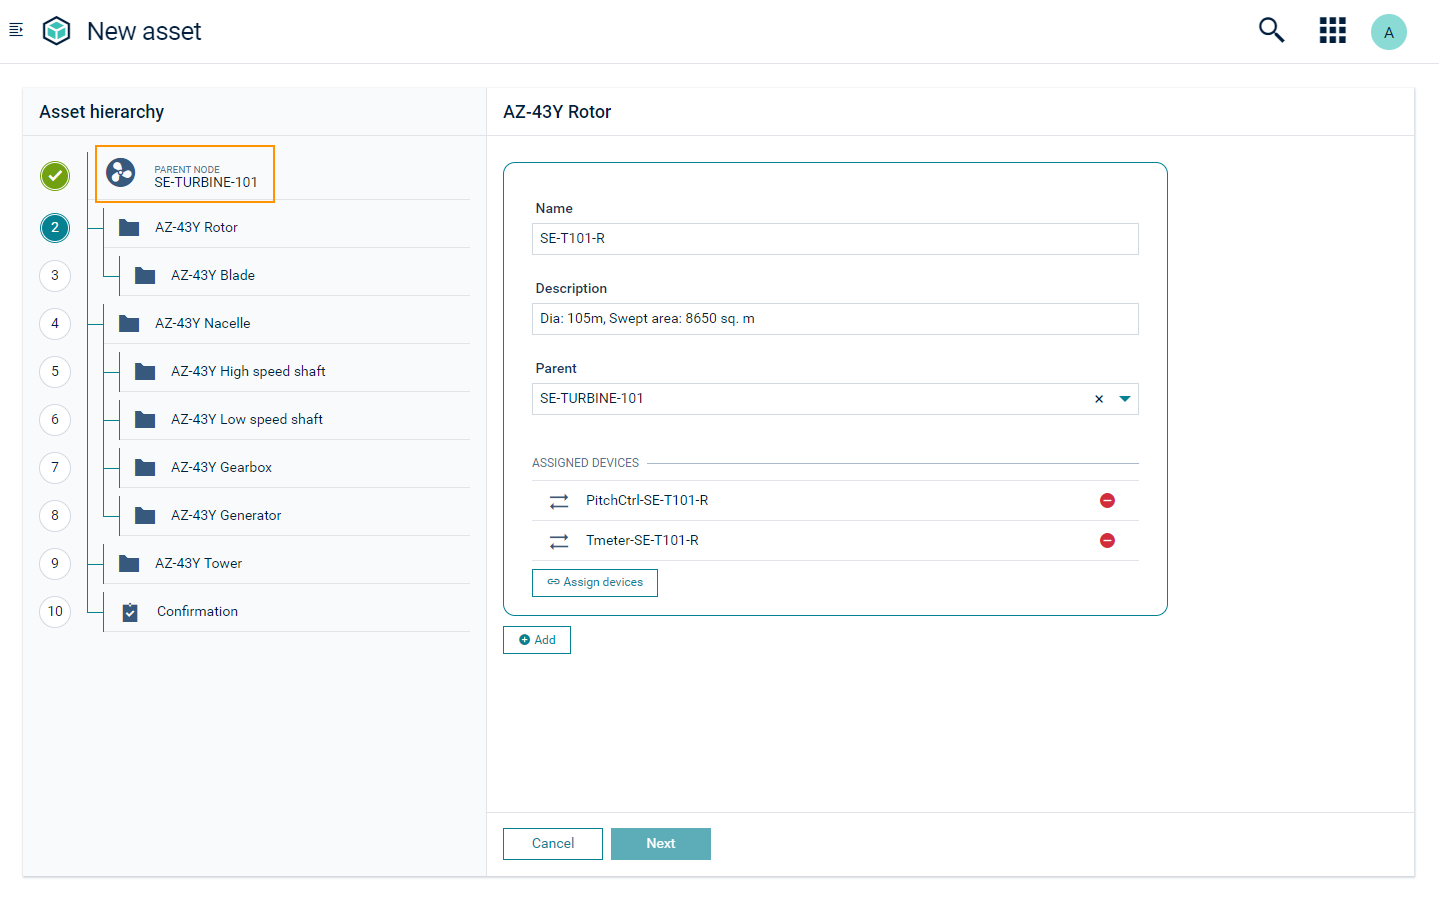
2. The current root asset definition is displayed with the label "START NODE". The asset hierarchy displayed below it is a subset of the root asset hierarchy.
#### Example
If "Wind turbine" is a root level asset, then "Rotor" is a subasset of "Wind turbine" and "Blade" is a subasset of "Rotor".
If you navigate to the **Subassets** or **Asset tree** page of "Wind turbine" and click **Add asset**, the asset hierarchy loads for "Rotor" and "Blade".
If you navigate to the "Rotor" asset and and click **Add asset**, you can only add subassets for "Blade".
For details on how to add assets in the asset hierarchy, see [To create an asset](https://cumulocity.com/docs/dtm/asset-hierarchy/#to-create-an-asset).
> **Info:**
> If you are at the end of the hierarchy, there is no option available to create subassets.
### To create multiple instances of an asset {#to-create-multiple-instances-of-an-asset}
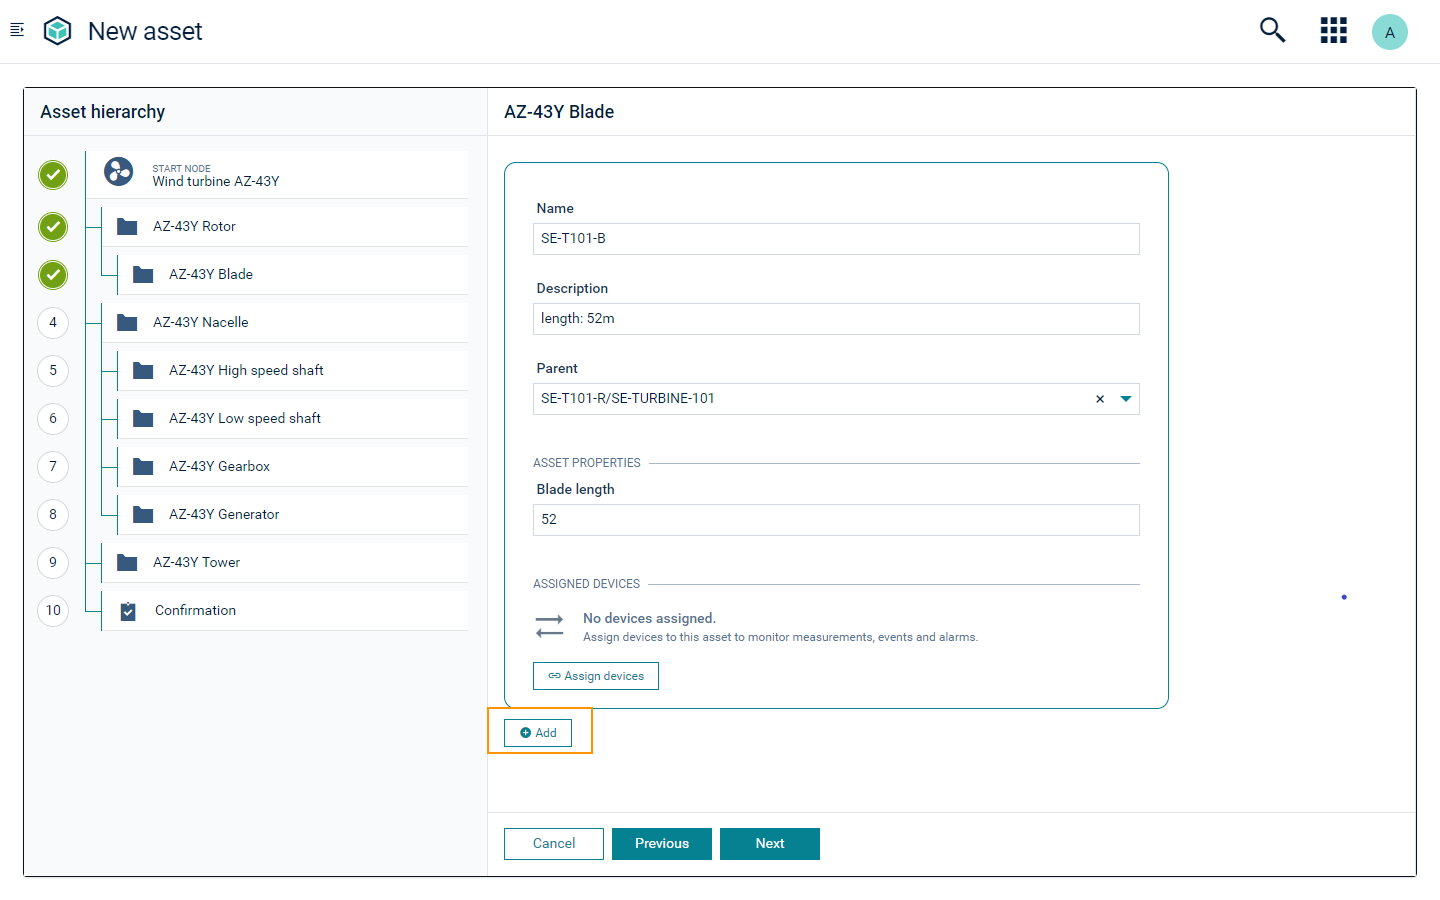
At each hierarchy level, you can create multiple assets from a single asset definition.
For a wind turbine rotor with three blades, for example, you first create the asset hierarchy level for "Rotor". Then use the asset definition "Blade" to add the blades.
Click **Add** at the bottom to add more blade assets.
### To assign devices to an asset
On creating a new asset you can assign one or more devices to it.
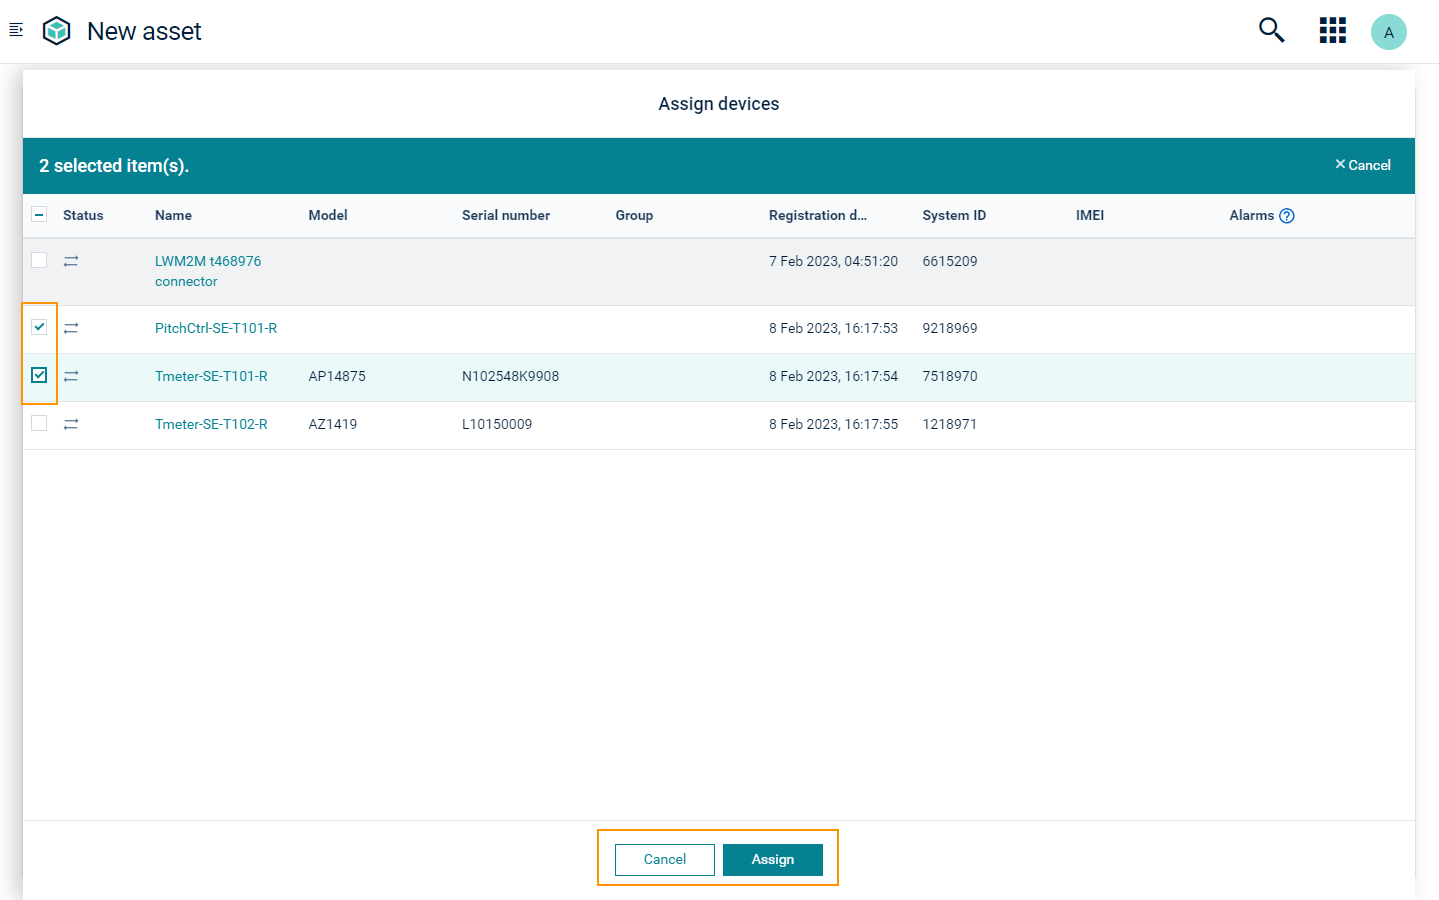
1. Click **Assign devices** in the **New asset** page.
2. The resulting dialog window lists all devices registered for the tenant. Select one or multiple devices and click **Assign**.
To add new devices, switch to the Device Management application.
For details, refer to [Registering devices](https://cumulocity.com/docs/device-management-application/registering-devices/).
> **Info:**
> Only select devices which are part of the current asset.
> If a device belongs to a subasset, then select it when you create the subasset.
#### To filter and select devices {#to-filter-and-select-devices}
You can view, search, or filter devices easily with the following options.
- The columns shown in the grid specify the device details for each device. Click **Configure columns** at the top right to show or hide columns.
- Click **Reload** to reload the page and display the latest list of devices present in the Cumulocity tenant.
- Click **Sort** on the applicable columns to view the device data in either ascending or descending order. The sort icon shows up when hovering over the column.
- To filter devices based on text, use the **Filter** option in the applicable columns. The filter icon shows up when hovering over the column. When a filter is applied, a notification will be shown at the top.
- To clear the filters, click **Clear all filters**.
### To modify an asset {#to-modify-an-asset}
To modify any of the asset details, click the edit icon next to it, enter the new information, and save it.
For details on the fields, see [To create an asset](https://cumulocity.com/docs/dtm/asset-hierarchy/#to-create-an-asset).
### To delete an asset {#to-delete-an-asset}
To delete a subasset or device in the hierarchy, click the delete icon next to it and confirm. The delete icon shows up when hovering over a row.
In the confirmation dialog, you can select if you only want to delete the asset with all associated subassets or if you additionally want to delete all associated devices.
### To search for an asset {#to-search-for-an-asset}
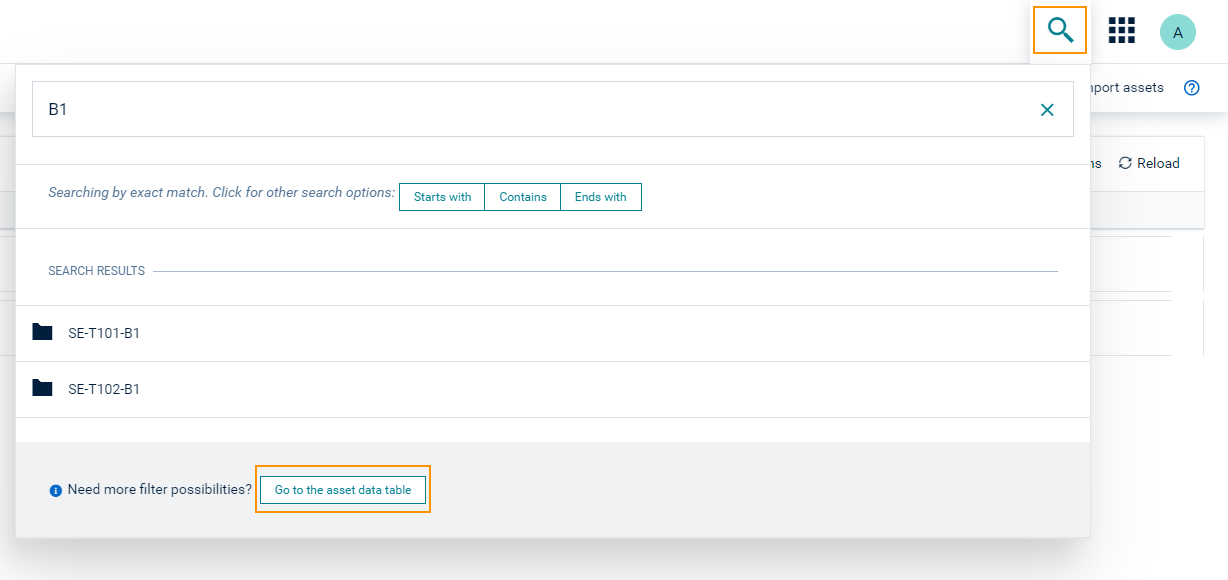
You can search for assets using the **Search** button at the right of the top bar.
Enter a search term into the textbox at the top of the **Search** window to see all assets matching the search criteria in the **Search results** section.
The **Search** page only shows a limited number of matches. To see more details, click **Go to the asset data table** at the bottom. This will show the entire search results in a table format.
> **Important:**
> The search results include all assets containing the search term in any property (name, model or any fragment), that is, the search results do not only include assets matching the search criteria with their names.
### To move assets {#to-move-assets}
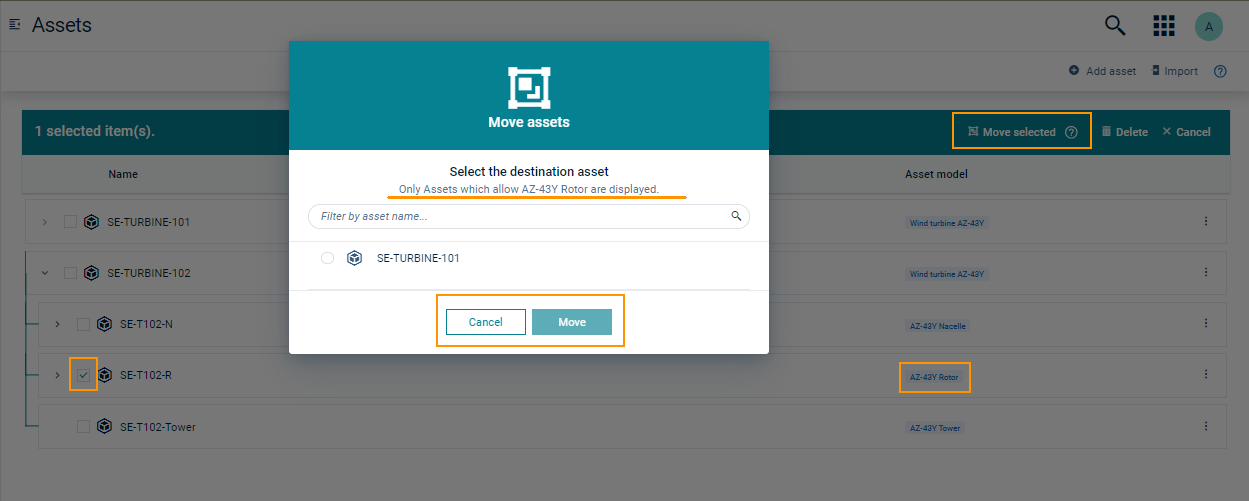
To move one or more assets, follow the steps below:
1. Select one or more assets of the same type in the **Assets** page.
2. Click **Move selected** at the top.
3. In the resulting dialog, a list of assets is shown which allow the selected assets as its children. Click the radio button to the left of an asset to select it.
4. Click **Move** to complete the relocation.
> **Info:**
> Only a maximum of 10 assets can be moved at a time.
>
> The **Move selected** option is disabled in the following scenarios:
>
> * One or more root assets are selected.
> * Assets described by different asset definitions are selected. Only assets of the same asset definition can be moved.
> * The selected asset's asset definition is no longer a child of its parent asset definition.
> * One or more assets with the same name are selected.
## Data points
Data points represent the numerical measurements collected from connected devices and sensors. These are the fundamental real-time data streams that offer insights into the operational status, performance, and environmental conditions of your physical assets. These data streams are key to monitoring asset health, identifying trends, and making informed decisions over time.
To effectively organize and interpret the vast amount of data collected from IoT devices, Cumulocity structures measurements using two key concepts: **fragments** and **series**. These concepts are crucial for understanding how measurement data is categorized and stored within the platform and how to use data points in the Digital Twin Manager (DTM) application.
A **fragment** serves as a logical container or category that groups related measurements or characteristics of an asset (or any managed object). It identifies a specific capability or a set of related data points. Within a fragment, a **series** represents a specific, individual measurement stream. It is the named property that holds the actual numerical value and its corresponding unit. A data point, and with this the measurement series it represents, is uniquely identified by the combination of its fragment and series.
> **Info:**
> To reference data points and measurement series in Cumulocity, the format `fragment.series` is used, such as `c8y_Temperature.T_Ambient`.
**Example:**
Within the `c8y_Temperature` fragment, `T` (for Temperature) could be a series. Each series provides a distinct stream of data for a particular metric. If a device has two temperature sensors, one for ambient temperature and one for internal temperature, both might fall under the `c8y_Temperature` fragment but would have distinct series names, such as for example `T_Ambient` and `T_Internal`.
The DTM application allows managing data points for assets.
> **Info:**
> The Data Points extension package must be installed for the Digital Twin Manager application to manage data points for assets. If the Data Points extension package is not installed, the **Data points** tab is not visible in the asset details view. Install the Data Points extension package in **Administration > Ecosystem > Dtm-plugins > Data points**.
### Types of data points {#types-of-data-points}
In Cumulocity, data points are inherently associated with managed objects in the platform's inventory. As assets are a type of managed object, measurements can be associated with assets as any other managed object. However, there are two distinct ways in which data points can be associated with assets in the Digital Twin Manager.
**Direct association:** Any managed object in Cumulocity, including an asset, can directly receive measurements and have measurements directly associated. This means that an asset itself can be the source of a measurement. For example, if a building asset has its own sensors directly integrated with Cumulocity, the measurements from these sensors will directly be associated with that building asset.
**Linked association:** The Digital Twin Manager allows linking of data points from one managed object (typically a device) to an asset. This means the asset itself does not generate the measurement and does not have the measurement directly associated, but it points to a measurement originating from another source, usually a connected device that is part of or related to the asset's hierarchy.
> **Feature preview:**
> Data point linking enables the contextualization of raw, device-level measurements within the logical framework of an asset hierarchy. This linking allows for a unified view of an asset's performance and status by aggregating relevant data from multiple underlying devices into the asset, transforming disparate sensor readings into actionable information for the asset itself.
>
> The new **DTM Data Service** processes configured data point links and automatically propagates incoming device measurements to the corresponding assets in the digital twin hierarchy. As soon as a data point link is created in the DTM application, the DTM Data Service starts forwarding incoming measurements from the source device to the linked data point on the asset.
>
> This feature is in **Public Preview**, that is, it is not enabled by default and may be subject to change in the future. To enable the DTM Data Service for your tenant, please contact [Cumulocity support](https://cumulocity.com/docs/additional-resources/contacting-support).
>
> Note that the number of measurements propagated to assets through data point linking depends on the number of linked assets per incoming measurement. For example, if a device measurement is linked to 3 different assets, the DTM Data Service will create 3 measurements on the asset level for each incoming device measurement.
> **Requirements:**
> ROLES & PERMISSIONS
>
> The DTM application provides a comprehensive set of permissions to manage linked data points effectively and securely. These permissions are essential for ensuring that users can create, update, view, and delete linked data points as needed while maintaining the integrity and security of the asset data.
>
> These permissions are categorized under two main permissions: "Digital twin assets" and "Digital twin linking". The following permissions are required to view or manage linked data points:
>
> - To view linked data points: READ permission for permission type "Inventory"
> - To create linked data points: CREATE permission for permission type "Digital twin assets" or "Digital twin linking"
> - To update linked data points: UPDATE permission for permission type "Digital twin assets" or "Digital twin linking"
> - To create, update and delete linked data points: ADMIN permission for permission type "Digital twin assets" or "Digital twin linking"
### To view data points {#view-datapoints}
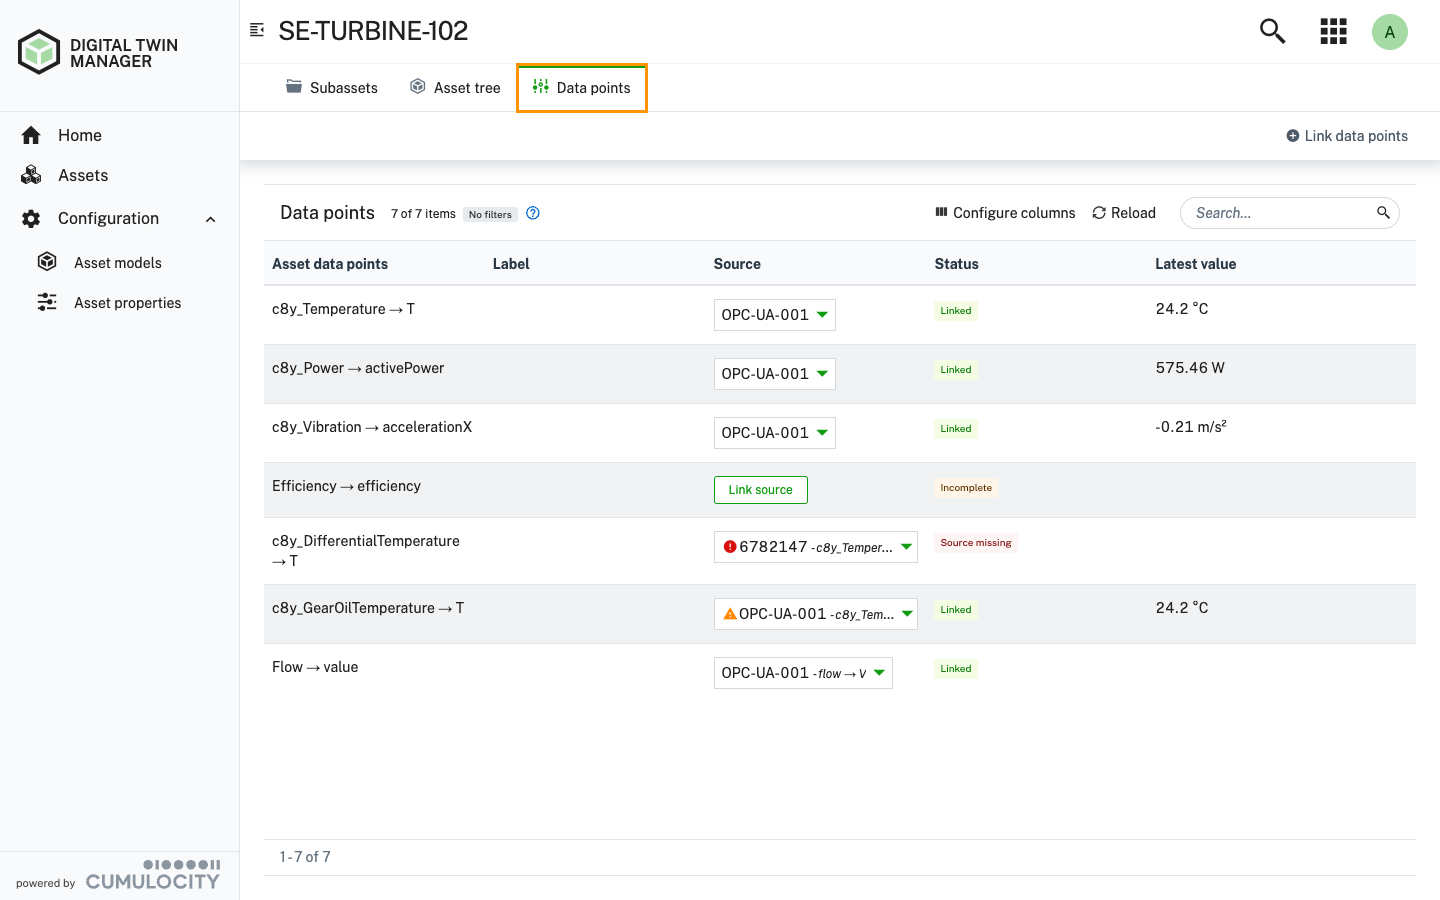
To view the data points for a specific asset, select an asset from the hierarchy on the **Assets** page. In the asset details view, select the **Data points** tab.
#### Understanding the columns in the data points list {#understanding-the-columns-in-the-datapoints-list}
The **Data points** tab presents all relevant information about the data points associated with the selected asset in a table format. Each row in the table represents a unique data point with the following columns:
| Column | Description
| ---------- | -----------
| Measurement series | The fragment and series (for example, `c8y_Temperature` → `Ts`), clearly identifying the specific type of measurement being tracked. The measurement series represents the unique identifier for the data point and its particular data stream.
| Data point template | Indicates if a predefined template from the Cumulocity data point library is applied to this measurement. If a template matches the fragment and series, it provides default visualization settings (like color and label) and pre-configured threshold rules for alarms.
| Source | Identifies the unique ID, or if available the name, of the device that is generating this measurement. For linked data points, this shows the source device the linked data point originates from.
| Status | The current state of the data point, possibly indicating whether it is actively receiving data, requires further configuration, or if its source is unavailable. This is crucial for troubleshooting and understanding the data flow and is particularly useful for linked data points.
| Latest value | Displays the most recently reported numerical value for this data point including its unit. If the data point is not yet configured or linked, it may show *Not configured*.
For linked data points, the **Source** column shows the name (or ID) of the source device and the fragment and series on the source device. Fragment and series are only shown for the source if they are different to fragment and series of the data point itself. Via the source context menu of linked data points, you get access to actions such as changing the source device or unlinking the data point.
#### Understanding states {#understanding-states}
The **Status** column provides immediate feedback on the state of a data point. Understanding these states is key to ensuring assets are receiving the expected data. States currently supported in the DTM application are:
| Status | Description
| ---------- | -----------
| Linked | The data point is a linked data point and is successfully connected to its designated source (managed object/device). This indicates a fully operational link, however, it does not indicate if the link source is actively receiving measurements.
| Source missing | The managed object (device) configured as the source for this linked data point cannot be found in the Cumulocity inventory. This could be the case because the device has been deleted. The link itself is defined, but its source is not found.
| Incomplete | The data point link has been initiated, but it requires further action to become fully operational. Typically, this means a specific source device needs to be selected and assigned to the data point for the link to become operational.
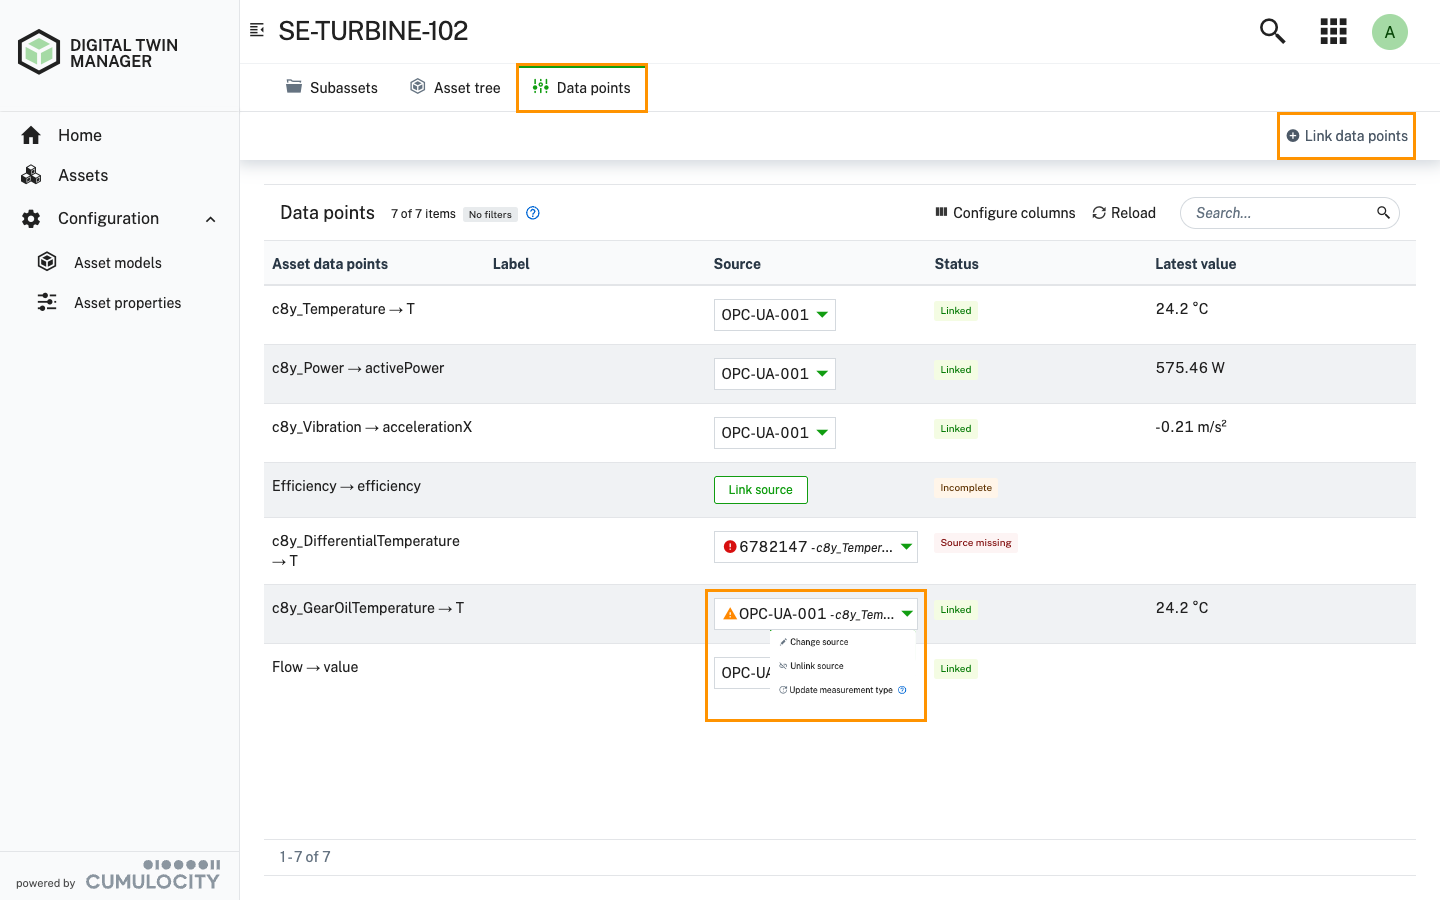
In case of an error or warning status for a data point the, **Source** shows the warning or error indicators and provides options to troubleshoot and resolve the issue via the context menu. For example, in the case of a *Missing source* status, you can select a new source device to link the data point to.
### To create linked data points {#to-create-linked-datapoints}
All data points associated with an asset can be created in the **Data points** tab of the **Assets** page.
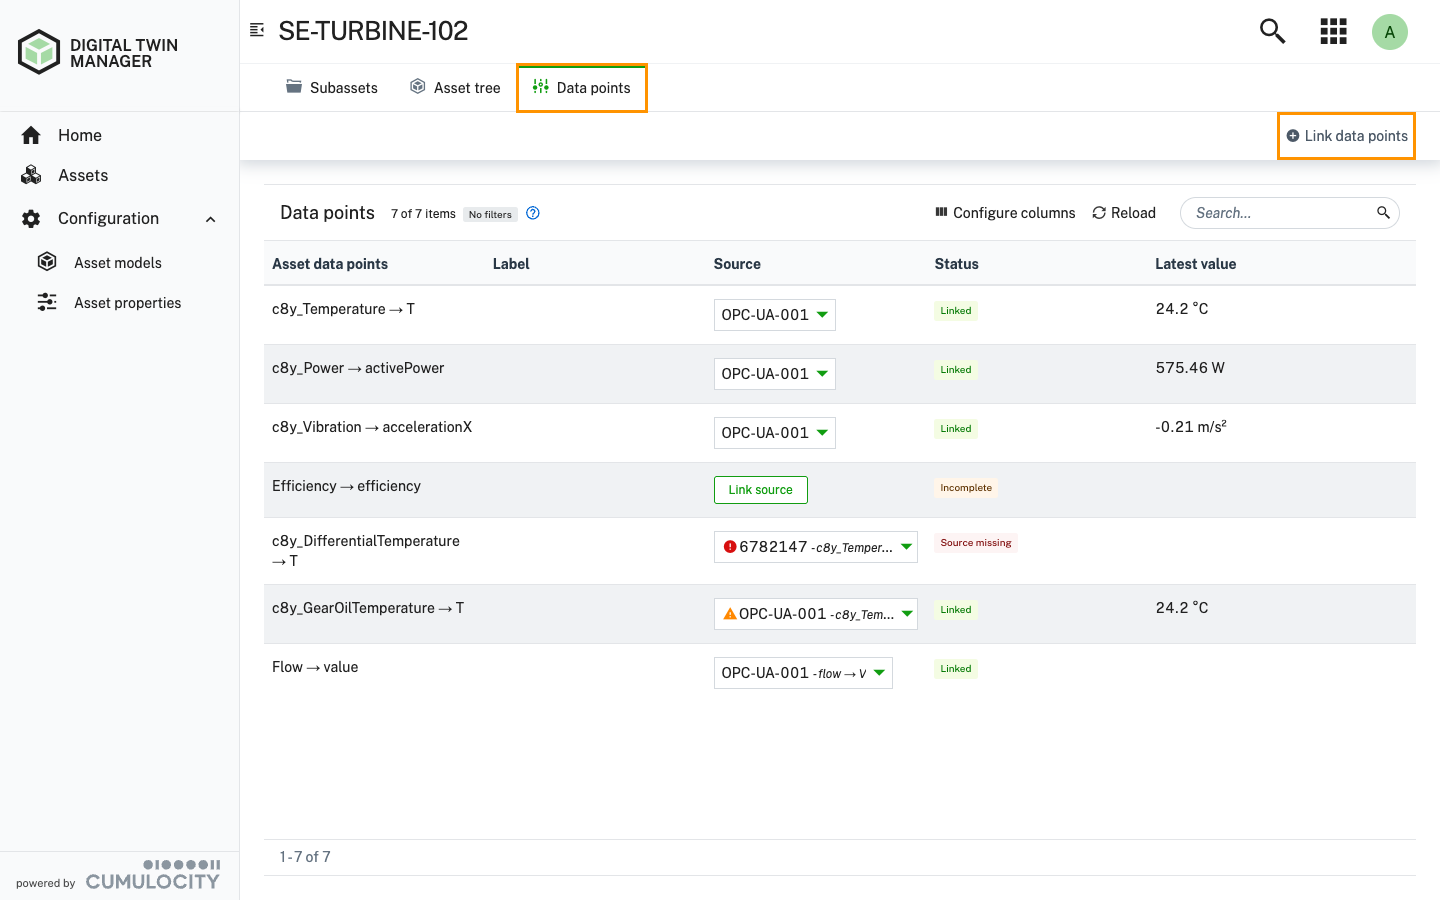
1. Select an asset from the hierarchy on the **Assets** page and switch to the **Data points** tab in the asset details.
2. The **Data points** tab contains a comprehensive list of all data points associated with the selected asset.
3. Click the **Link data points** button at the top right of the **Data points** tab. This opens the data point selector dialog.
4. Select the source device from which you want to link data points. This is done by navigating through the asset hierarchy in the left panel of the dialog.
5. In the center panel, you can either select from existing data points associated with the source device or define custom data points by specifying the fragment and series.
6. The right panel displays the data points you have selected for linking. Review your selections here.
7. Once you have made your selections, click the **Add data points** button at the bottom of the dialog to finalize the linking process.
For each selected data point, a new data point will be created for the asset, pointing to the source device and its specific measurement series.
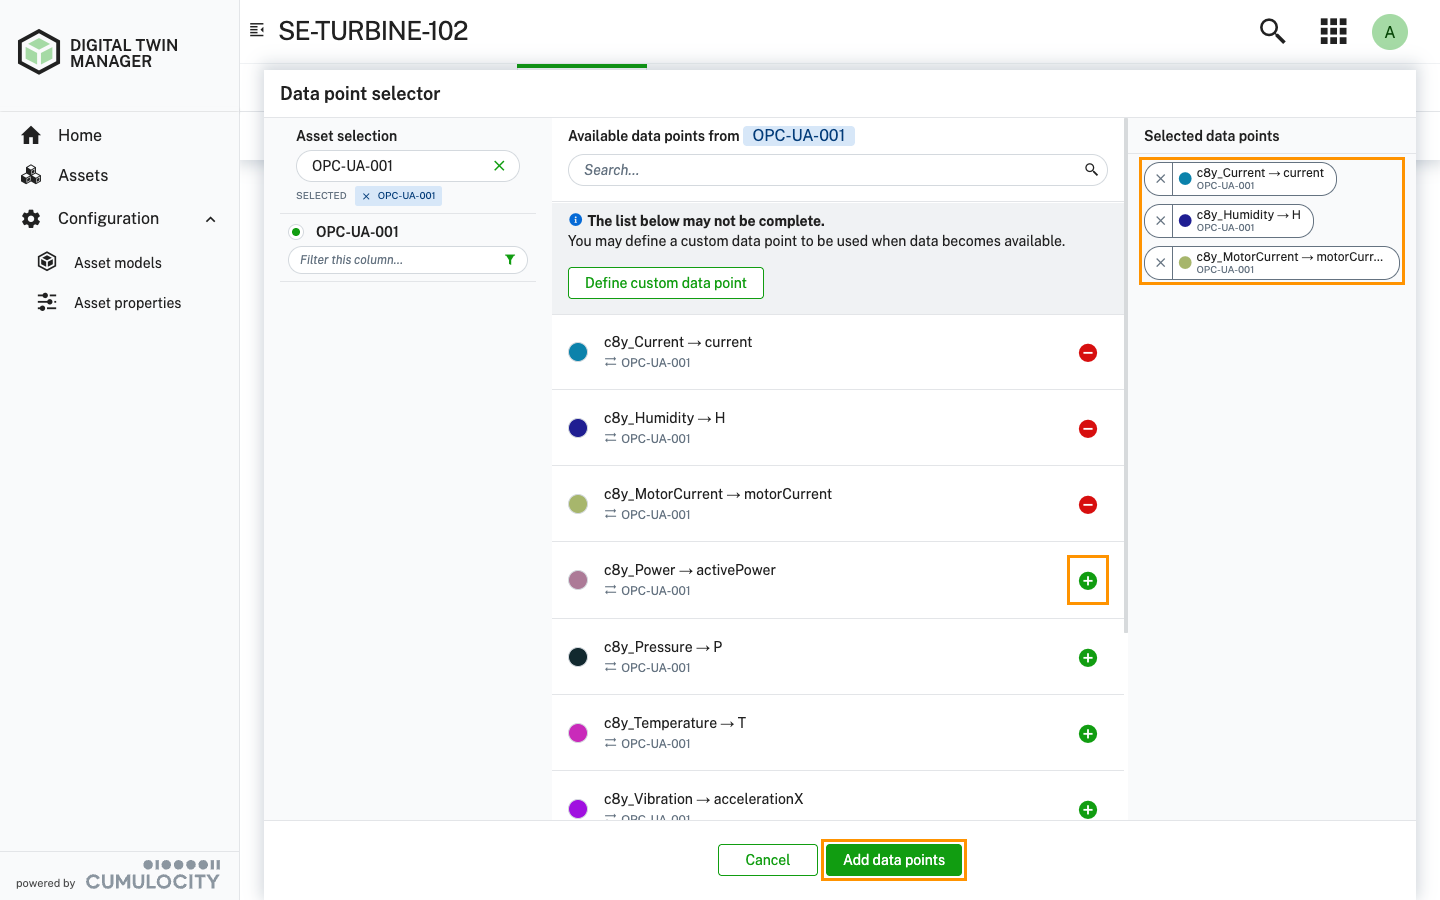
When choosing from available data points, you have two primary options:
**Associated data points**: Select from the list of measurement series already known or received by the platform from the currently selected source device in the **Data point selector**. These are measurements that the platform has already processed and recognized. You can click the plus button next to any of these listed data points to add them to your selection.
**Custom data points**: If the desired measurement has not yet been received by the platform from the source device, you can define it as a custom data point. To do this, you must manually provide the *fragment* (for example, `c8y_Temperature`) and *series* (for example, `T`) in the respective input fields. You might also need to provide a measurement type.
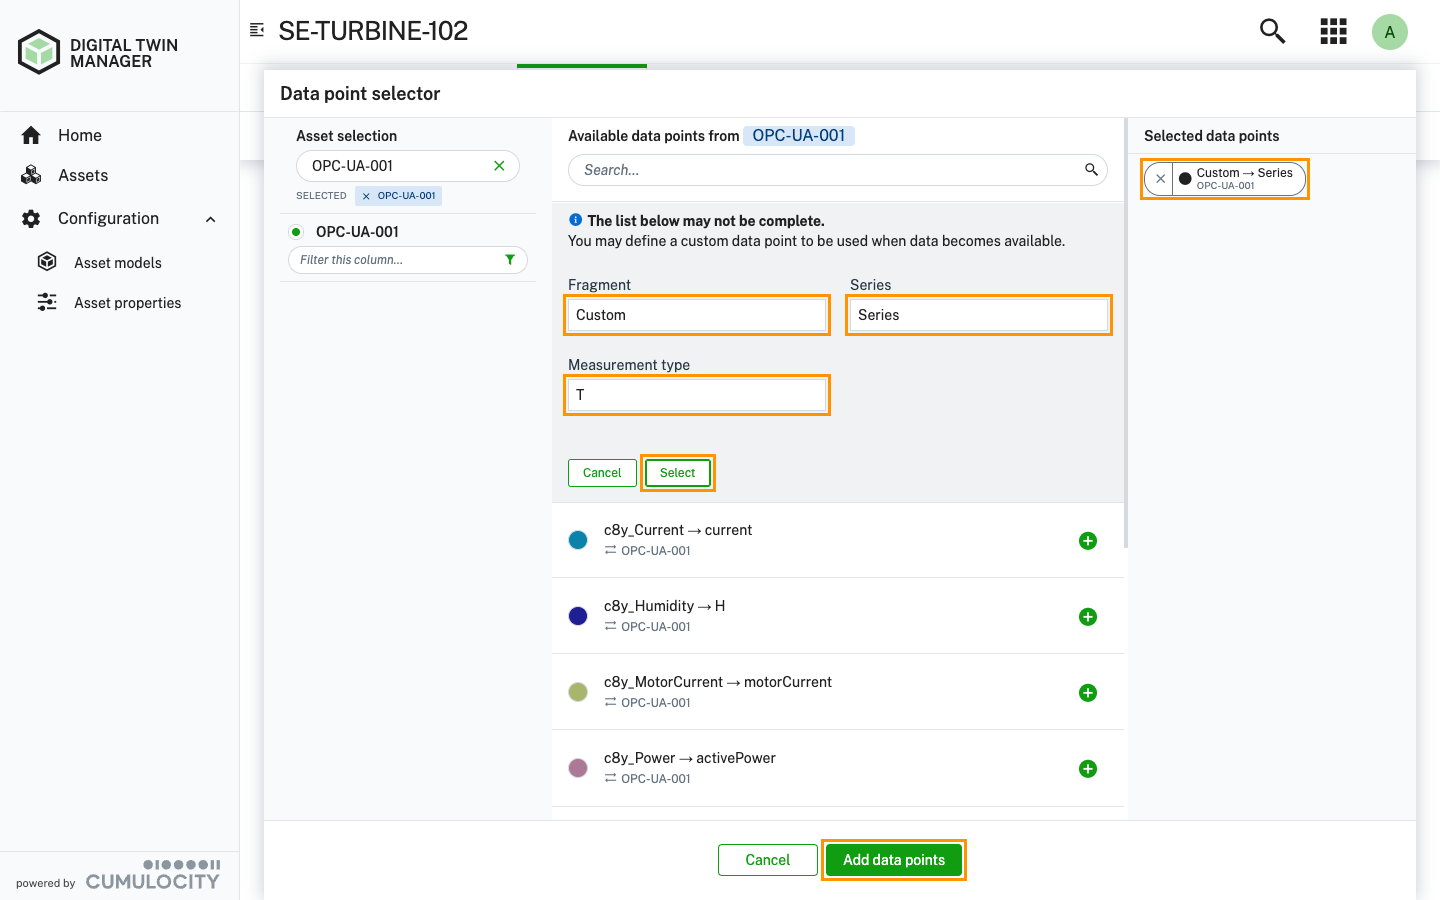
> **Info:**
> When creating a new linked data point, the data point on the asset is created with the fragment and series of the selected data point in the data point selector. Using the **Change source** context menu option, it is possible to change the source device itself and/or the fragment and series on the source device for the linked data point. This means that you can adapt the linked data point to different source devices or measurement series as needed.
>
> If fragment and series on the asset and the source device are different, the source will have the name of the source device and the fragment and series will be displayed as "DeviceName - c8y_Temperature → T". This helps to clearly identify the source of the linked data point.
### To modify linked data points {#to-modify-linked-datapoints}
1. Navigate to the **Assets** page and select the asset for which you want to manage linked data points.
2. In the **Data points** tab of the asset details, find the linked data point you wish to update.
3. Click the **Change source** option in the context menu of the linked data point.
4. In the **Change source** dialog, you can select a new source device or modify the fragment and series of the linked data point.
5. After making your changes, click **Save** to apply the changes.
### To delete linked data points {#to-delete-linked-datapoints}
1. Navigate to the **Assets** page and select the asset for which you want to delete linked data points.
2. In the **Data points** tab of the asset details, find the linked data point you wish to delete.
3. Hover over the linked data point and click the delete icon that appears at the right.
4. In the confirmation dialog, select **Delete** to delete the linked data point.
### To unlink linked data points {#to-unlink-linked-datapoints}
1. Navigate to the **Assets** page and select the asset for which you want to unlink data points.
2. In the **Data points** tab of the asset details, find the linked data point you wish to unlink.
3. Click the **Unlink source** option in the context menu of the linked data point.
4. In the confirmation dialog, select **Unlink** to remove the link between the asset and the source device for that data point.
> **Info:**
> Unlinking a data point does not delete the data point itself; it simply removes the association between the asset and the source device. The data point will still exist as a measurement of the source device but will no longer be linked to the asset. The state of the data point will change to *Incomplete* after unlinking, indicating that it is no longer associated with a source device.
### Source warnings and errors {#source-warnings-and-errors}
Sources of linked data points can have warnings or errors that indicate issues with the data point. Warnings are highlighted using the warning icon, while errors are highlighted using the error icon .
Possible issues include:
- **Error**: The source device cannot be found.
- **Warning**: The measurement type is required but is not configured for the data point.
- **Warning**: The measurement type, if configured for the data point, is not matching the measurement type of the latest measurement received from the source device.
By hovering over the warning or error icon, you can see more details about the issue. This helps in troubleshooting and resolving any problems with the linked data points. To resolve the issues, use the context menu actions available for the source.