# Exports
Source: https://cumulocity.com/docs/cockpit/exports/
Sector: Application enablement & solutions
Release: Latest
This section explains the difference between configuring exports at regular intervals for all or selected data of your platform as well as the export functionality integrated in to widgets, such as the "data point table" widget, where the export functionality allows you to export the data from selected data points at the current moment.
## Managing exports
The export functionality lets you export specific data to either CSV or Excel files.
> **Requirements:**
> ROLES & PERMISSIONS:
>
> - To view exports: READ permission for permission type "Inventory"
> - To edit an export: ADMIN permission for permission type "Inventory"
> - To add a new export: CREATE or ADMIN permission for permission type "Inventory"
> - To schedule an export: ADMIN permission for permission type "Schedule export"
> - To duplicate an export: ADMIN permission for permission type "Inventory"
> - To delete an export: ADMIN permission for permission type "Inventory"
With this feature, you can request data for the whole tenant. Additionally, you can choose to filter for specific devices, time ranges or fields. The export data contains information about all specified filters and enabled fields.
### To show all exports {#to-show-all-exports}
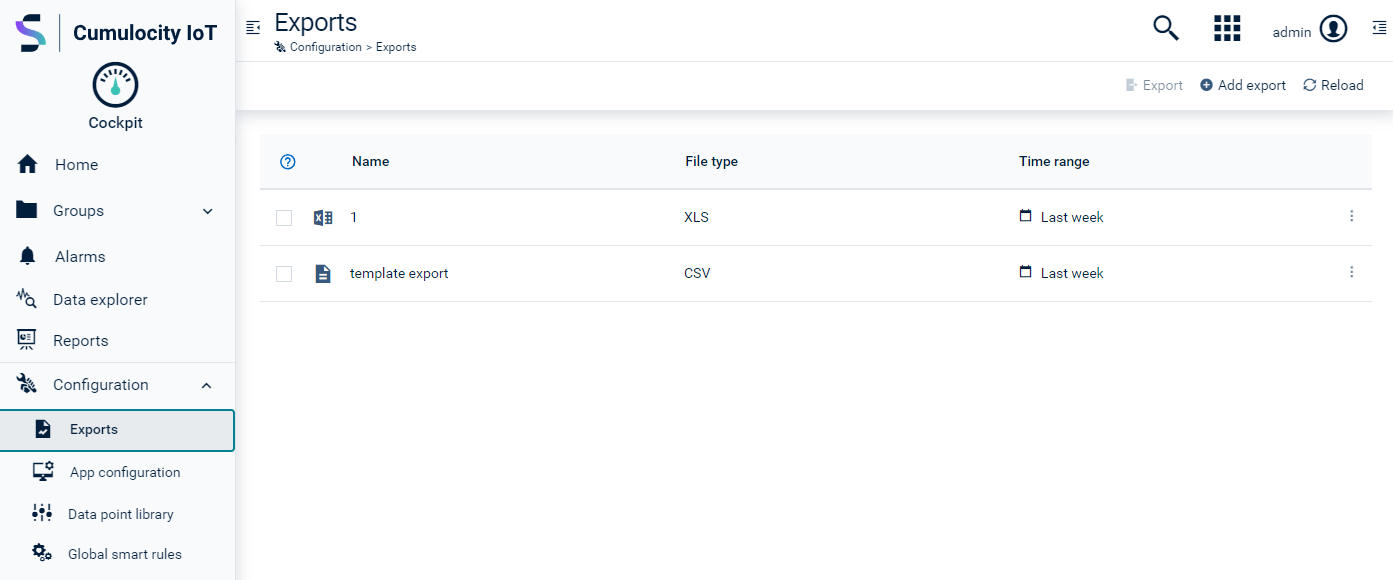
To show all exports, click **Export** in the **Configuration** menu in the navigator.
In the **Export** page you will find a list displaying all exports with their names, file type and time range.
### To add an export {#to-add-an-export}
1. Click **Add export** in the top menu bar.
2. Enter a name for the export and select the file type (CSV or XLSX) for the report output.
**Filters**
In the **Filter** section, you can select filters to request object- or time-specific data.
To filter for a particular object, enter a name or property value into the search field and click the search icon . All matching devices or groups will be displayed below the **Value** field. Click an object to select it (highlighted in green).
> **Info:**
> If you select a group, the data of direct child devices will be included. However the export will not contain the data of devices in subgroups (indirect children).
The **Time range** filter can filter data for a specific time range. Select a time range from the dropdown field. All times assume platform system time (UTC).
- Last 24 hours:
- From: exactly 24 hours before the time of export
- To: the time of export
- Example: from 2020-12-31 12:34:56 to 2021-01-01 12:34:56 (when the export is done at 2021-01-01 12:34:56)
- Last 7 days:
- From: exactly 7 days before the time of export
- To: the time of export
- Example: from 2020-12-25 12:34:56 to 2021-01-01 12:34:56 (when the export is done at 2021-01-01 12:34:56)
- Last 30 days:
- From: exactly 30 days before the time of export
- To: the time of export
- Example: from 2020-12-02 12:34:56 to 2021-01-01 12:34:56 (when the export is done at 2021-01-01 12:34:56)
- Last week:
- From: same day as the time of export, but last week at midnight
- To: the time of export
- Example: from 2020-12-25 00:00:00 to 2021-01-01 12:34:56 (when the export is done at 2021-01-01 12:34:56)
- Last month:
- From: same day as the time of export, but last month at midnight
- To: the time of export
- Example: from 2020-12-01 00:00:00 to 2021-01-01 12:34:56 (when the export is done at 2021-01-01 12:34:56)
- Last year:
- From: same day as the time of export, but last year at midnight
- To: the time of export
- Example: from 2020-01-01 00:00:00 to 2021-01-01 12:34:56 (when the export is done at 2021-01-01 12:34:56)
- Custom:
- From: date and time specified by the user
- To: date and time specified by the user
Select the **Object to export** and **Time range** checkboxes to enable the respective filters.
> **Info:**
> The maximum number of documents matching the defined filters that can be returned is 1 million. If the number of documents for the defined filters exceeds this limit, only the first 1 million documents will be exported. Additionally, when the result is truncated due to this limitation, an additional line with an indicator is added at the end of the file. The indicator row contains the statements "limit exceeded!" and "result truncated!" alternating every other column.
**Fields**
Apart from object- and time-specific filtering you may filter data for specific fields:
- Alarms
- Events
- Managed objects
- Measurements
Use the toggle to enable/disable a field.
> **Info:**
> The time range filter only applies to alarms, events and measurements but not to managed objects. If selected, managed objects will appear in the export, regardless of any specified time range.
When a field is enabled, predefined or empty properties can be added.
> **Info:**
> Documents that have no value defined for any of the selected fields are removed from the resulting export file. This is done only after the result of filters defined above was already calculated. This is commonly the reason why resulting files rarely reach the hard limit of 1 million rows.
##### To add a property {#to-add-a-property}
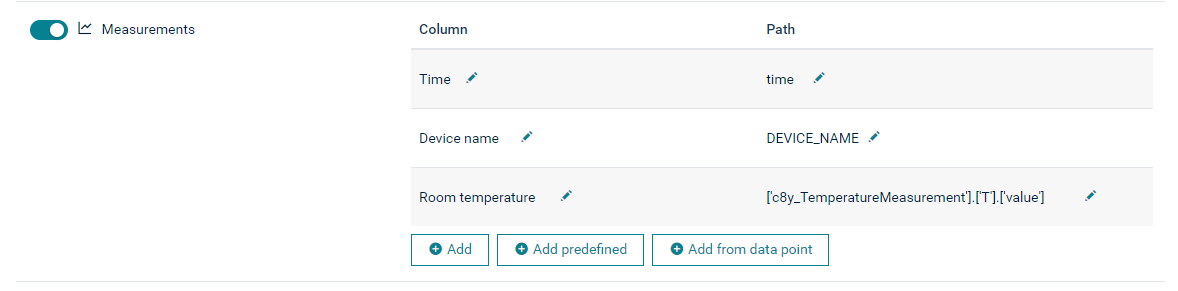
Click **Add** to add empty properties. To enter a label or path, click **Column** or **Path** and edit the field. For example, if you enable the **Alarms** field you could enter "Severity" in column and path to receive data for alarm severities.
Click **Add predefined**, to add predefined properties. Simply select the desired properties from the list and click **Select**. Use the search field at the top to search for a specific property.
If you have at least one field that is not originating from the "Add predefined" list but defined as a custom property, then you must set up at least one property for the custom values to appear in the export.
Example:
An export has 4 fields defined: time range, device name, type and c8y_SpeedMeasurement.speed.value. The first 3 are predefined properties, while the last one is a custom property. If any measurement for export does not have a custom property `c8y_SpeedMeasurement.speed.value`, then it will not appear in the export file.
If your field is a valid.key.with.dot then refer to it as ['fragment.key.with.dot'] in the path, for example: ['fragment.key.with.dot'].series.value
In case of measurements enabled, you can also select **Add from data point**. For details on how to add data points see [To add a data point](https://cumulocity.com/docs/cockpit/data-explorer/#to-add-a-data-point).
JsonPath expressions added from data points will be stored in bracket notation in order to increase the flexibility in fragment and series naming (for example whitespaces will be supported):
##### Predefined fields {#predefined-fields}
**Predefined fields** are standard properties that always exist in a given type of document. The list of properties that you can select for export in the UI is wider and contains a lot of frequently used fragments with business meaning, but these fragments are treated as **custom properties** by the export engine logic.
Here is the list of predefined fields for particular types of documents:
- Alarms: count, creationTime, firstOccurrenceTime, id, lastUpdated, severity, source, status, text, time, type
- Events: creationTime, id, lastUpdated, source, text, time, type
- Measurements: id, source, time, type
- Managed objects: additionParents, assetParents, childAdditions, childAssets, childDevices, creationTime, deviceParents,
id, latestMeasurements, lastUpdated, name, owner, previousMeasurements, supportedMeasurements, type
### To schedule an export {#to-schedule-an-export}
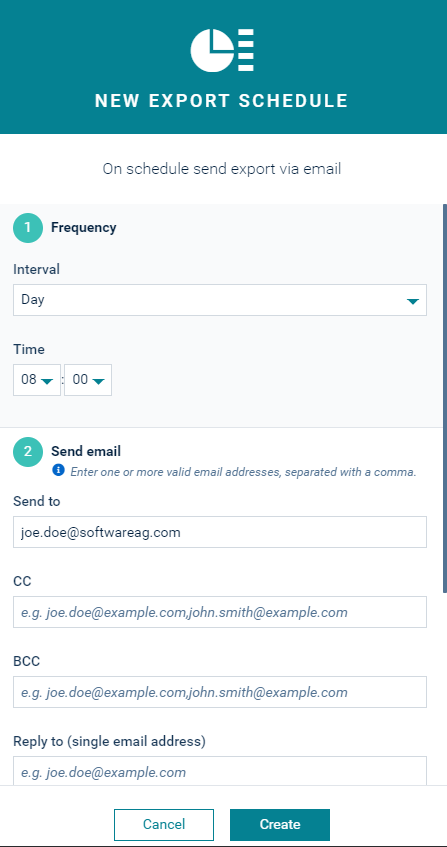
To schedule an export to a CSV or XLSX file to any point in time, open the respective export and click **Add schedule** at the bottom.
In the resulting dialog box provide the following information to receive the scheduled export via email.
**1 - Frequency**
Select the frequency for sending the export from the dropdown list, that is, every hour, day, week, month or year. Depending on the frequency selected, provide additional timing information. For example, if you have selected "every month", provide the day of month, hour and minute.
> **Info:**
> Schedule intervals must be provided in Coordinated Universal Time (UTC).
**2 - Send email:**
Complete the email information.
In the **Send to** field, provide the email address of the recipient. This field is mandatory. Optionally, you can provide email addresses for recipients of copies (CC) or blind copies (BCC). Use comma as separator to enter multiple recipients.
Optionally, add the email address of the sender for reply.
Specify the subject of the email. This field is pre-filled, but may be modified.
Enter the actual email message. Available placeholders are {host}, {binaryId}. The default value is "File with exported data can be downloaded from {host}/apps/public/login/index.html#/?download={binaryId}".
Note that to create a clickable link in the email, you must add "https://" to the link. For example: "A file with exported data can be downloaded from https://{tenant-domain}/apps/public/login/index.html#/?download={binaryId}."
> **Info:**
> Note that the corresponding emails are sent with "text/html" as the `Content-Type` header.
Click **Create** to create the new export schedule.
The export schedule will be added to the export details.
#### Migration of scheduled exports {#migration-of-scheduled-exports}
With version 10.6.2, a new report agent has been implemented to allow scheduled exports. The export schedules functionality based on smart rules has been deprecated.
On opening a report, all scheduled exports based on smart rules are automatically migrated to the new report agent, while displaying a message informing the user about the process.
> **Important:**
> You must open each report manually, to migrate the export schedules included in the report.
> **Info:**
> To use the new export schedule feature and for the migration to work, the report-agent microservice must be subscribed. New tenants will be subscribed to it automatically. Existing tenants should make sure that they are subscribed to it.
### To export data {#to-export-data}
To export data to a CSV or XLSX file, select the checkbox in front of the respective row in the list and at the left of the top menu bar click **Export**.
You will receive an email containing links to each export file.
Standard time properties (like time or creationTime in alarms) are exported to the XLSX and CSV files following the date and time format representation defined in [ISO-8601](https://www.w3.org/TR/NOTE-datetime).
When the export documents limit is reached and the result is truncated due to its limitations, an additional line with an indicator is added at the end of document.
Sample CSV export with indicator:
Time,Device name,Creation time,Device name,ID,Source,Text,Time,Type
2021-11-25T10:37:06.485Z,Position #1,2021-11-25T10:37:06.485Z,Position #1,1266,1195,Location updated,2021-11-25T10:37:06.485Z,c8y_LocationUpdate
2021-11-25T10:37:01.484Z,Position #1,2021-11-25T10:37:01.484Z,Position #1,1265,1195,Location updated,2021-11-25T10:37:01.484Z,c8y_LocationUpdate
[...]
limit exceeded!,result truncated!,limit exceeded!,result truncated!,limit exceeded!,result truncated!,limit exceeded!,result truncated!,limit exceeded!
### To edit an export {#to-edit-an-export}
Just click the respective row or click the menu icon at the end of the row and then click **Edit**.
For details on the fields see [To add an export](https://cumulocity.com/docs/cockpit/exports/#to-add-an-export).
### To duplicate an export {#to-duplicate-an-export}
1. Click the menu icon at the end of the row and then click **Duplicate**.
2. Modify at least the name.
3. Click **Save & close** to save the export and return to the export list.
### To delete an export {#to-delete-an-export}
Click the menu icon at the end of the row and then click **Delete**.
## Exports integration with Data Points based features
While the export functionality itself is a standalone feature, you can combine it with other features that allow you to select data points. To use the export
functionality in this way, you must integrate it in the respective feature, for example, the [Data points table](https://cumulocity.com/docs/cockpit/widgets-collection/#data-point-table)
widget or the [Data points list](https://cumulocity.com/docs/cockpit/widgets-collection/#data-point-list) widget.
> **Requirements:**
> ROLES & PERMISSIONS:
>
> To generate exports in a widget, you must meet at least one of these criteria:
>
> - Have READ permission for the "Measurements" permission type (either as a global role or for the specific source).
> - Be the owner of the source you want to export data from.
### To create an export in a widget {#to-create-an-export-in-a-widget}
The following example shows you how the export functionality is integrated with the [Data point table](https://cumulocity.com/docs/cockpit/widgets-collection/#data-point-table) widget.
1. Click the export icon at the top right of your data point table:
2. You see the **Generate export** dialog window, which allows you to configure the export further in the following categories:
- **Time range**: Select the time range for your export. By default, it uses the same time range as configured in the widget's settings.
- **Data scope** (not available for the [Data points list](https://cumulocity.com/docs/cockpit/widgets-collection/#data-point-list) widget, where data is exported as currently):
- **Export mode**:
- Compact (selected by default) - all data will be exported to one file and downloaded directly by your browser.
- Full - depending on the number of records to be processed, the data will either be available in a single ZIP file (containing one file per data point), sent by email or not exportable at all.
Refer to [Export modes](https://cumulocity.com/docs/cockpit/exports/#export-modes) for further details.
- **Aggregation**: Only available when you select the **Compact** mode. The default value is the same as in the widget's configuration. The following four options are available:
- None
- Minutely
- Hourly
- Daily
- **File types**: Select the file format for exporting data. **Microsoft Excel** is selected by default, with **CSV** as another option. You can select both types simultaneously.
3. Click the **Download** button. The download results depend on your chosen export mode.
### Export modes {#export-modes}
The export functionality integrated in a widget offers you a number of export modes:
- **Compact**:
- Processes up to 5,000 records per data point, or up to the data retention limit
- Creates a single merged file containing all the data
- Provides minimum and maximum values
- Preview is not available
- Supports optional data aggregation
- **Full**:
- Processes up to 1,000,000 records per data point, or up to the data retention limit
- For exports exceeding 50,000 records, data will be sent via email
- Creates a compressed ZIP file containing separate data files for each selected data point
- Preview is available
- Does not support data aggregation
#### Export for data points with over one million records {#export-for-data-points-with-over-one-million-records}
When you have selected the **Full** export mode for a data point that contains more than one million records (our processing limit), the download option is disabled. To proceed with the export, you'll need to reduce the number of records by narrowing the time range. Until the number is reduced, you will see a warning message.
If you select multiple data points for export in the **Full** mode and one or more individual data points exceed the one million record limit (per data point), narrow the time range to reduce the number. Data points within the limit are not affected.
In this case, you will see a detailed informational message describing how many data points are affected and why. The message is dynamic and may include the following details:
- **Downloadable item count**: data points that can be exported directly and downloaded in a single file from the browser.
- **Email deliverable item count**: data points that require further processing. These files will be sent to you in separate emails once ready, which may take some time.
- **Non-retrievable item count**: data points exceeding 1,000,000 records, which is the processing limit. To export this data, narrow down the date range, as these files cannot be downloaded or sent via email if the limit is exceeded.